
WJHD500A User Guide
Page 1
Digital Disk Recorder Operating Instructions Model No. WJ-HD500A ENGLISH FRANÇAIS REMOTO TIMER OPRATE ALARM ALARM RESET ALARM SUSPEND HDD FULL LOCK 1 2 3 4 SPOT MULTISCREEN 5 MULTISCREEN SELECT 9 SET 6 7 8 + 10 11 12 - 13 14 15 16 REC STOP REC REVIEW EL-ZOOM SGERLOEUCPT INDEX ALARM SEARCH DISPLAY PLAY PPAUSE REV FWD FS 16 500 DiRgietcaol Drdisekr WJ-HD A Before attempting to connect or operate this product, please read these instructions carefully and save this manual for future use.
Digital Disk Recorder Operating Instructions Model No. WJ-HD500A ENGLISH FRANÇAIS REMOTO TIMER OPRATE ALARM ALARM RESET ALARM SUSPEND HDD FULL LOCK 1 2 3 4 SPOT MULTISCREEN 5 MULTISCREEN SELECT 9 SET 6 7 8 + 10 11 12 - 13 14 15 16 REC STOP REC REVIEW EL-ZOOM SGERLOEUCPT INDEX ALARM SEARCH DISPLAY PLAY PPAUSE REV FWD FS 16 500 DiRgietcaol Drdisekr WJ-HD A Before attempting to connect or operate this product, please read these instructions carefully and save this manual for future use.
WJHD500A User Guide
Page 3
... Display Setting 66 s Clock and Status Display Position Setting 67 s Title Display Position Setting 67 COMMUNICATION SETUP 68 s PS•Data Setup 68 s RS-232C Setup 70 s Network Setup 71 SYSTEM SETUP 72 s Clock Setup 72 s Time Adjustment Setting 72 s Password Lock Setting 73 s Buzzer Setting 73 s User Defined Setting 73 s Disk Management 74 s Error Report 75 s System Information 75 DVD DRIVE SETUP 76 s DVD Format 76 s Alarm Recording Backup 76 s Emergency Recording Backup 77 s DVD Disk End Setup 77 s Disk Space Display 77 OPERATING PROCEDURES 79 CONTROLLING THE VIDEO...
... Display Setting 66 s Clock and Status Display Position Setting 67 s Title Display Position Setting 67 COMMUNICATION SETUP 68 s PS•Data Setup 68 s RS-232C Setup 70 s Network Setup 71 SYSTEM SETUP 72 s Clock Setup 72 s Time Adjustment Setting 72 s Password Lock Setting 73 s Buzzer Setting 73 s User Defined Setting 73 s Disk Management 74 s Error Report 75 s System Information 75 DVD DRIVE SETUP 76 s DVD Format 76 s Alarm Recording Backup 76 s Emergency Recording Backup 77 s DVD Disk End Setup 77 s Disk Space Display 77 OPERATING PROCEDURES 79 CONTROLLING THE VIDEO...
WJHD500A User Guide
Page 6
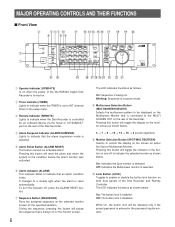
... OPERATING CONTROLS AND THEIR FUNCTIONS s Front View e t y u !0 r io !1 !2 !3 !4 !5 !6 !7 !8 !9 @0 w q REMOTE TIMER OPERATE ALARM ALARM RESET ALARM SUSPEND HDD FULL LOCK 1 SPOT MULTISCREEN 5 MULTISCREEN SELECT 9 2 3 4 SET 6 7 8 10 11 12 SEQUENCE 13 14 15 16 REC STOP REC PREVIEW EL-ZOOM SETUP /ESC COPY DAYLIGHT SAVINGS GROUP SELECT INDEX ALARM SEARCH DISPLAY STOP BPLAY/ PAUSE REC REV FWD FS 16 Digital Disk Recorder WJ-HD A #1 #0 @9 @8 @7 @6 @5 @4 @3 @2 @1 q Operate Indicator (OPERATE) Is on when the power of...
... OPERATING CONTROLS AND THEIR FUNCTIONS s Front View e t y u !0 r io !1 !2 !3 !4 !5 !6 !7 !8 !9 @0 w q REMOTE TIMER OPERATE ALARM ALARM RESET ALARM SUSPEND HDD FULL LOCK 1 SPOT MULTISCREEN 5 MULTISCREEN SELECT 9 2 3 4 SET 6 7 8 10 11 12 SEQUENCE 13 14 15 16 REC STOP REC PREVIEW EL-ZOOM SETUP /ESC COPY DAYLIGHT SAVINGS GROUP SELECT INDEX ALARM SEARCH DISPLAY STOP BPLAY/ PAUSE REC REV FWD FS 16 Digital Disk Recorder WJ-HD A #1 #0 @9 @8 @7 @6 @5 @4 @3 @2 @1 q Operate Indicator (OPERATE) Is on when the power of...
WJHD500A User Guide
Page 7
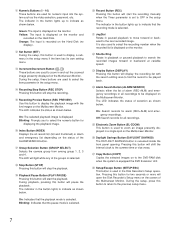
... button lights to select the numeric button for displaying the playback image. !6 Index Button (INDEX) Displays the all recordings. @5 Electronic Zoom Button (EL-ZOOM) This button is recessed inside the front panel opening. Blinking: Indicates that the playback mode is recorded on the Hard Disk (no display). !2 Set Button (SET) During the setup, this button will open the Disk Recorder's Setup menu on the monitor. The indicator in the button lights up to the next recorded image. !1 Numeric Buttons (1 - 16) These buttons are used for numeric input...
... button lights to select the numeric button for displaying the playback image. !6 Index Button (INDEX) Displays the all recordings. @5 Electronic Zoom Button (EL-ZOOM) This button is recessed inside the front panel opening. Blinking: Indicates that the playback mode is recorded on the Hard Disk (no display). !2 Set Button (SET) During the setup, this button will open the Disk Recorder's Setup menu on the monitor. The indicator in the button lights up to the next recorded image. !1 Numeric Buttons (1 - 16) These buttons are used for numeric input...

WJHD500A User Guide
Page 9
... Alarm Input 16 13 Alarm Input 13 $8 Copy Port (COPY) For connecting the optional DVD Extension Unit. $9 Mode Selector (MODE) Selects data termination for PS•Data system expansion. %0 Data Port (DATA) Exchanges control data with the external device with the optional WV-CU50 Remote Controller. $7 Alarm Port (ALARM) This port accepts the alarm input from rising. The pin assignment of the Disk Recorder on the cover. %7 AC Inlet Socket (AC IN) Plug the power cord (supplied as...
... Alarm Input 16 13 Alarm Input 13 $8 Copy Port (COPY) For connecting the optional DVD Extension Unit. $9 Mode Selector (MODE) Selects data termination for PS•Data system expansion. %0 Data Port (DATA) Exchanges control data with the external device with the optional WV-CU50 Remote Controller. $7 Alarm Port (ALARM) This port accepts the alarm input from rising. The pin assignment of the Disk Recorder on the cover. %7 AC Inlet Socket (AC IN) Plug the power cord (supplied as...

WJHD500A User Guide
Page 11
... Button (STOP) Stops playback. *8 Record Button (RECORD) Starts recording manually if applicable. Pressing this button will stop the recording. (3 Remote Port (REMOTE) Connect with the supplied modular cable to enter or exit the electronic zoom mode. &6 Electronic Zoom Button (EL-ZOOM) Use this button in combination with the STOP button will reset the activated alarm. *0 Display Button (DISPLAY) Toggles the all title displays on the Multiscreen Monitor on and off, such as camera and group titles, operating...
... Button (STOP) Stops playback. *8 Record Button (RECORD) Starts recording manually if applicable. Pressing this button will stop the recording. (3 Remote Port (REMOTE) Connect with the supplied modular cable to enter or exit the electronic zoom mode. &6 Electronic Zoom Button (EL-ZOOM) Use this button in combination with the STOP button will reset the activated alarm. *0 Display Button (DISPLAY) Toggles the all title displays on the Multiscreen Monitor on and off, such as camera and group titles, operating...
WJHD500A User Guide
Page 16
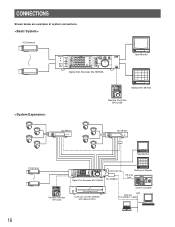
... 13 14 15 16 REC STOP REC PREVIEW EL-ZOOM SET UP /ESC COPY DAYLIGHT SAVINGS GROUP SELECT INDEX ALARM SEARCH DISPLAY STOP PLAY/ PAUSE REC REV FWD FS 16 Digital Disk Recorder WJ-HD A Digital Disk Recorder WJ-HD500A WJ-HDB502 POWER ON OFF Multiscreen Monitor PS-Data Link System Controller OPERATE HDD 1 HDD 2 HDD 3 HDD 4 Extension Unit WJ-HDE Extension Unit WJ-HDE500 (with optional HDs) System Controller LAN Ethernet (100 BASE-T Cable) 16
... 13 14 15 16 REC STOP REC PREVIEW EL-ZOOM SET UP /ESC COPY DAYLIGHT SAVINGS GROUP SELECT INDEX ALARM SEARCH DISPLAY STOP PLAY/ PAUSE REC REV FWD FS 16 Digital Disk Recorder WJ-HD A Digital Disk Recorder WJ-HD500A WJ-HDB502 POWER ON OFF Multiscreen Monitor PS-Data Link System Controller OPERATE HDD 1 HDD 2 HDD 3 HDD 4 Extension Unit WJ-HDE Extension Unit WJ-HDE500 (with optional HDs) System Controller LAN Ethernet (100 BASE-T Cable) 16
WJHD500A User Guide
Page 21
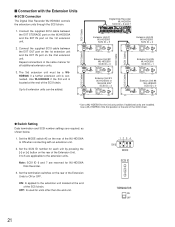
... Cable SCSI Cable SCSI Cable Digital Disk Recorder WJ-HD500A SCSI ID = 6 and 7 IN SPOT OUT EEXXTT SSTTOORRAAGGEE COPY DATA OUT MULTISCREENOUT AUDIO CONTROL ALARM MODE 16 15 14 13 12 11 10 9 8 7 6 IN OUT 16 15 14 13 12 11 10 9 8 7 6 VIDEO GEN-LOCK OUT REMOTE(WV-CU50) SERIAL SIGNAL GND 10/100BASE-T 5 4 3 2 1 5 4 3 2 1 AC IN ON OFF POWER EXT IN EXT OUT + - Set the MODE...
... Cable SCSI Cable SCSI Cable Digital Disk Recorder WJ-HD500A SCSI ID = 6 and 7 IN SPOT OUT EEXXTT SSTTOORRAAGGEE COPY DATA OUT MULTISCREENOUT AUDIO CONTROL ALARM MODE 16 15 14 13 12 11 10 9 8 7 6 IN OUT 16 15 14 13 12 11 10 9 8 7 6 VIDEO GEN-LOCK OUT REMOTE(WV-CU50) SERIAL SIGNAL GND 10/100BASE-T 5 4 3 2 1 5 4 3 2 1 AC IN ON OFF POWER EXT IN EXT OUT + - Set the MODE...
WJHD500A User Guide
Page 22
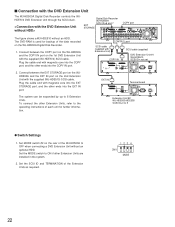
... port. EXT STORAGE Digital Disk Recorder WJ-HD500A SCSI ID=6 and 7 IN SPOT OUT EXT STORAGE OUT MULTISCREENOUT AUDIO CONTROL 16 15 14 13 12 11 IN COPY port COPY DATA ALARM MODE 10 9 8 7 6 GEN-LOCK OUT REMOTE(WV-CU50) SERIAL SIGNAL GND 10/100BASE-T 5 4 3 2 1 OUT 16 15 14 13 12 11 10 9 8 7 6 5 4 3 2 1 VIDEO CONTROL port AC IN ON OFF POWER SCSI cable (supplied with the supplied (WJ-HDE510) SCSI cable. The DVD...
... port. EXT STORAGE Digital Disk Recorder WJ-HD500A SCSI ID=6 and 7 IN SPOT OUT EXT STORAGE OUT MULTISCREENOUT AUDIO CONTROL 16 15 14 13 12 11 IN COPY port COPY DATA ALARM MODE 10 9 8 7 6 GEN-LOCK OUT REMOTE(WV-CU50) SERIAL SIGNAL GND 10/100BASE-T 5 4 3 2 1 OUT 16 15 14 13 12 11 10 9 8 7 6 5 4 3 2 1 VIDEO CONTROL port AC IN ON OFF POWER SCSI cable (supplied with the supplied (WJ-HDE510) SCSI cable. The DVD...
WJHD500A User Guide
Page 23
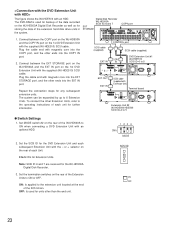
.... EXT STORAGE Digital Disk Recorder WJ-HD500A SCSI ID=6 and 7 COPY port IN SPOT OUT EXT STORAGE COPY DATA OUT MULTISCREENOUT AUDIO CONTROL ALARM MODE 16 15 14 13 12 11 10 9 8 7 6 IN OUT 16 15 14 13 12 11 10 9 8 7 6 VIDEO CONTROL port GEN-LOCK OUT REMOTE(WV-CU50) SERIAL SIGNAL GND 10/100BASE-T 5 4 3 2 1 5 4 3 2 1 SCSI cable (supplied) SCSI cable (supplied) AC IN ON OFF POWER EXT IN COPY IN DVD Extension Unit...
.... EXT STORAGE Digital Disk Recorder WJ-HD500A SCSI ID=6 and 7 COPY port IN SPOT OUT EXT STORAGE COPY DATA OUT MULTISCREENOUT AUDIO CONTROL ALARM MODE 16 15 14 13 12 11 10 9 8 7 6 IN OUT 16 15 14 13 12 11 10 9 8 7 6 VIDEO CONTROL port GEN-LOCK OUT REMOTE(WV-CU50) SERIAL SIGNAL GND 10/100BASE-T 5 4 3 2 1 5 4 3 2 1 SCSI cable (supplied) SCSI cable (supplied) AC IN ON OFF POWER EXT IN COPY IN DVD Extension Unit...

WJHD500A User Guide
Page 24
... ends of the MODE selector to be set up in the Disk Recorder, the system can be able to use PS •Data mode, the communication functions need to ON position. q MODE Selector Setting • Set DIP switch 4 of the PS •Data line. Example: RS-485 Cable RS-485 Cable System Controller System Controller Termination : ON IN SPOT OUT EXT STORAGE COPY DATA OUT MULTISCREENOUT AUDIO CONTROL ALARM MODE 16 15...
... ends of the MODE selector to be set up in the Disk Recorder, the system can be able to use PS •Data mode, the communication functions need to ON position. q MODE Selector Setting • Set DIP switch 4 of the PS •Data line. Example: RS-485 Cable RS-485 Cable System Controller System Controller Termination : ON IN SPOT OUT EXT STORAGE COPY DATA OUT MULTISCREENOUT AUDIO CONTROL ALARM MODE 16 15...
WJHD500A User Guide
Page 28
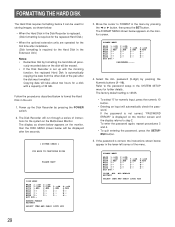
... the Hard Disk in the Disk Recorder is replaced. (Disk formatting is required for the replaced Hard Disk.) • When the optional extension units are operated for the first time after installation. (Disk formatting is set up the Disk Recorder by pressing the Numeric buttons (1 - 10). ously recorded data on the Multiscreen Monitor. If the password is correct, the instructions shown below appears on the monitor screen and the display returns to format the Hard Disk in the...
... the Hard Disk in the Disk Recorder is replaced. (Disk formatting is required for the replaced Hard Disk.) • When the optional extension units are operated for the first time after installation. (Disk formatting is set up the Disk Recorder by pressing the Numeric buttons (1 - 10). ously recorded data on the Multiscreen Monitor. If the password is correct, the instructions shown below appears on the monitor screen and the display returns to format the Hard Disk in the...
WJHD500A User Guide
Page 30
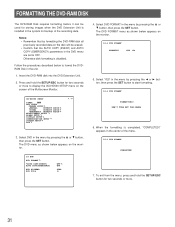
... menu are set to start formatting. 10-1 DVD FORMAT FORMATTING! Otherwise disk formatting is completed, "COMPLETED!" Select DVD in the menu by formatting the DVD-RAM disk all previously recorded data on the monitor. 10 DVD DVD FORMAT *AUTO COPY(EVENT) AUTO COPY(EMERGENCY) DVD DISKEND DVD FULL OFF OFF STOP 1% 4. appears in the unit. 1. WJ-HD500 SETUP TIMER OFF REC SETUP COMMON SETUP *MANUAL WITHOUT AUDIO *TIMER WITHOUT AUDIO *EMERGENCY WITHOUT AUDIO MULTIPLEXER SETUP ALARM SETUP DISPLAY SETUP COMMUNICATION SETUP SYSTEM SETUP DVD *.** 3. DON'T TURN OFF THE POWER...
... menu are set to start formatting. 10-1 DVD FORMAT FORMATTING! Otherwise disk formatting is completed, "COMPLETED!" Select DVD in the menu by formatting the DVD-RAM disk all previously recorded data on the monitor. 10 DVD DVD FORMAT *AUTO COPY(EVENT) AUTO COPY(EMERGENCY) DVD DISKEND DVD FULL OFF OFF STOP 1% 4. appears in the unit. 1. WJ-HD500 SETUP TIMER OFF REC SETUP COMMON SETUP *MANUAL WITHOUT AUDIO *TIMER WITHOUT AUDIO *EMERGENCY WITHOUT AUDIO MULTIPLEXER SETUP ALARM SETUP DISPLAY SETUP COMMUNICATION SETUP SYSTEM SETUP DVD *.** 3. DON'T TURN OFF THE POWER...
WJHD500A User Guide
Page 32
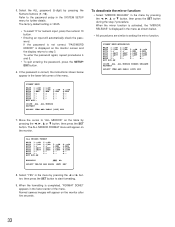
... 4:LOST 4:LOST 4:4:- 1DISK ALL ALL MIRROR MIRROR RELEASE RESTART SELECT ITEM AND PRESS [SET] KEY 7. To enter the password again, repeat procedures 4 and 5. • To quit entering the password, press the SETUP/ ESC button. 6. Move the cursor to "ALL MIRROR" on the monitor screen and the display returns to start formatting. 9. is not correct, "PASSWORD ERROR!" Refer to the password setup in the menu by...
... 4:LOST 4:LOST 4:4:- 1DISK ALL ALL MIRROR MIRROR RELEASE RESTART SELECT ITEM AND PRESS [SET] KEY 7. To enter the password again, repeat procedures 4 and 5. • To quit entering the password, press the SETUP/ ESC button. 6. Move the cursor to "ALL MIRROR" on the monitor screen and the display returns to start formatting. 9. is not correct, "PASSWORD ERROR!" Refer to the password setup in the menu by...

WJHD500A User Guide
Page 35
... Disk Recorder. 5: Indicates that data are being played back. 5 X✽: Indicates that data are being played back with the search function. (✽ indicates the search speed value) y : Indicates that the line is being paused. u Electronic Zoom Display Displays to indicate that the DVD-RAM disk is being copied. Replace ones for system complement. THERMAL ✽: Indicates thermal error in the setup menu. o Camera Title Display Displays the camera title edited in the Disk Recorder...
... Disk Recorder. 5: Indicates that data are being played back. 5 X✽: Indicates that data are being played back with the search function. (✽ indicates the search speed value) y : Indicates that the line is being paused. u Electronic Zoom Display Displays to indicate that the DVD-RAM disk is being copied. Replace ones for system complement. THERMAL ✽: Indicates thermal error in the setup menu. o Camera Title Display Displays the camera title edited in the Disk Recorder...
WJHD500A User Guide
Page 46
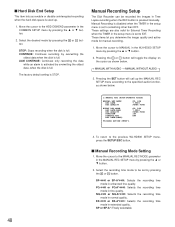
... recording time mode in extended quality. s Hard Disk End Setup This item lets you determine the image quality and active mode for External Timer Recording when the TIMER in the setup menu is set to the HDD DISKEND parameter in the MANUAL REC SETUP menu by pressing the D or C button. 2. Select the recording time mode to the MANUAL REC MODE parameter in the COMMON SETUP menu by pressing the D or C button. 2. button. Select the desired mode by overwriting the oldest data...
... recording time mode in extended quality. s Hard Disk End Setup This item lets you determine the image quality and active mode for External Timer Recording when the TIMER in the setup menu is set to the HDD DISKEND parameter in the MANUAL REC SETUP menu by pressing the D or C button. 2. Select the recording time mode to the MANUAL REC MODE parameter in the COMMON SETUP menu by pressing the D or C button. 2. button. Select the desired mode by overwriting the oldest data...

WJHD500A User Guide
Page 48
... assigned program number menu as shown below appears on a daily basis. s Alarm Active Mode (Manual Recording) This item lets you set the program timer for other days. 4. The ALARM display on the monitor is REC+ALM. 4. The TIMER REC SETUP menu according to be assigned for the camera by pressing the A, B,C or D button. 3. button. The ALARM display on the monitor is received during manual recording. 1. The internal timer comprises four event times...
... assigned program number menu as shown below appears on a daily basis. s Alarm Active Mode (Manual Recording) This item lets you set the program timer for other days. 4. The ALARM display on the monitor is REC+ALM. 4. The TIMER REC SETUP menu according to be assigned for the camera by pressing the A, B,C or D button. 3. button. The ALARM display on the monitor is received during manual recording. 1. The internal timer comprises four event times...
WJHD500A User Guide
Page 71
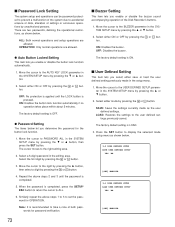
... saved. The factory default setting is OFF. Press the SET button to take a note of the Disk Recorder's buttons. 1. ON: Enables the button lock function automatically if no operation takes place within about 5 minutes. Similarly repeat the above steps 2 and 3 until the LOCK button is recommended to display the selected mode setup menu as the user defined settings. Move the cursor to set - q Auto Button Locked Setting This item lets...
... saved. The factory default setting is OFF. Press the SET button to take a note of the Disk Recorder's buttons. 1. ON: Enables the button lock function automatically if no operation takes place within about 5 minutes. Similarly repeat the above steps 2 and 3 until the LOCK button is recommended to display the selected mode setup menu as the user defined settings. Move the cursor to set - q Auto Button Locked Setting This item lets...
WJHD500A User Guide
Page 83
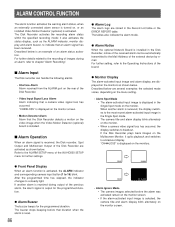
... is turned on, or an installed Video Motion Detector (optional) is installed. If another alarm is selected, the camera title and alarm display blink alternately on the monitor screen. The Disk Recorder activates the recording alarm status within the specified recording mode; s Alarm Input The Disk recorder can be automatically transmitted to the Mail Address of images during output of the Disk Recorder are several examples; When another alarm is reset...
... is turned on, or an installed Video Motion Detector (optional) is installed. If another alarm is selected, the camera title and alarm display blink alternately on the monitor screen. The Disk Recorder activates the recording alarm status within the specified recording mode; s Alarm Input The Disk recorder can be automatically transmitted to the Mail Address of images during output of the Disk Recorder are several examples; When another alarm is reset...
WJHD500A User Guide
Page 99
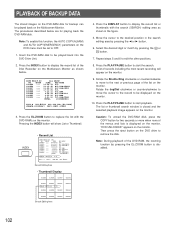
... playback image appears on the monitor. Insert the DVD-RAM disk to remove the disk. ALL GROUP TIME REC-MODE 23:59:59 T/L 22:15:40 M/S ALM-TRM12 21:00:07 O/S ALM-VMD3 17:33:05 T/L 7:23:11 T/L EMR 6:59:44 M/S ALM-PC4 8:55:28 T/L MAN 0:01:28 T/L ALM-TRM1 (TOTAL 2343RECORD) PLAY:5 ESC:FSTOP SEL:JOG HDD:[EL-ZOOM] SEARCH:[DISPLAY] COPY:[SET]→[COPY...
... playback image appears on the monitor. Insert the DVD-RAM disk to remove the disk. ALL GROUP TIME REC-MODE 23:59:59 T/L 22:15:40 M/S ALM-TRM12 21:00:07 O/S ALM-VMD3 17:33:05 T/L 7:23:11 T/L EMR 6:59:44 M/S ALM-PC4 8:55:28 T/L MAN 0:01:28 T/L ALM-TRM1 (TOTAL 2343RECORD) PLAY:5 ESC:FSTOP SEL:JOG HDD:[EL-ZOOM] SEARCH:[DISPLAY] COPY:[SET]→[COPY...


