
WJHD500A User Guide
Page 1
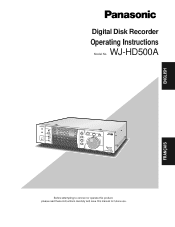
Digital Disk Recorder Operating Instructions Model No. WJ-HD500A ENGLISH FRANÇAIS REMOTO TIMER OPRATE ALARM ALARM RESET ALARM SUSPEND HDD FULL LOCK 1 2 3 4 SPOT MULTISCREEN 5 MULTISCREEN SELECT 9 SET 6 7 8 + 10 11 12 - 13 14 15 16 REC STOP REC REVIEW EL-ZOOM SGERLOEUCPT INDEX ALARM SEARCH DISPLAY PLAY PPAUSE REV FWD FS 16 500 DiRgietcaol Drdisekr WJ-HD A Before attempting to connect or operate this product, please read these instructions carefully and save this manual for future use.
Digital Disk Recorder Operating Instructions Model No. WJ-HD500A ENGLISH FRANÇAIS REMOTO TIMER OPRATE ALARM ALARM RESET ALARM SUSPEND HDD FULL LOCK 1 2 3 4 SPOT MULTISCREEN 5 MULTISCREEN SELECT 9 SET 6 7 8 + 10 11 12 - 13 14 15 16 REC STOP REC REVIEW EL-ZOOM SGERLOEUCPT INDEX ALARM SEARCH DISPLAY PLAY PPAUSE REV FWD FS 16 500 DiRgietcaol Drdisekr WJ-HD A Before attempting to connect or operate this product, please read these instructions carefully and save this manual for future use.
WJHD500A User Guide
Page 2
...Rules. Any changes or modifications not expressly approved by the party responsible for a Class A digital device, pursuant to Part 15 of important operating and maintenance (servicing) instructions in accordance with ... serial number of this unit in the space provided and retain this book as a permanent record of your purchase to aid identification in the event of fire or electric shock, do not... area is operated in which case the user will be found to comply with the instruction manual, may be required to correct the interference at his own expense. FCC Caution: To assure...
...Rules. Any changes or modifications not expressly approved by the party responsible for a Class A digital device, pursuant to Part 15 of important operating and maintenance (servicing) instructions in accordance with ... serial number of this unit in the space provided and retain this book as a permanent record of your purchase to aid identification in the event of fire or electric shock, do not... area is operated in which case the user will be found to comply with the instruction manual, may be required to correct the interference at his own expense. FCC Caution: To assure...
WJHD500A User Guide
Page 3
... 47 s Hard Disk End Setup 48 Manual Recording Setup 48 s Manual Recording Mode Setting 48 s Event Recording (Manual Recording 49 s Alarm Active Mode (Manual Recording 50 Timer Recording Setup 50 s Program Timer 50 s Special Day Timer 51 s External Program Timer 52 s Time Lapse Recording (Internal Timer 52 s Multi Shot Recording (Internal Timer 54 s One Shot Recording (Internal Timer 55 Emergency Recording (Time Lapse Recording 56 MULTIPLEXER...
... 47 s Hard Disk End Setup 48 Manual Recording Setup 48 s Manual Recording Mode Setting 48 s Event Recording (Manual Recording 49 s Alarm Active Mode (Manual Recording 50 Timer Recording Setup 50 s Program Timer 50 s Special Day Timer 51 s External Program Timer 52 s Time Lapse Recording (Internal Timer 52 s Multi Shot Recording (Internal Timer 54 s One Shot Recording (Internal Timer 55 Emergency Recording (Time Lapse Recording 56 MULTIPLEXER...
WJHD500A User Guide
Page 7
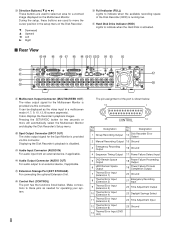
...of the Multiscreen Monitor. Pressing this button will stop the playback. !9 Playback/Pause Button (PLAY/PAUSE) Pressing this button will start the recording manually when the Timer parameter is recessed inside the front panel opening. !1 Numeric Buttons (1 - 16) These buttons are used for numeric ...the selected images on the Multiscreen Monitor. @6 Daylight Savings Button (DAYLIGHT SAVINGS) The DAYLIGHT SAVINGS button is set to OFF in the Disk Recorder's Setup operation. Yellow: The input is used to select the item parameter in a single spot on to zoom an image presently ...
...of the Multiscreen Monitor. Pressing this button will stop the playback. !9 Playback/Pause Button (PLAY/PAUSE) Pressing this button will start the recording manually when the Timer parameter is recessed inside the front panel opening. !1 Numeric Buttons (1 - 16) These buttons are used for numeric ...the selected images on the Multiscreen Monitor. @6 Daylight Savings Button (DAYLIGHT SAVINGS) The DAYLIGHT SAVINGS button is set to OFF in the Disk Recorder's Setup operation. Yellow: The input is used to select the item parameter in a single spot on to zoom an image presently ...
WJHD500A User Guide
Page 8
..., these pins as the video input in the setup menu of the Disk Recorder (HDD) is running low. #1 Hard Disk Drive Indicator (HDD) Lights to indicate when the Hard Disk is provided via this connector. Designation 14 Disk Recorder Error Output 2 Manual Recording Output 15 Ground 3 Emergency Recording Output 16 Ground 4 Sequence Timing Output 17 Power Failure Detect Input...
..., these pins as the video input in the setup menu of the Disk Recorder (HDD) is running low. #1 Hard Disk Drive Indicator (HDD) Lights to indicate when the Hard Disk is provided via this connector. Designation 14 Disk Recorder Error Output 2 Manual Recording Output 15 Ground 3 Emergency Recording Output 16 Ground 4 Sequence Timing Output 17 Power Failure Detect Input...

WJHD500A User Guide
Page 11
...the status as shown below . Rotating the dial also selects the record number when the recorded list is displayed on to the DVD-RAM disk when the system is established with the WJHD500A Disk Recorder. *2 Copy Button (COPY) Copies the selected images on the monitor... 1, 2, 3 and 4. C: Downward D: Upward A: Left B: Right *7 Stop Button (STOP) Stops playback. *8 Record Button (RECORD) Starts recording manually if applicable. Pressing this button will stop the recording. (3 Remote Port (REMOTE) Connect with the STOP button will reset the activated alarm. *0 Display Button (DISPLAY) Toggles...
...the status as shown below . Rotating the dial also selects the record number when the recorded list is displayed on to the DVD-RAM disk when the system is established with the WJHD500A Disk Recorder. *2 Copy Button (COPY) Copies the selected images on the monitor... 1, 2, 3 and 4. C: Downward D: Upward A: Left B: Right *7 Stop Button (STOP) Stops playback. *8 Record Button (RECORD) Starts recording manually if applicable. Pressing this button will stop the recording. (3 Remote Port (REMOTE) Connect with the STOP button will reset the activated alarm. *0 Display Button (DISPLAY) Toggles...
WJHD500A User Guide
Page 19
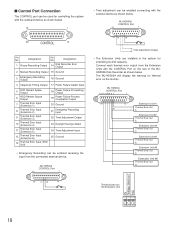
...with the CONTROL Port on the rear of the WJHD500A Disk Recorder as shown below. The WJ-HD500A will display the warning for thermal error on the Extension Unit G THERMAL ERROR OUT NC 19 Designation 1 Group Recording Output Pin No. WJ-HD500A CONTROL Port 13 121110... 1 25 CONTROL 14 Pin No. Connect each thermal error output from the connected external device. Designation 14 Disk Recorder Error Output 2 Manual Recording Output 15 Ground 3 Emergency Recording Output 16 Ground 4 Sequence Timing Output 17 Power Failure Detect Input 5 DVD Remain Space Output 6 HDD ...
...with the CONTROL Port on the rear of the WJHD500A Disk Recorder as shown below. The WJ-HD500A will display the warning for thermal error on the Extension Unit G THERMAL ERROR OUT NC 19 Designation 1 Group Recording Output Pin No. WJ-HD500A CONTROL Port 13 121110... 1 25 CONTROL 14 Pin No. Connect each thermal error output from the connected external device. Designation 14 Disk Recorder Error Output 2 Manual Recording Output 15 Ground 3 Emergency Recording Output 16 Ground 4 Sequence Timing Output 17 Power Failure Detect Input 5 DVD Remain Space Output 6 HDD ...
WJHD500A User Guide
Page 20
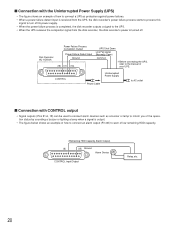
... against power failures. • When a power failure detect input is received from the UPS, the disk recorder's power failure process starts to process this signal to turn off Disk Recorder WJ-HD500A Power Failure Process Completion Output Power Failure Detect Input Ground (19) (17) (16) ...the UPS. • When the UPS receives the completion signal from the disk recorder, the disk recorder's power is output. • The figure below shows an example of how to connect an alarm output (Pin #6) to the manual of low remaining HDD capacity. (Remaining HDD Capacity Alarm Output) (6) (15...
... against power failures. • When a power failure detect input is received from the UPS, the disk recorder's power failure process starts to process this signal to turn off Disk Recorder WJ-HD500A Power Failure Process Completion Output Power Failure Detect Input Ground (19) (17) (16) ...the UPS. • When the UPS receives the completion signal from the disk recorder, the disk recorder's power is output. • The figure below shows an example of how to connect an alarm output (Pin #6) to the manual of low remaining HDD capacity. (Remaining HDD Capacity Alarm Output) (6) (15...
WJHD500A User Guide
Page 30
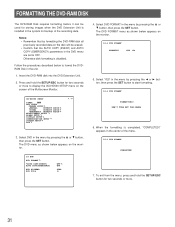
... the DVD Extension Unit. 2. Select DVD in the menu by formatting the DVD-RAM disk all previously recorded data on the screen of the Multiscreen Monitor. YES NO 5. Notes: • Remember that the AUTO COPY (EVENT) and AUTO COPY (EMERGENCY) parameters in the...monitor. 10-1 DVD FORMAT EXECUTE? appears in the center of the recording data. To exit from the menu, press and hold the SETUP/ESC button for two seconds or more . 31 WJ-HD500 SETUP TIMER OFF REC SETUP COMMON SETUP *MANUAL WITHOUT AUDIO *TIMER WITHOUT AUDIO *EMERGENCY WITHOUT AUDIO MULTIPLEXER SETUP ALARM...
... the DVD Extension Unit. 2. Select DVD in the menu by formatting the DVD-RAM disk all previously recorded data on the screen of the Multiscreen Monitor. YES NO 5. Notes: • Remember that the AUTO COPY (EVENT) and AUTO COPY (EMERGENCY) parameters in the...monitor. 10-1 DVD FORMAT EXECUTE? appears in the center of the recording data. To exit from the menu, press and hold the SETUP/ESC button for two seconds or more . 31 WJ-HD500 SETUP TIMER OFF REC SETUP COMMON SETUP *MANUAL WITHOUT AUDIO *TIMER WITHOUT AUDIO *EMERGENCY WITHOUT AUDIO MULTIPLEXER SETUP ALARM...
WJHD500A User Guide
Page 31
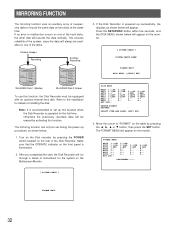
... run through a series of the hard disks, the other disk still records the data normally. The FORMAT MENU will appear. Camera Images Recording Auxiliary Recording Manual Recorder Group 1 Timer Group 2 Recorder Group 3 Group 4 Emergency Recorder WJ-HD500 Disk 1 (Master) Manual Recorder Group 1 Timer Group 2 Recorder Group 3 Group 4 Emergency Recorder WJ-HD500 Disk 2 (Slave) To use this function. If the Disk Recorder is powered up procedure, as shown...
... run through a series of the hard disks, the other disk still records the data normally. The FORMAT MENU will appear. Camera Images Recording Auxiliary Recording Manual Recorder Group 1 Timer Group 2 Recorder Group 3 Group 4 Emergency Recorder WJ-HD500 Disk 1 (Master) Manual Recorder Group 1 Timer Group 2 Recorder Group 3 Group 4 Emergency Recorder WJ-HD500 Disk 2 (Slave) To use this function. If the Disk Recorder is powered up procedure, as shown...
WJHD500A User Guide
Page 36
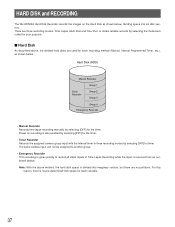
... outboard device. Hard Disk (HDD) Manual Recorder Group 1 Timer Recorder Group 2 Group 3 Group 4 Emergency Recorder • Manual Recorder Records time lapse recording manually by selecting the mode best suited for your purpose. Note: With the above , the divided hard disks are used for each recording method (Manual, Internal Programmed Timer, etc.), as shown below . HARD DISK and RECORDING The WJ-HD500A Hard Disk Recorder records the images on...
... outboard device. Hard Disk (HDD) Manual Recorder Group 1 Timer Recorder Group 2 Group 3 Group 4 Emergency Recorder • Manual Recorder Records time lapse recording manually by selecting the mode best suited for your purpose. Note: With the above , the divided hard disks are used for each recording method (Manual, Internal Programmed Timer, etc.), as shown below . HARD DISK and RECORDING The WJ-HD500A Hard Disk Recorder records the images on...
WJHD500A User Guide
Page 37
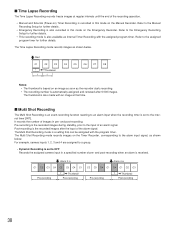
... this mode on an image as soon as shown below . Refer to the internal timer [INT]. Refer to the Manual Recording Setup for further details. • This recording mode is also available as shown below . Start C1 C2 C3 C4 C5 C6 C7 C8 T Thumbnail t t ... Manual Recorder. s Time Lapse Recording The Time Lapse Recording records freeze images at that can be assigned with an image at regular intervals until the end of the recording operation. • Manual and External (Power-on) Timer Recording is recorded in this mode on the Timer Recorder, corresponding to OFF Records...
... this mode on an image as soon as shown below . Refer to the internal timer [INT]. Refer to the Manual Recording Setup for further details. • This recording mode is also available as shown below . Start C1 C2 C3 C4 C5 C6 C7 C8 T Thumbnail t t ... Manual Recorder. s Time Lapse Recording The Time Lapse Recording records freeze images at that can be assigned with an image at regular intervals until the end of the recording operation. • Manual and External (Power-on) Timer Recording is recorded in this mode on the Timer Recorder, corresponding to OFF Records...
WJHD500A User Guide
Page 40
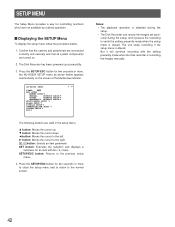
...Disk Recorder has been powered up . Press the SETUP/ESC button for two seconds or more to close the setup menu and to return to the normal screen. D button: Moves the cursor up successfully. 3. button: Selects an item parameter. The unit stops recording if the setup menu is recording the images manually... A button: Moves the cursor to the previous setup menu. 4. B button: Moves the cursor to verify the setting presently made when the Disk recorder is altered. Press the SETUP/ESC button for two seconds or more , the WJ-HD500 SETUP menu as shown below . 1. SETUP MENU ...
...Disk Recorder has been powered up . Press the SETUP/ESC button for two seconds or more to close the setup menu and to return to the normal screen. D button: Moves the cursor up successfully. 3. button: Selects an item parameter. The unit stops recording if the setup menu is recording the images manually... A button: Moves the cursor to the previous setup menu. 4. B button: Moves the cursor to verify the setting presently made when the Disk recorder is altered. Press the SETUP/ESC button for two seconds or more , the WJ-HD500 SETUP menu as shown below . 1. SETUP MENU ...

WJHD500A User Guide
Page 41
... RECORDING SETUP Common Recording Setup Manual Recording Setup Timer Recording Setup Emergency Recording MULTIPLEXER SETUP ALARM SETUP DISPLAY SETUP COMMUNICATION SETUP SYSTEM SETUP DVD DRIVE SETUP 43 Group Setup Program Timer Time Lapse Recording Multi Shot Recording One Shot Recording ...Sequence Setup Multiscreen Monitor Spot Monitor Alarm Port Setting Video Motion Detector Setting Camera Title Setup PS • Data Setup RS-232C Setup Clock Setup Time Adjustment Setting Password Lock Setting Buzzer Setting User Defined Setting Disk...
... RECORDING SETUP Common Recording Setup Manual Recording Setup Timer Recording Setup Emergency Recording MULTIPLEXER SETUP ALARM SETUP DISPLAY SETUP COMMUNICATION SETUP SYSTEM SETUP DVD DRIVE SETUP 43 Group Setup Program Timer Time Lapse Recording Multi Shot Recording One Shot Recording ...Sequence Setup Multiscreen Monitor Spot Monitor Alarm Port Setting Video Motion Detector Setting Camera Title Setup PS • Data Setup RS-232C Setup Clock Setup Time Adjustment Setting Password Lock Setting Buzzer Setting User Defined Setting Disk...

WJHD500A User Guide
Page 42
...record manually, set to be activated by the internal or an external timer. Note: When the parameter is set to the TIMER parameter in the programmed menu. This item lets you enable or disable the timer for recording. TIMER SETTING The timer recording mode is disabled. Select a parameter to something other than OFF, the Disk Recorder... does not start recording even if the REC button is OFF. OFF: ...
...record manually, set to be activated by the internal or an external timer. Note: When the parameter is set to the TIMER parameter in the programmed menu. This item lets you enable or disable the timer for recording. TIMER SETTING The timer recording mode is disabled. Select a parameter to something other than OFF, the Disk Recorder... does not start recording even if the REC button is OFF. OFF: ...
WJHD500A User Guide
Page 46
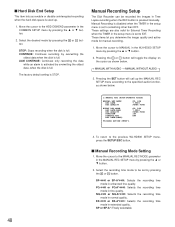
... overwriting the oldest data when the disk is full. Manual Recording Setup The Disk Recorder can be set by pressing the + or - Move the cursor to the HDD DISKEND parameter in the COMMON SETUP menu by pressing the D or C button. 2. FQ-✽✽H or FQ-A*✽✽H: Selects the recording time mode in enhanced fine quality...
... overwriting the oldest data when the disk is full. Manual Recording Setup The Disk Recorder can be set by pressing the + or - Move the cursor to the HDD DISKEND parameter in the COMMON SETUP menu by pressing the D or C button. 2. FQ-✽✽H or FQ-A*✽✽H: Selects the recording time mode in enhanced fine quality...
WJHD500A User Guide
Page 47
...parameter by pressing the D or C button, then select a recording image quality by pressing the + or - button. button. MANUAL: Enables alarm recording while the alarm sig- button. The recording rate can be possible to set the recording time, depending on the selected parameters in the menu. nal...REC MODE parameter by pressing the D or C button, then select a recording time mode by pressing the + or - The factory default setting is pressed. button. 1 - 60FPS: Records the selected number of the hard disk. Move the cursor to the DURATION parameter by pressing the D or C ...
...parameter by pressing the D or C button, then select a recording image quality by pressing the + or - button. button. MANUAL: Enables alarm recording while the alarm sig- button. The recording rate can be possible to set the recording time, depending on the selected parameters in the menu. nal...REC MODE parameter by pressing the D or C button, then select a recording time mode by pressing the + or - The factory default setting is pressed. button. 1 - 60FPS: Records the selected number of the hard disk. Move the cursor to the DURATION parameter by pressing the D or C ...

WJHD500A User Guide
Page 48
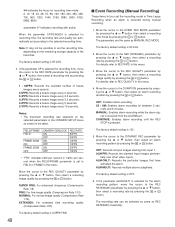
... basis. OFF: Deactivates alarm input. Move the cursor to the assigned program number (PROG1), then press the SET button. It is received during manual recording. 1. Move the cursor to TIMER in the WJ-HD500 SETUP menu by pressing the D or C button. 2. Move the cursor to the previous...REC+ALM 14 REC+ALM 7 REC+ALM 15 REC+ALM 8 REC+ALM 16 REC+ALM 2. button. Timer Recording Setup The Disk Recorder can record the images triggered by pressing the + or - s Alarm Active Mode (Manual Recording) This item lets you set the program timer for each day in the TIMER REC SETUP menu by pressing...
... basis. OFF: Deactivates alarm input. Move the cursor to the assigned program number (PROG1), then press the SET button. It is received during manual recording. 1. Move the cursor to TIMER in the WJ-HD500 SETUP menu by pressing the D or C button. 2. Move the cursor to the previous...REC+ALM 14 REC+ALM 7 REC+ALM 15 REC+ALM 8 REC+ALM 16 REC+ALM 2. button. Timer Recording Setup The Disk Recorder can record the images triggered by pressing the + or - s Alarm Active Mode (Manual Recording) This item lets you set the program timer for each day in the TIMER REC SETUP menu by pressing...
WJHD500A User Guide
Page 51
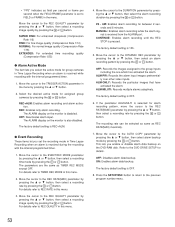
... or C button, then select an alarm recording pattern by pressing the + or button. button. 2S - 6M: Enables alarm recording for details. ALM-MILUTI: Records multiple alarms adaptively. The ALARM display on the DVD-RAM disk. q Event Recording These items let you select the active mode ...the REC RATE(MAX) parameter by pressing the D or C button, then select a recording rate by pressing the + or - MANUAL: Enables alarm recording while the alarm signal is pressed. CONTINUE: Enables alarm recording until the REC STOP is received from the ALARM port. The factory default setting is...
... or C button, then select an alarm recording pattern by pressing the + or button. button. 2S - 6M: Enables alarm recording for details. ALM-MILUTI: Records multiple alarms adaptively. The ALARM display on the DVD-RAM disk. q Event Recording These items let you select the active mode ...the REC RATE(MAX) parameter by pressing the D or C button, then select a recording rate by pressing the + or - MANUAL: Enables alarm recording while the alarm signal is pressed. CONTINUE: Enables alarm recording until the REC STOP is received from the ALARM port. The factory default setting is...
WJHD500A User Guide
Page 54
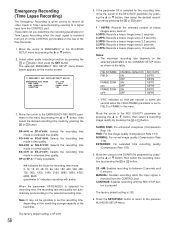
... depends on the remaining storage capacity of the hard disk. MANUAL: Enables recording while the input signal is selected for the recording time, move the cursor to the EMERGENCY REC MODE parameter in fine quality. button. 1 - 60FPS: Records the selected number of the Disk Recorder. 1. Move the cursor to FIELD or FRAME in the menu. Move the...
... depends on the remaining storage capacity of the hard disk. MANUAL: Enables recording while the input signal is selected for the recording time, move the cursor to the EMERGENCY REC MODE parameter in fine quality. button. 1 - 60FPS: Records the selected number of the Disk Recorder. 1. Move the cursor to FIELD or FRAME in the menu. Move the...
