
WJHD500A User Guide
Page 3
... Setup 47 s Playback Mode Setup 47 s Shuttle Speed Setup 47 s Hard Disk End Setup 48 Manual Recording Setup 48 s Manual Recording Mode Setting 48 s Event Recording (Manual Recording 49 s Alarm Active Mode (Manual Recording 50 Timer Recording Setup 50 s Program Timer 50 s Special Day Timer 51 s External Program ... Motion Detector Setting 63 s Alarm Mode on the Multiscreen Monitor 64 s Alarm Mode on the Spot Monitor 64 DISPLAY SETUP 65 s Camera Title Setup 65 s Display Setting (Multiscreen Monitor 65 s Title Display Setting (Spot Monitor 66 s Alarm Display Setting 66 s Clock ...
... Setup 47 s Playback Mode Setup 47 s Shuttle Speed Setup 47 s Hard Disk End Setup 48 Manual Recording Setup 48 s Manual Recording Mode Setting 48 s Event Recording (Manual Recording 49 s Alarm Active Mode (Manual Recording 50 Timer Recording Setup 50 s Program Timer 50 s Special Day Timer 51 s External Program ... Motion Detector Setting 63 s Alarm Mode on the Multiscreen Monitor 64 s Alarm Mode on the Spot Monitor 64 DISPLAY SETUP 65 s Camera Title Setup 65 s Display Setting (Multiscreen Monitor 65 s Title Display Setting (Spot Monitor 66 s Alarm Display Setting 66 s Clock ...
WJHD500A User Guide
Page 7
... Setup/Escape Button (SETUP/ESC) This button is displayed on the monitor and recorded on the Hard Disk. The indicator in the button lights to indicate as shown below . Pressing this button will open the Disk Recorder's Setup menu on the screen of the groups is used to display a submenu...the playback mode is selected. @1 JogDial Rotate in the button lights up to the next recorded image. The LED indicates the status of the ALARM SEARCH button. !7 Group Selection Button (GROUP SELECT) Selects the camera group from among group 1, 2, 3 and 4. On: The selected playback image is ...
... Setup/Escape Button (SETUP/ESC) This button is displayed on the monitor and recorded on the Hard Disk. The indicator in the button lights to indicate as shown below . Pressing this button will open the Disk Recorder's Setup menu on the screen of the groups is used to display a submenu...the playback mode is selected. @1 JogDial Rotate in the button lights up to the next recorded image. The LED indicates the status of the ALARM SEARCH button. !7 Group Selection Button (GROUP SELECT) Selects the camera group from among group 1, 2, 3 and 4. On: The selected playback image is ...

WJHD500A User Guide
Page 9
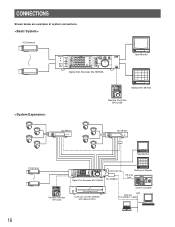
To connect to the controller, use a 6-conductor modular cable supplied as a standard accessory) into this output to the cameras to the Video Input Connector (VIDEO IN) is looped through either a color or B/W composite video signal from rising. Designation 14 Ground 2 ...expansion. %0 Data Port (DATA) Exchanges control data with the external device with PS•Data (Panasonic Security Data) mode. %1 Remote Port [REMOTE (WV-CU50)] This port is provided for controlling the Disk Recorder with the controller. %2 Gen-lock Output Connector (GEN-LOCK OUT) This connector is used to ...
To connect to the controller, use a 6-conductor modular cable supplied as a standard accessory) into this output to the cameras to the Video Input Connector (VIDEO IN) is looped through either a color or B/W composite video signal from rising. Designation 14 Ground 2 ...expansion. %0 Data Port (DATA) Exchanges control data with the external device with PS•Data (Panasonic Security Data) mode. %1 Remote Port [REMOTE (WV-CU50)] This port is provided for controlling the Disk Recorder with the controller. %2 Gen-lock Output Connector (GEN-LOCK OUT) This connector is used to ...

WJHD500A User Guide
Page 11
...camera group from among group 1, 2, 3 and 4. The LED will release the button lock function. *4 Set Button (SET) Use this button will start playback. Entering the preset password with the supplied modular cable to the WJHD500A Disk Recorder. Pressing this button to select multiple records... in the list for alarm and emergency recordings. The LED indicates the status of selection as shown below . During playback,...
...camera group from among group 1, 2, 3 and 4. The LED will release the button lock function. *4 Set Button (SET) Use this button will start playback. Entering the preset password with the supplied modular cable to the WJHD500A Disk Recorder. Pressing this button to select multiple records... in the list for alarm and emergency recordings. The LED indicates the status of selection as shown below . During playback,...
WJHD500A User Guide
Page 16
...Cameras REMOTO TIMER OPERATE ALARM ALARM RESET ALARM SUSPEND HDD FULL LOCK 1 SPOT MULTISCREEN 5 MULTISCREEN SELECT 9 2 3 4 SET 6 7 8 10 11 12 SEQUENCE 13 14 15 16 REC STOP REC PREVIEW EL-ZOOM SET UP /ESC COPY DAYLIGHT SAVINGS GROUP SELECT INDEX ALARM SEARCH DISPLAY STOP PLAY/ PAUSE REC REV FWD Digital Disk Recorder... SAVINGS GROUP SELECT INDEX ALARM SEARCH DISPLAY STOP PLAY/ PAUSE REC REV FWD FS 16 Digital Disk Recorder WJ-HD A Digital Disk Recorder WJ-HD500A WJ-HDB502 POWER ON OFF Multiscreen Monitor PS-Data Link System Controller OPERATE HDD...
...Cameras REMOTO TIMER OPERATE ALARM ALARM RESET ALARM SUSPEND HDD FULL LOCK 1 SPOT MULTISCREEN 5 MULTISCREEN SELECT 9 2 3 4 SET 6 7 8 10 11 12 SEQUENCE 13 14 15 16 REC STOP REC PREVIEW EL-ZOOM SET UP /ESC COPY DAYLIGHT SAVINGS GROUP SELECT INDEX ALARM SEARCH DISPLAY STOP PLAY/ PAUSE REC REV FWD Digital Disk Recorder... SAVINGS GROUP SELECT INDEX ALARM SEARCH DISPLAY STOP PLAY/ PAUSE REC REV FWD FS 16 Digital Disk Recorder WJ-HD A Digital Disk Recorder WJ-HD500A WJ-HDB502 POWER ON OFF Multiscreen Monitor PS-Data Link System Controller OPERATE HDD...
WJHD500A User Guide
Page 17
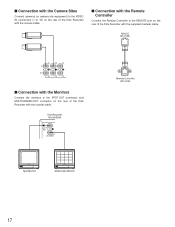
... Controller WV-CU50 POWER ON OFF Spot Monitor POWER ON OFF Multiscreen Monitor 17 s Connection with the Camera Sites Connect cameras (or camera site equipment) to the VIDEO IN connectors (1 to 16) on the rear of the Disk Recorder with the coaxial cable. REMOTE (WV-CU50) 16 15 14 IN OUT 16 15 14 s Connection...
... Controller WV-CU50 POWER ON OFF Spot Monitor POWER ON OFF Multiscreen Monitor 17 s Connection with the Camera Sites Connect cameras (or camera site equipment) to the VIDEO IN connectors (1 to 16) on the rear of the Disk Recorder with the coaxial cable. REMOTE (WV-CU50) 16 15 14 IN OUT 16 15 14 s Connection...

WJHD500A User Guide
Page 27
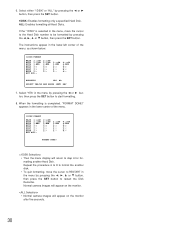
... per- sonnel. ¢¢GB indicates the hard disk capacity. Normal camera images will appear on the monitor screen, it will be followed by the DISK MENU after five seconds. [ SYSTEM CHECK ] YOU HAVE TO CONFIGURE DISKS PLEASE WAIT [ SYSTEM CHECK ] PLEASE WAIT 3. Note: If the Disk Recorder is illuminated. 2. After you completed the start, the...
... per- sonnel. ¢¢GB indicates the hard disk capacity. Normal camera images will appear on the monitor screen, it will be followed by the DISK MENU after five seconds. [ SYSTEM CHECK ] YOU HAVE TO CONFIGURE DISKS PLEASE WAIT [ SYSTEM CHECK ] PLEASE WAIT 3. Note: If the Disk Recorder is illuminated. 2. After you completed the start, the...
WJHD500A User Guide
Page 29
... • Normal camera images will return to step 6 for formatting another disk. • To quit formatting, move the cursor to the Hard Disk number to be ..., then press the SET button to format the another Hard Disk. If the "1DISK" is completed, "FORMAT DONE!" Select...ADD 3:3:3:3:- 4:¢¢GB 4:ADD 4:4:4:4:- ALL: Enables formatting all Hard Disks. EXECUTE? Normal camera images will appear on the monitor after five seconds. 30 YES NO ... then press the SET button. 1DISK: Enables formatting only a specified Hard Disk. Select "YES" in the lower-left corner of the menu. 1DISK ...
... • Normal camera images will return to step 6 for formatting another disk. • To quit formatting, move the cursor to the Hard Disk number to be ..., then press the SET button to format the another Hard Disk. If the "1DISK" is completed, "FORMAT DONE!" Select...ADD 3:3:3:3:- 4:¢¢GB 4:ADD 4:4:4:4:- ALL: Enables formatting all Hard Disks. EXECUTE? Normal camera images will appear on the monitor after five seconds. 30 YES NO ... then press the SET button. 1DISK: Enables formatting only a specified Hard Disk. Select "YES" in the lower-left corner of the menu. 1DISK ...
WJHD500A User Guide
Page 31
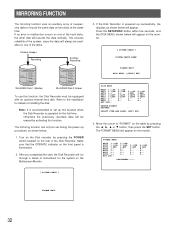
... Multiscreen Monitor. 3. Camera Images Recording Auxiliary Recording Manual Recorder Group 1 Timer Group 2 Recorder Group 3 Group 4 Emergency Recorder WJ-HD500 Disk 1 (Master) Manual Recorder Group 1 Timer Group 2 Recorder Group 3 Group 4 Emergency Recorder WJ-HD500 Disk 2 (Slave) To use this function, the Disk Recorder must be available on the table by activating this function when the Disk Recorder is illuminated. 2. PLEASE WAIT DISK MENU: [SETUP] KEY DISK MENU MAIN...
... Multiscreen Monitor. 3. Camera Images Recording Auxiliary Recording Manual Recorder Group 1 Timer Group 2 Recorder Group 3 Group 4 Emergency Recorder WJ-HD500 Disk 1 (Master) Manual Recorder Group 1 Timer Group 2 Recorder Group 3 Group 4 Emergency Recorder WJ-HD500 Disk 2 (Slave) To use this function, the Disk Recorder must be available on the table by activating this function when the Disk Recorder is illuminated. 2. PLEASE WAIT DISK MENU: [SETUP] KEY DISK MENU MAIN...
WJHD500A User Guide
Page 32
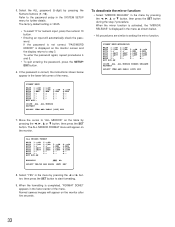
...1DISK ALL ALL MIRROR MIRROR RELEASE RESTART SELECT ITEM AND PRESS [SET] KEY 7. When the formatting is not correct, "PASSWORD ERROR!" Normal camera images will appear on the monitor. Move the cursor to start formatting. 9. The ALL MIRROR FORMAT menu will automatically check the password. To ...GB 2:* 2:LOST 2:LOST 2:2:- 3:¢¢GB 3:ADD 3:LOST 3:LOST 3:3:- 4:¢¢GB 4:ADD 4:LOST 4:LOST 4:4:- Select the ALL password (5-digit) by pressing the A or B button, then press the SET button to "ALL MIRROR" on the monitor screen and the display returns to the password setup...
...1DISK ALL ALL MIRROR MIRROR RELEASE RESTART SELECT ITEM AND PRESS [SET] KEY 7. When the formatting is not correct, "PASSWORD ERROR!" Normal camera images will appear on the monitor. Move the cursor to start formatting. 9. The ALL MIRROR FORMAT menu will automatically check the password. To ...GB 2:* 2:LOST 2:LOST 2:2:- 3:¢¢GB 3:ADD 3:LOST 3:LOST 3:3:- 4:¢¢GB 4:ADD 4:LOST 4:LOST 4:4:- Select the ALL password (5-digit) by pressing the A or B button, then press the SET button to "ALL MIRROR" on the monitor screen and the display returns to the password setup...

WJHD500A User Guide
Page 33
... with "LOST" and "✽" in the menu. 34 Select "YES" in the menu Normal camera images will run through a series of the Disk Recorder. When the remove is applied to hard disks displayed with "-" in the menu by pressing the A, B, D or C button, then press the...162;GB 3:ADD 3:LOST 3:LOST 3:3:- 4:¢¢GB 4:ADD 4:LOST 4:LOST 4:4:- The selected disks are changes to execute the disk remove. The Disk Recorder will appear on the monitor screen. PLEASE WAIT s 4. DISK REMOVE MAIN 1:¢¢GB EXT5 1:¢¢GB EXT4 1:EXT3 1:EXT2 1:EXT1 1:EXT0 1:EXT ...
... with "LOST" and "✽" in the menu. 34 Select "YES" in the menu Normal camera images will run through a series of the Disk Recorder. When the remove is applied to hard disks displayed with "-" in the menu by pressing the A, B, D or C button, then press the...162;GB 3:ADD 3:LOST 3:LOST 3:3:- 4:¢¢GB 4:ADD 4:LOST 4:LOST 4:4:- The selected disks are changes to execute the disk remove. The Disk Recorder will appear on the monitor screen. PLEASE WAIT s 4. DISK REMOVE MAIN 1:¢¢GB EXT5 1:¢¢GB EXT4 1:EXT3 1:EXT2 1:EXT1 1:EXT0 1:EXT ...

WJHD500A User Guide
Page 34
... of the Recorder. w Date Display e Recording Status and Recording Number Display Displays the recording status and recording number currently being recorded. (✽✽ indicates the remaining space of the numeric buttons (1 16) will not display live camera images. Recording Number (during recording and playback and contains the following information. It also displays the Recorder's playback images. Displaying the Disk Recorder's playback is...
... of the Recorder. w Date Display e Recording Status and Recording Number Display Displays the recording status and recording number currently being recorded. (✽✽ indicates the remaining space of the numeric buttons (1 16) will not display live camera images. Recording Number (during recording and playback and contains the following information. It also displays the Recorder's playback images. Displaying the Disk Recorder's playback is...

WJHD500A User Guide
Page 35
...PROTECTED: Indicates that the hard disk will become failure soon. DVD BUSY: Indicates that the DVD-RAM disk is being copied. y Group Display Displays the selected group (G1, G2, G3, G4). o Camera Title Display Displays the camera title edited in the Disk Recorder or the extension units. ...(✽ indicates the extension unit number) HDD ✽✽%: Is displayed when the remaining space of the Hard Disk reaches a specified value. (✽✽ indicates...
...PROTECTED: Indicates that the hard disk will become failure soon. DVD BUSY: Indicates that the DVD-RAM disk is being copied. y Group Display Displays the selected group (G1, G2, G3, G4). o Camera Title Display Displays the camera title edited in the Disk Recorder or the extension units. ...(✽ indicates the extension unit number) HDD ✽✽%: Is displayed when the remaining space of the Hard Disk reaches a specified value. (✽✽ indicates...
WJHD500A User Guide
Page 36
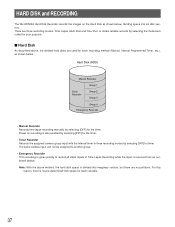
... outboard device. HARD DISK and RECORDING The WJ-HD500A Hard Disk Recorder records the images on recording is also enabled by selecting the mode best suited for timer. s Hard Disk As described above method, the hard disk space is given priority to another group. • Emergency Recorder This recording is divided into six disk sectors. The same camera input can not be...
... outboard device. HARD DISK and RECORDING The WJ-HD500A Hard Disk Recorder records the images on recording is also enabled by selecting the mode best suited for timer. s Hard Disk As described above method, the hard disk space is given priority to another group. • Emergency Recorder This recording is divided into six disk sectors. The same camera input can not be...
WJHD500A User Guide
Page 37
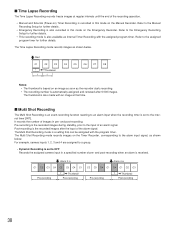
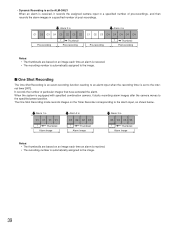
... set to the Emergency Recording Setup for further details. • This recording mode is the recorded images during standby, prior to OFF Records the assigned camera input in a specified number of pre- and post-recording. and post-recording when an alarm is recorded in this mode on the Emergency Recorder. The Multi Shot Recording mode records images on an image as...
... set to the Emergency Recording Setup for further details. • This recording mode is the recorded images during standby, prior to OFF Records the assigned camera input in a specified number of pre- and post-recording. and post-recording when an alarm is recorded in this mode on the Emergency Recorder. The Multi Shot Recording mode records images on an image as...
WJHD500A User Guide
Page 38
...: • The thumbnails are based on an image each time an alarm is received. • The recording number is equipped with specified combination camera, it records the assigned camera input in a specified number of pre-recordings, and then records the alarm images in a specified number of particular images that have activated the alarm. Alarm 1 in C1...
...: • The thumbnails are based on an image each time an alarm is received. • The recording number is equipped with specified combination camera, it records the assigned camera input in a specified number of pre-recordings, and then records the alarm images in a specified number of particular images that have activated the alarm. Alarm 1 in C1...
WJHD500A User Guide
Page 40
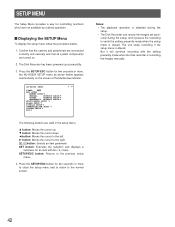
...seconds or more , the WJ-HD500 SETUP menu as shown below . 1. B button: Moves the cursor to the left. Confirm that the camera and peripherals are connected correctly and securely and that all system components are turned on the screen of the Multiscreen Monitor. SETUP/ESC button: ...normal screen. Press the SETUP/ESC button for controlling functions which are valid in the setup menu. But it pauses the recording to verify the setting presently made when the Disk recorder is altered. D button: Moves the cursor up successfully. 3. C button: Moves the cursor down. Press the SETUP...
...seconds or more , the WJ-HD500 SETUP menu as shown below . 1. B button: Moves the cursor to the left. Confirm that the camera and peripherals are connected correctly and securely and that all system components are turned on the screen of the Multiscreen Monitor. SETUP/ESC button: ...normal screen. Press the SETUP/ESC button for controlling functions which are valid in the setup menu. But it pauses the recording to verify the setting presently made when the Disk recorder is altered. D button: Moves the cursor up successfully. 3. C button: Moves the cursor down. Press the SETUP...

WJHD500A User Guide
Page 41
... SYSTEM SETUP DVD DRIVE SETUP 43 Group Setup Program Timer Time Lapse Recording Multi Shot Recording One Shot Recording Sequence Setup Multiscreen Monitor Spot Monitor Alarm Port Setting Video Motion Detector Setting Camera Title Setup PS • Data Setup RS-232C Setup Clock Setup... Time Adjustment Setting Password Lock Setting Buzzer Setting User Defined Setting Disk Management Error...
... SYSTEM SETUP DVD DRIVE SETUP 43 Group Setup Program Timer Time Lapse Recording Multi Shot Recording One Shot Recording Sequence Setup Multiscreen Monitor Spot Monitor Alarm Port Setting Video Motion Detector Setting Camera Title Setup PS • Data Setup RS-232C Setup Clock Setup... Time Adjustment Setting Password Lock Setting Buzzer Setting User Defined Setting Disk Management Error...
WJHD500A User Guide
Page 43
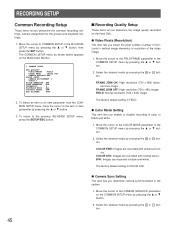
... COLOR STD. Move the cursor to the FIELD/FRAME parameter in the system. 1. COLOR FINE: Images are recorded with normal colors. q Camera Sync Setting This item lets you determine the image quality recorded on the Hard Disk. The COMMON SETUP menu as shown below appears on the COMMON SETUP menu by pressing the + or...
... COLOR STD. Move the cursor to the FIELD/FRAME parameter in the system. 1. COLOR FINE: Images are recorded with normal colors. q Camera Sync Setting This item lets you determine the image quality recorded on the Hard Disk. The COMMON SETUP menu as shown below appears on the COMMON SETUP menu by pressing the + or...
WJHD500A User Guide
Page 44
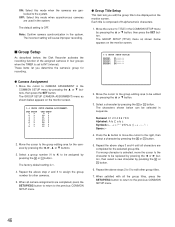
... Setup This item lets you determine the camera's group for the cameras by pressing the + or - The characters shown below can be selected in the system. s Group Setup As described before, the Disk Recorder activates the recording function of 8 alphanumeric characters. 1. Each.... 6. The default setting is 1. 4. These items let you edit the group title to the group editing area for recording. The GROUP SETUP (TITLE) menu as shown below appears on the monitor screen. 1-1 GROUP SETUP(CAMERA ASSIGNMENT) CAM GROUP 1 1 2 1 3 1 4 1 5 1 6 1 7 1 8 1 CAM GROUP 9 1 10 1 11 1 12 ...
... Setup This item lets you determine the camera's group for the cameras by pressing the + or - The characters shown below can be selected in the system. s Group Setup As described before, the Disk Recorder activates the recording function of 8 alphanumeric characters. 1. Each.... 6. The default setting is 1. 4. These items let you edit the group title to the group editing area for recording. The GROUP SETUP (TITLE) menu as shown below appears on the monitor screen. 1-1 GROUP SETUP(CAMERA ASSIGNMENT) CAM GROUP 1 1 2 1 3 1 4 1 5 1 6 1 7 1 8 1 CAM GROUP 9 1 10 1 11 1 12 ...