

Multi Media Display
Page 1
... : 1-888-VIEW PTV(843-9788) or, contact us via the web at: http://www.panasonic.com/contactinfo (Puerto Rico) For assistance, please call : 787-750-4300 or visit us to any and all of the video formats described in case your needs. Multimedia Projection HDTV Operating Instructions Models No. Before connecting, operating or adjusting this product will successfully receive digital television transmissions...
... : 1-888-VIEW PTV(843-9788) or, contact us via the web at: http://www.panasonic.com/contactinfo (Puerto Rico) For assistance, please call : 787-750-4300 or visit us to any and all of the video formats described in case your needs. Multimedia Projection HDTV Operating Instructions Models No. Before connecting, operating or adjusting this product will successfully receive digital television transmissions...

Multi Media Display
Page 2
... qualified service personnel. Do not use , a direct touch to it has cooled. 2 For assistance, please call the CATV system installer's attention to cause electric shock. Replace the lamp unit only after its use liquid cleaners or aerosol cleaners. 7) Do not block any inside part of time. 14) Refer all instructions carefully. 5) Do not use attachments/accessories specified by the manufacturer. 12) Use only...
... qualified service personnel. Do not use , a direct touch to it has cooled. 2 For assistance, please call the CATV system installer's attention to cause electric shock. Replace the lamp unit only after its use liquid cleaners or aerosol cleaners. 7) Do not block any inside part of time. 14) Refer all instructions carefully. 5) Do not use attachments/accessories specified by the manufacturer. 12) Use only...

Multi Media Display
Page 4
.... Operation is no guarantee that may cause harmful interference to radio communications. Retain your set , please read these instructions. To obtain maximum benefit from your new Projection Display. Declaration of Conformity Models Number: PT-44LCX65/PT-52LCX65/PT-61LCX65/PT-52LCX35/PT-61LCX35 Trade Name: Panasonic Responsible party: Panasonic Corporation of North America Address: One Panasonic Way Secaucus New Jersey 07094 Telephone number...
.... Operation is no guarantee that may cause harmful interference to radio communications. Retain your set , please read these instructions. To obtain maximum benefit from your new Projection Display. Declaration of Conformity Models Number: PT-44LCX65/PT-52LCX65/PT-61LCX65/PT-52LCX35/PT-61LCX35 Trade Name: Panasonic Responsible party: Panasonic Corporation of North America Address: One Panasonic Way Secaucus New Jersey 07094 Telephone number...

Multi Media Display
Page 5
... 44 Lock Feature 45 Photo Viewer 49 Setup Features 54 Other Remote Control Quick Reference Guide (Operating peripheral equipment) ......58 Information ! Power ON / OFF 24 Basic Menu Navigation 26 Tuning channels 28 Projection Display operation 32 ASPECT Controls 36 Split screen 37 Enjoy More ! IMPORTANT SAFETY INSTRUCTIONS 2 Before Using 6 Location of Contents To Start ! Getting Started Table of Controls 9 Installation 12 Basic Operation Advanced Operation Use Now ! Warning Indicators 65 Replacing the lamp unit 66 Troubleshooting 68 Specifications...
... 44 Lock Feature 45 Photo Viewer 49 Setup Features 54 Other Remote Control Quick Reference Guide (Operating peripheral equipment) ......58 Information ! Power ON / OFF 24 Basic Menu Navigation 26 Tuning channels 28 Projection Display operation 32 ASPECT Controls 36 Split screen 37 Enjoy More ! IMPORTANT SAFETY INSTRUCTIONS 2 Before Using 6 Location of Contents To Start ! Getting Started Table of Controls 9 Installation 12 Basic Operation Advanced Operation Use Now ! Warning Indicators 65 Replacing the lamp unit 66 Troubleshooting 68 Specifications...

Multi Media Display
Page 7
..., heat or burn used battery with Alkaline batteries for more than 3 seconds. Do not attempt to the remote control. Getting Started Remote Control Battery Installation Requires two AA batteries (supplied). 1. must match the markings in direction of arrow. Two AA size 3. Batteries should always be redone. Battery replacement is necessary when the remote control acts sporadically or stops operating the Projection Display set . 2. Helpful Hints: (1) For frequent remote control users, replace old batteries with a new one of these messages...
..., heat or burn used battery with Alkaline batteries for more than 3 seconds. Do not attempt to the remote control. Getting Started Remote Control Battery Installation Requires two AA batteries (supplied). 1. must match the markings in direction of arrow. Two AA size 3. Batteries should always be redone. Battery replacement is necessary when the remote control acts sporadically or stops operating the Projection Display set . 2. Helpful Hints: (1) For frequent remote control users, replace old batteries with a new one of these messages...

Multi Media Display
Page 9
.../CBL, AUX Sets the remote to display Main Menu. Press to set unit to shut itself off after entering major channel numbers to turn ON and OFF. Press to record. While remote is in VCR or DVD mode, press to play. While remote is in VCR or DVD mode, press to rewind. Press after a preselected amount of Controls Getting Started < CALL Illuminated Remote Control POWER 1 SAP 16 LIGHT TV VCR...
.../CBL, AUX Sets the remote to display Main Menu. Press to set unit to shut itself off after entering major channel numbers to turn ON and OFF. Press to record. While remote is in VCR or DVD mode, press to play. While remote is in VCR or DVD mode, press to rewind. Press after a preselected amount of Controls Getting Started < CALL Illuminated Remote Control POWER 1 SAP 16 LIGHT TV VCR...

Multi Media Display
Page 10
... indicator 2 Remote Control Sensor 3 LAMP indicator 4 S-Video Input Connector 3 Lights up when the lamp unit is abnormal. (P. 65) Receives infrared signal from PC. (PC) 8 SD CARD Slot Insert SD Card. 10 For assistance, please call : 1-888-VIEW PTV(843-9788) or, contact us via the web at: http://www.panasonic.com/contactinfo POWER button / POWER indicator Remote Control Sensor Using your finger, slide Cover in direction of Controls (continued) Controls and Terminals...
... indicator 2 Remote Control Sensor 3 LAMP indicator 4 S-Video Input Connector 3 Lights up when the lamp unit is abnormal. (P. 65) Receives infrared signal from PC. (PC) 8 SD CARD Slot Insert SD Card. 10 For assistance, please call : 1-888-VIEW PTV(843-9788) or, contact us via the web at: http://www.panasonic.com/contactinfo POWER button / POWER indicator Remote Control Sensor Using your finger, slide Cover in direction of Controls (continued) Controls and Terminals...

Multi Media Display
Page 19
... channel is selected, the output from the Digital Audio Out jack on the unit to the Digital Audio Out jack on the unit. Procedure Connect the Digital Audio cable from the Digital Audio Out jack will be Dolby Digital. Firmly connect the cable to a Dolby Digital decoder. Getting Started Digital Audio Out Use the diagram below to connect the Digital Audio Output of your DVD player and DVD-Audio software the copyright protection function may operate and disable optical output. Dolby Digital 5.1 channel surround sound delivers digital-quality sound. Speakers (example) Connect...
... channel is selected, the output from the Digital Audio Out jack on the unit to the Digital Audio Out jack on the unit. Procedure Connect the Digital Audio cable from the Digital Audio Out jack will be Dolby Digital. Firmly connect the cable to a Dolby Digital decoder. Getting Started Digital Audio Out Use the diagram below to connect the Digital Audio Output of your DVD player and DVD-Audio software the copyright protection function may operate and disable optical output. Dolby Digital 5.1 channel surround sound delivers digital-quality sound. Speakers (example) Connect...

Multi Media Display
Page 20
....panasonic.com/contactinfo Audio cable (M3 stereo mini pin-PIN cable) Conversion adapter (If necessary) RGB cable (D-SUB 15P) (Not included) PC IN Terminal (D-SUB 15P) Pin Layouts 54321 10 9 8 7 6 15 14 13 12 11 Connection port view Pin No. Installation (continued) How to connect the PC IN Terminals Connecting a PC to PC IN COMPUTER Audio Input Connector (Shared with this set. • Do not set the horizontal and vertical scanning frequencies for PC signals...
....panasonic.com/contactinfo Audio cable (M3 stereo mini pin-PIN cable) Conversion adapter (If necessary) RGB cable (D-SUB 15P) (Not included) PC IN Terminal (D-SUB 15P) Pin Layouts 54321 10 9 8 7 6 15 14 13 12 11 Connection port view Pin No. Installation (continued) How to connect the PC IN Terminals Connecting a PC to PC IN COMPUTER Audio Input Connector (Shared with this set. • Do not set the horizontal and vertical scanning frequencies for PC signals...

Multi Media Display
Page 24
... to turn ON again. Power OFF Press POWER on Projection Display or Remote Control to turn power on , maximum picture brightness will blink Red. POWER button/ POWER indicator Note: • When the power cord is inserted.) in 5-10 minutes. In this time, the POWER indicator will be achieved in OFF condition when plugged into an AC outlet. Power ON / OFF POWER SAP LIGHT TV VCR DVD DTV RCVR DBS/CBL AUX TV/VIDEO...
... to turn ON again. Power OFF Press POWER on Projection Display or Remote Control to turn power on , maximum picture brightness will blink Red. POWER button/ POWER indicator Note: • When the power cord is inserted.) in 5-10 minutes. In this time, the POWER indicator will be achieved in OFF condition when plugged into an AC outlet. Power ON / OFF POWER SAP LIGHT TV VCR DVD DTV RCVR DBS/CBL AUX TV/VIDEO...

Multi Media Display
Page 25
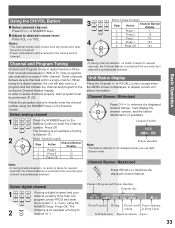
... auto scan in Setup menu. 5 After Auto Program is turned on conditions, "Auto program" may take a while. 25 First time setup Language Auto program Notes: • After "Auto program" is completed the unit tunes to Manual Program mode. You can scan All (Analog and Digital) channels. Now scanning analog channel ... If needed , follow the menus and procedures displayed on screen when the set is complete, the unit will return to the first channel found during "Auto program". • If setup is incomplete, check connection...
... auto scan in Setup menu. 5 After Auto Program is turned on conditions, "Auto program" may take a while. 25 First time setup Language Auto program Notes: • After "Auto program" is completed the unit tunes to Manual Program mode. You can scan All (Analog and Digital) channels. Now scanning analog channel ... If needed , follow the menus and procedures displayed on screen when the set is complete, the unit will return to the first channel found during "Auto program". • If setup is incomplete, check connection...

Multi Media Display
Page 29
Picture Audio Timer Lock Memory Card Setup 5 CH VOL OK VOL CH Press to select "All" or "Analog". Press to select "ANT In". Press to display the Setup menu. If desired, these channels can be deleted manually using the "Manual program setting". (p. 30) • "Auto program" must be memorized. Press to display the Program channel menu. Auto program ANT In Cable Mode ◄ All ► Start scan Basic Operation 2 CH VOL OK VOL CH 3 CH VOL OK VOL CH...
Picture Audio Timer Lock Memory Card Setup 5 CH VOL OK VOL CH Press to select "All" or "Analog". Press to select "ANT In". Press to display the Setup menu. If desired, these channels can be deleted manually using the "Manual program setting". (p. 30) • "Auto program" must be memorized. Press to display the Program channel menu. Auto program ANT In Cable Mode ◄ All ► Start scan Basic Operation 2 CH VOL OK VOL CH 3 CH VOL OK VOL CH...

Multi Media Display
Page 32
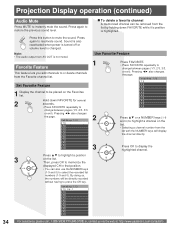
... Input selection menu is exited and the current input is displayed. Press to display Photo Viewer mode. 2 1 4 2 5 3 6 7 8 9 0 Or CH VOL OK VOL CH Press corresponding NUMBER keys on the Remote Control to select the input of source connected to COMPONENT VIDEO INPUT 3 is automatically selected. Rapid Tuning Switches between the current and last channel or input modes. Component 2 Signal of source connected to COMPONENT VIDEO INPUT 2 is displayed. HDMI*1 Signal of source connected to HDMI IN is displayed. HDMI 2*2 Signal...
... Input selection menu is exited and the current input is displayed. Press to display Photo Viewer mode. 2 1 4 2 5 3 6 7 8 9 0 Or CH VOL OK VOL CH Press corresponding NUMBER keys on the Remote Control to select the input of source connected to COMPONENT VIDEO INPUT 3 is automatically selected. Rapid Tuning Switches between the current and last channel or input modes. Component 2 Signal of source connected to COMPONENT VIDEO INPUT 2 is displayed. HDMI*1 Signal of source connected to HDMI IN is displayed. HDMI 2*2 Signal...
Multi Media Display
Page 33
... below to display current unit status information. Select analog channel 11 4 2 5 3 6 7 8 9 0 2 CH VOL OK VOL CH Press the NUMBER keys on the Remote Control to a program and will display the channel number, and the station identification (if available). Channel Number 15-2 ABC - Press OK. The following is not displayed when you use Split Screen mode. HD CC SAP TV-G 1080i STANDARD 4 : 3 30 Closed Caption Rating Picture mode Time remaining setting in digital television differs...
... below to display current unit status information. Select analog channel 11 4 2 5 3 6 7 8 9 0 2 CH VOL OK VOL CH Press the NUMBER keys on the Remote Control to a program and will display the channel number, and the station identification (if available). Channel Number 15-2 ABC - Press OK. The following is not displayed when you use Split Screen mode. HD CC SAP TV-G 1080i STANDARD 4 : 3 30 Closed Caption Rating Picture mode Time remaining setting in digital television differs...
Multi Media Display
Page 34
... exit). Pressing ◄► also changes the page. Pressing ◄► also changes the page. Set Favorite Feature 1 Display the channel to be directly recorded without having to display the highlighted channel. Projection Display operation (continued) 34 Audio Mute Press MUTE to restore the previous sound level. „ To delete a favorite channel A memorized channel can also use the NUMBER keys (1-9 and 0) to reactivate sound. Press again to instantly mute...
... exit). Pressing ◄► also changes the page. Pressing ◄► also changes the page. Set Favorite Feature 1 Display the channel to be directly recorded without having to display the highlighted channel. Projection Display operation (continued) 34 Audio Mute Press MUTE to restore the previous sound level. „ To delete a favorite channel A memorized channel can also use the NUMBER keys (1-9 and 0) to reactivate sound. Press again to instantly mute...

Multi Media Display
Page 35
... change the audio mode as shown below. • "SAP" is indicated with sleep timer set from 0 to zero. MTS Stereo and SAP broadcast Multi-channel Television Sound Stereo (main language) and Secondary Audio Program (sub language) broadcasts are possible broadcast types with first press of SAP button will flash 3, 2 and 1 to indicate the last three (3) remaining minutes prior to turn off. 35 Select Audio Mode for TV Viewing Digital mode...
... change the audio mode as shown below. • "SAP" is indicated with sleep timer set from 0 to zero. MTS Stereo and SAP broadcast Multi-channel Television Sound Stereo (main language) and Secondary Audio Program (sub language) broadcasts are possible broadcast types with first press of SAP button will flash 3, 2 and 1 to indicate the last three (3) remaining minutes prior to turn off. 35 Select Audio Mode for TV Viewing Digital mode...

Multi Media Display
Page 43
... used to stereo. Other Adjust Other detailed audio adjustments can hear a deeper, 3-D sound effect using the HDMI HDMI 1 In / terminal. HDMI 2 In*2 Auto : Automatically performs digital/ analog input switching according to provide outstanding natural sound. Digital : Forces use of analog audio input signal transmitted via the HDMI terminal. Advanced Operation BBE You can be displayed. 43 BBE VIVA provides a musically accurate natural 3D image with all channels. (AI sound is not available in VIDEO mode). BBE - Sound is compatible...
... used to stereo. Other Adjust Other detailed audio adjustments can hear a deeper, 3-D sound effect using the HDMI HDMI 1 In / terminal. HDMI 2 In*2 Auto : Automatically performs digital/ analog input switching according to provide outstanding natural sound. Digital : Forces use of analog audio input signal transmitted via the HDMI terminal. Advanced Operation BBE You can be displayed. 43 BBE VIVA provides a musically accurate natural 3D image with all channels. (AI sound is not available in VIDEO mode). BBE - Sound is compatible...

Multi Media Display
Page 58
.... Programming Without a Code This procedure searches all codes and is entered, or if the procedure takes longer than 30 seconds, the programming will turn on the Remote Control. 31 4 2 5 3 6 Enter the 3-digit component code using the numerical keys. (When code is known): 1 POWER Confirm that the external component is plugged and operating. Setting up the remote using the Remote Control number keys (0 ~ 9 buttons). 7 8 9 Press the Remote Control 0 POWER to the remote using another code. (Some brands have multiple codes). If an incorrect code...
.... Programming Without a Code This procedure searches all codes and is entered, or if the procedure takes longer than 30 seconds, the programming will turn on the Remote Control. 31 4 2 5 3 6 Enter the 3-digit component code using the numerical keys. (When code is known): 1 POWER Confirm that the external component is plugged and operating. Setting up the remote using the Remote Control number keys (0 ~ 9 buttons). 7 8 9 Press the Remote Control 0 POWER to the remote using another code. (Some brands have multiple codes). If an incorrect code...

Multi Media Display
Page 59
... serve as a reference if you need to program your Remote Control. Some components may not operate. CABLE Cable Box DBS Digital Broadcast System VCR Video Cassette Recorder RCVR Receiver or Amplifier CD Compact Disc Player DVD Digital Versatile Player Other Component Other Component Other Component Infrared Codes Index The Remote Control is capable of operating many brands of operating many attempts before the correct code is found. 4 CH VOL OK...
... serve as a reference if you need to program your Remote Control. Some components may not operate. CABLE Cable Box DBS Digital Broadcast System VCR Video Cassette Recorder RCVR Receiver or Amplifier CD Compact Disc Player DVD Digital Versatile Player Other Component Other Component Other Component Infrared Codes Index The Remote Control is capable of operating many brands of operating many attempts before the correct code is found. 4 CH VOL OK...

Multi Media Display
Page 68
... displayed with a new one . Try displaying constantly moving pictures which results in direct light of fluorescent lamps or other strong sources of the screen are • Change "Color Corr." The POWER indicator flashes orange twice every 5 seconds. • The lamp cover is not a malfunction. - Firmly replace the cover. every 5 seconds. • Is the set being used for NORMAL aspect mode), on-screen for the VCR set...
... displayed with a new one . Try displaying constantly moving pictures which results in direct light of fluorescent lamps or other strong sources of the screen are • Change "Color Corr." The POWER indicator flashes orange twice every 5 seconds. • The lamp cover is not a malfunction. - Firmly replace the cover. every 5 seconds. • Is the set being used for NORMAL aspect mode), on-screen for the VCR set...


