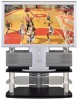
Multi-media Display
Page 2
... part of power source indicated on the projection display. 4. Do not defeat the safety purpose of electric shock, do not remove cover or back. Therefore, it from the type of this projection display where the power cord will fit into the power outlet only one blade wider than the other similar surface. Read and apply the operating instructions provided with care. Unplug this projection display...
... part of power source indicated on the projection display. 4. Do not defeat the safety purpose of electric shock, do not remove cover or back. Therefore, it from the type of this projection display where the power cord will fit into the power outlet only one blade wider than the other similar surface. Read and apply the operating instructions provided with care. Unplug this projection display...

Multi-media Display
Page 3
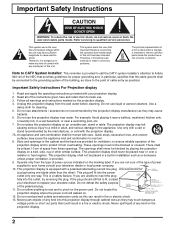
... considerations. When installing an outside antenna system shall not be fatal. 17. Unauthorized substitutions may expose you to lightning and power-line surges. 16. If the lamp is connected to provide some components. Adjust only those controls that have the same characteristics as contact with them might be located in performance - When the projection display exhibits a distinct change in the vicinity...
... considerations. When installing an outside antenna system shall not be fatal. 17. Unauthorized substitutions may expose you to lightning and power-line surges. 16. If the lamp is connected to provide some components. Adjust only those controls that have the same characteristics as contact with them might be located in performance - When the projection display exhibits a distinct change in the vicinity...
Multi-media Display
Page 4
... technician for compliance could void the user's authority to operate this equipment. These limits are trademarks of the FCC Rules. Any changes or modifications not expressly approved by one or more of your set . Retain your new projection television set , please read these trademarks have many years of these instructions. Declaration of Conformity Model Number: PT-40LC12/PT-45LC12 Trade...
... technician for compliance could void the user's authority to operate this equipment. These limits are trademarks of the FCC Rules. Any changes or modifications not expressly approved by one or more of your set . Retain your new projection television set , please read these trademarks have many years of these instructions. Declaration of Conformity Model Number: PT-40LC12/PT-45LC12 Trade...

Multi-media Display
Page 5
... Using projection display Channel up/down buttons to connect the PC Input Terminals 18 Analog RGB signals that can be input 19 Basic Operation Advanced Operation Information Use Now ! Power ON / OFF ...20 Initial Setup ...20 Turning the Power ON and OFF 21 Flow Chart of Contents TO Start ! Adjusting screen position and size 40 Audio Adjustments ...42 Picture Adjustments ...44 Lock Feature ...46 Closed Captions ...50 Channel Caption Feature ...52 Weak Signal Display Feature ...53 Video NR (Noise Reduction) Feature 54 Automatically changing screen size...
... Using projection display Channel up/down buttons to connect the PC Input Terminals 18 Analog RGB signals that can be input 19 Basic Operation Advanced Operation Information Use Now ! Power ON / OFF ...20 Initial Setup ...20 Turning the Power ON and OFF 21 Flow Chart of Contents TO Start ! Adjusting screen position and size 40 Audio Adjustments ...42 Picture Adjustments ...44 Lock Feature ...46 Closed Captions ...50 Channel Caption Feature ...52 Weak Signal Display Feature ...53 Video NR (Noise Reduction) Feature 54 Automatically changing screen size...

Multi-media Display
Page 9
.../VIDEO button This input mode changes each time this button is displayed, (PP. 22, 23) Moves cursor upward during menu mode. The selected mode button (TV, VCR, etc.) flashes. Previous before item in MENU. Moves cursor to normal viewing from the MENU screen. Moves cursor to the next channel down Increase volume The screen below is displayed for 5 seconds. (P. 29) NORMAL STEREO SAP MONO CH 1 2 ABC When the Menu screen is pressed. (P. 33) SAP button Changes the audio mode. (P. 35) Light button Lights all buttons...
.../VIDEO button This input mode changes each time this button is displayed, (PP. 22, 23) Moves cursor upward during menu mode. The selected mode button (TV, VCR, etc.) flashes. Previous before item in MENU. Moves cursor to normal viewing from the MENU screen. Moves cursor to the next channel down Increase volume The screen below is displayed for 5 seconds. (P. 29) NORMAL STEREO SAP MONO CH 1 2 ABC When the Menu screen is pressed. (P. 33) SAP button Changes the audio mode. (P. 35) Light button Lights all buttons...

Multi-media Display
Page 12
... connect a TBC (time base corrector). Overtightening may damage terminals. 12 For assistance, please call : 1-888-VIEW PTV(843-9788) Connecting the Antenna / Cable to the RF in Terminal (No VCR) Antenna Connection For proper reception of jitter in the video signal input from the video source, the picture on the screen may flicker. For best reception an outdoor antenna is required. Installation Notes on connections • Turn off the power supply for all components...
... connect a TBC (time base corrector). Overtightening may damage terminals. 12 For assistance, please call : 1-888-VIEW PTV(843-9788) Connecting the Antenna / Cable to the RF in Terminal (No VCR) Antenna Connection For proper reception of jitter in the video signal input from the video source, the picture on the screen may flicker. For best reception an outdoor antenna is required. Installation Notes on connections • Turn off the power supply for all components...

Multi-media Display
Page 13
Antenna Mode must be set to the VHF/UHF terminal on the back of cable channels (01 - 125) connect the cable supplied by your local Cable company for proper reception. A cable converter box is required for its compatibility requirements. • For reception of the Projection dis.play. Check with your local cable company. Installation Getting Started CABLE BOX TERMINAL ON THE BACK OF THE CABLE BOX INPUT OUTPUT In from cable Or In from...
Antenna Mode must be set to the VHF/UHF terminal on the back of cable channels (01 - 125) connect the cable supplied by your local Cable company for proper reception. A cable converter box is required for its compatibility requirements. • For reception of the Projection dis.play. Check with your local cable company. Installation Getting Started CABLE BOX TERMINAL ON THE BACK OF THE CABLE BOX INPUT OUTPUT In from cable Or In from...

Multi-media Display
Page 24
... LAY :OFF Press to your connections. CH AUTO SET PROCEED ING Channels will be set according to select TV or CABLE. Note: TV or Cable Tuning mode must be stored in progress, press the SWAP button. SELECT E X I DEO Press to select ANTENNA. Press the ACTION button to display the MENU screen and select SET UP. 1 Press to select AUTO SET. PAGE SELECT E N D RECALL 2 Press to display the CHANNEL. Channel numbers with a video signal present will automatically advance until all...
... LAY :OFF Press to your connections. CH AUTO SET PROCEED ING Channels will be set according to select TV or CABLE. Note: TV or Cable Tuning mode must be stored in progress, press the SWAP button. SELECT E X I DEO Press to select ANTENNA. Press the ACTION button to display the MENU screen and select SET UP. 1 Press to select AUTO SET. PAGE SELECT E N D RECALL 2 Press to display the CHANNEL. Channel numbers with a video signal present will automatically advance until all...

Multi-media Display
Page 29
... Operation Projection display operation TV status display Press the RECALL button, except when the MENU screen is displayed, to 125 with no signal to select an CABLE TV 125 or 69 CH01 outside input as shown right. Example 1: To select channel 125, first press the 1 key, then 2, then 5. FREEZE 29 Aspect types (P. 30) Receivable broadcast types (P. 35) NORMAL STEREO SAP MONO CH 1 2 ABC Channel Channel caption (P. 52) Using the number keys When selecting CABLE channels 100 to display...
... Operation Projection display operation TV status display Press the RECALL button, except when the MENU screen is displayed, to 125 with no signal to select an CABLE TV 125 or 69 CH01 outside input as shown right. Example 1: To select channel 125, first press the 1 key, then 2, then 5. FREEZE 29 Aspect types (P. 30) Receivable broadcast types (P. 35) NORMAL STEREO SAP MONO CH 1 2 ABC Channel Channel caption (P. 52) Using the number keys When selecting CABLE channels 100 to display...

Multi-media Display
Page 33
Basic Operation Turning the power on and switching input modes 1 Turn the projection display on the front of the projection display. LINE 3: Signal of source connected to COMPONENT VIDEO INPUT 1 is displayed. COMPONENT 1: Signal of source connected to PC IN is displayed. Example: Connect Input 3 Video camera VCR DVD player To S-video output or video output To audio output This equipment can also be connected to COMPONENT VIDEO INPUT 2 is displayed. TV 2 The input mode changes each time this button is pressed. * LINE 1 * No input mode is displayed for details. ...
Basic Operation Turning the power on and switching input modes 1 Turn the projection display on the front of the projection display. LINE 3: Signal of source connected to COMPONENT VIDEO INPUT 1 is displayed. COMPONENT 1: Signal of source connected to PC IN is displayed. Example: Connect Input 3 Video camera VCR DVD player To S-video output or video output To audio output This equipment can also be connected to COMPONENT VIDEO INPUT 2 is displayed. TV 2 The input mode changes each time this button is pressed. * LINE 1 * No input mode is displayed for details. ...

Multi-media Display
Page 41
... and 720p input images, screen size cannot be adjusted. • The adjusted setting will be cut off . • The signals output from the broadcast program is equipped with various screen modes. Adjusting screen position and size Adjustment item Button Adjustment Details Note Press button. Press button. Press to view the original image intended by using this projection display for commercial purposes or for public use, such as in NORMAL mode to shrink image vertically Only ZOOM mode Advanced Operation H SIZE Press button.
... and 720p input images, screen size cannot be adjusted. • The adjusted setting will be cut off . • The signals output from the broadcast program is equipped with various screen modes. Adjusting screen position and size Adjustment item Button Adjustment Details Note Press button. Press button. Press to view the original image intended by using this projection display for commercial purposes or for public use, such as in NORMAL mode to shrink image vertically Only ZOOM mode Advanced Operation H SIZE Press button.

Multi-media Display
Page 42
Audio Adjustments Press the ACTION button to display the MENU screen and select ADJUST. 1 Press to suit the program source. See next page 3 NORMAL Emits the original sound. (Factory setting) The sound level is connected to dialogue. Press to music. You can hear deeper, 3D audio using just the units two front speakers. Notes: • Sound signals are output from the rear AUDIO OUT terminal. • When volume is adjusted or the mute button is not...
Audio Adjustments Press the ACTION button to display the MENU screen and select ADJUST. 1 Press to suit the program source. See next page 3 NORMAL Emits the original sound. (Factory setting) The sound level is connected to dialogue. Press to music. You can hear deeper, 3D audio using just the units two front speakers. Notes: • Sound signals are output from the rear AUDIO OUT terminal. • When volume is adjusted or the mute button is not...

Multi-media Display
Page 50
... to select CAPTION MODE. Also, text contents can vary so you may be displayed. C. (Closed Caption) broadcasts. When the TV station broadcasts information, such as program listings, it will remain on a black background). Note: The closed caption or text signal may wish to try different settings. 3 Press to display the CAPTION screen. Closed Captions This receiver has a built in decoder that provides a visual depiction of the audio portion of a television program...
... to select CAPTION MODE. Also, text contents can vary so you may be displayed. C. (Closed Caption) broadcasts. When the TV station broadcasts information, such as program listings, it will remain on a black background). Note: The closed caption or text signal may wish to try different settings. 3 Press to display the CAPTION screen. Closed Captions This receiver has a built in decoder that provides a visual depiction of the audio portion of a television program...

Multi-media Display
Page 51
Press the ACTION button to display the MENU screen and select SET UP. 1 Press to ON will override CC ON MUTE. • Closed Caption is not displayed if the input signal is OFF, CC MODE set to select CAPTION. CAP C1 CAP C2 SELECT E X I DEO PAGE SELECT E N D RECALL 2 Press to exit menu. Closed Captions CC ON MUTE Activates the On-Screen Closed Caption feature, when the MUTE button on the Remote Control is in the "OFF" position...
Press the ACTION button to display the MENU screen and select SET UP. 1 Press to ON will override CC ON MUTE. • Closed Caption is not displayed if the input signal is OFF, CC MODE set to select CAPTION. CAP C1 CAP C2 SELECT E X I DEO PAGE SELECT E N D RECALL 2 Press to exit menu. Closed Captions CC ON MUTE Activates the On-Screen Closed Caption feature, when the MUTE button on the Remote Control is in the "OFF" position...
Multi-media Display
Page 53
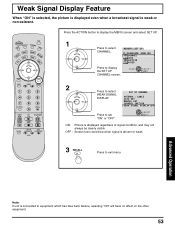
... : CABL E AUTO SE T MANUAL SE T CHANNE L CAP T I ON WEAK S I GNAL D I T RECALL ON : Picture is absent or weak. 3 Press to select WEAK SIGNAL DISPLAY. OFF : Screen turns solid blue when signal is displayed regardless of signal condition, and may not always be clearly visible. PAGE SELECT E N D RECALL 2 Press to exit menu. Weak Signal Display Feature When "ON" is selected, the picture is displayed even when a broadcast signal is connected to select CHANNEL. Advanced Operation Note...
... : CABL E AUTO SE T MANUAL SE T CHANNE L CAP T I ON WEAK S I GNAL D I T RECALL ON : Picture is absent or weak. 3 Press to select WEAK SIGNAL DISPLAY. OFF : Screen turns solid blue when signal is displayed regardless of signal condition, and may not always be clearly visible. PAGE SELECT E N D RECALL 2 Press to exit menu. Weak Signal Display Feature When "ON" is selected, the picture is displayed even when a broadcast signal is connected to select CHANNEL. Advanced Operation Note...

Multi-media Display
Page 55
... : OF F size is automatically changed , Aspect mode will be set when using Hi-Definition equipment or 480i output equipment. 55 Press the ACTION button to display the MENU screen and select SET UP. 1 Press to COMPONENT VIDEO INPUT (Y, PB / Cb ,PR / Cr input terminals). OFF : The screen size is not automatically changed . Notes: • When ID-1 is detected and screen size is changed . Press to exit menu. ID- 1 : OF F Press to select ON : When screen size specification V I DEO...
... : OF F size is automatically changed , Aspect mode will be set when using Hi-Definition equipment or 480i output equipment. 55 Press the ACTION button to display the MENU screen and select SET UP. 1 Press to COMPONENT VIDEO INPUT (Y, PB / Cb ,PR / Cr input terminals). OFF : The screen size is not automatically changed . Notes: • When ID-1 is detected and screen size is changed . Press to exit menu. ID- 1 : OF F Press to select ON : When screen size specification V I DEO...
Multi-media Display
Page 61
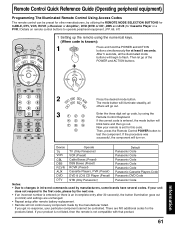
... the manufacturer listed. After 5 seconds, all others will not control every component made by utilizing the REMOTE MODE SELECTION BUTTONS for CABLE, DTV, VCR, RCVR (a Receiver or Amplifier), DVD (DVD or CD) ,DBS and AUX (for Cassette Player or a PVR.) Details on . If you get no blink) and settings are NO additional codes for at least 5 seconds. Remote Control Quick Reference Guide (Operating peripheral equipment) Programming The Illuminated Remote Control Using Access Codes The remote control can be...
... the manufacturer listed. After 5 seconds, all others will not control every component made by utilizing the REMOTE MODE SELECTION BUTTONS for CABLE, DTV, VCR, RCVR (a Receiver or Amplifier), DVD (DVD or CD) ,DBS and AUX (for Cassette Player or a PVR.) Details on . If you get no blink) and settings are NO additional codes for at least 5 seconds. Remote Control Quick Reference Guide (Operating peripheral equipment) Programming The Illuminated Remote Control Using Access Codes The remote control can be...

Multi-media Display
Page 62
Remote Control Quick Reference Guide (Operating peripheral equipment) 2 Setting to send a test signal in that format. Press POWER button to the remote using the " " button. This will serve as a handy reference whenever you need to the next code. CABLE Cable Box DBS Digital Broadcast System VCR Video Cassette Recorder RCVR Receiver or Amplifier CD Compact Disc Player DVD Digital Versatile Player Other Component Other Component Other Component Other Component Other Component Other Component 62 For assistance, please call : 1-888-VIEW PTV(843-9788...
Remote Control Quick Reference Guide (Operating peripheral equipment) 2 Setting to send a test signal in that format. Press POWER button to the remote using the " " button. This will serve as a handy reference whenever you need to the next code. CABLE Cable Box DBS Digital Broadcast System VCR Video Cassette Recorder RCVR Receiver or Amplifier CD Compact Disc Player DVD Digital Versatile Player Other Component Other Component Other Component Other Component Other Component Other Component 62 For assistance, please call : 1-888-VIEW PTV(843-9788...
Multi-media Display
Page 68
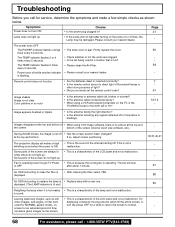
.... - a sound. - If so, adjust screen positioning. 30,31,40,41 The projection display set makes a high • This is flashing. Some parts of fluorescent lamps or - The fan will not light after about 1 minute. 21 An OSD instructing to normal. - Try video images, web pages, or filler bars displaying constantly moving pictures which fill the entire screen, or (used in ? Troubleshooting Before you correctly set the remote control code? 61 Image shakes Image is...
.... - a sound. - If so, adjust screen positioning. 30,31,40,41 The projection display set makes a high • This is flashing. Some parts of fluorescent lamps or - The fan will not light after about 1 minute. 21 An OSD instructing to normal. - Try video images, web pages, or filler bars displaying constantly moving pictures which fill the entire screen, or (used in ? Troubleshooting Before you correctly set the remote control code? 61 Image shakes Image is...
Multi-media Display
Page 72
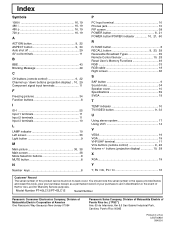
... Light button 9 M Main picture 36, 38 Main screen 38 Mode Selection buttons 8 MUTE button 8 N Number keys 8 P PC Input terminal 10 Phones jack 10 PIP screen 38 POWER button 8, 21 POWER button/POWER indicator 10, 21, 60 R R-TUNE button 8 RECALL button 9, 23, 29 Receivable Broadcast Types 35 Remote Control Sensor 10, 28 Reset User's Memory Functions 49 RGB 33 RGB cable 18 Right screen 36 S SAP button 9 Sound mute 34 Speaker cover 10 Specifications 69 SVGA 19 T TEMP indicator 10 TV/VIDEO button 9, 33 U Using...
... Light button 9 M Main picture 36, 38 Main screen 38 Mode Selection buttons 8 MUTE button 8 N Number keys 8 P PC Input terminal 10 Phones jack 10 PIP screen 38 POWER button 8, 21 POWER button/POWER indicator 10, 21, 60 R R-TUNE button 8 RECALL button 9, 23, 29 Receivable Broadcast Types 35 Remote Control Sensor 10, 28 Reset User's Memory Functions 49 RGB 33 RGB cable 18 Right screen 36 S SAP button 9 Sound mute 34 Speaker cover 10 Specifications 69 SVGA 19 T TEMP indicator 10 TV/VIDEO button 9, 33 U Using...


