P2 Camcoder
Page 1
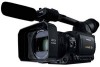
AG-HVX200AP Shooting Playback Editing Displays Menu Reference Before operating this product, please read the instructions carefully and save this manual for future use of parts Operating Instructions Memory Card Camera-Recorder Model No. F0208T0 -P D Printed in Japan ENGLISH VQT1Q85 Preparation Description Before use .
AG-HVX200AP Shooting Playback Editing Displays Menu Reference Before operating this product, please read the instructions carefully and save this manual for future use of parts Operating Instructions Memory Card Camera-Recorder Model No. F0208T0 -P D Printed in Japan ENGLISH VQT1Q85 Preparation Description Before use .
P2 Camcoder
Page 6
... Genuine Panasonic Battery Pack (Rechargeable Battery 4 Software information for this product .......... 4 IMPORTANT SAFETY INSTRUCTIONS ......... 5 Outline of operations 8 Precaution for use 10 Accessories 11 About this manual 11 ...photos taken (REC CHECK 26 P2 card access lamps 26 Protecting against a possible erasure 26 Formatting P2 cards 27 Recording times 27 Remove the P2 card 28 Basic shooting operations ... frame rates (VFR 36 Shooting in 1080i/480i progressive mode.. 37 Shooting in manual mode 38 Switching to manual mode 38 Manual focusing 38 Using focus assist 38 Iris...
... Genuine Panasonic Battery Pack (Rechargeable Battery 4 Software information for this product .......... 4 IMPORTANT SAFETY INSTRUCTIONS ......... 5 Outline of operations 8 Precaution for use 10 Accessories 11 About this manual 11 ...photos taken (REC CHECK 26 P2 card access lamps 26 Protecting against a possible erasure 26 Formatting P2 cards 27 Recording times 27 Remove the P2 card 28 Basic shooting operations ... frame rates (VFR 36 Shooting in 1080i/480i progressive mode.. 37 Shooting in manual mode 38 Switching to manual mode 38 Manual focusing 38 Using focus assist 38 Iris...
P2 Camcoder
Page 11
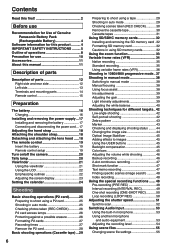
... usage only. References • References are identified by the icons below. P2 : Explanations for tape usage only. 11 Before use Accessories Battery ∗1 AC Adapter AC power supply cord /DC cord Wireless remote control and battery (... "OPTIONAL UNITS". (Page 136) ∗2 When using 1394 cable (sold separately), install a ferrite core on the end nearest the PC. (Page 79) About this manual Note concerning illustrations in these instructions • Illustrations (camera-recorder, menu screens, etc.) in these operating instructions differ slightly from the actual camera-recorder.
... usage only. References • References are identified by the icons below. P2 : Explanations for tape usage only. 11 Before use Accessories Battery ∗1 AC Adapter AC power supply cord /DC cord Wireless remote control and battery (... "OPTIONAL UNITS". (Page 136) ∗2 When using 1394 cable (sold separately), install a ferrite core on the end nearest the PC. (Page 79) About this manual Note concerning illustrations in these instructions • Illustrations (camera-recorder, menu screens, etc.) in these operating instructions differ slightly from the actual camera-recorder.
P2 Camcoder
Page 13
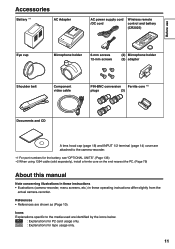
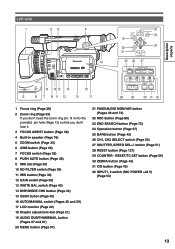
button (Page 51) 28 RESET button (Page 127) 29 COUNTER - Description of parts Left side 1 23 4 18 AWB ZOOM SERVO MANUAL 8 10 12 14 16 5 6 7 9 11 13 15 17 22 AUDIO DUB/ THUMBNAIL REC END SEARCH 23 19 SET 20 24 21 MENU PAGE/ AUDIO MON/...) 12 GAIN switch (Page 39) 13 WHITE BAL switch (Page 40) 14 DISP/MODE CHK button (Page 44) 15 USER button (Page 45) 16 AUTO/MANUAL switch (Pages 25 and 29) 17 LCD monitor (Page 22) 18 Diopter adjustment dial (Page 21) 19 AUDIO DUB/THUMBNAIL button (Pages 67 and 81...
button (Page 51) 28 RESET button (Page 127) 29 COUNTER - Description of parts Left side 1 23 4 18 AWB ZOOM SERVO MANUAL 8 10 12 14 16 5 6 7 9 11 13 15 17 22 AUDIO DUB/ THUMBNAIL REC END SEARCH 23 19 SET 20 24 21 MENU PAGE/ AUDIO MON/...) 12 GAIN switch (Page 39) 13 WHITE BAL switch (Page 40) 14 DISP/MODE CHK button (Page 44) 15 USER button (Page 45) 16 AUTO/MANUAL switch (Pages 25 and 29) 17 LCD monitor (Page 22) 18 Diopter adjustment dial (Page 21) 19 AUDIO DUB/THUMBNAIL button (Pages 67 and 81...

P2 Camcoder
Page 25
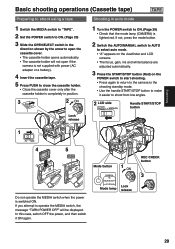
...Stopped after only a short recording time • Stopped immediately after the recording has moved to a second P2 card 25 Mode button 1 ON CAMERA MCR VCR PC DUB Mode lamp Lock release REC CHECK button ... some time until the writing to shoot from low angles. 2 LCD side AUTO MANUAL Handle START/STOP button P2 TAPE Do not operate the MEDIA switch when the power is lighted red. For this...that the mode lamp (CAMERA) is switched ON. If not, press the mode button. 2 Switch the AUTO/MANUAL switch to AUTO to select auto mode. • "A" appears on the POWER switch to start shooting. &#...
...Stopped after only a short recording time • Stopped immediately after the recording has moved to a second P2 card 25 Mode button 1 ON CAMERA MCR VCR PC DUB Mode lamp Lock release REC CHECK button ... some time until the writing to shoot from low angles. 2 LCD side AUTO MANUAL Handle START/STOP button P2 TAPE Do not operate the MEDIA switch when the power is lighted red. For this...that the mode lamp (CAMERA) is switched ON. If not, press the mode button. 2 Switch the AUTO/MANUAL switch to AUTO to select auto mode. • "A" appears on the POWER switch to start shooting. &#...
P2 Camcoder
Page 29
If not, press the mode button. 2 Switch the AUTO/MANUAL switch to AUTO to select auto mode. • "A" appears on the viewfinder and LCD screens. • The focus, gain, iris and white balance are adjusted ... to the camera to the shooting standby mode. • Use the handle START/STOP button to shoot from low angles. 2 LCD side AUTO MANUAL Handle START/STOP button 1 P2 TAPE 4 5 PUSH PUSH Do not operate the MEDIA switch when the power is switched ON. If you attempt to ON. (Page 20) •...
If not, press the mode button. 2 Switch the AUTO/MANUAL switch to AUTO to select auto mode. • "A" appears on the viewfinder and LCD screens. • The focus, gain, iris and white balance are adjusted ... to the camera to the shooting standby mode. • Use the handle START/STOP button to shoot from low angles. 2 LCD side AUTO MANUAL Handle START/STOP button 1 P2 TAPE 4 5 PUSH PUSH Do not operate the MEDIA switch when the power is switched ON. If you attempt to ON. (Page 20) •...

P2 Camcoder
Page 38
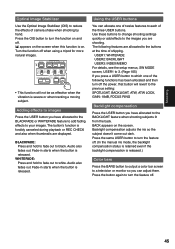
... Use the FOCUS switch to choose how to manual mode when manually adjusting the focus, iris, gain and white balance. The FOCUS switch automatically moves back to . Using focus assist When you press the FOCUS ASSIST button, the area at the center of 1080i and 720P, and it switches to bring the... subjects into focus. This function is restored about 10 seconds after you to manual focus. The normal display is enabled only during recording or recording standby in ...
... Use the FOCUS switch to choose how to manual mode when manually adjusting the focus, iris, gain and white balance. The FOCUS switch automatically moves back to . Using focus assist When you press the FOCUS ASSIST button, the area at the center of 1080i and 720P, and it switches to bring the... subjects into focus. This function is restored about 10 seconds after you to manual focus. The normal display is enabled only during recording or recording standby in ...
P2 Camcoder
Page 39
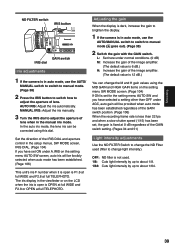
...gain to brighten the display. 1 If the camera is in auto mode, use the AUTO/ MANUAL switch to switch to manual mode. (Page 38) 2 Press the IRIS button to switch how to adjust the aperture of lens ...when in the manual iris mode. In the auto iris mode, the lens iris can change light intensity). OFF: ND ...filter is not used (filter to change the M and H gain values using the MID GAIN and HIGH GAIN items on the setting menu AUTO SW screen, auto iris will be corrected using this dial. AUTO IRIS: Adjust...
...gain to brighten the display. 1 If the camera is in auto mode, use the AUTO/ MANUAL switch to switch to manual mode. (Page 38) 2 Press the IRIS button to switch how to adjust the aperture of lens ...when in the manual iris mode. In the auto iris mode, the lens iris can change light intensity). OFF: ND ...filter is not used (filter to change the M and H gain values using the MID GAIN and HIGH GAIN items on the setting menu AUTO SW screen, auto iris will be corrected using this dial. AUTO IRIS: Adjust...
P2 Camcoder
Page 40
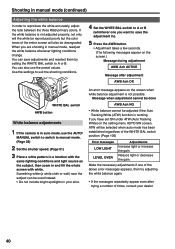
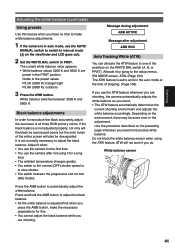
... message appears on the screen when white balance adjustment is working. Reduce light or decrease the gain. You can also use the AUTO/ MANUAL switch to switch to manual mode. (Page 38) 2 Set the shutter speed. (Page 51) 3 Place a white pattern in a location with the same lighting conditions and light ... the ratio between the three RGB primary colors. If the white balance is in auto mode, use the preset values. If you are shooting in manual mode (continued) Adjusting the white balance In order to A or B. When you have set ON under ATW (Auto Tracking White) on the screen.) ...
... message appears on the screen when white balance adjustment is working. Reduce light or decrease the gain. You can also use the AUTO/ MANUAL switch to switch to manual mode. (Page 38) 2 Set the shutter speed. (Page 51) 3 Place a white pattern in a location with the same lighting conditions and light ... the ratio between the three RGB primary colors. If the white balance is in auto mode, use the preset values. If you are shooting in manual mode (continued) Adjusting the white balance In order to A or B. When you have set ON under ATW (Auto Tracking White) on the screen.) ...
P2 Camcoder
Page 41
... and hold the AWB button to adjust the black balance. • As the white balance is adjusted first when you use the AUTO/ MANUAL switch to switch to manual mode ( on the viewfinder and LCD goes out). 2 Set the WHITE BAL switch to slow shutter. • You switch between 3200 K and 5600...
... and hold the AWB button to adjust the black balance. • As the white balance is adjusted first when you use the AUTO/ MANUAL switch to switch to manual mode ( on the viewfinder and LCD goes out). 2 Set the WHITE BAL switch to slow shutter. • You switch between 3200 K and 5600...
P2 Camcoder
Page 43
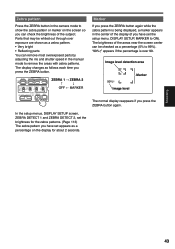
... as a zebra pattern. • Very bright • Reflecting parts You can be whited out through over 99. Zebra pattern Press the ZEBRA button in the manual mode to remove the areas with zebra patterns. In the setup menus, DISPLAY SETUP screen, ZEBRA DETECT 1 and ZEBRA DETECT 2, set the brightness for the...
... as a zebra pattern. • Very bright • Reflecting parts You can be whited out through over 99. Zebra pattern Press the ZEBRA button in the manual mode to remove the areas with zebra patterns. In the setup menus, DISPLAY SETUP screen, ZEBRA DETECT 1 and ZEBRA DETECT 2, set the brightness for the...
P2 Camcoder
Page 45
...: Press and hold to fade out to turn the function on . The following functions has been allocated and then turn the feature off. (In the manual iris mode, the backlight compensation status is retained even if the backlight compensation is on and off . 45 Press the button again to black. Press...
...: Press and hold to fade out to turn the function on . The following functions has been allocated and then turn the feature off. (In the manual iris mode, the backlight compensation status is retained even if the backlight compensation is on and off . 45 Press the button again to black. Press...
P2 Camcoder
Page 79
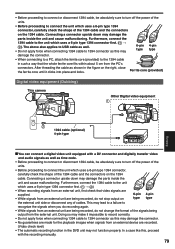
... equipment (Dubbing) This camera Other Digital video equipment 1 1394 2 1394 cable (optional) 4-pin type Editing You can connect a digital video unit equipped with the recording manually. 79 Doing so may damage the connector. • No guarantees are made for the playback images when signals from an external device are being recorded...
... equipment (Dubbing) This camera Other Digital video equipment 1 1394 2 1394 cable (optional) 4-pin type Editing You can connect a digital video unit equipped with the recording manually. 79 Doing so may damage the connector. • No guarantees are made for the playback images when signals from an external device are being recorded...
P2 Camcoder
Page 92
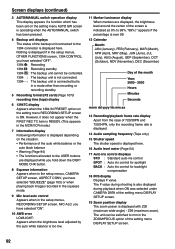
... 1394 : Recording standby 1394 : The backup unit cannot be switched to the 1394 connector is displayed here. Screen displays (continued) 3 AUTO/MANUAL switch operation display This display appears if a function which has been set on the setting menu AUTO SW screen is operating when the AUTO... RECORDING SETUP screen is indicated as 0% to 99%. Nothing is displayed if in a mode other than recording or recording standby. 5 Recording format (P2 card) (Page 107)/ recording time (tape) display 6 1394TC display Appears when the 1394 IN PRESET option on the situation. • Performance of...
... 1394 : Recording standby 1394 : The backup unit cannot be switched to the 1394 connector is displayed here. Screen displays (continued) 3 AUTO/MANUAL switch operation display This display appears if a function which has been set on the setting menu AUTO SW screen is operating when the AUTO... RECORDING SETUP screen is indicated as 0% to 99%. Nothing is displayed if in a mode other than recording or recording standby. 5 Recording format (P2 card) (Page 107)/ recording time (tape) display 6 1394TC display Appears when the 1394 IN PRESET option on the situation. • Performance of...

P2 Camcoder
Page 93
... the current shooting conditions is displayed here. 23 ND filter display ND filter selected is stopped) A. In the auto focus mode, AF appears. In the manual focus mode, MF appears. Also, the remaining memory is pressed while recording and the index/memo signals are displayed in reverse. 95 (Focal distance: infinity...
... the current shooting conditions is displayed here. 23 ND filter display ND filter selected is stopped) A. In the auto focus mode, AF appears. In the manual focus mode, MF appears. Also, the remaining memory is pressed while recording and the index/memo signals are displayed in reverse. 95 (Focal distance: infinity...
P2 Camcoder
Page 96
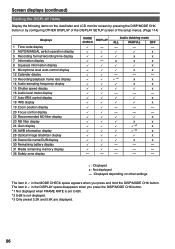
... DISP/MODE CHK button or by configuring OTHER DISPLAY of the DISPLAY SETUP screen of the setup menus. (Page 114) Displays 1 Time code display 3 AUTO/MANUAL switch operation display 5 Recording format/recording time display 7 Information display 8 Squeeze information display 9 Microphone level auto-control display 12 Calendar display 13 Recording/playback frame...
... DISP/MODE CHK button or by configuring OTHER DISPLAY of the DISPLAY SETUP screen of the setup menus. (Page 114) Displays 1 Time code display 3 AUTO/MANUAL switch operation display 5 Recording format/recording time display 7 Information display 8 Squeeze information display 9 Microphone level auto-control display 12 Calendar display 13 Recording/playback frame...
P2 Camcoder
Page 104
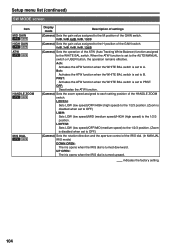
... of the IRIS dial. (In MANUAL IRIS mode) DOWN OPEN: The iris opens when the IRIS dial is set to B. Setup menu list (continued) SW MODE screen Item MID GAIN P2 TAPE HIGH GAIN P2 TAPE ATW P2 TAPE HANDLE ZOOM P2 TAPE IRIS DIAL P2 TAPE Display mode Description of settings ...disabled when set to the 1/2/3 position. L/OFF/H: Sets LOW (low speed)/OFF/HIGH (high speed) to the 1/2/3 position. (Zoom is set to OFF.) L/M/H: Sets LOW (low speed)/MID (medium speed)/HIGH (high speed) to the AUTO/MANUAL switch or USER button, the operation remains effective. Ach: Activates the ATW function...
... of the IRIS dial. (In MANUAL IRIS mode) DOWN OPEN: The iris opens when the IRIS dial is set to B. Setup menu list (continued) SW MODE screen Item MID GAIN P2 TAPE HIGH GAIN P2 TAPE ATW P2 TAPE HANDLE ZOOM P2 TAPE IRIS DIAL P2 TAPE Display mode Description of settings ...disabled when set to the 1/2/3 position. L/OFF/H: Sets LOW (low speed)/OFF/HIGH (high speed) to the 1/2/3 position. (Zoom is set to OFF.) L/M/H: Sets LOW (low speed)/MID (medium speed)/HIGH (high speed) to the AUTO/MANUAL switch or USER button, the operation remains effective. Ach: Activates the ATW function...
P2 Camcoder
Page 105
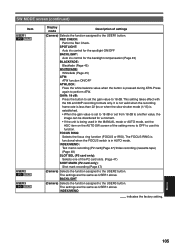
SW MODE screen (continued) Item USER1 P2 TAPE USER2 P2 TAPE USER3 P2 TAPE Display mode Description of the setting menu to OFF to use this function. ...) ATW: ATW function ON/OFF ATWLOCK: Fixes the white balance value when the button is in the MANUAL mode or AUTO mode, set the gain value to the USER3 button. INDEX/MEMO: Text memo recording... (P2 card)(Page 47)/Index recording (cassette tape) (Page 48) SLOT SEL (P2 card only): Selects one of the P2 card slots. (Page 47) SHOT MARK (P2 card only): Shot mark recording (Page 47) (Camera)...
SW MODE screen (continued) Item USER1 P2 TAPE USER2 P2 TAPE USER3 P2 TAPE Display mode Description of the setting menu to OFF to use this function. ...) ATW: ATW function ON/OFF ATWLOCK: Fixes the white balance value when the button is in the MANUAL mode or AUTO mode, set the gain value to the USER3 button. INDEX/MEMO: Text memo recording... (P2 card)(Page 47)/Index recording (cassette tape) (Page 48) SLOT SEL (P2 card only): Selects one of the P2 card slots. (Page 47) SHOT MARK (P2 card only): Shot mark recording (Page 47) (Camera)...
P2 Camcoder
Page 120
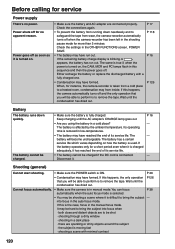
... from wear, the camera-recorder automatically turns off . If this sequence and then the power goes off when the camera-recorder has been left in manual mode. Power shuts off as soon as it . Check the connections again. • To prevent the battery from running down quickly. Either recharge ...The battery runs down needlessly and to remove the tape. The battery will be shot · shooting through a dirty window · shooting in the manual focus mode. The battery has a certain service life which varies depending on how the battery is turned on , the CAM, MCR and PC lamps ...
... from wear, the camera-recorder automatically turns off . If this sequence and then the power goes off when the camera-recorder has been left in manual mode. Power shuts off as soon as it . Check the connections again. • To prevent the battery from running down quickly. Either recharge ...The battery runs down needlessly and to remove the tape. The battery will be shot · shooting through a dirty window · shooting in the manual focus mode. The battery has a certain service life which varies depending on how the battery is turned on , the CAM, MCR and PC lamps ...

P2 Camcoder
Page 134
... inches x 15-3/8 inches) [Camera] Pickup devices CCD image sensor (x3) (1/3-inch, interline transfer, progressive-capable) Lens LEICA DICOMAR Optical image stabilizer lens, Motorized/Manual selectable 13x zoom, F1.6 to 2.8 (f = 4.2 mm to 55 mm) (35 mm equivalent: 30.3 mm to 394 mm) Color separation optical system Prism ...+12 dB with a shutter speed of 1/24) Lens hood Large-sized lens hood with wide angle of view Filter diameter 82 mm [VIDEO P2] (DVCPRO HD 1080i 720P) Sampling frequency Y: 74.25 MHz, PB/PR: 37.125 MHz Quantizing 8 bit Video compression system DCT + variable-length code Video ...
... inches x 15-3/8 inches) [Camera] Pickup devices CCD image sensor (x3) (1/3-inch, interline transfer, progressive-capable) Lens LEICA DICOMAR Optical image stabilizer lens, Motorized/Manual selectable 13x zoom, F1.6 to 2.8 (f = 4.2 mm to 55 mm) (35 mm equivalent: 30.3 mm to 394 mm) Color separation optical system Prism ...+12 dB with a shutter speed of 1/24) Lens hood Large-sized lens hood with wide angle of view Filter diameter 82 mm [VIDEO P2] (DVCPRO HD 1080i 720P) Sampling frequency Y: 74.25 MHz, PB/PR: 37.125 MHz Quantizing 8 bit Video compression system DCT + variable-length code Video ...

