P2 Camcoder
Page 6
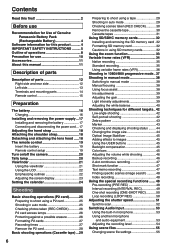
... battery 19 Remote control setup 19 Turn on/off the camera 20 Tally lamp 20 Viewfinder 21 Using the viewfinder 21 Using the LCD 22 Emphasizing outlines 22 Adjusting the screen display 23 Setting the calendar 24 Shooting Basic shooting operations (P2 card 25 Preparing to shoot using a P2 card 25 Shooting in auto mode 25 Checking photos taken (REC CHECK 26 P2 card access lamps 26 Protecting against a possible erasure 26 Formatting P2 cards 27 Recording times 27 Remove the P2 card 28 Basic shooting operations (Cassette tape) ... 29 Preparing to shoot using a tape 29 Shooting...
... battery 19 Remote control setup 19 Turn on/off the camera 20 Tally lamp 20 Viewfinder 21 Using the viewfinder 21 Using the LCD 22 Emphasizing outlines 22 Adjusting the screen display 23 Setting the calendar 24 Shooting Basic shooting operations (P2 card 25 Preparing to shoot using a P2 card 25 Shooting in auto mode 25 Checking photos taken (REC CHECK 26 P2 card access lamps 26 Protecting against a possible erasure 26 Formatting P2 cards 27 Recording times 27 Remove the P2 card 28 Basic shooting operations (Cassette tape) ... 29 Preparing to shoot using a tape 29 Shooting...

P2 Camcoder
Page 7
...(P2 card / Tape)...... 75 Clip skip (P2 card 75 End search (Tape 75 Index search (Tape 76 Adjusting the volume (P2 card / Tape 76 Viewing images on a television (P2 card / Tape 76 Checking the date and time (P2 card / Tape) .. 76 Editing Connecting external units 77 Headphones 77 External microphone 77 Computer (non-linear editing/file transfer) ....... 78 Hard disk drive (data copying 78 Digital video equipment (Dubbing 79 Video deck (Dubbing 80 TV/Monitor (playback/dubbing 80 Audio dubbing 81 Nonlinear editing with P2 card (PC mode) ... 83 Copying from P2 cards to the hard disk...
...(P2 card / Tape)...... 75 Clip skip (P2 card 75 End search (Tape 75 Index search (Tape 76 Adjusting the volume (P2 card / Tape 76 Viewing images on a television (P2 card / Tape 76 Checking the date and time (P2 card / Tape) .. 76 Editing Connecting external units 77 Headphones 77 External microphone 77 Computer (non-linear editing/file transfer) ....... 78 Hard disk drive (data copying 78 Digital video equipment (Dubbing 79 Video deck (Dubbing 80 TV/Monitor (playback/dubbing 80 Audio dubbing 81 Nonlinear editing with P2 card (PC mode) ... 83 Copying from P2 cards to the hard disk...
P2 Camcoder
Page 8
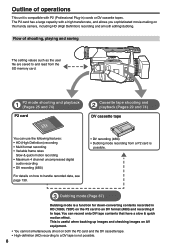
... user file are saved to and read from a P2 card is possible. 3 Dubbing mode (Page 87) Dubbing mode is a function for down-converting contents recorded in ) cards or DV cassette tapes. The P2 card has a large capacity with P2 (Professional Plug-in HD (1080i, 720P) on the P2 card to an DV format (480i) and recording it to handle recorded data, see page 130. • DV recording (480i) • Dubbing mode recording from the SD memory card. 1 P2 mode shooting and playback...
... user file are saved to and read from a P2 card is possible. 3 Dubbing mode (Page 87) Dubbing mode is a function for down-converting contents recorded in ) cards or DV cassette tapes. The P2 card has a large capacity with P2 (Professional Plug-in HD (1080i, 720P) on the P2 card to an DV format (480i) and recording it to handle recorded data, see page 130. • DV recording (480i) • Dubbing mode recording from the SD memory card. 1 P2 mode shooting and playback...

P2 Camcoder
Page 27
...://eww.pavc.panasonic.co.jp/pro-av/ 27 approx. 8 min. approx. 32 min. When you are displayed. 2 Press the MENU button. Formatting P2 cards 1 Press the mode button and set it to MCR mode (the MCR/VCR lamp lights). • Thumbnails are using P2 cards, you can operate them as the one shown below appears. Recording times DVCPRO/DV Card model Capacity 2-channel audio DVCPRO50 4-channel audio DVCPRO HD∗1 DVCPRO HD 720P/24PN DVCPRO HD 720P/30PN...
...://eww.pavc.panasonic.co.jp/pro-av/ 27 approx. 8 min. approx. 32 min. When you are displayed. 2 Press the MENU button. Formatting P2 cards 1 Press the mode button and set it to MCR mode (the MCR/VCR lamp lights). • Thumbnails are using P2 cards, you can operate them as the one shown below appears. Recording times DVCPRO/DV Card model Capacity 2-channel audio DVCPRO50 4-channel audio DVCPRO HD∗1 DVCPRO HD 720P/24PN DVCPRO HD 720P/30PN...
P2 Camcoder
Page 39
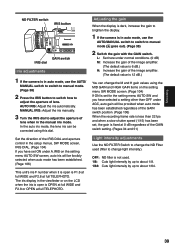
... F number when it is open is OPEN at full WIDE and F2.8 or OPEN at full TELEPHOTO. Shooting ND FILTER switch IRIS button GAIN switch IRIS dial Iris adjustments 1 If the camera is in auto mode, use the AUTO/ MANUAL switch to switch to manual mode. (Page 38) 2 Press the IRIS button to switch how to adjust the aperture of lens. Set the direction of the IRIS DIAL and aperture control in the setup menus, SW MODE screen, IRIS...
... F number when it is open is OPEN at full WIDE and F2.8 or OPEN at full TELEPHOTO. Shooting ND FILTER switch IRIS button GAIN switch IRIS dial Iris adjustments 1 If the camera is in auto mode, use the AUTO/ MANUAL switch to switch to manual mode. (Page 38) 2 Press the IRIS button to switch how to adjust the aperture of lens. Set the direction of the IRIS DIAL and aperture control in the setup menus, SW MODE screen, IRIS...
P2 Camcoder
Page 46
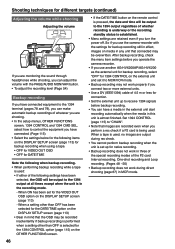
... the OTHER FUNCTIONS screen. • If the DATE/TIME button on the remote control is pressed, the date and time will be output to "CHAIN". • Note that images are recorded even when you perform a rec check if a P2 card is being used: When a tape is used : • If either of the following when backup recording. • When performing backup recording while a tape is used , no images are output during direct shooting (page 67) in MCR mode. 46...
... the OTHER FUNCTIONS screen. • If the DATE/TIME button on the remote control is pressed, the date and time will be output to "CHAIN". • Note that images are recorded even when you perform a rec check if a P2 card is being used: When a tape is used : • If either of the following when backup recording. • When performing backup recording while a tape is used , no images are output during direct shooting (page 67) in MCR mode. 46...
P2 Camcoder
Page 48
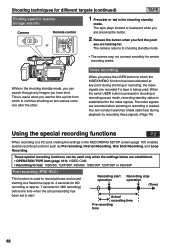
... recording functions can conduct searches (index searches) during shooting or recording, the index signals are recorded when shooting or recording is useful when you are established. • OPERATION TYPE item (page 101): VIDEO CAM • Recording format: 1080i/60i, 720P/60P, 480i/60i, 1080i/30P, 720P/30P or 480i/30P Pre-recording (PRE REC) This function is established for certain recording states. The camera returns to start operation Recording stop operation (Time) Actual recording time Pre-recording time 48 The tape plays...
... recording functions can conduct searches (index searches) during shooting or recording, the index signals are recorded when shooting or recording is useful when you are established. • OPERATION TYPE item (page 101): VIDEO CAM • Recording format: 1080i/60i, 720P/60P, 480i/60i, 1080i/30P, 720P/30P or 480i/30P Pre-recording (PRE REC) This function is established for certain recording states. The camera returns to start operation Recording stop operation (Time) Actual recording time Pre-recording time 48 The tape plays...
P2 Camcoder
Page 49
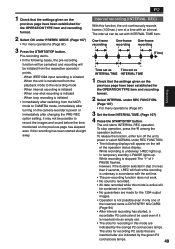
... a time with the set time. • The pre-recording function does not work. • No sound is recorded. • All data recorded while this mode are indicated by the green P2 card access lamps. 49 The interval can be possible to the recording mode · When interval recording is initiated · When one of the operation status display. To stop operation, press the among the operation buttons. In temporary standby: I -REC lights up . 1 Check that the settings...
... a time with the set time. • The pre-recording function does not work. • No sound is recorded. • All data recorded while this mode are indicated by the green P2 card access lamps. 49 The interval can be possible to the recording mode · When interval recording is initiated · When one of the operation status display. To stop operation, press the among the operation buttons. In temporary standby: I -REC lights up . 1 Check that the settings...
P2 Camcoder
Page 50
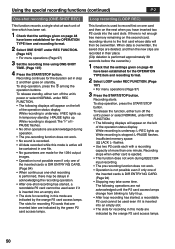
... mode are made for the OPERATION TYPE item and recording format. 2 Select ONE SHOT under REC FUNCTION. (Page 107) • For menu operations (Page 97) 3 Set the recording time using ONE-SHOT TIME. (Page 107) 4 Press the START/STOP button. If there is stopped: L-PAUSE flashes. Recording continues for the duration set . 1 Check that the settings given on page 48 have been established for recording P2 cards that are inserted later are not acknowledged until the P2 card access...
... mode are made for the OPERATION TYPE item and recording format. 2 Select ONE SHOT under REC FUNCTION. (Page 107) • For menu operations (Page 97) 3 Set the recording time using ONE-SHOT TIME. (Page 107) 4 Press the START/STOP button. If there is stopped: L-PAUSE flashes. Recording continues for the duration set . 1 Check that the settings given on page 48 have been established for recording P2 cards that are inserted later are not acknowledged until the P2 card access...
P2 Camcoder
Page 54
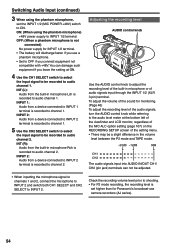
... recording level of the sound for INPUT 1/2 terminal. • The battery will discharge faster if you use camera recorders (AJ series). 54 OFF: (When a phantom microphone is recorded to channel 1. INT (R): Audio from the built-in microphone Lch is set the INPUT 1/2 (MIC POWER +48V) switch to ON. Check the recording volume level prior to shooting. • For P2 mode recording, the recording level is recorded to audio channel 1. ON: (When using the phantom microphone, set higher than for Panasonic's broadcast-use a phantom microphone. • Set...
... recording level of the sound for INPUT 1/2 terminal. • The battery will discharge faster if you use camera recorders (AJ series). 54 OFF: (When a phantom microphone is recorded to channel 1. INT (R): Audio from the built-in microphone Lch is set the INPUT 1/2 (MIC POWER +48V) switch to ON. Check the recording volume level prior to shooting. • For P2 mode recording, the recording level is recorded to audio channel 1. ON: (When using the phantom microphone, set higher than for Panasonic's broadcast-use a phantom microphone. • Set...
P2 Camcoder
Page 60
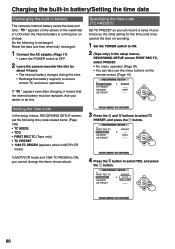
...; TCG • FIRST REC TC (Tape only) • TC PRESET • 1394 TC REGEN (appears when in battery The camera's internal battery saves the date and time. Setting the time code In the setup menus, RECORDING SETUP screen, set the following to recharge it means that the internal battery must be used at OFF. 2 Leave the camera-recorder like this . Charging the built-in battery/Setting the time data Recharging the built-in MCR/VCR mode) 3 Press the and...
...; TCG • FIRST REC TC (Tape only) • TC PRESET • 1394 TC REGEN (appears when in battery The camera's internal battery saves the date and time. Setting the time code In the setup menus, RECORDING SETUP screen, set the following to recharge it means that the internal battery must be used at OFF. 2 Leave the camera-recorder like this . Charging the built-in battery/Setting the time data Recharging the built-in MCR/VCR mode) 3 Press the and...
P2 Camcoder
Page 65
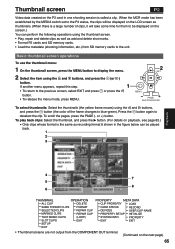
... thumbnail screen, press the MENU button to display the menu. 2 Select the item using the and buttons, and press the button (the color of clips, it will take some time for them to be played back. 1 2 3 Playback 4 7 5 8 6 THUMBNAIL OPERATION ALL CLIP DELETE SAME FORMAT CLIPS FORMAT SELECTED CLIPS REPAIR CLIP MARKED CLIPS REPAIR CLIP TEXT MEMO CLIPS (LOOP) SLOT CLIPS EXIT SETUP EXIT PROPERTY META DATA CLIP PROPERTY LOAD CARD STATUS RECORD DEVICES USER...
... thumbnail screen, press the MENU button to display the menu. 2 Select the item using the and buttons, and press the button (the color of clips, it will take some time for them to be played back. 1 2 3 Playback 4 7 5 8 6 THUMBNAIL OPERATION ALL CLIP DELETE SAME FORMAT CLIPS FORMAT SELECTED CLIPS REPAIR CLIP MARKED CLIPS REPAIR CLIP TEXT MEMO CLIPS (LOOP) SLOT CLIPS EXIT SETUP EXIT PROPERTY META DATA CLIP PROPERTY LOAD CARD STATUS RECORD DEVICES USER...
P2 Camcoder
Page 83
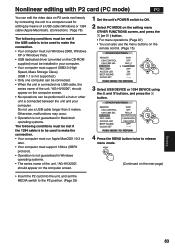
.... USB DEVICE 4 Press the MENU button twice to ON. 2 Select PC MODE on the setting menu OTHER FUNCTIONS screen, and press the (or ) button. • For menu operations (Page 97) • You can also use a USB cable longer than 3 meters. Nonlinear editing with P2 card (PC mode) P2 You can edit the video data on P2 cards nonlinearly by connecting the unit to a computer used for editing by means of a USB cable (Windows) or 1394 cable (Apple Macintosh). (Connections : Page...
.... USB DEVICE 4 Press the MENU button twice to ON. 2 Select PC MODE on the setting menu OTHER FUNCTIONS screen, and press the (or ) button. • For menu operations (Page 97) • You can also use a USB cable longer than 3 meters. Nonlinear editing with P2 card (PC mode) P2 You can edit the video data on P2 cards nonlinearly by connecting the unit to a computer used for editing by means of a USB cable (Windows) or 1394 cable (Apple Macintosh). (Connections : Page...
P2 Camcoder
Page 88
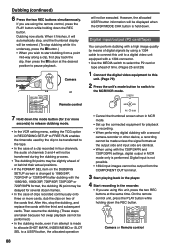
.... • Use the MEDIA switch to select the P2 card or tape ahead of time. (Pages 25 and 29) 1 Connect the digital video equipment to this unit, press the two REC buttons at the output side and input side are using the remote control, press the PLAY button while holding down . REC COUNTER RESET TITLE ZOOM MULTI/ P-IN-P REC A.DUB ÐVOL + /REW PLAY FF/ STILL ADV PAUSE STILL ADV INDEX STOP INDEX Camera or Remote control 88 Digital input/output (P2 card/Tape) You...
.... • Use the MEDIA switch to select the P2 card or tape ahead of time. (Pages 25 and 29) 1 Connect the digital video equipment to this unit, press the two REC buttons at the output side and input side are using the remote control, press the PLAY button while holding down . REC COUNTER RESET TITLE ZOOM MULTI/ P-IN-P REC A.DUB ÐVOL + /REW PLAY FF/ STILL ADV PAUSE STILL ADV INDEX STOP INDEX Camera or Remote control 88 Digital input/output (P2 card/Tape) You...
P2 Camcoder
Page 92
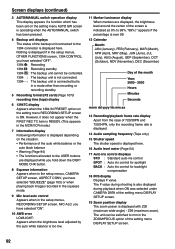
... Shutter speed The shutter speed is too low. 11 Marker luminance display When markers are displayed while you hold down the DISP/ MODE CHK button. 8 Squeeze information Appears when in the setup menus, CAMERA SETUP screen, ASPECT CONV, you have selected "SQUEEZE" (page 103) or when playing back images recorded in the squeeze mode. 9 Mic level auto control Appears when in the setup menus, RECORDING SETUP screen, MIC ALC, you have selected "ON". 10 AWB error...
... Shutter speed The shutter speed is too low. 11 Marker luminance display When markers are displayed while you hold down the DISP/ MODE CHK button. 8 Squeeze information Appears when in the setup menus, CAMERA SETUP screen, ASPECT CONV, you have selected "SQUEEZE" (page 103) or when playing back images recorded in the squeeze mode. 9 Mic level auto control Appears when in the setup menus, RECORDING SETUP screen, MIC ALC, you have selected "ON". 10 AWB error...

P2 Camcoder
Page 93
... stopped) A. Also, the remaining memory is not displayed during tape playback as follows: When the battery has completely discharged, ( ) blinks. (When the AC adapter is locked 27 Displays marker During shooting, pressing the ZEBRA button once or twice will display the marker. 28 Optical Image Stabilizer ( ) display [ ] also appears during slow playback using tape. 25 AWB operation display The white balance operation is displayed.) When the CAMERA DATA option on the next page) Displays 93 20 Focus control display Displays the focus control...
... stopped) A. Also, the remaining memory is not displayed during tape playback as follows: When the battery has completely discharged, ( ) blinks. (When the AC adapter is locked 27 Displays marker During shooting, pressing the ZEBRA button once or twice will display the marker. 28 Optical Image Stabilizer ( ) display [ ] also appears during slow playback using tape. 25 AWB operation display The white balance operation is displayed.) When the CAMERA DATA option on the next page) Displays 93 20 Focus control display Displays the focus control...
P2 Camcoder
Page 95
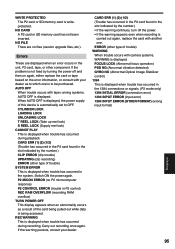
... PLAY This is writeprotected. Errors These are no P2 microcomputer response) P2 CONTROL ERROR (trouble in the system. When AUTO OFF is displayed, the power supply of trouble) WARNING When trouble occurs with your dealer. CARD ERR (1) (2) (1/2) (Trouble has occurred in the P2 card found in the unit, P2 card, tape, or other type of this device is being pulled out while data is automatically set to OFF. P2 MICON ERROR (no files (version upgrade files, etc.). FOCUS LOCK...
... PLAY This is writeprotected. Errors These are no P2 microcomputer response) P2 CONTROL ERROR (trouble in the system. When AUTO OFF is displayed, the power supply of trouble) WARNING When trouble occurs with your dealer. CARD ERR (1) (2) (1/2) (Trouble has occurred in the P2 card found in the unit, P2 card, tape, or other type of this device is being pulled out while data is automatically set to OFF. P2 MICON ERROR (no files (version upgrade files, etc.). FOCUS LOCK...
P2 Camcoder
Page 96
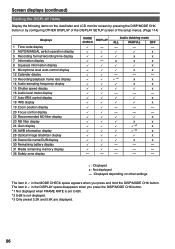
... and LCD monitor screen by pressing the DISP/MODE CHK button or by configuring OTHER DISPLAY of the DISPLAY SETUP screen of the setup menus. (Page 114) Displays 1 Time code display 3 AUTO/MANUAL switch operation display 5 Recording format/recording time display 7 Information display 8 Squeeze information display 9 Microphone level auto-control display 12 Calendar display 13 Recording/playback frame rate display 14 Audio-sampling frequency display 15 Shutter speed display 16 Audio level meter display 17 Auto-IRIS control display 18 IRIS display 19 Zoom position display 20 Focus control display...
... and LCD monitor screen by pressing the DISP/MODE CHK button or by configuring OTHER DISPLAY of the DISPLAY SETUP screen of the setup menus. (Page 114) Displays 1 Time code display 3 AUTO/MANUAL switch operation display 5 Recording format/recording time display 7 Information display 8 Squeeze information display 9 Microphone level auto-control display 12 Calendar display 13 Recording/playback frame rate display 14 Audio-sampling frequency display 15 Shutter speed display 16 Audio level meter display 17 Auto-IRIS control display 18 IRIS display 19 Zoom position display 20 Focus control display...
P2 Camcoder
Page 108
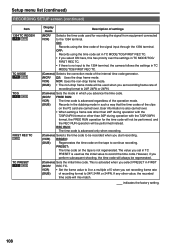
... signal input through the 1394 terminal. This is not regenerated. indicates the factory setting. 108 Setup menu list (continued) RECORDING SETUP screen (continued) Item 1394 TC REGEN P2 TAPE TC MODE P2 TAPE TCG P2 TAPE FIRST REC TC TAPE TC PRESET P2 TAPE Display mode Description of settings (MCR/ VCR) Selects the time code used as the initial value to record the time code. If any other than 30P during operation with the 720P/30PN format, the FREE RUN operation for recording the...
... signal input through the 1394 terminal. This is not regenerated. indicates the factory setting. 108 Setup menu list (continued) RECORDING SETUP screen (continued) Item 1394 TC REGEN P2 TAPE TC MODE P2 TAPE TCG P2 TAPE FIRST REC TC TAPE TC PRESET P2 TAPE Display mode Description of settings (MCR/ VCR) Selects the time code used as the initial value to record the time code. If any other than 30P during operation with the 720P/30PN format, the FREE RUN operation for recording the...
P2 Camcoder
Page 122
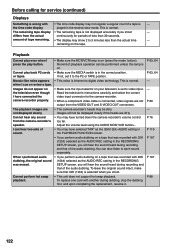
.... Adjust the volume level using the AUDIO MON/ VAR button+. • You may have connected the camera-recorder properly. played in the RECORDING SETUP screen, you will hear the sound heard during recording and that was erased. Cannot play even when I cue or review a tape. P 63, 64 P 63, 64 - - P 80 - If not, set to 3 minutes less than 30 seconds. Read the television's instructions carefully and select the correct video input connector for service (continued) Displays...
.... Adjust the volume level using the AUDIO MON/ VAR button+. • You may have connected the camera-recorder properly. played in the RECORDING SETUP screen, you will hear the sound heard during recording and that was erased. Cannot play even when I cue or review a tape. P 63, 64 P 63, 64 - - P 80 - If not, set to 3 minutes less than 30 seconds. Read the television's instructions carefully and select the correct video input connector for service (continued) Displays...


