Dvc Camcorder
Page 1
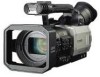
Preparation Description of Before use F0805S0 -H ENGLISH VQT0U08 Shooting Playback Editing Displays Menus Reference Before operating this product, please read the instructions carefully and save this manual for future use parts Operating Instructions Camera-Recorder Model No. AG- P .
Preparation Description of Before use F0805S0 -H ENGLISH VQT0U08 Shooting Playback Editing Displays Menus Reference Before operating this product, please read the instructions carefully and save this manual for future use parts Operating Instructions Camera-Recorder Model No. AG- P .

Dvc Camcorder
Page 2
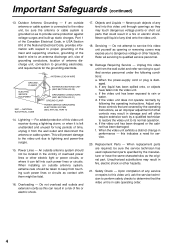
...PREVENT ELECTRIC SHOCK, MATCH WIDE BLADE OF PLUG TO WIDE SLOT, FULLY INSERT. Warning: To assure continued FCC emission limit compliance, the user must use . For Remote Controller • Replace battery with the instruction manual, may be required to constitute a risk of this unit in a bookcase, ... alert the user to the presence of important operating and maintenance (servicing) instructions in temperatures over 140°F (60°C). • Use specified charger for a class A digital device, pursuant to Part 15 of electric shock or fire hazard due to overheating, ensure that may...
...PREVENT ELECTRIC SHOCK, MATCH WIDE BLADE OF PLUG TO WIDE SLOT, FULLY INSERT. Warning: To assure continued FCC emission limit compliance, the user must use . For Remote Controller • Replace battery with the instruction manual, may be required to constitute a risk of this unit in a bookcase, ... alert the user to the presence of important operating and maintenance (servicing) instructions in temperatures over 140°F (60°C). • Use specified charger for a class A digital device, pursuant to Part 15 of electric shock or fire hazard due to overheating, ensure that may...

Dvc Camcorder
Page 3
.... The 3-wire grounding type plug will fit into a grounding type power outlet. Important Safeguards 1. Read Instructions - Follow Instructions - Cleaning - Use a dry cloth for ventilation and to ensure reliable operation of plugs, convenience receptacles, and the point where they exit from battery power, or...video unit near or over a radiator or heat register. The video unit may cause the appliance and cart combination to the unit. Use only with a cart, stand, tripod, bracket, or table recommended by the manufacturer. Any mounting of the unit should follow the ...
.... The 3-wire grounding type plug will fit into a grounding type power outlet. Important Safeguards 1. Read Instructions - Follow Instructions - Cleaning - Use a dry cloth for ventilation and to ensure reliable operation of plugs, convenience receptacles, and the point where they exit from battery power, or...video unit near or over a radiator or heat register. The video unit may cause the appliance and cart combination to the unit. Use only with a cart, stand, tripod, bracket, or table recommended by the manufacturer. Any mounting of the unit should follow the ...
Dvc Camcorder
Page 4
... or removing covers may result in USA Section 810 of the National Electrical Code, provides information with them might be sure the service technician has used replacement parts specified by following conditions: a. Adjust only those controls that are required, be fatal. 16. f. When installing an outside antenna or cable system is...
... or removing covers may result in USA Section 810 of the National Electrical Code, provides information with them might be sure the service technician has used replacement parts specified by following conditions: a. Adjust only those controls that are required, be fatal. 16. f. When installing an outside antenna or cable system is...
Dvc Camcorder
Page 5
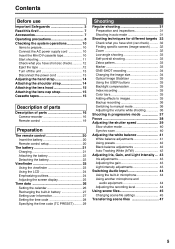
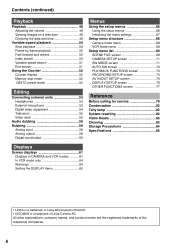
... battery 20 Remote control setup 20 The battery 21 Charging 21 Attaching the battery 22 Detaching the battery 22 Viewfinder 23 Using the viewfinder 23 Using the LCD 24 Emphasizing outlines 24 Adjusting the screen display 25 Time data 26 Setting the calendar 26 Recharging the built-... 37 Focus 38 Adjusting the shutter speed 39 Slow shutter mode 40 Synchro scan 40 Adjusting the white balance 41 White balance adjustments 41 Using presets 42 Black balance adjustments 42 Auto Tracking White (ATW 42 Adjusting Iris, Gain, and Light Intensity ... 43 Iris adjustments 43 Adjusting...
... battery 20 Remote control setup 20 The battery 21 Charging 21 Attaching the battery 22 Detaching the battery 22 Viewfinder 23 Using the viewfinder 23 Using the LCD 24 Emphasizing outlines 24 Adjusting the screen display 25 Time data 26 Setting the calendar 26 Recharging the built-... 37 Focus 38 Adjusting the shutter speed 39 Slow shutter mode 40 Synchro scan 40 Adjusting the white balance 41 White balance adjustments 41 Using presets 42 Black balance adjustments 42 Auto Tracking White (ATW 42 Adjusting Iris, Gain, and Light Intensity ... 43 Iris adjustments 43 Adjusting...
Dvc Camcorder
Page 6
...Frame-by-frame playback 50 Fast-forward and rewind 50 Index search 50 Variable speed search 51 End search 51 Using the Counter 52 Counter display 52 Memory stop mode 52 1394TC preset mode 52 Editing Connecting external units 53 ... 55 Audio dubbing 56 Dubbing 58 Analog input 58 Analog output 59 Digital input/output 60 Menus Using the setup menus 66 Using the setup menus 66 Initializing the menu settings 67 Setup menu structure 68 Camera mode menu 68 ... companies. 6 All other explanations, company names, and product names are the registered trademarks of Leica Camera AG.
...Frame-by-frame playback 50 Fast-forward and rewind 50 Index search 50 Variable speed search 51 End search 51 Using the Counter 52 Counter display 52 Memory stop mode 52 1394TC preset mode 52 Editing Connecting external units 53 ... 55 Audio dubbing 56 Dubbing 58 Analog input 58 Analog output 59 Digital input/output 60 Menus Using the setup menus 66 Using the setup menus 66 Initializing the menu settings 67 Setup menu structure 68 Camera mode menu 68 ... companies. 6 All other explanations, company names, and product names are the registered trademarks of Leica Camera AG.
Dvc Camcorder
Page 7
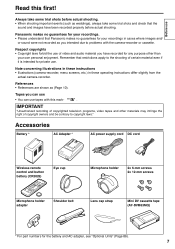
References • References are shown as you intended due to copyright laws." Panasonic makes no guarantees for your recordings. • Please understand that Panasonic makes no guarantees for private use. Remember that the sound and images have recorded for the battery and AC adapter, see...television programs, video tapes and other than your recordings in these operating instructions differ slightly from the actual camera-recorder. Before use Read this mark- . Accessories Battery * AC Adapter * AC power supply cord DC cord Wireless remote control and button battery...
References • References are shown as you intended due to copyright laws." Panasonic makes no guarantees for your recordings. • Please understand that Panasonic makes no guarantees for private use. Remember that the sound and images have recorded for the battery and AC adapter, see...television programs, video tapes and other than your recordings in these operating instructions differ slightly from the actual camera-recorder. Before use Read this mark- . Accessories Battery * AC Adapter * AC power supply cord DC cord Wireless remote control and button battery...
Dvc Camcorder
Page 8
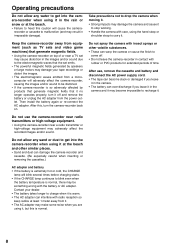
... carry it in the camera. • The battery can interfere with the battery or AC adapter. Do not spray the camera with care, using the hand strap or shoulder strap to malfunction (and may result in irreparable damage). Contact your tape recordings or distort the images. • ...The electromagnetic waves emitted from equip- Do not use , remove the cassette and battery and disconnect the AC power supply cord. • The tape can become slack or damaged if you leave it ...
... carry it in the camera. • The battery can interfere with the battery or AC adapter. Do not spray the camera with care, using the hand strap or shoulder strap to malfunction (and may result in irreparable damage). Contact your tape recordings or distort the images. • ...The electromagnetic waves emitted from equip- Do not use , remove the cassette and battery and disconnect the AC power supply cord. • The tape can become slack or damaged if you leave it ...
Dvc Camcorder
Page 9
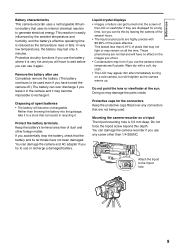
... Mounting the camera-recorder on a cold camera, but you accidentally drop the battery, check that the battery and its internal chemical reaction to use or recharge a damaged battery. Keep the battery's terminal area free of the LCD or viewfinder if they are highly precise with a soft,... the tripod to recharge it again. This reaction is easily influenced by leaving the camera off .) The battery can use it . Protective circuitry functions if you use the battery where it is very hot and you try to generate electrical energy. Rather than 1/4-20UNC. Liquid crystal ...
... Mounting the camera-recorder on a cold camera, but you accidentally drop the battery, check that the battery and its internal chemical reaction to use or recharge a damaged battery. Keep the battery's terminal area free of the LCD or viewfinder if they are highly precise with a soft,... the tripod to recharge it again. This reaction is easily influenced by leaving the camera off .) The battery can use it . Protective circuitry functions if you use the battery where it is very hot and you try to generate electrical energy. Rather than 1/4-20UNC. Liquid crystal ...
Dvc Camcorder
Page 11
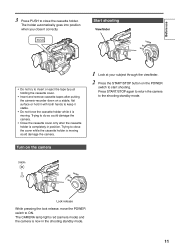
... to close the cover while the cassette holder is now in position. The CAMERA lamp lights red (camera mode) and the camera is moving . Before use 3 Press PUSH to close it is completely in the shooting standby mode. 11 The holder automatically goes into position when you close the cassette holder...
... to close the cover while the cassette holder is now in position. The CAMERA lamp lights red (camera mode) and the camera is moving . Before use 3 Press PUSH to close it is completely in the shooting standby mode. 11 The holder automatically goes into position when you close the cassette holder...
Dvc Camcorder
Page 13
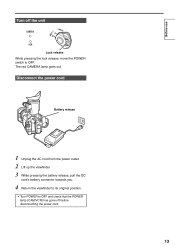
Before use Turn off the unit CAMERA POWER ON OFF VCR Lock release While pressing the lock release, move the POWER switch to OFF and check that the POWER lamp (CAM/VCR) has gone off before disconnecting the power cord. 13 The red CAMERA lamp goes out. Disconnect the power cord Battery release 1 Unplug the AC cord from the power outlet. 2 Lift up the viewfinder. 3 While pressing the battery release, pull the DC cord's battery connector towards you. 4 Return the viewfinder to its original position. • Turn POWER to OFF.
Before use Turn off the unit CAMERA POWER ON OFF VCR Lock release While pressing the lock release, move the POWER switch to OFF and check that the POWER lamp (CAM/VCR) has gone off before disconnecting the power cord. 13 The red CAMERA lamp goes out. Disconnect the power cord Battery release 1 Unplug the AC cord from the power outlet. 2 Lift up the viewfinder. 3 While pressing the battery release, pull the DC cord's battery connector towards you. 4 Return the viewfinder to its original position. • Turn POWER to OFF.
Dvc Camcorder
Page 14
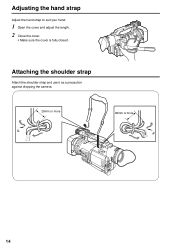
Attaching the shoulder strap Attach the shoulder strap and use it as a precaution against dropping the camera. 20mm or more 20mm or more 14 Adjusting the hand strap Adjust the hand strap to suit your hand. 1 Open the cover and adjust the length. 2 Close the cover. • Make sure the cover is fully closed.
Attaching the shoulder strap Attach the shoulder strap and use it as a precaution against dropping the camera. 20mm or more 20mm or more 14 Adjusting the hand strap Adjust the hand strap to suit your hand. 1 Open the cover and adjust the length. 2 Close the cover. • Make sure the cover is fully closed.

Dvc Camcorder
Page 15
...the lens hood counterclockwise to SAVE. Block noise and feature limitations occur in the following mini DV cassette tapes with the screw. Cassette tapes g Use the following situations. • When you play a tape on other digital video equipment that you have shot in LP mode on this camera...detach it on other digital video equipment that you have an LP mode. • During slow motion or still-picture playback • When using the camera's search functions g Audio dubbing cannot be other digital video equipment. • When you may notice some block noise and there may...
...the lens hood counterclockwise to SAVE. Block noise and feature limitations occur in the following mini DV cassette tapes with the screw. Cassette tapes g Use the following situations. • When you play a tape on other digital video equipment that you have shot in LP mode on this camera...detach it on other digital video equipment that you have an LP mode. • During slow motion or still-picture playback • When using the camera's search functions g Audio dubbing cannot be other digital video equipment. • When you may notice some block noise and there may...

Dvc Camcorder
Page 19
... RESET button on the main unit. 5 A.DUB button Same function as the AUDIO DUB button on the main unit. 6 REC button (Pages 58 and 60) (Used during VCR mode) 7 PLAY button (q)(Page 48) 8 /REW button (t)(Page 48) 9 PAUSE button (h)(Page 48) 10 STILL ADV button ( , )(Page 50) 11 INDEX buttons (u, i)(Page...
... RESET button on the main unit. 5 A.DUB button Same function as the AUDIO DUB button on the main unit. 6 REC button (Pages 58 and 60) (Used during VCR mode) 7 PLAY button (q)(Page 48) 8 /REW button (t)(Page 48) 9 PAUSE button (h)(Page 48) 10 STILL ADV button ( , )(Page 50) 11 INDEX buttons (u, i)(Page...
Dvc Camcorder
Page 20
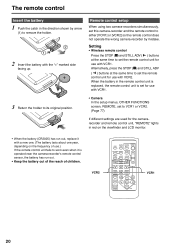
... VCR1. Alternatively, press the STOP (g) and STILL ADV ( ) buttons at the same time to set the remote control unit for use .) If the remote control unit fails to work even when it is operated near the camera-recorder's remote control sensor, the battery has run out, ... VCR2. VCR2 OSD START/ DATE/ PHOTO STOP TIME SHOT - Remote control setup When using two camera-recorders simultaneously, set to VCR1 or VCR2. (Page 77) If different settings are used for use with VCR1. • Camera In the setup menus, OTHER FUNCTIONS screen, REMOTE, set this camera-recorder and the remote control to...
... VCR1. Alternatively, press the STOP (g) and STILL ADV ( ) buttons at the same time to set the remote control unit for use .) If the remote control unit fails to work even when it is operated near the camera-recorder's remote control sensor, the battery has run out, ... VCR2. VCR2 OSD START/ DATE/ PHOTO STOP TIME SHOT - Remote control setup When using two camera-recorders simultaneously, set to VCR1 or VCR2. (Page 77) If different settings are used for use with VCR1. • Camera In the setup menus, OTHER FUNCTIONS screen, REMOTE, set this camera-recorder and the remote control to...
Dvc Camcorder
Page 21
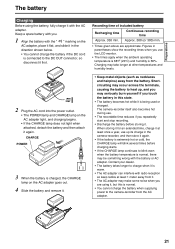
...lamp and CHARGE lamp on the AC adapter goes out. 4 Slide the battery and remove it. The camera-recorder itself also becomes hot during use. • The recordable time reduces if you repeatedly start and stop recording. • Discharge the battery before charging starts. • If ...the CHARGE lamp continues to blink even when the battery temperature is warm. • The AC adapter can interfere with you use up , and you may seriously burn yourself if you are approximate. Recording time of included battery Recharging time Continuous recording time Approx. 330 ...
...lamp and CHARGE lamp on the AC adapter goes out. 4 Slide the battery and remove it. The camera-recorder itself also becomes hot during use. • The recordable time reduces if you repeatedly start and stop recording. • Discharge the battery before charging starts. • If ...the CHARGE lamp continues to blink even when the battery temperature is warm. • The AC adapter can interfere with you use up , and you may seriously burn yourself if you are approximate. Recording time of included battery Recharging time Continuous recording time Approx. 330 ...

Dvc Camcorder
Page 23
... cup Projection 2 Adjust the viewfinder's angle so that you can move the view finder out to about 90° perpendicular to come off . Use the viewfinder that images appear in the viewfinder and the other is easiest to see. • You can see "Cleaning the Viewfinder" (Page 83...details on a TV monitor. Preparations Viewfinder This camera has two viewfinders; Viewfinder diopter dial Eye piece Do not point the viewfinder at the sun. Using the viewfinder 1 Set the POWER switch to refit it is a retractable 3.5-inch LCD. POWER ON OFF Fitting the eye cup Attach the eye cup...
... cup Projection 2 Adjust the viewfinder's angle so that you can move the view finder out to about 90° perpendicular to come off . Use the viewfinder that images appear in the viewfinder and the other is easiest to see. • You can see "Cleaning the Viewfinder" (Page 83...details on a TV monitor. Preparations Viewfinder This camera has two viewfinders; Viewfinder diopter dial Eye piece Do not point the viewfinder at the sun. Using the viewfinder 1 Set the POWER switch to refit it is a retractable 3.5-inch LCD. POWER ON OFF Fitting the eye cup Attach the eye cup...

Dvc Camcorder
Page 24
... to the open out to 120 degrees. This can open LCD. Press EVF DTL/END SEARCH again to return to open the LCD. Viewfinder (continued) Using the LCD 1 Set the POWER switch to ON. 2 Press the OPEN button in the same direction as this will damage the camera. EVF DTL/ END...
... to the open out to 120 degrees. This can open LCD. Press EVF DTL/END SEARCH again to return to open the LCD. Viewfinder (continued) Using the LCD 1 Set the POWER switch to ON. 2 Press the OPEN button in the same direction as this will damage the camera. EVF DTL/ END...
Dvc Camcorder
Page 25
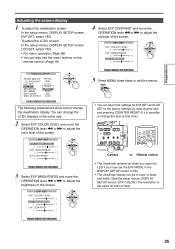
... [_] [ + ] EVF CONTRAST [_] [ + ] PUSH MENU TO RETURN 4 Select EVF CONTRAST and move the OPERATION lever t or y to change the viewfinder's display. MENU • You can also use the menu buttons on when you open the LCD if you have set the EVF MODE in the same way. 2 Select EVF COLOR LEVEL and...
... [_] [ + ] EVF CONTRAST [_] [ + ] PUSH MENU TO RETURN 4 Select EVF CONTRAST and move the OPERATION lever t or y to change the viewfinder's display. MENU • You can also use the menu buttons on when you open the LCD if you have set the EVF MODE in the same way. 2 Select EVF COLOR LEVEL and...

Dvc Camcorder
Page 26
.../FF SEL : PUSH PLAY/STOP PUSH MENU TO RETURN 5 Move the OPERATION lever t or y to set the year to 2005. MENU The clock can also use the menu buttons on December 25, 2005. 1 Set the POWER switch to ON. CLOCK SET YEAR 2005 MONTH DEC DAY 24 HOUR 13 MIN 7 +/- : PUSH... REW/FF SEL : PUSH PLAY/STOP PUSH MENU TO RETURN 6 Set DAY, HOUR, and MIN using the method shown in accuracy so check that the time is a 24-hour clock. POWER ON OFF 2 In the setup menus, OTHER FUNCTIONS screen, CLOCK...
.../FF SEL : PUSH PLAY/STOP PUSH MENU TO RETURN 5 Move the OPERATION lever t or y to set the year to 2005. MENU The clock can also use the menu buttons on December 25, 2005. 1 Set the POWER switch to ON. CLOCK SET YEAR 2005 MONTH DEC DAY 24 HOUR 13 MIN 7 +/- : PUSH... REW/FF SEL : PUSH PLAY/STOP PUSH MENU TO RETURN 6 Set DAY, HOUR, and MIN using the method shown in accuracy so check that the time is a 24-hour clock. POWER ON OFF 2 In the setup menus, OTHER FUNCTIONS screen, CLOCK...


