

WU515TST User Manual
Page 1
DLP® Projector User manual
DLP® Projector User manual
WU515TST User Manual
Page 2
... accessories...8 Product Overview...9 Connections...10 Keypad...11 Remote...12 SETUP AND INSTALLATION 13 Installing the projector...13 Connecting sources to the projector 15 Adjusting the projector image...16 Remote setup...17 USING THE PROJECTOR 19 Powering on / off the projector 19 Selecting an input source...21 Menu navigation and features 22 OSD Menu tree...23...
... accessories...8 Product Overview...9 Connections...10 Keypad...11 Remote...12 SETUP AND INSTALLATION 13 Installing the projector...13 Connecting sources to the projector 15 Adjusting the projector image...16 Remote setup...17 USING THE PROJECTOR 19 Powering on / off the projector 19 Selecting an input source...21 Menu navigation and features 22 OSD Menu tree...23...
WU515TST User Manual
Page 3
... 64 Cleaning the dust filter...65 ADDITIONAL INFORMATION 67 Compatible resolutions...67 Image size and projection distance 69 Determining the lens shift center position 74 Projector dimensions and ceiling mount installation 77 RS232 protocol function list...78 IR remote codes...86 Using the Information button...88 Troubleshooting...89 Warning indicators...90...
... 64 Cleaning the dust filter...65 ADDITIONAL INFORMATION 67 Compatible resolutions...67 Image size and projection distance 69 Determining the lens shift center position 74 Projector dimensions and ceiling mount installation 77 RS232 protocol function list...78 IR remote codes...86 Using the Information button...88 Troubleshooting...89 Warning indicators...90...

WU515TST User Manual
Page 4
...; Please do not open or disassemble the projector as amplifiers that emits heat. ‡‡ Do not let objects or liquids enter the projector. The projector may fall over heating, it has been physically damaged or abused. Please call Optoma before you to dangerous voltages or other apparatus... such as this user's guide. To ensure reliable operation of the projector and to protect from over...
...; Please do not open or disassemble the projector as amplifiers that emits heat. ‡‡ Do not let objects or liquids enter the projector. The projector may fall over heating, it has been physically damaged or abused. Please call Optoma before you to dangerous voltages or other apparatus... such as this user's guide. To ensure reliable operation of the projector and to protect from over...
WU515TST User Manual
Page 5
... to experience these symptoms. Parents should monitor their children and ask whether they may leak. ‡‡ Do not use or store the projector in 3D and should be closely supervised when viewing these images. Do not use abrasive cleaners, waxes or solvents to health issues associated with ... conditions, those who are sleep deprived or under "Replacing the Lamp" section on pages 63-64. ‡‡ Do not setup the projector in certain Projector pictures or video games. Please contact your eyes. ‡‡ When replacing the lamp, please allow the unit to the end of time...
... to experience these symptoms. Parents should monitor their children and ask whether they may leak. ‡‡ Do not use or store the projector in 3D and should be closely supervised when viewing these images. Do not use abrasive cleaners, waxes or solvents to health issues associated with ... conditions, those who are sleep deprived or under "Replacing the Lamp" section on pages 63-64. ‡‡ Do not setup the projector in certain Projector pictures or video games. Please contact your eyes. ‡‡ When replacing the lamp, please allow the unit to the end of time...

WU515TST User Manual
Page 6
... you have any particular purpose. The manufacturer makes no representations or warranties with issued registrations and pending applications in 3D projection may damage your 3D PROJECTOR near open stairwells, cables, balconies, or other purpose (as general spectacles, sunglasses, protective goggles, etc.) may also cause motion sickness, perceptual after the symptoms have...
... you have any particular purpose. The manufacturer makes no representations or warranties with issued registrations and pending applications in 3D projection may damage your 3D PROJECTOR near open stairwells, cables, balconies, or other purpose (as general spectacles, sunglasses, protective goggles, etc.) may also cause motion sickness, perceptual after the symptoms have...

WU515TST User Manual
Page 7
... B digital device pursuant to Part 15 of the global environment, please recycle it. However, there is granted by the Federal Communications Commission, to operate this projector.
... B digital device pursuant to Part 15 of the global environment, please recycle it. However, there is granted by the Federal Communications Commission, to operate this projector.
WU515TST User Manual
Page 8
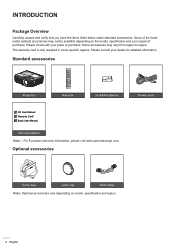
.... INTRODUCTION Package Overview Carefully unpack and verify that you have the items listed below under optional accessories may vary from region to region. Standard accessories Projector On Off Geometric Correction PIP/PBP F1 Mode F2 AV Mute ENTER Info. Optional accessories Carry bag Lens cap VGA cable Note: Optional accessories vary...
.... INTRODUCTION Package Overview Carefully unpack and verify that you have the items listed below under optional accessories may vary from region to region. Standard accessories Projector On Off Geometric Correction PIP/PBP F1 Mode F2 AV Mute ENTER Info. Optional accessories Carry bag Lens cap VGA cable Note: Optional accessories vary...

WU515TST User Manual
Page 9
IR Receiver 3. Ventilation (outlet) 10. No Item 1. Lens Shift (vertical) 5. Focus Lever 6. Lens Shift (horizontal) 7. Tilt-Adjustment Feet No Item 8. Power Socket 14. INTRODUCTION Product Overview 1 2 3 4 5 6 7 14 8 9 HDBaseT 13 2 12 10 11 Note: Do not block projector inlet or outlet air vents. (*) optional accessory vary depending on model, specification and region. Lamp Cover 9. Keypad 13. Ventilation (inlet) English 9 Lens 4. Input/Output Connections 12. Speaker 11. Lens Cap (*) 2.
IR Receiver 3. Ventilation (outlet) 10. No Item 1. Lens Shift (vertical) 5. Focus Lever 6. Lens Shift (horizontal) 7. Tilt-Adjustment Feet No Item 8. Power Socket 14. INTRODUCTION Product Overview 1 2 3 4 5 6 7 14 8 9 HDBaseT 13 2 12 10 11 Note: Do not block projector inlet or outlet air vents. (*) optional accessory vary depending on model, specification and region. Lamp Cover 9. Keypad 13. Ventilation (inlet) English 9 Lens 4. Input/Output Connections 12. Speaker 11. Lens Cap (*) 2.

WU515TST User Manual
Page 13
... designed to be placed flat on a surface and 90 degrees / perpendicular to the to the screen. ‡‡ How to determine projector location for a given screen size, please refer to distance table on pages 69-73. ‡‡ How to determine screen size for a ...four possible positions. Table mount front Ceiling mount front Table mount rear Ceiling mount rear Projector should be installed in to distance table on pages 69-73. SETUP AND INSTALLATION Installing the projector Your projector is placed from the screen the projected image size increases and vertical offset also increases ...
... designed to be placed flat on a surface and 90 degrees / perpendicular to the to the screen. ‡‡ How to determine projector location for a given screen size, please refer to distance table on pages 69-73. ‡‡ How to determine screen size for a ...four possible positions. Table mount front Ceiling mount front Table mount rear Ceiling mount rear Projector should be installed in to distance table on pages 69-73. SETUP AND INSTALLATION Installing the projector Your projector is placed from the screen the projected image size increases and vertical offset also increases ...

WU515TST User Manual
Page 14
...other unpredictable damages. 15° -15° ‡‡ Allow at least 50 cm clearance around the exhaust vent. When operating the projector in a horizontal position. Minimum 500mm (19.69 inches) Minimum 500mm (19.69 inches) Minimum 500mm (19.69 inches) Minimum 100mm (3.94... Ensure that the surrounding air temperature within the enclosure does not exceed operation temperature while the projector is with the acceptable operation temperature range. The tilt angle of the projector should not exceed 15 degrees, nor should pass a certified thermal evaluation to ensure that the...
...other unpredictable damages. 15° -15° ‡‡ Allow at least 50 cm clearance around the exhaust vent. When operating the projector in a horizontal position. Minimum 500mm (19.69 inches) Minimum 500mm (19.69 inches) Minimum 500mm (19.69 inches) Minimum 100mm (3.94... Ensure that the surrounding air temperature within the enclosure does not exceed operation temperature while the projector is with the acceptable operation temperature range. The tilt angle of the projector should not exceed 15 degrees, nor should pass a certified thermal evaluation to ensure that the...
WU515TST User Manual
Page 15
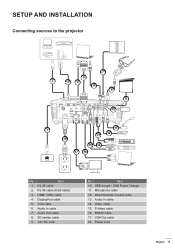
... 6. Audio Out cable 8. 3D emitter cable 9. 12V DC Jack No Item 10. Microphone cable 12. S-Video cable 16. SETUP AND INSTALLATION Connecting sources to the projector 7 5 2 3 4 6 8 MOUSE SERVICE LAN HDMI 1 / MHL HDBaseT AC POWER HDMI 2 DisplayPort VGA1-IN / YPbPr Full 3D VGA2-IN / YPbPr / VGA-OUT S-VIDEO L AUDIO1-IN (VGA1) AUDIO...
... 6. Audio Out cable 8. 3D emitter cable 9. 12V DC Jack No Item 10. Microphone cable 12. S-Video cable 16. SETUP AND INSTALLATION Connecting sources to the projector 7 5 2 3 4 6 8 MOUSE SERVICE LAN HDMI 1 / MHL HDBaseT AC POWER HDMI 2 DisplayPort VGA1-IN / YPbPr Full 3D VGA2-IN / YPbPr / VGA-OUT S-VIDEO L AUDIO1-IN (VGA1) AUDIO...

WU515TST User Manual
Page 16
... equipped with elevator feet for adjusting the image height. 1. Rotate the adjustable foot clockwise or anticlockwise to adjust on the underside of the projector. 2. Focus Lever Note: The projector will focus at a distance as follows: ‡‡ XGA: 19.7" ~ 196.9" (0.5 ~ 5.0m) ‡‡ WXGA: 19.7" ~ 212.6" (0.5 ~ 5.4m) &#...~ 208.7" (0.5 ~ 5.3m) ‡‡ WUXGA: 19.7" ~ 204.7" (0.5 ~ 5.2m) 16 English Locate the adjustable foot you wish to raise or lower the projector. SETUP AND INSTALLATION Adjusting the projector image Image height The projector is sharp and legible.
... equipped with elevator feet for adjusting the image height. 1. Rotate the adjustable foot clockwise or anticlockwise to adjust on the underside of the projector. 2. Focus Lever Note: The projector will focus at a distance as follows: ‡‡ XGA: 19.7" ~ 196.9" (0.5 ~ 5.0m) ‡‡ WXGA: 19.7" ~ 212.6" (0.5 ~ 5.4m) &#...~ 208.7" (0.5 ~ 5.3m) ‡‡ WUXGA: 19.7" ~ 204.7" (0.5 ~ 5.2m) 16 English Locate the adjustable foot you wish to raise or lower the projector. SETUP AND INSTALLATION Adjusting the projector image Image height The projector is sharp and legible.

WU515TST User Manual
Page 17
...as illustrated. 3. Effective range Infra-Red (IR) remote control sensor is located on remote. English 17 Remove the battery cover on the projector that might obstruct the infra-red beam. ‡‡ Make sure the IR transmitter of the remote control is not being shined by ... country. However, the effective range might become ineffective. ‡‡ When you aim at an angle within 30 degrees perpendicular to the projector's IR remote control sensors to function correctly. Ensure to hold the remote control at the screen, the effective distance is close to Inverter-...
...as illustrated. 3. Effective range Infra-Red (IR) remote control sensor is located on remote. English 17 Remove the battery cover on the projector that might obstruct the infra-red beam. ‡‡ Make sure the IR transmitter of the remote control is not being shined by ... country. However, the effective range might become ineffective. ‡‡ When you aim at an angle within 30 degrees perpendicular to the projector's IR remote control sensors to function correctly. Ensure to hold the remote control at the screen, the effective distance is close to Inverter-...

WU515TST User Manual
Page 19
... signal/source cable. Source F3 Volume Re-Sync D Zoom Menu Lens cap (*) Powering on the projector keypad or the remote control 4. Remove the lens cap(*). Note: The first time the projector is turned on / off the projector or On Off Geometric Correction PIP/PBP F1 Mode F2 AV Mute ENTER Info. A start up... will be asked to select the preferred language, projection orientation and a few other settings. When connected, the On/Standby LED will turn amber. 3. USING THE PROJECTOR Powering on you will be solid red.
... signal/source cable. Source F3 Volume Re-Sync D Zoom Menu Lens cap (*) Powering on the projector keypad or the remote control 4. Remove the lens cap(*). Note: The first time the projector is turned on / off the projector or On Off Geometric Correction PIP/PBP F1 Mode F2 AV Mute ENTER Info. A start up... will be asked to select the preferred language, projection orientation and a few other settings. When connected, the On/Standby LED will turn amber. 3. USING THE PROJECTOR Powering on you will be solid red.

WU515TST User Manual
Page 20
... and region. The following a power off procedure. 20 English Press Power again 3. If you wish to turn the projector back on immediately following message will shut down. 4. When the projector is tuned on , you press the " " button for the cooling cycle and the On/ Standby LED will disappear...control. 2. Press the " " again to operate for about 10 seconds for the second time the projector will be displayed: Power Off? When the On/Standby LED turns solid red the projector has entered standby mode. Turn off 1. When you must wait until the cooling cycle has finished and...
... and region. The following a power off procedure. 20 English Press Power again 3. If you wish to turn the projector back on immediately following message will shut down. 4. When the projector is tuned on , you press the " " button for the cooling cycle and the On/ Standby LED will disappear...control. 2. Press the " " again to operate for about 10 seconds for the second time the projector will be displayed: Power Off? When the On/Standby LED turns solid red the projector has entered standby mode. Turn off 1. When you must wait until the cooling cycle has finished and...

WU515TST User Manual
Page 21
ENTER or Info. If multiple sources are connMoedected, puAsVhMuttehe source button on the projector keypad or remote to display on the connected source that you want to select the desired input. The projector will automatically detect the source. Source F3 Volume Re-Sync D Zoom Menu Format Freeze Remote ID All VGA S-Video HDMI1 HDMI2 123 HDBaseT Video DVI 456 BNC YPbPr DisplayPort 3D 7890 English 21 USING THE PROJECTOR On Off Selecting an input source Geometric Correction PIP/PBP Turn on the screen (compFu1 ter, noF2tebook, video player, etc.).
ENTER or Info. If multiple sources are connMoedected, puAsVhMuttehe source button on the projector keypad or remote to display on the connected source that you want to select the desired input. The projector will automatically detect the source. Source F3 Volume Re-Sync D Zoom Menu Format Freeze Remote ID All VGA S-Video HDMI1 HDMI2 123 HDBaseT Video DVI 456 BNC YPbPr DisplayPort 3D 7890 English 21 USING THE PROJECTOR On Off Selecting an input source Geometric Correction PIP/PBP Turn on the screen (compFu1 ter, noF2tebook, video player, etc.).

WU515TST User Manual
Page 22
... that allow you to select any item in the sub menu and adjust as described above. 5. The OSD menu will close and the projector will automatically detect the source. 1. When OSD is displayed, use keys to make image adjustments and change a variety of settings. Adjust ...in the sub menu and then press or "Enter" key to the main menu. 6. USING THE PROJECTOR Menu navigation and features The projector has multilingual on the Remote Control or Keypad. 2. The projector will automatically save the new settings. While making a selection on a particular page, press or "Enter...
... that allow you to select any item in the sub menu and adjust as described above. 5. The OSD menu will close and the projector will automatically detect the source. 1. When OSD is displayed, use keys to make image adjustments and change a variety of settings. Adjust ...in the sub menu and then press or "Enter" key to the main menu. 6. USING THE PROJECTOR Menu navigation and features The projector has multilingual on the Remote Control or Keypad. 2. The projector will automatically save the new settings. While making a selection on a particular page, press or "Enter...

WU515TST User Manual
Page 23
... Single-item menu Value Presentation Bright Movie Default [Presentation] sRGB Blackboard PS. Each mode can adjust and save in each mode DICOM SIM. USING THE PROJECTOR OSD Menu tree Main menu Sub menu Display Mode Brightness Contrast Sharpness Color Tint Image Advanced Advanced menu BrilliantColorTM Gamma Color Temp.
... Single-item menu Value Presentation Bright Movie Default [Presentation] sRGB Blackboard PS. Each mode can adjust and save in each mode DICOM SIM. USING THE PROJECTOR OSD Menu tree Main menu Sub menu Display Mode Brightness Contrast Sharpness Color Tint Image Advanced Advanced menu BrilliantColorTM Gamma Color Temp.

WU515TST User Manual
Page 24
.../Gain [-50~50] Hue/Saturation/Gain [-50~50] Red/Green/Blue On Off 0~31 -10~10 -5~5 -5~5 0~31 -5~5 0/7.5 (NTSC only) H V H. Keystone V. Keystone Auto V. Position V. USING THE PROJECTOR Main menu Sub menu Image Advanced Display Reset Format Zoom Edge Mask Image Shift Geometric Correction Advanced menu Color Matching Signal (RGB) Signal (Video) Exit...
.../Gain [-50~50] Hue/Saturation/Gain [-50~50] Red/Green/Blue On Off 0~31 -10~10 -5~5 -5~5 0~31 -5~5 0/7.5 (NTSC only) H V H. Keystone V. Keystone Auto V. Position V. USING THE PROJECTOR Main menu Sub menu Image Advanced Display Reset Format Zoom Edge Mask Image Shift Geometric Correction Advanced menu Color Matching Signal (RGB) Signal (Video) Exit...


