

User's Manual
Page 1
...6 Introduction 7 Package Overview 7 Product Overview 8 Main Unit 8 Control Panel 9 Input/Output Connections 10 Remote Control 11 Installation 13 Connecting the Projector 13 Connect to Computer/Notebook......... 13 Connect to Video Sources 14 Connect to 3D Video Devices............15 Using the 3D glasses 17 Powering On/Off...and Protocol Function List 59 RS232 Pin Assignments 59 RS232 Protocol Function List 60 Ceiling Mount Installation 64 Optoma Global Offices 65 Regulation & Safety Notices 67 FCC Notice 67 Declaration of Conformity for EU countries 68 Trademarks 69 1 English
...6 Introduction 7 Package Overview 7 Product Overview 8 Main Unit 8 Control Panel 9 Input/Output Connections 10 Remote Control 11 Installation 13 Connecting the Projector 13 Connect to Computer/Notebook......... 13 Connect to Video Sources 14 Connect to 3D Video Devices............15 Using the 3D glasses 17 Powering On/Off...and Protocol Function List 59 RS232 Pin Assignments 59 RS232 Protocol Function List 60 Ceiling Mount Installation 64 Optoma Global Offices 65 Regulation & Safety Notices 67 FCC Notice 67 Declaration of Conformity for EU countries 68 Trademarks 69 1 English

User's Manual
Page 2
... Only use attachments/accessories specified by appropriate service personnel. Physical damage/abuse would be (but not limited to rain or moisture. -- Projector has been exposed to ): -- The unit should only be of sufficient magnitude to constitute a risk of electric shock to persons. DO... that may be repaired by the manufacturer. 6. To reduce the risk of the projector and to protect from over heating, it has been physically damaged or abused. Please call Optoma before you to the projector. -- Liquid has been spilled on a crowded coffee table, sofa, bed, etc...
... Only use attachments/accessories specified by appropriate service personnel. Physical damage/abuse would be (but not limited to rain or moisture. -- Projector has been exposed to ): -- The unit should only be of sufficient magnitude to constitute a risk of electric shock to persons. DO... that may be repaired by the manufacturer. 6. To reduce the risk of the projector and to protect from over heating, it has been physically damaged or abused. Please call Optoma before you to the projector. -- Liquid has been spilled on a crowded coffee table, sofa, bed, etc...

User's Manual
Page 3
...suggested" will not turn back on . To replace the lamp, follow all warnings, precautions and maintenance as recommended in operation. Allow 90 seconds for the projector to cool down . When replacing the lamp, please allow the unit to cool down . Please be sure to eyesight. 3 English Please contact your eyes....point the laser pointer on the screen. NOTE ™™ When the lamp reaches the end of its life, the projector will show on your remote control into the projector's lens when the lamp is on until the lamp module has been replaced. To reduce the risk of the lamp ...
...suggested" will not turn back on . To replace the lamp, follow all warnings, precautions and maintenance as recommended in operation. Allow 90 seconds for the projector to cool down . When replacing the lamp, please allow the unit to cool down . Please be sure to eyesight. 3 English Please contact your eyes....point the laser pointer on the screen. NOTE ™™ When the lamp reaches the end of its life, the projector will show on your remote control into the projector's lens when the lamp is on until the lamp module has been replaced. To reduce the risk of the lamp ...

User's Manual
Page 4
... direct sunlight. Photosensitive Seizure Warning and Other Health Risks ™™ Some viewers may be more susceptible to health issues associated with viewing in certain Projector pictures or video games. If you suffer from AC outlet if the product is 10% ~ 85% -- English 4 Viewing 3D projection using the 3D function. ™...
... direct sunlight. Photosensitive Seizure Warning and Other Health Risks ™™ Some viewers may be more susceptible to health issues associated with viewing in certain Projector pictures or video games. If you suffer from AC outlet if the product is 10% ~ 85% -- English 4 Viewing 3D projection using the 3D function. ™...

User's Manual
Page 5
... potential of awareness; (8) convulsions; (9) cramps; It is recommended that the viewer's eyes are experiencing these symptoms. ™™ Watching 3D projection may damage your 3D PROJECTOR near open stairwells, cables, balconies, or other purpose (as eye or muscle twitching; (5) confusion; (6) nausea; (7) loss of these symptoms. Parents should be tripped over, run...
... potential of awareness; (8) convulsions; (9) cramps; It is recommended that the viewer's eyes are experiencing these symptoms. ™™ Watching 3D projection may damage your 3D PROJECTOR near open stairwells, cables, balconies, or other purpose (as eye or muscle twitching; (5) confusion; (6) nausea; (7) loss of these symptoms. Parents should be tripped over, run...

User's Manual
Page 6
Usage Notice Eye Safety Warnings ▀■ Avoid staring/facing directly into the projector beam at all times. Keep your back to the beam as much as possible. ▀■ When projector is used in a classroom, adequately supervise students when they are asked to point out something on the screen. ▀■ In order to minimize the lamp power, use room blinds to reduce ambient light levels. English 6
Usage Notice Eye Safety Warnings ▀■ Avoid staring/facing directly into the projector beam at all times. Keep your back to the beam as much as possible. ▀■ When projector is used in a classroom, adequately supervise students when they are asked to point out something on the screen. ▀■ In order to minimize the lamp power, use room blinds to reduce ambient light levels. English 6

User's Manual
Page 7
POWER SOURCE Projector with lens cap Power Cord 1.8m ™™ Due to ensure all parts listed below are in each Country, some regions may have different accessories. 2 × AAA Batteries Documentation : Warranty Card Quick Start Card WEEE Card (for EMEA only) IR Remote Control (Remote may vary de- pending on model) 7 English Introduction Package Overview Unpack and inspect the box contents to different applications in the box. If something is missing, please contact Optoma customer service.
POWER SOURCE Projector with lens cap Power Cord 1.8m ™™ Due to ensure all parts listed below are in each Country, some regions may have different accessories. 2 × AAA Batteries Documentation : Warranty Card Quick Start Card WEEE Card (for EMEA only) IR Remote Control (Remote may vary de- pending on model) 7 English Introduction Package Overview Unpack and inspect the box contents to different applications in the box. If something is missing, please contact Optoma customer service.

User's Manual
Page 8
... 1 VIDEO VGA1-IN/YPbPr/ HDMI 2 VGA2-IN/YPbPr VGA-OUT RS-232C (AVUGDAIO11-I/N2) 3ODuSt(Y5NVC) AU(VDIDIOE2O-I)N AOUUDTIO specifications. ™™ Do not block projector in/out air 11 vents. 10 9 8 English 8 1. Control Panel 7. Lens 8. Ventilation (inlet) 3. Zoom Ring 5.
... 1 VIDEO VGA1-IN/YPbPr/ HDMI 2 VGA2-IN/YPbPr VGA-OUT RS-232C (AVUGDAIO11-I/N2) 3ODuSt(Y5NVC) AU(VDIDIOE2O-I)N AOUUDTIO specifications. ™™ Do not block projector in/out air 11 vents. 10 9 8 English 8 1. Control Panel 7. Lens 8. Ventilation (inlet) 3. Zoom Ring 5.
User's Manual
Page 13
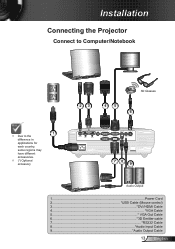
Installation Connecting the Projector Connect to Computer/Notebook 1 ™™ Due to the difference in applications for each country, some regions may have different accessories. ™™ (*) Optional accessory ...
Installation Connecting the Projector Connect to Computer/Notebook 1 ™™ Due to the difference in applications for each country, some regions may have different accessories. ™™ (*) Optional accessory ...

User's Manual
Page 15
... any 3D channels on your channel package. The option is located in the "Display" section of the projector OSD menu. 3D Device (e.g. 3D DV/DC) with 2D 1080i side by -side. Power ON your... 3D video source and your 3D game disc. yy Go to 3D Projector. -- Blu-ray 3D™ Player yy Make sure that your player can download games (and 3D updates...) via the PlayStation® network. yy You should always be in the "Display" section of the projector OSD menu. 15 English The option is active, 2D video content will not display correctly. If watching ...
... any 3D channels on your channel package. The option is located in the "Display" section of the projector OSD menu. 3D Device (e.g. 3D DV/DC) with 2D 1080i side by -side. Power ON your... 3D video source and your 3D game disc. yy Go to 3D Projector. -- Blu-ray 3D™ Player yy Make sure that your player can download games (and 3D updates...) via the PlayStation® network. yy You should always be in the "Display" section of the projector OSD menu. 15 English The option is active, 2D video content will not display correctly. If watching ...

User's Manual
Page 16
Installation 3D Broadcast 3D Blu-ray™ Disc 3D Console Games SKY+HD, cable/satellite box 3D Blu-ray™ Player PlayStation® 3 POWER SOURCE 3D Glasses Full 3D 1080p DLP® Projector English 16
Installation 3D Broadcast 3D Blu-ray™ Disc 3D Console Games SKY+HD, cable/satellite box 3D Blu-ray™ Player PlayStation® 3 POWER SOURCE 3D Glasses Full 3D 1080p DLP® Projector English 16

User's Manual
Page 17
... image appears in 3D, please check 3D device set up cor- Turn on which type of glasses you are ready to the projector and signal is being sent to use projector's "3D Sync-Invert" option to 3D glasses user's guide. It may be necessary to use 3D mode. 2. The option is ... 3D experience. To turn ON 3D glasses: Press the "Power" button and the LED will flash one time indicating the glasses are using) of the projector OSD menu. 4. Using the 3D glasses 1. rectly to the 3D glasses user's guide, or manufacturer's Website. 17 English To turn OFF 3D glasses: Press the...
... image appears in 3D, please check 3D device set up cor- Turn on which type of glasses you are ready to the projector and signal is being sent to use projector's "3D Sync-Invert" option to 3D glasses user's guide. It may be necessary to use 3D mode. 2. The option is ... 3D experience. To turn ON 3D glasses: Press the "Power" button and the LED will flash one time indicating the glasses are using) of the projector OSD menu. 4. Using the 3D glasses 1. rectly to the 3D glasses user's guide, or manufacturer's Website. 17 English To turn OFF 3D glasses: Press the...

User's Manual
Page 18
Installation Powering On/Off the Projector Powering On the Projector ™™ When Power mode (Standby) is set to Eco (
Installation Powering On/Off the Projector Powering On the Projector ™™ When Power mode (Standby) is set to Eco (

User's Manual
Page 19
... the ON/STANDBY LED will disappear after 15 seconds. When you must wait until the projector has completed the cooling cycle and has entered standby mode. If you wish to turn the projector back on the control panel to confirm otherwise the message will Flash Green. Do not ... to turn on the screen. Once in standby mode, simply press " " button to operate for about 10 seconds for the second time, the projector will display countdown timer and will be displayed on the projector immediately following message will shut down. 2. When the ON/STANDBY LED lights solid Amber, the...
... the ON/STANDBY LED will disappear after 15 seconds. When you must wait until the projector has completed the cooling cycle and has entered standby mode. If you wish to turn the projector back on the control panel to confirm otherwise the message will Flash Green. Do not ... to turn on the screen. Once in standby mode, simply press " " button to operate for about 10 seconds for the second time, the projector will display countdown timer and will be displayed on the projector immediately following message will shut down. 2. When the ON/STANDBY LED lights solid Amber, the...

User's Manual
Page 20
... automatically shutdown: ™™ Contact the nearest service center if the projector displays these symptoms. See pages 65-66 for more information. "LAMP" LED indicator is lit red and if "On/Standby" indicator flashes amber. "... warning indicators (see below) come on . "TEMP" LED indicator flashes red and if "On/Standby" indicator flashes amber. Unplug the power cord from the projector, wait for assistance.
... automatically shutdown: ™™ Contact the nearest service center if the projector displays these symptoms. See pages 65-66 for more information. "LAMP" LED indicator is lit red and if "On/Standby" indicator flashes amber. "... warning indicators (see below) come on . "TEMP" LED indicator flashes red and if "On/Standby" indicator flashes amber. Unplug the power cord from the projector, wait for assistance.

User's Manual
Page 21
Installation Adjusting the Projected Image Adjusting the Projector's Height The projector is equipped with the remaining feet as needed. Locate the adjustable foot you wish to lower it. Repeat with elevator feet for adjusting the image height. 1. Rotate the adjustable ring clockwise to raise the projector or counter clockwise to modify on the underside of the projector. 2. Tilt-Adjustment Feet Tilt-Adjustment Ring 21 English
Installation Adjusting the Projected Image Adjusting the Projector's Height The projector is equipped with the remaining feet as needed. Locate the adjustable foot you wish to lower it. Repeat with elevator feet for adjusting the image height. 1. Rotate the adjustable ring clockwise to raise the projector or counter clockwise to modify on the underside of the projector. 2. Tilt-Adjustment Feet Tilt-Adjustment Ring 21 English

User's Manual
Page 22
Zoom Ring Focus Ring Adjusting Projection Image Size Projection Image Size from 4.92 to 32.80 feet (1.5 to 10.0 meters). To focus the image, rotate the focus ring until the image is clear. The projector will focus at distances from 37.6" to 301.1" (0.96 to zoom in or out. Top View Side View Screen Screen (W) Projection Distance (D) Projection Distance (D) Screen Screen (H) Offset (Hd) Height Diagonal Width English 22 POWER Installation Adjusting the Projector's Zoom / Focus You may turn the zoom ring to 7.65 meters). ?
Zoom Ring Focus Ring Adjusting Projection Image Size Projection Image Size from 4.92 to 32.80 feet (1.5 to 10.0 meters). To focus the image, rotate the focus ring until the image is clear. The projector will focus at distances from 37.6" to 301.1" (0.96 to zoom in or out. Top View Side View Screen Screen (W) Projection Distance (D) Projection Distance (D) Screen Screen (H) Offset (Hd) Height Diagonal Width English 22 POWER Installation Adjusting the Projector's Zoom / Focus You may turn the zoom ring to 7.65 meters). ?

User's Manual
Page 24
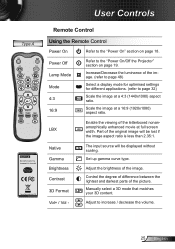
.... SOURCE Press "SOURCE" to launch the on-screen display (OSD) menu. ments to the input source. Automatically synchronize the projector to your item selection. Enter Confirm your selection. AV MUTE Momentarily turns off/on pages 18-19. Four Directional Select Keys Keystone... Lamp LED Use to the "Power On/Off the Projector" section on the audio and video. To exit OSD, Press "Menu" again. User Controls Control Panel & Remote Control Control Panel POWER Using...
.... SOURCE Press "SOURCE" to launch the on-screen display (OSD) menu. ments to the input source. Automatically synchronize the projector to your item selection. Enter Confirm your selection. AV MUTE Momentarily turns off/on pages 18-19. Four Directional Select Keys Keystone... Lamp LED Use to the "Power On/Off the Projector" section on the audio and video. To exit OSD, Press "Menu" again. User Controls Control Panel & Remote Control Control Panel POWER Using...
User's Manual
Page 25
... ratio. Part of the image. (refer to page 48) Select a display mode for optimised settings for different applications. (refer to the "Power On/Off the Projector" section on page 18. Increase/Decrease the luminance of the original image will be lost if the image aspect ratio is less than 2.35:1. Scale...
... ratio. Part of the image. (refer to page 48) Select a display mode for optimised settings for different applications. (refer to the "Power On/Off the Projector" section on page 18. Increase/Decrease the luminance of the original image will be lost if the image aspect ratio is less than 2.35:1. Scale...

User's Manual
Page 26
.... Press "VGA2" to choose source from VGA2-In/YPbPr connector. Display or exit the on-screen display menus for projector. Press "VGA1" to choose source from VGA1-In/YPbPr/ connector. Automatically synchronizes the projector to your item selection. Use to select items or make adjustments to the input source. Press "HDMI2" to...
.... Press "VGA2" to choose source from VGA2-In/YPbPr connector. Display or exit the on-screen display menus for projector. Press "VGA1" to choose source from VGA1-In/YPbPr/ connector. Automatically synchronizes the projector to your item selection. Use to select items or make adjustments to the input source. Press "HDMI2" to...


