
User Manual
Page 1
...Contents Usage Notice Precautions ...2 Introduction Product Features ...4 Package Overview ...5 Product Overview ...6 Main Unit ...6 Control Panel ...7 Connection Ports ...8 Wireless Remote Control 9 Installation Connecting the Projector 10 Powering On/Off the Projector 11 Powering On the Projector 11 ...the Projector 12 Adjusting the Projected Image 13 Adjusting the Projector's Height 13 Adjusting the Projector's Zoom/Focus 14 User Controls Control Panel & Remote Control 15 Onscreen Display Menus 18 How to Operate ...18 Menu Tree ...19 Picture ...20 Image ...22 System ...24 Display...
...Contents Usage Notice Precautions ...2 Introduction Product Features ...4 Package Overview ...5 Product Overview ...6 Main Unit ...6 Control Panel ...7 Connection Ports ...8 Wireless Remote Control 9 Installation Connecting the Projector 10 Powering On/Off the Projector 11 Powering On the Projector 11 ...the Projector 12 Adjusting the Projected Image 13 Adjusting the Projector's Height 13 Adjusting the Projector's Zoom/Focus 14 User Controls Control Panel & Remote Control 15 Onscreen Display Menus 18 How to Operate ...18 Menu Tree ...19 Picture ...20 Image ...22 System ...24 Display...

User Manual
Page 4
... compatible (480i/p, 576i/p, 720p, 1080i ) ‹ NTSC/PAL/SECAM, and HDTV compatible ‹ Hi-tech DVI-I connection for digital and analog video connectivity ‹ IR remote control ‹ User-friendly multilingual onscreen display menu ‹ Advanced electronic keystone correction ‹ User-friendly...
... compatible (480i/p, 576i/p, 720p, 1080i ) ‹ NTSC/PAL/SECAM, and HDTV compatible ‹ Hi-tech DVI-I connection for digital and analog video connectivity ‹ IR remote control ‹ User-friendly multilingual onscreen display menu ‹ Advanced electronic keystone correction ‹ User-friendly...
User Manual
Page 5
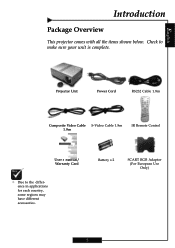
Check to the difference in applications for each country, some regions may have different accessories. Battery x 2 SCART RGB Adaptor (For European Use Only) 5 English Introduction Package Overview This projector comes with all the items shown below. Projector Unit Power Cord RS232 Cable 1.8m Composite Video Cable S-Video Cable 1.8m 1.8m IR Remote Control User's Manual/ Warranty Card ™ Due to make sure your unit is complete.
Check to the difference in applications for each country, some regions may have different accessories. Battery x 2 SCART RGB Adaptor (For European Use Only) 5 English Introduction Package Overview This projector comes with all the items shown below. Projector Unit Power Cord RS232 Cable 1.8m Composite Video Cable S-Video Cable 1.8m 1.8m IR Remote Control User's Manual/ Warranty Card ™ Due to make sure your unit is complete.

User Manual
Page 9
Power On/Off 2. Freeze 5. Keystone Adjustment 10. Optics Zoom In/Up 9 13. Enter 18. Component Source (YPbPr) Display Hide 3. Format 11. DVI-I Source 22. Brightness 4. Electronic Zoom 9. Menu/Exit 12. S-Video Source 19. Composite Source 20. Contrast 6. BNC Source 21. English Introduction Wireless Remote Control 9 1 2 3 4 5 6 7 8 10 11 12 16 14 15 17 13 19 18 20 22 21 1. Re-sync 7. Hue Adjustment 8. Optics Zoom Out/Down 14. Optics Focus +/Left 15. Optics Focus -/Right 16. Four Directional Select Keys 17.
Power On/Off 2. Freeze 5. Keystone Adjustment 10. Optics Zoom In/Up 9 13. Enter 18. Component Source (YPbPr) Display Hide 3. Format 11. DVI-I Source 22. Brightness 4. Electronic Zoom 9. Menu/Exit 12. S-Video Source 19. Composite Source 20. Contrast 6. BNC Source 21. English Introduction Wireless Remote Control 9 1 2 3 4 5 6 7 8 10 11 12 16 14 15 17 13 19 18 20 22 21 1. Re-sync 7. Hue Adjustment 8. Optics Zoom Out/Down 14. Optics Focus +/Left 15. Optics Focus -/Right 16. Four Directional Select Keys 17.
User Manual
Page 11
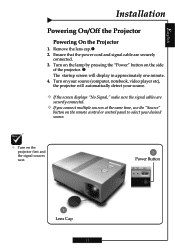
... the power cord and signal cable are securely connected. ™ If you connect multiple sources at the same time, use the "Source" button on the remote control or control panel to select your desired source. ™ Turn on the projector first and the signal sources next. 2 Power Button 1 Lens Cap 11 o The startup...
... the power cord and signal cable are securely connected. ™ If you connect multiple sources at the same time, use the "Source" button on the remote control or control panel to select your desired source. ™ Turn on the projector first and the signal sources next. 2 Power Button 1 Lens Cap 11 o The startup...
User Manual
Page 15
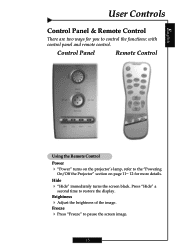
Press "Hide" a second time to pause the screen image. 15 Brightness 4 Adjust the brightness of the image. Freeze 4 Press "Freeze" to restore the display. Control Panel Remote Control Using the Remote Control Power 4 "Power" turns on the projector's lamp, refer to the "Powering On/Off the Projector" section on page 11~ 12 for you to control the functions: with control panel and remote control. Hide 4 "Hide" immediately turns the screen black. English User Controls Control Panel & Remote Control There are two ways for more details.
Press "Hide" a second time to pause the screen image. 15 Brightness 4 Adjust the brightness of the image. Freeze 4 Press "Freeze" to restore the display. Control Panel Remote Control Using the Remote Control Power 4 "Power" turns on the projector's lamp, refer to the "Powering On/Off the Projector" section on page 11~ 12 for you to control the functions: with control panel and remote control. Hide 4 "Hide" immediately turns the screen black. English User Controls Control Panel & Remote Control There are two ways for more details.
User Manual
Page 18
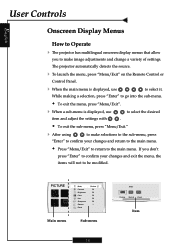
..., the items will not to be modified. The projector automatically detects the source. 4 To launch the menu, press "Menu/Exit" on the Remote Control or Control Panel. 4 When the main menu is displayed, use to select it. While making a selection, press "Enter" to go into the sub-menu...; To exit the sub-menu, press "Menu/Exit." 4 After using to make image adjustments and change a variety of settings. English User Controls Onscreen Display Menus How to Operate 4 The projector has multilingual onscreen display menus that allow you don't press "Enter" to confirm your changes and...
..., the items will not to be modified. The projector automatically detects the source. 4 To launch the menu, press "Menu/Exit" on the Remote Control or Control Panel. 4 When the main menu is displayed, use to select it. While making a selection, press "Enter" to go into the sub-menu...; To exit the sub-menu, press "Menu/Exit." 4 After using to make image adjustments and change a variety of settings. English User Controls Onscreen Display Menus How to Operate 4 The projector has multilingual onscreen display menus that allow you don't press "Enter" to confirm your changes and...

User Manual
Page 27
Next, open the "Control Panel" folder, and double click the "Display" icon. 2. English Appendices Troubleshooting If you may need to adjust your monitor display setting. Problem: Partial, scrolling, or ... Manager, double click the "Windows Setup" icon in "Windows 3.x). Verify that the projection lamp has been securely installed. If the projector is turned on the remote control or control panel. 4 If using a PC: For Windows 3.x: 1.
Next, open the "Control Panel" folder, and double click the "Display" icon. 2. English Appendices Troubleshooting If you may need to adjust your monitor display setting. Problem: Partial, scrolling, or ... Manager, double click the "Windows Setup" icon in "Windows 3.x). Verify that the projection lamp has been securely installed. If the projector is turned on the remote control or control panel. 4 If using a PC: For Windows 3.x: 1.


