
User Manual
Page 1
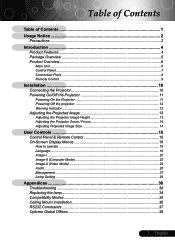
... Panel ...7 Connection Ports ...8 Remote Control...9 Installation 10 Connecting the Projector 10 Powering On/Off the Projector 11 Powering On the Projector 11 Powering Off the projector 12 Warning Indicator...12 Adjusting the Projected Image 13 Adjusting the Projector Image Height 13 Adjusting the Projector Zoom / Focus 14 Adjusting Projected Image Size 14 User Controls 15......26 Management ...27 Lamp Setting ...29 Appendices 30 Troubleshooting 30 Replacing the lamp 34 Compatibility Modes 35 Ceiling Mount Installation 36 RS232 Commands 37 Optoma Global Offices 38 1 ...
... Panel ...7 Connection Ports ...8 Remote Control...9 Installation 10 Connecting the Projector 10 Powering On/Off the Projector 11 Powering On the Projector 11 Powering Off the projector 12 Warning Indicator...12 Adjusting the Projected Image 13 Adjusting the Projector Image Height 13 Adjusting the Projector Zoom / Focus 14 Adjusting Projected Image Size 14 User Controls 15......26 Management ...27 Lamp Setting ...29 Appendices 30 Troubleshooting 30 Replacing the lamp 34 Compatibility Modes 35 Ceiling Mount Installation 36 RS232 Commands 37 Optoma Global Offices 38 1 ...
User Manual
Page 2
... cycle has been completed before disconnecting power. Warning- Warning- If this happens, the projector will detect the life of fire or electric shock, do not open or disassemble the projector as recommended in operation. When replacing the lamp, please allow unit to change the lamp...to maximize the life of its life, it shows warning messages. Warning- The bright light may cause electric shock. Warning- Warning- This projector will not turn back on -screen display "Lamp Setting" menu after replacing the lamp module (refer to rain or moisture. Do not use...
... cycle has been completed before disconnecting power. Warning- Warning- If this happens, the projector will detect the life of fire or electric shock, do not open or disassemble the projector as recommended in operation. When replacing the lamp, please allow unit to change the lamp...to maximize the life of its life, it shows warning messages. Warning- The bright light may cause electric shock. Warning- Warning- This projector will not turn back on -screen display "Lamp Setting" menu after replacing the lamp module (refer to rain or moisture. Do not use...
User Manual
Page 4
... DLP® technology NTSC/NTSC4.43/PAL/PAL-M/PAL-N/SECAM and HDTV compatible (480i/p, 576i/p, 720p, 1080i) High-tech DVI connection for choosing Optoma projectors. This product is a XGA single chip 0.7" DLP®...
... DLP® technology NTSC/NTSC4.43/PAL/PAL-M/PAL-N/SECAM and HDTV compatible (480i/p, 576i/p, 720p, 1080i) High-tech DVI connection for choosing Optoma projectors. This product is a XGA single chip 0.7" DLP®...

User Manual
Page 5
Check to make sure your dealer immediately if anything is complete. Projector with all the items shown below. English Contact your unit is missing. Introduction Package Overview This projector comes with lens cap Power Cord 1.8m VGA Cable 1.8m Composite Video Cable 2.0m Remote Control 2 x Battery Carrying Case (Optional Accessory) Documents : User's Guide Quick Start Card Warranty Card WEEE Card SCART RGB/S-Video Adaptor (Optional Accessory) 5 ...
Check to make sure your dealer immediately if anything is complete. Projector with all the items shown below. English Contact your unit is missing. Introduction Package Overview This projector comes with lens cap Power Cord 1.8m VGA Cable 1.8m Composite Video Cable 2.0m Remote Control 2 x Battery Carrying Case (Optional Accessory) Documents : User's Guide Quick Start Card Warranty Card WEEE Card SCART RGB/S-Video Adaptor (Optional Accessory) 5 ...

User Manual
Page 10
Installation Connecting the Projector 1 RS232 9 USB RGB DVI 5 28 4 DVD Player, Settop Box, HDTV receiver English ... 10 Video Output 3 6 7 S-Video Output 1...Power Cord 2...VGA Cable 3 Composite Video Cable 4 SCART ...) 7 D-Sub to RCA Cable for HDTV/Component (Optional Accessory) 8 DVI to DVI Cable (Optional Accessory) 9 RS232 Cable (Optional Accessory) To ensure the projector works well with the projector. Make sure the timing of the display mode is compatible with your computer, please set the display mode of your graphic card less...
Installation Connecting the Projector 1 RS232 9 USB RGB DVI 5 28 4 DVD Player, Settop Box, HDTV receiver English ... 10 Video Output 3 6 7 S-Video Output 1...Power Cord 2...VGA Cable 3 Composite Video Cable 4 SCART ...) 7 D-Sub to RCA Cable for HDTV/Component (Optional Accessory) 8 DVI to DVI Cable (Optional Accessory) 9 RS232 Cable (Optional Accessory) To ensure the projector works well with the projector. Make sure the timing of the display mode is compatible with your computer, please set the display mode of your graphic card less...
User Manual
Page 11
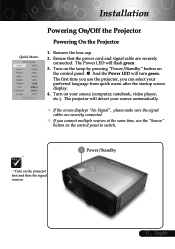
... connect multiple sources at the same time, use the "Source" button on the control panel to switch. Turn on the projector first and then the signal sources. 1 Power/Standby 11 ... English Remove the lens cap. 2. Turn on the lamp by pressing "Power/Standby" button ...on your source (computer, notebook, video player, etc.). The projector will turn green. Turn on the control panel. And the Power LED will detect your preferred language from quick menu after the startup screen...
... connect multiple sources at the same time, use the "Source" button on the control panel to switch. Turn on the projector first and then the signal sources. 1 Power/Standby 11 ... English Remove the lens cap. 2. Turn on the lamp by pressing "Power/Standby" button ...on your source (computer, notebook, video player, etc.). The projector will turn green. Turn on the control panel. And the Power LED will detect your preferred language from quick menu after the startup screen...
User Manual
Page 12
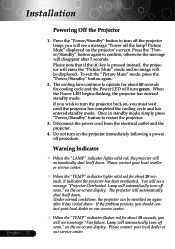
..." button again. 2. Warning Indicator When the "LAMP" indicator lights solid red, the projector will automatically turn the projector back on, you will be switched on the projector's screen. The cooling fans continue to turn off procedure. Disconnect the power cord from the electrical outlet...Standby" button to turn off the lamp? Press the "Power/Standby" button to restart the projector. 3. You will automatically turn off the projector lamp, you must wait until the projector has completed the cooling cycle and has entered standby mode. Lamp will see a message "Power...
..." button again. 2. Warning Indicator When the "LAMP" indicator lights solid red, the projector will automatically turn the projector back on, you will be switched on the projector's screen. The cooling fans continue to turn off procedure. Disconnect the power cord from the electrical outlet...Standby" button to turn off the lamp? Press the "Power/Standby" button to restart the projector. 3. You will automatically turn off the projector lamp, you must wait until the projector has completed the cooling cycle and has entered standby mode. Lamp will see a message "Power...

User Manual
Page 13
... the button to lock the elevator foot into position. 3. Use to fine-tune the display angle. Installation Adjusting the Projected Image Adjusting the Projector Image Height The projector is equipped with an elevator foot for adjusting the image height. Press the elevator button . 2.
... the button to lock the elevator foot into position. 3. Use to fine-tune the display angle. Installation Adjusting the Projected Image Adjusting the Projector Image Height The projector is equipped with an elevator foot for adjusting the image height. Press the elevator button . 2.
User Manual
Page 14
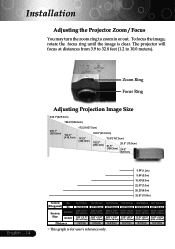
... focus at distances from 3.9 to 32.8 feet (1.2 to zoom in or out. Installation Adjusting the Projector Zoom / Focus You may turn the zoom ring to 10.0 meters). Screen Size Max.(WxH) Min.(WxH) Distance 29.5"(75.0cm) 24.6"(62.5cm) 23....
... focus at distances from 3.9 to 32.8 feet (1.2 to zoom in or out. Installation Adjusting the Projector Zoom / Focus You may turn the zoom ring to 10.0 meters). Screen Size Max.(WxH) Min.(WxH) Distance 29.5"(75.0cm) 24.6"(62.5cm) 23....

User Manual
Page 15
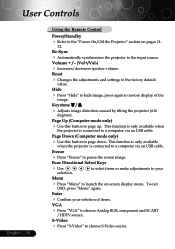
... Select Keys Use selection. Control Panel Remote Control Using the Control Panel Power/Standby Refer to the "Power On/Off the Projector" section on screen display (OSD) menu. Video, Composite Video and HDTV sources. To exit OSD, press "Menu" again. to select items... or make adjustments to your Enter Confirm your selection of items. Auto Image Automatically synchronizes the projector to control the functions: Remote Control and Control Panel. Source Press "Source" to launch the on pages 11- 12. Menu ...
... Select Keys Use selection. Control Panel Remote Control Using the Control Panel Power/Standby Refer to the "Power On/Off the Projector" section on screen display (OSD) menu. Video, Composite Video and HDTV sources. To exit OSD, press "Menu" again. to select items... or make adjustments to your Enter Confirm your selection of items. Auto Image Automatically synchronizes the projector to control the functions: Remote Control and Control Panel. Source Press "Source" to launch the on pages 11- 12. Menu ...
User Manual
Page 16
...source. Page Up (Computer mode only) Use this button to page down. Keystone / Adjusts image distortion caused by tilting the projector (±16 degrees). S-Video Press "S-Video" to pause the screen image. to select items or make adjustments to your selection of the ...image. User Controls English ... 16 Using the Remote Control Power/Standby Refer to the "Power On/Off the Projector" section on screen display menu. Volume + / - (Vol+/Vol-) Increases/decreases speaker volume. This function is only available when the...
...source. Page Up (Computer mode only) Use this button to page down. Keystone / Adjusts image distortion caused by tilting the projector (±16 degrees). S-Video Press "S-Video" to pause the screen image. to select items or make adjustments to your selection of the ...image. User Controls English ... 16 Using the Remote Control Power/Standby Refer to the "Power On/Off the Projector" section on screen display menu. Volume + / - (Vol+/Vol-) Increases/decreases speaker volume. This function is only available when the...

User Manual
Page 18
..., press "Enter " key to operate 1. Select the next item to make image adjustments and change a variety of settings. User Controls On Screen Display Menus The Projector has multilingual On Screen Display menus that allow you to be adjusted in the main menu. The OSD menu will close and the...
..., press "Enter " key to operate 1. Select the next item to make image adjustments and change a variety of settings. User Controls On Screen Display Menus The Projector has multilingual On Screen Display menus that allow you to be adjusted in the main menu. The OSD menu will close and the...
User Manual
Page 20
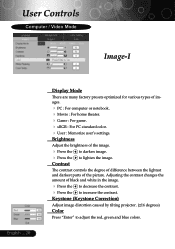
... theater. Game : For game. sRGB : For PC standard color. User : Memorize user's settings. Keystone (Keystone Correction) Adjust image distortion caused by tilting projector. (±16 degrees) Color Press "Enter" to lighten the image. Brightness Adjust the brightness of the picture. to adjust the red, green and blue colors...
... theater. Game : For game. sRGB : For PC standard color. User : Memorize user's settings. Keystone (Keystone Correction) Adjust image distortion caused by tilting projector. (±16 degrees) Color Press "Enter" to lighten the image. Brightness Adjust the brightness of the picture. to adjust the red, green and blue colors...
User Manual
Page 27
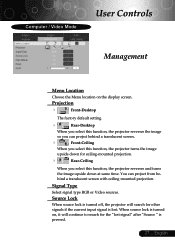
...setting. Rear-Desktop When you select this function, the projector reverses the image so you can project from behind a translucent screen. Front-Ceiling When you select this function, the projector turns the image upside down for ceiling-mounted projection. Rear...-Ceiling When you select this function, the projector reverses and turns the image upside down at same time. You can project ...
...setting. Rear-Desktop When you select this function, the projector reverses the image so you can project from behind a translucent screen. Front-Ceiling When you select this function, the projector turns the image upside down for ceiling-mounted projection. Rear...-Ceiling When you select this function, the projector reverses and turns the image upside down at same time. You can project ...

User Manual
Page 28
English ... 28 Zoom Press the Press the to the factory default settings. Reset Choose "Yes" to return the display parameters on all menus to reduce the size of the projector. User Controls Computer / Video Mode Management High Altitude Choose "ON" to allow for proper high altitude cooling of an image. Operates the fans at full speed continuously to turn on the projection screen. to magnify an image on High Altitude mode.
English ... 28 Zoom Press the Press the to the factory default settings. Reset Choose "Yes" to return the display parameters on all menus to reduce the size of the projector. User Controls Computer / Video Mode Management High Altitude Choose "ON" to allow for proper high altitude cooling of an image. Operates the fans at full speed continuously to turn on the projection screen. to magnify an image on High Altitude mode.
User Manual
Page 29
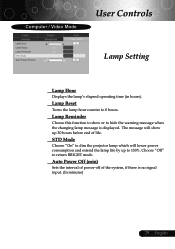
... the warning message when the changing lamp message is no signal input. (In minutes) 29 ... Lamp Reset Turns the lamp hour counter to dim the projector lamp which will show or to return BRIGHT mode.
... the warning message when the changing lamp message is no signal input. (In minutes) 29 ... Lamp Reset Turns the lamp hour counter to dim the projector lamp which will show or to return BRIGHT mode.
User Manual
Page 30
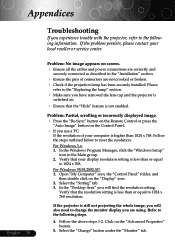
... Control Panel. If you use a PC: If the resolution of connectors are using. For Windows 95,98,2000,XP: 1. If the projector is not enabled. Select the "Change" button under the "Monitor" tab. English ... 30 Problem: No image appears on . Ensure that...Select the "Setting" tab. 3. Refer to the following steps. 4. Follow the above steps 1-2. Appendices Troubleshooting If you experience trouble with the projector, refer to the following information. Please refer to change the monitor display you are not crooked or broken. Check if the projection...
... Control Panel. If you use a PC: If the resolution of connectors are using. For Windows 95,98,2000,XP: 1. If the projector is not enabled. Select the "Change" button under the "Monitor" tab. English ... 30 Problem: No image appears on . Ensure that...Select the "Setting" tab. 3. Refer to the following steps. 4. Follow the above steps 1-2. Appendices Troubleshooting If you experience trouble with the projector, refer to the following information. Please refer to change the monitor display you are not crooked or broken. Check if the projection...
User Manual
Page 31
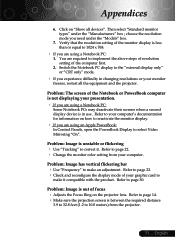
... mode you are using a Notebook PC: 1. Switch the Notebook PC display to page 22. Change the monitor color setting from the projector. 31 ... Refer to the "external display only" or "CRT only" mode. If you experience difficulty in changing resolutions ...or your computer's documentation for information on "Show all the equipment and the projector. Problem: The screen of the computer first. 2. Problem: Image has vertical flickering bar Use "Frequency" to page...
... mode you are using a Notebook PC: 1. Switch the Notebook PC display to page 22. Change the monitor color setting from the projector. 31 ... Refer to the "external display only" or "CRT only" mode. If you experience difficulty in changing resolutions ...or your computer's documentation for information on "Show all the equipment and the projector. Problem: The screen of the computer first. 2. Problem: Image has vertical flickering bar Use "Frequency" to page...
User Manual
Page 32
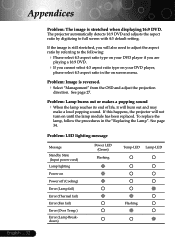
... Temp.) Error (Lamp Breakdown) Power LED (Green) Flashing Temp-LED Lamp-LED Flashing See page 34. Problem: Image is stretched when displaying 16:9 DVD. The projector automatically detects 16:9 DVD and adjusts the aspect ratio by referring to full screen with 4:3 default setting. Problem: Lamp burns out or makes a popping sound...
... Temp.) Error (Lamp Breakdown) Power LED (Green) Flashing Temp-LED Lamp-LED Flashing See page 34. Problem: Image is stretched when displaying 16:9 DVD. The projector automatically detects 16:9 DVD and adjusts the aspect ratio by referring to full screen with 4:3 default setting. Problem: Lamp burns out or makes a popping sound...

User Manual
Page 33
will be shown about 10 seconds, when lamp is out of life. "Projector Overheated. will automatically turn off soon." Appendices Problem: Message Reminders "Lamp is too high. "Fan failure. tion. Lamp will be shown when the system temperature is approaching the end of its useful life in full power opera- will automatically turn off soon." Lamp will be shown when the fan is nearing end of order. 33 ... Replacement Suggested!" English
will be shown about 10 seconds, when lamp is out of life. "Projector Overheated. will automatically turn off soon." Appendices Problem: Message Reminders "Lamp is too high. "Fan failure. tion. Lamp will be shown when the system temperature is approaching the end of its useful life in full power opera- will automatically turn off soon." Lamp will be shown when the fan is nearing end of order. 33 ... Replacement Suggested!" English


