

User Manual
Page 3
... 10 ----+--- Adjusting the Projector Zoom/Focus 12 ------- On-Screen Display Menus 15 ------- Image-I (Computer mode 16 ------- Panel Control & Remote Control 13 ----+--- Product Overview 5 ------- Changing the Lamp 24 ------- Laser Pointer Caution 7 Installation ------- Powering On/Off the Projector 9 ------- Connection Ports 6 ------- Troubleshooting 22 -------
... 10 ----+--- Adjusting the Projector Zoom/Focus 12 ------- On-Screen Display Menus 15 ------- Image-I (Computer mode 16 ------- Panel Control & Remote Control 13 ----+--- Product Overview 5 ------- Changing the Lamp 24 ------- Laser Pointer Caution 7 Installation ------- Powering On/Off the Projector 9 ------- Connection Ports 6 ------- Troubleshooting 22 -------

User Manual
Page 4
...the risk of its life, it shows warning messages. Please do not expose this may cause electric shock. After changing a new lamp, please reset the lamp life from AC outlet if the product is equipped with mild detergent to clean the display housing. Warning- Before switching off the... listed under the following conditions: - v Disconnect the power plug from OSD menu. Do not look directly into the laser light on until the lamp module has been replaced. The bright light may make a loud popping sound. Warning- Warning- Warning- Warning- This product will burn out and ...
...the risk of its life, it shows warning messages. Please do not expose this may cause electric shock. After changing a new lamp, please reset the lamp life from AC outlet if the product is equipped with mild detergent to clean the display housing. Warning- Before switching off the... listed under the following conditions: - v Disconnect the power plug from OSD menu. Do not look directly into the laser light on until the lamp module has been replaced. The bright light may make a loud popping sound. Warning- Warning- Warning- Warning- This product will burn out and ...
User Manual
Page 5
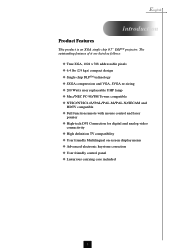
... XGA, 1024 x 768 addressable pixels u 6.4 lbs (2.9 kgs) compact design u Single chip DLPTM technology u SXGA compression and VGA, SVGA re-sizing u 200 Watts user replaceable UHP lamp u Mac/NEC PC-98/FM Towns compatible u NTSC/NTSC4.43/PAL/PAL-M/PAL-N/SECAM and HDTV compatible u Full function remote with mouse control and laser...
... XGA, 1024 x 768 addressable pixels u 6.4 lbs (2.9 kgs) compact design u Single chip DLPTM technology u SXGA compression and VGA, SVGA re-sizing u 200 Watts user replaceable UHP lamp u Mac/NEC PC-98/FM Towns compatible u NTSC/NTSC4.43/PAL/PAL-M/PAL-N/SECAM and HDTV compatible u Full function remote with mouse control and laser...
User Manual
Page 8
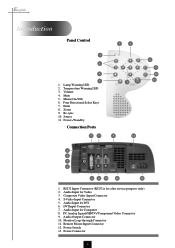
... 6 Re-sync 10. Composite Video Input Connector 4. S-Video Input Connector 5. Audio Output Connector 10. Monitor Loop-through Connector 11. Remote Mouse Input Connector 12. Enter 8. Lamp Warning LED 2. Menu (On/Off) 6. Zoom 9. Volume 4. DVI Input Connecter 7. Power Switch 13. English Introduction Panel Control 1 3 4 5 1. Audio Input for after service purpose only) 2. Four...
... 6 Re-sync 10. Composite Video Input Connector 4. S-Video Input Connector 5. Audio Output Connector 10. Monitor Loop-through Connector 11. Remote Mouse Input Connector 12. Enter 8. Lamp Warning LED 2. Menu (On/Off) 6. Zoom 9. Volume 4. DVI Input Connecter 7. Power Switch 13. English Introduction Panel Control 1 3 4 5 1. Audio Input for after service purpose only) 2. Four...

User Manual
Page 11
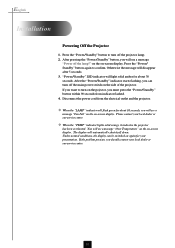
... will light solid amber. v If you connect multiple sources at the same time, use the "Source" button on your source automatically. Turn on the lamp by pressing "Power/Standby" button on the side of the projector and allow the projector to switch. 3 Power / Standby Lens cap 1 9 2 ...2. Turn on the main power switch on the panel control. Ž The startup screen will display and count down for 1-2 minutes. 4. The "LAMP" LED indicator will detect your source (computer, notebook, or video player ,etc.). v If the screen displays "No Signal" , please make sure the signal ...
... will light solid amber. v If you connect multiple sources at the same time, use the "Source" button on your source automatically. Turn on the lamp by pressing "Power/Standby" button on the side of the projector and allow the projector to switch. 3 Power / Standby Lens cap 1 9 2 ...2. Turn on the main power switch on the panel control. Ž The startup screen will display and count down for 1-2 minutes. 4. The "LAMP" LED indicator will detect your source (computer, notebook, or video player ,etc.). v If the screen displays "No Signal" , please make sure the signal ...
User Manual
Page 12
... persists, you will light solid amber for your presentation. Disconnect the power cord from indicator flashed. 4. Press the "Power/Standby" button to turn off the lamp?" on the on the side of the projector. After the "Power/Standby" indicator starts flashing, you can be switched on -screen display. If you must... will see a message "Over Temperature" on the on the pojector, you want to confirm. "Power/Standby" LED indicator will see a message "Power off the projector lamp. 2. v When the "LAMP" indicator will flash green for about 30 seconds.
... persists, you will light solid amber for your presentation. Disconnect the power cord from indicator flashed. 4. Press the "Power/Standby" button to turn off the lamp?" on the on the side of the projector. After the "Power/Standby" indicator starts flashing, you can be switched on -screen display. If you must... will see a message "Over Temperature" on the on the pojector, you want to confirm. "Power/Standby" LED indicator will see a message "Power off the projector lamp. 2. v When the "LAMP" indicator will flash green for about 30 seconds.
User Manual
Page 23
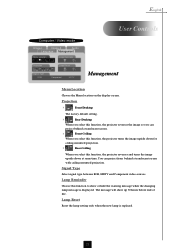
...type between RGB, HDTV and Component video sources. Lamp Reset Reset the lamp setting only when the new lamp is displayed. English Computer / Video mode Image-I Image-II Audio Language Management Menu Location Lamp Reminder Projection Lamp Reset Signal Type RGB Component HDTV User Controls ...can project behind a translucent screen with ceiling mounted projection. The message will show or hide the warning message when the changing lamp message is replaced. 21 Projection 4 Front-Desktop The factory default setting. 4 Rear-Desktop When you select this function, the ...
...type between RGB, HDTV and Component video sources. Lamp Reset Reset the lamp setting only when the new lamp is displayed. English Computer / Video mode Image-I Image-II Audio Language Management Menu Location Lamp Reminder Projection Lamp Reset Signal Type RGB Component HDTV User Controls ...can project behind a translucent screen with ceiling mounted projection. The message will show or hide the warning message when the changing lamp message is replaced. 21 Projection 4 Front-Desktop The factory default setting. 4 Rear-Desktop When you select this function, the ...
User Manual
Page 24
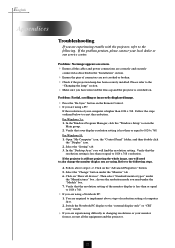
... under the "Manufactures" box ; English Appendices Troubleshooting If you are not crooked or broken. 4 Check if the projection lamp has been securely installed. Follow the steps outlined below to the "Changing the lamp" section. 4 Make sure you have removed the lens cap and the projector is higher than 1024 x 768. Verify that...
... under the "Manufactures" box ; English Appendices Troubleshooting If you are not crooked or broken. 4 Check if the projection lamp has been securely installed. Follow the steps outlined below to the "Changing the lamp" section. 4 Make sure you have removed the lens cap and the projector is higher than 1024 x 768. Verify that...
User Manual
Page 25
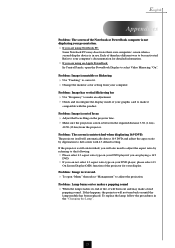
... them has different way to full screen with the product. Problem : Image is out of focus 4 Adjust the Focus Ring on until the lamp module has been replaced. Refer to your computer's documentation for your display. The projector itself will burn out and may deactivate their own computers'... screen when a second display device is in the "Changing the Lamp". 23 If the projector is still outstretched, you will not turn back on the projector lens. 4 Make sure the projection screen is between ...
... them has different way to full screen with the product. Problem : Image is out of focus 4 Adjust the Focus Ring on until the lamp module has been replaced. Refer to your computer's documentation for your display. The projector itself will burn out and may deactivate their own computers'... screen when a second display device is in the "Changing the Lamp". 23 If the projector is still outstretched, you will not turn back on the projector lens. 4 Make sure the projection screen is between ...
User Manual
Page 26
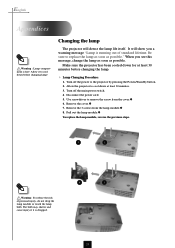
... has been cooled down before changing the lamp. 4 Lamp Changing Procedure: 1. Pull out the lamp module. To replace the lamp module, reverse the previous steps. 2 1 Warning : To reduce the risk of standard lifetime. English Appendices Warning : Lamp compartment is running out of personal injury,... do not drop the lamp module or touch the lamp bulb. Allow the projector to the projector by pressing the Power/Standby button. 2. The ...
... has been cooled down before changing the lamp. 4 Lamp Changing Procedure: 1. Pull out the lamp module. To replace the lamp module, reverse the previous steps. 2 1 Warning : To reduce the risk of standard lifetime. English Appendices Warning : Lamp compartment is running out of personal injury,... do not drop the lamp module or touch the lamp bulb. Allow the projector to the projector by pressing the Power/Standby button. 2. The ...
User Manual
Page 27
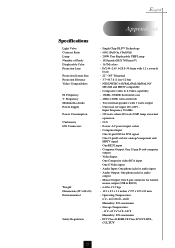
... - 10.9 x 8.9 x 3.3 inches / 277 x 225 x 85 mm - Single Chip DLPTM Technology - 600:1 (Full On / Full Off) - 200W User Replaceable UHP Lamp - 1024 pixels(H) X 768 lines(V) - 16.7M colors - Power: AC power input socket - Video Input: One Composite video RCA input One S-Video input - Mouse Output: ...- Storage Temperature: -10oC~60oC/ 14oF~140oF Humidity: 80% maximum - Input Frequency 50-60Hz - 350 watts when 200 watts UHP lamp at normal operation - 90 % - Operating Temperature: 0oC~ 40oC/32oF~104oF Humidity: 80% maximum - English Appendices Specifications Light Valve Contrast Ratio...
... - 10.9 x 8.9 x 3.3 inches / 277 x 225 x 85 mm - Single Chip DLPTM Technology - 600:1 (Full On / Full Off) - 200W User Replaceable UHP Lamp - 1024 pixels(H) X 768 lines(V) - 16.7M colors - Power: AC power input socket - Video Input: One Composite video RCA input One S-Video input - Mouse Output: ...- Storage Temperature: -10oC~60oC/ 14oF~140oF Humidity: 80% maximum - Input Frequency 50-60Hz - 350 watts when 200 watts UHP lamp at normal operation - 90 % - Operating Temperature: 0oC~ 40oC/32oF~104oF Humidity: 80% maximum - English Appendices Specifications Light Valve Contrast Ratio...


