
User Manual
Page 1
... 16 On-Screen Display Menus 19 How to Operate ...19 Menu Tree...20 Image-I ...21 Image-II ...23 Colour Adjustment...25 Language ...25 Management ...26 Lamp Setting...29 Appendices 30 Troubleshooting 30 Replacing the Lamp 34 Compatibility Modes 35 RS232 Commands 36 Ceiling Mount Installation 37 Optoma Global Offices 38 1 English
... 16 On-Screen Display Menus 19 How to Operate ...19 Menu Tree...20 Image-I ...21 Image-II ...23 Colour Adjustment...25 Language ...25 Management ...26 Lamp Setting...29 Appendices 30 Troubleshooting 30 Replacing the Lamp 34 Compatibility Modes 35 RS232 Commands 36 Ceiling Mount Installation 37 Optoma Global Offices 38 1 English
User Manual
Page 2
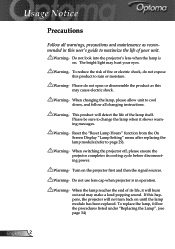
...the projector will not turn back on until the lamp module has been replaced. Warning- Warning- Reset the "Reset Lamp Hours" function from the On Screen Display "Lamp Setting" menu after replacing the lamp module (refer to maximize the life of the lamp itself. Warning- Warning- To reduce the risk of...- The bright light may make a loud popping sound. When changing the lamp, please allow unit to cool down, and follow the procedures listed under "Replacing the Lamp". (see page 34) English 2 Turn on . When the lamp reaches the end of fire or electric shock, do not open or...
...the projector will not turn back on until the lamp module has been replaced. Warning- Warning- Reset the "Reset Lamp Hours" function from the On Screen Display "Lamp Setting" menu after replacing the lamp module (refer to maximize the life of the lamp itself. Warning- Warning- To reduce the risk of...- The bright light may make a loud popping sound. When changing the lamp, please allow unit to cool down, and follow the procedures listed under "Replacing the Lamp". (see page 34) English 2 Turn on . When the lamp reaches the end of fire or electric shock, do not open or...

User Manual
Page 7
Re-Sync 10. Power/Standby LED 4. Menu (On/Off) 5. Source Select 7 English Keystone +/8. Temp Indicator LED 3. IR Receiver 7. Enter 6. Four Directional Select Keys 9. Lamp Indicator LED 2. Introduction Control Panel 10 9 8 7 654 321 1.
Re-Sync 10. Power/Standby LED 4. Menu (On/Off) 5. Source Select 7 English Keystone +/8. Temp Indicator LED 3. IR Receiver 7. Enter 6. Four Directional Select Keys 9. Lamp Indicator LED 2. Introduction Control Panel 10 9 8 7 654 321 1.
User Manual
Page 12
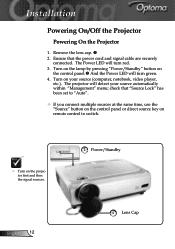
... on the control panel or direct source key on remote control to switch. Turn on your source automatically within "Management" menu; Turn on the lamp by pressing "Power/Standby" button on the control panel. And the Power LED will turn green. 4. The Power LED will turn red. 3. Remove the...
... on the control panel or direct source key on remote control to switch. Turn on your source automatically within "Management" menu; Turn on the lamp by pressing "Power/Standby" button on the control panel. And the Power LED will turn green. 4. The Power LED will turn red. 3. Remove the...
User Manual
Page 13
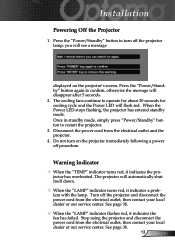
...to operate for about 30 seconds for cooling cycle and the Power LED will automatically shut itself down. When the "LAMP" indicator turns red, it indicates a problem with the lamp. Once in standby mode, simply press "Power/Standby" button to confirm, otherwise the message will see a message displayed... the Projector 1. Disconnect the power cord from the electrical outlet, then contact your local dealer or our service center. Turn off the projector lamp; See page 38. When the "LAMP" indicator flashes red, it indicates the projector has overheated.
...to operate for about 30 seconds for cooling cycle and the Power LED will automatically shut itself down. When the "LAMP" indicator turns red, it indicates a problem with the lamp. Once in standby mode, simply press "Power/Standby" button to confirm, otherwise the message will see a message displayed... the Projector 1. Disconnect the power cord from the electrical outlet, then contact your local dealer or our service center. Turn off the projector lamp; See page 38. When the "LAMP" indicator flashes red, it indicates the projector has overheated.
User Manual
Page 29
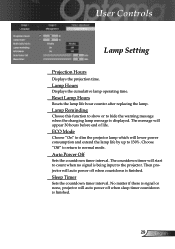
... by up to normal mode. Then projector will auto power off when countdown is finished. 29 English Reset Lamp Hours Resets the lamp life hour counter after replacing the lamp. Choose "Off" to return to 130%. No matter if there is signal or none, projector will auto power off when ... Choose this function to show or to hide the warning message when the changing lamp message is being input to count when no signal is displayed. User Controls Lamp Setting Projection Hours Displays the projection time. The countdown timer will appear 30 hours before end of life. Sleep Timer Sets ...
... by up to normal mode. Then projector will auto power off when countdown is finished. 29 English Reset Lamp Hours Resets the lamp life hour counter after replacing the lamp. Choose "Off" to return to 130%. No matter if there is signal or none, projector will auto power off when ... Choose this function to show or to hide the warning message when the changing lamp message is being input to count when no signal is displayed. User Controls Lamp Setting Projection Hours Displays the projection time. The countdown timer will appear 30 hours before end of life. Sleep Timer Sets ...
User Manual
Page 30
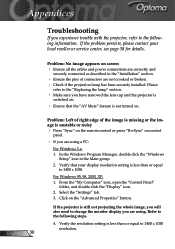
Please refer to the "Replacing the lamp" section. Make sure you have removed the lens cap and the projector is less than or equal to 1400 x 1050. Verify the resolution setting ... or service center, see page 38 for details. Problem: Left of right edge of connectors are not crooked or broken. Check if the projection lamp has been securely installed. Select the "Settings" tab. 3. If the projector is unstable or noisy Press "Sync" on the remote control or press "Re...
Please refer to the "Replacing the lamp" section. Make sure you have removed the lens cap and the projector is less than or equal to 1400 x 1050. Verify the resolution setting ... or service center, see page 38 for details. Problem: Left of right edge of connectors are not crooked or broken. Check if the projection lamp has been securely installed. Select the "Settings" tab. 3. If the projector is unstable or noisy Press "Sync" on the remote control or press "Re...
User Manual
Page 32
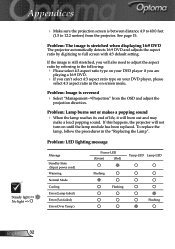
..., you will also need to adjust the aspect ratio by digitizing to full screen with 4:3 default setting. Problem: Lamp burns out or makes a popping sound When the lamp reaches its end of life, it will not turn on screen menu. Problem: LED lighting message Message Standby State ...you can't select 4:3 aspect ratio type on your DVD player, please select 4:3 aspect ratio in the "Replacing the Lamp". To replace the lamp, follow the procedures in the on until the lamp module has been replaced. If this happens, the projector will burn out and may make a loud popping sound. Problem...
..., you will also need to adjust the aspect ratio by digitizing to full screen with 4:3 default setting. Problem: Lamp burns out or makes a popping sound When the lamp reaches its end of life, it will not turn on screen menu. Problem: LED lighting message Message Standby State ...you can't select 4:3 aspect ratio type on your DVD player, please select 4:3 aspect ratio in the "Replacing the Lamp". To replace the lamp, follow the procedures in the on until the lamp module has been replaced. If this happens, the projector will burn out and may make a loud popping sound. Problem...

User Manual
Page 34
... Push up and remove the cover. 6. Make sure the projector has cooled down for at least 30 minutes before changing lamp! When you a warning message Warning: Lamp compartment is dropped. Allow the projector to cool down for at least 30 minutes. 3. Remove the 2 screws from the cover... 5. Allow 30 minutes to cool down before changing the lamp. 3 1 2 4 Warning: To reduce the risk of the lamp usage. Appendices Replacing the Lamp The projector keeps track of personal injury, do not drop the lamp module or touch the lamp bulb. It will show you see this message, change ...
... Push up and remove the cover. 6. Make sure the projector has cooled down for at least 30 minutes before changing lamp! When you a warning message Warning: Lamp compartment is dropped. Allow the projector to cool down for at least 30 minutes. 3. Remove the 2 screws from the cover... 5. Allow 30 minutes to cool down before changing the lamp. 3 1 2 4 Warning: To reduce the risk of the lamp usage. Appendices Replacing the Lamp The projector keeps track of personal injury, do not drop the lamp module or touch the lamp bulb. It will show you see this message, change ...


