
User Guide
Page 1
...Installation 10 Connecting the Projector 10 Powering On/Off the Projector 11 Powering On the Projector 11 Powering Off the projector 12 Warning Indicator ...12 Adjusting the Projected Image 13 Adjusting the Projector Image Height 13 Adjusting the Projector Zoom / Focus 14... Adjusting Projected Image Size 14 User Controls 15 Control Panel & Remote Control 15 On-Screen Display Menus 18 How to operate ...18 Language ...19 Image-I ...20 Image-II (Computer Mode 22 Image-II (Video Mode 24 Audio ...26 Management ...27 Lamp...
...Installation 10 Connecting the Projector 10 Powering On/Off the Projector 11 Powering On the Projector 11 Powering Off the projector 12 Warning Indicator ...12 Adjusting the Projected Image 13 Adjusting the Projector Image Height 13 Adjusting the Projector Zoom / Focus 14... Adjusting Projected Image Size 14 User Controls 15 Control Panel & Remote Control 15 On-Screen Display Menus 18 How to operate ...18 Language ...19 Image-I ...20 Image-II (Computer Mode 22 Image-II (Video Mode 24 Audio ...26 Management ...27 Lamp...
User Guide
Page 2
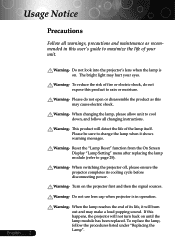
... and maintenance as this may cause electric shock. Reset the "Lamp Reset" function from the On Screen Display "Lamp Setting" menu after replacing the lamp module (refer to rain or moisture. Do not use lens cap when projector is on. Warning- Warning- The bright light may make a... loud popping sound. Warning- When switching the projector off, please ensure the projector completes its life, it shows warning messages. To reduce the risk of the lamp itself. Please do not expose this user's guide to cool down, and follow the...
... and maintenance as this may cause electric shock. Reset the "Lamp Reset" function from the On Screen Display "Lamp Setting" menu after replacing the lamp module (refer to rain or moisture. Do not use lens cap when projector is on. Warning- Warning- The bright light may make a... loud popping sound. Warning- When switching the projector off, please ensure the projector completes its life, it shows warning messages. To reduce the risk of the lamp itself. Please do not expose this user's guide to cool down, and follow the...
User Guide
Page 11
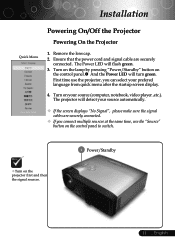
... Press Enter to switch. ™Turn on the projector first and then the signal sources. 1 Power/Standby 11 ... Turn on the lamp by pressing "Power/Standby" button on the control panel.n And the Power LED will flash green. 3. The projector will detect your source automatically. ™ If the.... Ensure that the power cord and signal cable are securely connected. ™ If you connect multiple sources at the same time, use the projector, you can select your source (computer, notebook, video player ,etc.). First time use the "Source" button on your prefered language from quick...
... Press Enter to switch. ™Turn on the projector first and then the signal sources. 1 Power/Standby 11 ... Turn on the lamp by pressing "Power/Standby" button on the control panel.n And the Power LED will flash green. 3. The projector will detect your source automatically. ™ If the.... Ensure that the power cord and signal cable are securely connected. ™ If you connect multiple sources at the same time, use the projector, you can select your source (computer, notebook, video player ,etc.). First time use the "Source" button on your prefered language from quick...
User Guide
Page 12
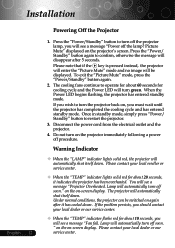
... see a message "Fan fail. Picture Mute" displayed on -screen display. If you wish to turn off the projector lamp, you will automatically shut itself down. Warning Indicator ™ When the "LAMP" indicator lights solid red, the projector will see a message "Power off soon." Once in standby mode, simply press "Power/ Standby" button to confirm...
... see a message "Fan fail. Picture Mute" displayed on -screen display. If you wish to turn off the projector lamp, you will automatically shut itself down. Warning Indicator ™ When the "LAMP" indicator lights solid red, the projector will see a message "Power off soon." Once in standby mode, simply press "Power/ Standby" button to confirm...

User Guide
Page 18
...exit, press "Menu"again. While making a selection on the Remote Control or Control Panel. 2. Use keys to the main menu. 6. The projector will automatically save the new settings. Press "Menu" to confirm, and the screen will return to select the desired item and adjust the settings by... key. 4. User Controls On Screen Display Menus The Projector has multilingual On Screen Display menus that allow you to Set Sub Menu Setting English ... 18 Management Image-II Lamp Setting Audio PC Movie sRGB Game User Press Enter to make image adjustments and...
...exit, press "Menu"again. While making a selection on the Remote Control or Control Panel. 2. Use keys to the main menu. 6. The projector will automatically save the new settings. Press "Menu" to confirm, and the screen will return to select the desired item and adjust the settings by... key. 4. User Controls On Screen Display Menus The Projector has multilingual On Screen Display menus that allow you to Set Sub Menu Setting English ... 18 Management Image-II Lamp Setting Audio PC Movie sRGB Game User Press Enter to make image adjustments and...
User Guide
Page 27
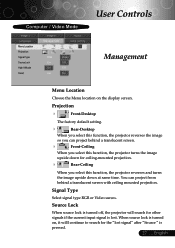
...Video surces. Computer / Video Mode Image-I Language Menu Location Projection Signal Type Source Lock High Altitude Reset Image-II Management Audio Lamp setting RGB On On Yes Video Off Off No User Controls Management Menu Location Choose the Menu location on , it willl ...-mounted projection. 4 Rear-Ceiling When you can project from behind a translucent screen. 4 Front-Ceiling When you select this function, the projector reverses and turns the image upside down for the "lost . You can project behind a translucent screen with ceiling mounted projection. Source Lock...
...Video surces. Computer / Video Mode Image-I Language Menu Location Projection Signal Type Source Lock High Altitude Reset Image-II Management Audio Lamp setting RGB On On Yes Video Off Off No User Controls Management Menu Location Choose the Menu location on , it willl ...-mounted projection. 4 Rear-Ceiling When you can project from behind a translucent screen. 4 Front-Ceiling When you select this function, the projector reverses and turns the image upside down for the "lost . You can project behind a translucent screen with ceiling mounted projection. Source Lock...
User Guide
Page 28
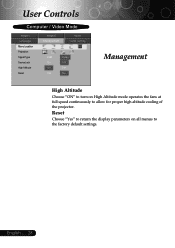
Reset Choose "Yes" to return the display parameters on High Altitude mode operates the fans at full speed continuously to the factory default settings. English ... 28 User Controls Computer / Video Mode Image-I Language Menu Location Projection Signal Type Source Lock High Altitude Reset Image-II Management Audio Lamp setting RGB On On Yes Video Off Off No Management High Altitude Choose "ON" to turn on all menus to allow for proper high altitude cooling of the projector.
Reset Choose "Yes" to return the display parameters on High Altitude mode operates the fans at full speed continuously to the factory default settings. English ... 28 User Controls Computer / Video Mode Image-I Language Menu Location Projection Signal Type Source Lock High Altitude Reset Image-II Management Audio Lamp setting RGB On On Yes Video Off Off No Management High Altitude Choose "ON" to turn on all menus to allow for proper high altitude cooling of the projector.
User Guide
Page 29
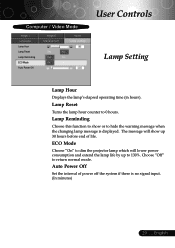
Computer / Video Mode Image-I Language Lamp Hour Lamp Reset Lamp Reminding ECO Mode Auto Power Off Image-II Management Audio Lamp setting Yes No Yes No On Off User Controls Lamp Setting Lamp Hour Displays the lamp's elapsed operating time (in hours). Lamp Reminding Choose this function to show up to 0 hours. Choose ... lower power consumption and extend the lamp life by up 30 hours before end of power off the system if there is displayed. English Auto Power Off Set the interval of life. ECO Mode Choose "On" to dim the projector lamp which will show or to return normal...
Computer / Video Mode Image-I Language Lamp Hour Lamp Reset Lamp Reminding ECO Mode Auto Power Off Image-II Management Audio Lamp setting Yes No Yes No On Off User Controls Lamp Setting Lamp Hour Displays the lamp's elapsed operating time (in hours). Lamp Reminding Choose this function to show up to 0 hours. Choose ... lower power consumption and extend the lamp life by up 30 hours before end of power off the system if there is displayed. English Auto Power Off Set the interval of life. ECO Mode Choose "On" to dim the projector lamp which will show or to return normal...
User Guide
Page 30
...securely connected as described in the Main group. 2. Click on the "Display" icon. 2. Please refer to the "Replacing the lamp" section. 4 Make sure you have removed the lens cap and the projector is switched on the Control Panel. 4 If you use a PC: If the resolution of connectors are using. Problem: Partial,..."Re-Sync" button on the Remote Control or press the "Auto Image" button on . 4 Ensure that your local reseller or service center. If the projector is higher than or equal to 1024 x 768 resolution. Verify that the "Hide" feature is less than or equal to 1024 x 768. Refer to ...
...securely connected as described in the Main group. 2. Click on the "Display" icon. 2. Please refer to the "Replacing the lamp" section. 4 Make sure you have removed the lens cap and the projector is switched on the Control Panel. 4 If you use a PC: If the resolution of connectors are using. Problem: Partial,..."Re-Sync" button on the Remote Control or press the "Auto Image" button on . 4 Ensure that your local reseller or service center. If the projector is higher than or equal to 1024 x 768 resolution. Verify that the "Hide" feature is less than or equal to 1024 x 768. Refer to ...
User Guide
Page 32
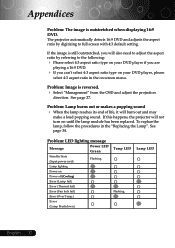
... If this happens, the projector will also need to adjust the aspect ratio by digitizing to the following: 4 Please select 4:3 aspect ratio type on your DVD player if you are playing a 16:9 DVD. 4 If you will not turn on Power off (Cooling) Error (Lamp fail) Error (Thermal fail... is still outstretched, you can't select 4:3 aspect ratio type on your DVD player, please select 4:3 aspect ratio in the "Replacing the Lamp". The projector automatically detects 16:9 DVD and adjusts the aspect ratio by referring to full screen with 4:3 default setting. See page 34. Problem: LED ...
... If this happens, the projector will also need to adjust the aspect ratio by digitizing to the following: 4 Please select 4:3 aspect ratio type on your DVD player if you are playing a 16:9 DVD. 4 If you will not turn on Power off (Cooling) Error (Lamp fail) Error (Thermal fail... is still outstretched, you can't select 4:3 aspect ratio type on your DVD player, please select 4:3 aspect ratio in the "Replacing the Lamp". The projector automatically detects 16:9 DVD and adjusts the aspect ratio by referring to full screen with 4:3 default setting. See page 34. Problem: LED ...

User Guide
Page 33
will be shown when the system temperature is going to deplete. 4 "Projector Overheated. will be shown when the fan is approaching the end of order. 33 ... will be shown about 10 seconds when lamp life is over heat. 4 "Fan fail. Lamp will automatically turn off soon." English Replacement Suggested!" Lamp will automatically turn off soon." Appendices Problem: Message Reminders 4 "Lamp is out of its useful life in full power operation.
will be shown when the system temperature is going to deplete. 4 "Projector Overheated. will be shown when the fan is approaching the end of order. 33 ... will be shown about 10 seconds when lamp life is over heat. 4 "Fan fail. Lamp will automatically turn off soon." English Replacement Suggested!" Lamp will automatically turn off soon." Appendices Problem: Message Reminders 4 "Lamp is out of its useful life in full power operation.
User Guide
Page 34
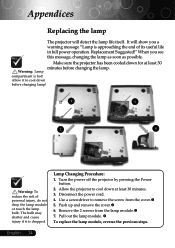
...the cover.n 5. Appendices Replacing the lamp The projector will show you see this message, changing the lamp as soon as possible. Make sure the projector has been cooled down before changing the lamp. Push up and remove the cover.o 6. When you a warning message "Lamp is approaching the end of personal injury..., do not drop the lamp module or touch the lamp bulb. Allow it is hot! Disconnect the power cord. 4. q To replace the lamp module, reverse the previous steps. Turn the power off the projector by pressing the Power button. 2. Use a screwdriver ...
...the cover.n 5. Appendices Replacing the lamp The projector will show you see this message, changing the lamp as soon as possible. Make sure the projector has been cooled down before changing the lamp. Push up and remove the cover.o 6. When you a warning message "Lamp is approaching the end of personal injury..., do not drop the lamp module or touch the lamp bulb. Allow it is hot! Disconnect the power cord. 4. q To replace the lamp module, reverse the previous steps. Turn the power off the projector by pressing the Power button. 2. Use a screwdriver ...


