

User's Manual
Page 1
... ...7 Using the Product 9 Control Panel ...9 Connection Ports ...10 Remote Control ...11 Installing the Batteries ...13 Remote Control Operation 14 Connection 15 Connecting a computer or monitor 16 Connecting Video source devices 17 Operation 21 Powering On/Off the Projector 21 Adjusting the Projector Height 22 Adjusting the Projector Zoom and Focus 22 Adjusting Projection Image Size 23 Menu Operation ...24 Appendix 33 Replacing the Lamp ...33 Ceiling mount installation ...35 Compatibility Modes ...36 RS232 Commands and Protocol Function List 39 Troubleshooting ...43 Optoma Global...
... ...7 Using the Product 9 Control Panel ...9 Connection Ports ...10 Remote Control ...11 Installing the Batteries ...13 Remote Control Operation 14 Connection 15 Connecting a computer or monitor 16 Connecting Video source devices 17 Operation 21 Powering On/Off the Projector 21 Adjusting the Projector Height 22 Adjusting the Projector Zoom and Focus 22 Adjusting Projection Image Size 23 Menu Operation ...24 Appendix 33 Replacing the Lamp ...33 Ceiling mount installation ...35 Compatibility Modes ...36 RS232 Commands and Protocol Function List 39 Troubleshooting ...43 Optoma Global...

User's Manual
Page 5
...-pin terminal for analog video connectivity „ User-friendly, multi-language on-screen display „ Advanced electronic keystone correction „ RS-232 connector for serial control Note „ The information in this manual is subject to deliver high reliability and ease of this document is not permitted without notices. „ The reproduction, transfer or copy of all or any part of use.
...-pin terminal for analog video connectivity „ User-friendly, multi-language on-screen display „ Advanced electronic keystone correction „ RS-232 connector for serial control Note „ The information in this manual is subject to deliver high reliability and ease of this document is not permitted without notices. „ The reproduction, transfer or copy of all or any part of use.

User's Manual
Page 9
EN-9 Using the Product Control Panel 1 2 345 6 7 8 4 1 Power Turn the projector on or off. 2 SOURCE Switch between input signals. 3 MENU/EXIT Display or exit the on-screen display menus. 4 Keystone ( / ) Manually correct distorted images resulting from an angled projection. 5 Four directional buttons Use four directional buttons to select items or make adjustments to your selection. 6 Re-SYNC Automatically synchronize the projector to the input source. 7 POWER (Power LED indicator) Refer to "LED Indicator Messages". 8 TEMP/LAMP (Temp/Lamp LED indicator) Refer to "LED Indicator Messages".
EN-9 Using the Product Control Panel 1 2 345 6 7 8 4 1 Power Turn the projector on or off. 2 SOURCE Switch between input signals. 3 MENU/EXIT Display or exit the on-screen display menus. 4 Keystone ( / ) Manually correct distorted images resulting from an angled projection. 5 Four directional buttons Use four directional buttons to select items or make adjustments to your selection. 6 Re-SYNC Automatically synchronize the projector to the input source. 7 POWER (Power LED indicator) Refer to "LED Indicator Messages". 8 TEMP/LAMP (Temp/Lamp LED indicator) Refer to "LED Indicator Messages".

User's Manual
Page 10
... certain models) Connect HDMI output from video equipment to this jack. 3 S-VIDEO Connect S-Video output from video equipment to this jack. 4 VGA1-IN/YPbPr Connect image input signal (analog RGB or component) to this jack. 5 RS-232 When operating the projector via a computer, connect this to the controlling computer's RS-232C port. 6 Service/Mouse This connector is for firmware update and mouse function support. 7 VGA OUT Connect to a computer display, etc. 8 VGA2-IN/YPbPr Connect image input signal...
... certain models) Connect HDMI output from video equipment to this jack. 3 S-VIDEO Connect S-Video output from video equipment to this jack. 4 VGA1-IN/YPbPr Connect image input signal (analog RGB or component) to this jack. 5 RS-232 When operating the projector via a computer, connect this to the controlling computer's RS-232C port. 6 Service/Mouse This connector is for firmware update and mouse function support. 7 VGA OUT Connect to a computer display, etc. 8 VGA2-IN/YPbPr Connect image input signal...

User's Manual
Page 11
Remote Control 1 Switch Switch to mouse mode when the on-screen menus are close. 1 12 2 Source 2 13 Switch between input signals. 3 Four directional buttons 3 14 Use four directional buttons to select items or make 4 15 adjustments to your selection. 4 Left mouse 5 16 Perform the left button of the 6 17 mouse when mouse mode is activated. 7 5 Keystone ( / ) 8 18 19 20 Manually correct distorted 9 21 images resulting from an 10 22 angled...
Remote Control 1 Switch Switch to mouse mode when the on-screen menus are close. 1 12 2 Source 2 13 Switch between input signals. 3 Four directional buttons 3 14 Use four directional buttons to select items or make 4 15 adjustments to your selection. 4 Left mouse 5 16 Perform the left button of the 6 17 mouse when mouse mode is activated. 7 5 Keystone ( / ) 8 18 19 20 Manually correct distorted 9 21 images resulting from an 10 22 angled...

User's Manual
Page 12
... indicate the activation of the with a USB cable prior to Adjust the volume level. activated. 1. Connect the projector to your computer Perform the right button of the mouse can output sound and image. any other buttons are close. 14 Enter Using the remote mouse Confirmed selections. Press Switch on -screen display menus. 18 ZOOM Magnifies or reduces the projected picture size. 19 AV mute your remote control. Set the input signal to the normal mode...
... indicate the activation of the with a USB cable prior to Adjust the volume level. activated. 1. Connect the projector to your computer Perform the right button of the mouse can output sound and image. any other buttons are close. 14 Enter Using the remote mouse Confirmed selections. Press Switch on -screen display menus. 18 ZOOM Magnifies or reduces the projected picture size. 19 AV mute your remote control. Set the input signal to the normal mode...
User's Manual
Page 16
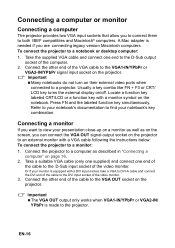
... the projector. A Mac adapter is made to a notebook or desktop computer: 1. Usually a key combo like FN + F3 or CRT/ LCD key turns the external display on the projector to an external monitor with a VGA cable following the instructions below: To connect the projector to the DVI input socket of the cable to a monitor: 1. Connecting a monitor If you can connect the VGA OUT signal output socket on /off. Locate a function...
... the projector. A Mac adapter is made to a notebook or desktop computer: 1. Usually a key combo like FN + F3 or CRT/ LCD key turns the external display on the projector to an external monitor with a VGA cable following the instructions below: To connect the projector to the DVI input socket of the cable to a monitor: 1. Connecting a monitor If you can connect the VGA OUT signal output socket on /off. Locate a function...

User's Manual
Page 18
... selected video image is not displayed after the projector is turned on and the correct video source has been selected, check that the signal cables have been connected correctly. To connect the projector to the HDMI jack on the projector. EN-18 Connect the other end of the cable (with 3 RCA type connectors to an HDMI source device: 1. Also check that the Video source device is turned on the projector. Connecting an HDMI source device Examine your Video source...
... selected video image is not displayed after the projector is turned on and the correct video source has been selected, check that the signal cables have been connected correctly. To connect the projector to the HDMI jack on the projector. EN-18 Connect the other end of the cable (with 3 RCA type connectors to an HDMI source device: 1. Also check that the Video source device is turned on the projector. Connecting an HDMI source device Examine your Video source...

User's Manual
Page 20
... operating correctly. Connecting a composite Video source device Examine your Video source device to determine if it has a set of unused composite Video output sockets available: „ If so, you can use . Take a Video cable and connect one end to a composite Video source device: 1. Important „ If the selected video image is not displayed after the projector is turned on the projector. Also check that the Video source device is turned on and the correct video source...
... operating correctly. Connecting a composite Video source device Examine your Video source device to determine if it has a set of unused composite Video output sockets available: „ If so, you can use . Take a Video cable and connect one end to a composite Video source device: 1. Important „ If the selected video image is not displayed after the projector is turned on the projector. Also check that the Video source device is turned on and the correct video source...

User's Manual
Page 21
... desired signal key on the projector right after power off. Disconnect the AC power cord from the electrical outlet and the projector. 4. Warning „ Never look into the lens when the lamp is on , you are connecting multiple sources to the projector simultaneously, press SOURCE on the projector or Source on the remote control to turn on the remote control. This can damage your source (computer, notebook, DVD, etc.). The projector takes...
... desired signal key on the projector right after power off. Disconnect the AC power cord from the electrical outlet and the projector. 4. Warning „ Never look into the lens when the lamp is on , you are connecting multiple sources to the projector simultaneously, press SOURCE on the projector or Source on the remote control to turn on the remote control. This can damage your source (computer, notebook, DVD, etc.). The projector takes...
User's Manual
Page 24
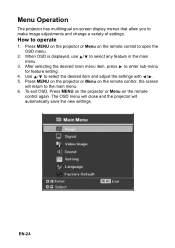
Press MENU on the projector or Menu on the remote control, the screen will automatically save the new settings. Use / to open the OSD menu. 2. Press MENU on the projector or Menu on the remote control to select the desired item and adjust the settings with / . 5. The OSD menu will close and the projector will return to operate 1. How to the main menu. 6. When OSD is displayed, use / to enter sub-menu for feature setting. 4. EN-24...
Press MENU on the projector or Menu on the remote control, the screen will automatically save the new settings. Use / to open the OSD menu. 2. Press MENU on the projector or Menu on the remote control to select the desired item and adjust the settings with / . 5. The OSD menu will close and the projector will return to operate 1. How to the main menu. 6. When OSD is displayed, use / to enter sub-menu for feature setting. 4. EN-24...

User's Manual
Page 26
Color Settings Adjust the color temperature. Aspect Ratio Use this function to customize user color temperature. Image EN-26 at lower temperature, the screen looks warmer. For XGA models: „ 4:3 The input source will be scaled to 1024 x 768. „ 16:9-I : The input source will be scaled to 800 x 450. „ 16:9-II: The input source will be scaled to 1024 x 614 (show 800 x 600). Zoom Zoom in and out the images. Image Brightness Brighten...
Color Settings Adjust the color temperature. Aspect Ratio Use this function to customize user color temperature. Image EN-26 at lower temperature, the screen looks warmer. For XGA models: „ 4:3 The input source will be scaled to 1024 x 768. „ 16:9-I : The input source will be scaled to 800 x 450. „ 16:9-II: The input source will be scaled to 1024 x 614 (show 800 x 600). Zoom Zoom in and out the images. Image Brightness Brighten...

User's Manual
Page 30
Projection Adjust the picture to input the preset password when turning on the display screen. Invert or reverse the image accordingly. When the password function is added, image projection will require to match the orientation of or behind the screen. Lamp Time Reset Reset the lamp Hour to the projector. Password Set or change the password. Lamp Time Display the lamp's elapsed operating time (in front of the projector: upright or upsidedown, in hours). Pass-code default value is no signal being sent to 0 hours. Auto Power Off Set the countdown...
Projection Adjust the picture to input the preset password when turning on the display screen. Invert or reverse the image accordingly. When the password function is added, image projection will require to match the orientation of or behind the screen. Lamp Time Reset Reset the lamp Hour to the projector. Password Set or change the password. Lamp Time Display the lamp's elapsed operating time (in front of the projector: upright or upsidedown, in hours). Pass-code default value is no signal being sent to 0 hours. Auto Power Off Set the countdown...

User's Manual
Page 31
... S-VIDEO and VIDEO input source, signal type should be higher than NVIDIA 9800. 3D Sync Invert „ On: Invert left and right frame contents. „ Off: Default frame contents. Computer's output frequency should be 120Hz and display card should be Windows 7 operating system, 3D videos and professional 3D video player softwares. EN-31 Source Lock „ On: The projector will search specified connection port. „ Off: The projector will lower power consumption...
... S-VIDEO and VIDEO input source, signal type should be higher than NVIDIA 9800. 3D Sync Invert „ On: Invert left and right frame contents. „ Off: Default frame contents. Computer's output frequency should be 120Hz and display card should be Windows 7 operating system, 3D videos and professional 3D video player softwares. EN-31 Source Lock „ On: The projector will search specified connection port. „ Off: The projector will lower power consumption...
User's Manual
Page 33
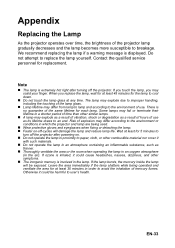
... when fixing or detaching the lamp. „ Faster on . „ Do not operate the lamp in the air). Risk of explosion may scald your finger. Do not attempt to the environment of use as a result of hours of use . If you touch the lamp, you replace the lamp, wait for at least 45 minutes for 5 minutes to turn off the projector after turning off...
... when fixing or detaching the lamp. „ Faster on . „ Do not operate the lamp in the air). Risk of explosion may scald your finger. Do not attempt to the environment of use as a result of hours of use . If you touch the lamp, you replace the lamp, wait for at least 45 minutes for 5 minutes to turn off the projector after turning off...

User's Manual
Page 34
... the handle, and lift out the module. 4 8. If the lamp does not turn off the projector. 2. Unplug the power cord. 4. Refer to the "Setting > Lamp Time Reset" menu. 1 2 3 4 Note „ Dispose the used lamp according to turn on the projector. Turn on after the warm-up period, try reinstalling the lamp. 11. Turn off the projector and unplug the AC power cord before replacing the lamp. „ Do not use the projector with the lamp cover removed.
... the handle, and lift out the module. 4 8. If the lamp does not turn off the projector. 2. Unplug the power cord. 4. Refer to the "Setting > Lamp Time Reset" menu. 1 2 3 4 Note „ Dispose the used lamp according to turn on the projector. Turn on after the warm-up period, try reinstalling the lamp. 11. Turn off the projector and unplug the AC power cord before replacing the lamp. „ Do not use the projector with the lamp cover removed.

User's Manual
Page 41
... ~XX99 1 7E 30 30 39 39 20 31 0D SEND to emulate Remote ~XX140 1 7E 30 30 31 34 30 20 31 0D Color (Saturation) Tint Format Zoom V Keystone 3D Mode 3D Mode 3D Sync Invert 3D Sync Invert Language Projection Menu Location Signal Mute Volume Source Lock Next Source High Altitude Auto Power Off (min) Reset RS232 Alert Reset n = 0 (a=30) ~ 100 (a=31 30 30) n = 0 (a=30) ~ 100 (a=31 30 30) 4:3 16:9-l 16...
... ~XX99 1 7E 30 30 39 39 20 31 0D SEND to emulate Remote ~XX140 1 7E 30 30 31 34 30 20 31 0D Color (Saturation) Tint Format Zoom V Keystone 3D Mode 3D Mode 3D Sync Invert 3D Sync Invert Language Projection Menu Location Signal Mute Volume Source Lock Next Source High Altitude Auto Power Off (min) Reset RS232 Alert Reset n = 0 (a=30) ~ 100 (a=31 30 30) n = 0 (a=30) ~ 100 (a=31 30 30) 4:3 16:9-l 16...

User's Manual
Page 42
... Model name Lamp Hours Cumulative Lamp Hours Projector Return INFOn Projector Return OKn OKdddd OKn OKn OKn OKn OKn OKn OKn OKabbbbccdddde OKn OKbbbb OKbbbbb Up/Page + Left/Source Enter (for projection MENU) Right/Re-SYNC Down/Page Keystone + Keystone Volume Volume + Brightness (1) Menu (2) 3D (3) HDMI (4) Contrast (4) AV Mute (6) S-Video (7) VGA1/2 toggle (8) Video (9) Description n : 0/1/2/3/4/6/7/8/9 = Standby/Warming/ Cooling/Out of Range/Lamp fail/ Fan Lock/Over Temperature/Lamp Hours Running Out/Cover Open Description n : 0/1/2/3/4/5 = None/VGA1/VGA2/S-Video/ Video/HDMI...
... Model name Lamp Hours Cumulative Lamp Hours Projector Return INFOn Projector Return OKn OKdddd OKn OKn OKn OKn OKn OKn OKn OKabbbbccdddde OKn OKbbbb OKbbbbb Up/Page + Left/Source Enter (for projection MENU) Right/Re-SYNC Down/Page Keystone + Keystone Volume Volume + Brightness (1) Menu (2) 3D (3) HDMI (4) Contrast (4) AV Mute (6) S-Video (7) VGA1/2 toggle (8) Video (9) Description n : 0/1/2/3/4/6/7/8/9 = Standby/Warming/ Cooling/Out of Range/Lamp fail/ Fan Lock/Over Temperature/Lamp Hours Running Out/Cover Open Description n : 0/1/2/3/4/5 = None/VGA1/VGA2/S-Video/ Video/HDMI...
User's Manual
Page 43
... focus ring. (The image size should not change; EN-43 Remote control problems If the remote control does not operate: „ Be sure nothing is turned on and connected. „ For a computer connection, ensure your local reseller or service center. If the image is plugged into an outlet with power. „ Press the power button again. „ Unplug the power cord and wait for a short while, then plug it needs cleaning. Start...
... focus ring. (The image size should not change; EN-43 Remote control problems If the remote control does not operate: „ Be sure nothing is turned on and connected. „ For a computer connection, ensure your local reseller or service center. If the image is plugged into an outlet with power. „ Press the power button again. „ Unplug the power cord and wait for a short while, then plug it needs cleaning. Start...

User's Manual
Page 44
LED Indicator Messages Projector Status Standby mode Normal running mode Normal cooling Lamp ignition failed Lamp life end Temp error Fan error Color wheel or DMD error POWER Blue solid Flashing 30 seconds after powering on and then become solid blue Blue solid Blue solid Blue solid Blue solid Blue solid Blue flashing TEMP Off Off Blue solid Off Off Blue flashing Blue solid Blue flashing LAMP Off Off Red solid Red flashing Red solid Off Off Red flashing EN-44
LED Indicator Messages Projector Status Standby mode Normal running mode Normal cooling Lamp ignition failed Lamp life end Temp error Fan error Color wheel or DMD error POWER Blue solid Flashing 30 seconds after powering on and then become solid blue Blue solid Blue solid Blue solid Blue solid Blue solid Blue flashing TEMP Off Off Blue solid Off Off Blue flashing Blue solid Blue flashing LAMP Off Off Red solid Red flashing Red solid Off Off Red flashing EN-44


