
User Manual
Page 2
...out and may make a loud popping sound. Warning- Do not use lens cap when projector is on. The bright light may cause electric shock. Please do not expose this user's guide to page 31). Warning- Turn on until the lamp module has been replaced. Warning- English ... 2 Warning- When ...changing the lamp, please allow unit to rain or moisture. This product will not turn back on the projector first and then the signal sources. Warning- When the lamp reaches the end of fire or electric shock, do not ...
...out and may make a loud popping sound. Warning- Do not use lens cap when projector is on. The bright light may cause electric shock. Please do not expose this user's guide to page 31). Warning- Turn on until the lamp module has been replaced. Warning- English ... 2 Warning- When ...changing the lamp, please allow unit to rain or moisture. This product will not turn back on the projector first and then the signal sources. Warning- When the lamp reaches the end of fire or electric shock, do not ...
User Manual
Page 11
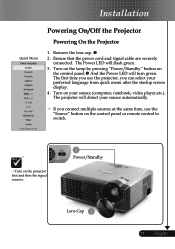
... flash green. 3. The first time you use the projector, you connect multiple sources at the same time, use the "Source" button on the control panel or remote control to switch. Turn on your preferred language from quick menu after the startup screen display. ...4. Remove the lens cap. 2. The Power LED will turn green. Ensure that the power cord and signal cable are securely connected. English Turn on the projector first and then the signal sources. 2 Power/Standby Lens Cap 1 11 ... Installation Quick ...
... flash green. 3. The first time you use the projector, you connect multiple sources at the same time, use the "Source" button on the control panel or remote control to switch. Turn on your preferred language from quick menu after the startup screen display. ...4. Remove the lens cap. 2. The Power LED will turn green. Ensure that the power cord and signal cable are securely connected. English Turn on the projector first and then the signal sources. 2 Power/Standby Lens Cap 1 11 ... Installation Quick ...
User Manual
Page 12
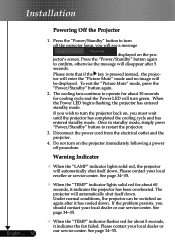
... see a message displayed on again after 5 seconds. Do not turn off procedure. When the Power LED begins flashing, the projector has entered standby mode. If you must wait until the projector has completed the cooling cycle and has entered standby mode. To ...Disconnect the power cord from the electrical outlet and the projector. 4. The projector will be switched on the projector's screen. If the problem persists, you will turn the projector back on the projector immediately following a power off the projector lamp, you should contact your local dealer or our ...
... see a message displayed on again after 5 seconds. Do not turn off procedure. When the Power LED begins flashing, the projector has entered standby mode. If you must wait until the projector has completed the cooling cycle and has entered standby mode. To ...Disconnect the power cord from the electrical outlet and the projector. 4. The projector will be switched on the projector's screen. If the problem persists, you will turn the projector back on the projector immediately following a power off the projector lamp, you should contact your local dealer or our ...
User Manual
Page 14
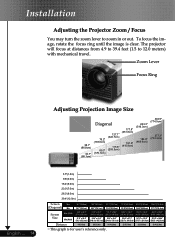
The projector will focus at distances from 4.9 to 39.4 feet (1.5 to zoom in or out. Zoom Lever Focus Ring Adjusting Projection Image Size 38.1" (96.8cm) 34.7" (...) (563.5 x 422.6cm) Distance 4.9'(1.5m) 9.8'(3.0m) 16.4'(5.0m) 23.0'(7.0m) 26.3'(8.0m) 39.4'(12.0m) This graph is clear. Installation Adjusting the Projector Zoom / Focus You may turn the zoom lever to 12.0 meters) with mechanical travel. To focus the image, rotate the focus ring until the image is for user...
The projector will focus at distances from 4.9 to 39.4 feet (1.5 to zoom in or out. Zoom Lever Focus Ring Adjusting Projection Image Size 38.1" (96.8cm) 34.7" (...) (563.5 x 422.6cm) Distance 4.9'(1.5m) 9.8'(3.0m) 16.4'(5.0m) 23.0'(7.0m) 26.3'(8.0m) 39.4'(12.0m) This graph is clear. Installation Adjusting the Projector Zoom / Focus You may turn the zoom lever to 12.0 meters) with mechanical travel. To focus the image, rotate the focus ring until the image is for user...
User Manual
Page 28
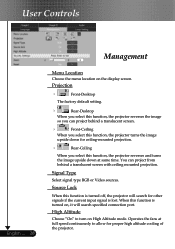
... upside down for ceiling-mounted projection. Rear-Ceiling When you select this function, the projector turns the image upside down at full speed continuously to turn on the display screen. You can project behind a translucent screen with ceiling mounted projection. High ...you select this function, the projector reverses the image so you can project from behind a translucent screen. Front-Ceiling When you select this function is turned off, the projector will search for proper high altitude cooling of the projector. User Controls English ... 28 ...
... upside down for ceiling-mounted projection. Rear-Ceiling When you select this function, the projector turns the image upside down at full speed continuously to turn on the display screen. You can project behind a translucent screen with ceiling mounted projection. High ...you select this function, the projector reverses the image so you can project from behind a translucent screen. Front-Ceiling When you select this function is turned off, the projector will search for proper high altitude cooling of the projector. User Controls English ... 28 ...
User Manual
Page 32
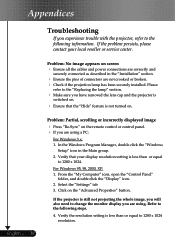
Appendices Troubleshooting If you experience trouble with the projector, refer to the following steps. 4. Verify that the "Hide" feature is not turned on the "Advanced Properties" button. Verify the resolution setting is less than or equal to the following information. Problem: Partial, ...61492; Ensure the pins of connectors are using a PC: For Windows 3.x: 1. Please refer to 1280 x 1024. Select the "Settings" tab 3. If the projector is still not projecting the whole image, you will also need to change the monitor display you have removed the lens cap and the...
Appendices Troubleshooting If you experience trouble with the projector, refer to the following steps. 4. Verify that the "Hide" feature is not turned on the "Advanced Properties" button. Verify the resolution setting is less than or equal to the following information. Problem: Partial, ...61492; Ensure the pins of connectors are using a PC: For Windows 3.x: 1. Please refer to 1280 x 1024. Select the "Settings" tab 3. If the projector is still not projecting the whole image, you will also need to change the monitor display you have removed the lens cap and the...

User Manual
Page 34
... in the "Replacing the Lamp". Problem: Lamp burns out or makes a popping sound When the lamp reaches its end of life, it will not turn on Power off (Cooling) Error (Lamp fail) Error (Thermal fail) Error (Fan fail) Error (Over Temp.) Erroe (Lamp Breakdown) Temp-LED Lamp-LED Flashing To... need to adjust the aspect ratio by digitizing to full screen with 4:3 default setting. Problem: The image is reversed Select "Management-->Projection" from the projector. See page 14. If this happens, the projector will burn out and may make a loud popping sound.
... in the "Replacing the Lamp". Problem: Lamp burns out or makes a popping sound When the lamp reaches its end of life, it will not turn on Power off (Cooling) Error (Lamp fail) Error (Thermal fail) Error (Fan fail) Error (Over Temp.) Erroe (Lamp Breakdown) Temp-LED Lamp-LED Flashing To... need to adjust the aspect ratio by digitizing to full screen with 4:3 default setting. Problem: The image is reversed Select "Management-->Projection" from the projector. See page 14. If this happens, the projector will burn out and may make a loud popping sound.


