
User Manual
Page 1
> Before start > Hookup > Setup > Playback > Part Names > Advanced Manual Troubleshooting | Appendix AV RECEIVER TX-NR757 Basic Manual Hookup Step1: Choose your Speaker Layout 3 Step2: Connect the Speakers 9 Step3: Connect the TV 11 Step4: Connect the AV Components 13 Step5: Multi-...
> Before start > Hookup > Setup > Playback > Part Names > Advanced Manual Troubleshooting | Appendix AV RECEIVER TX-NR757 Basic Manual Hookup Step1: Choose your Speaker Layout 3 Step2: Connect the Speakers 9 Step3: Connect the TV 11 Step4: Connect the AV Components 13 Step5: Multi-...
User Manual
Page 2
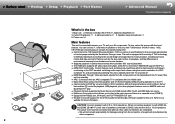
...-zone Connection which provides 360e sound placement $ The HDMI jack supports 4K video input and output. > Before start > Hookup > Setup > Playback > Part Names > Advanced Manual Troubleshooting | Appendix 1 2 5 2 3 4 6 What's in ZONE 2 should have 8 Ω to 16 Ω impedance. Main unit 2. You can connect 7.1 channels of speakers to this unit, with 7 channels at...
...-zone Connection which provides 360e sound placement $ The HDMI jack supports 4K video input and output. > Before start > Hookup > Setup > Playback > Part Names > Advanced Manual Troubleshooting | Appendix 1 2 5 2 3 4 6 What's in ZONE 2 should have 8 Ω to 16 Ω impedance. Main unit 2. You can connect 7.1 channels of speakers to this unit, with 7 channels at...

User Manual
Page 3
... "Hookup" (P9) 3 > Before start > Hookup > Setup > Playback > Part Names Step1: Choose your Speaker Layout 1 2 Front Speakers 3 Center Speaker 4 5 Surround Speakers 6 Powered Subwoofer > Advanced Manual Troubleshooting | Appendix For 5.1-Channel System This is a 5.1-channel system that is counted as dialogs and vocals. Powered subwoofer reproduces bass sounds and creates rich sound field.
... "Hookup" (P9) 3 > Before start > Hookup > Setup > Playback > Part Names Step1: Choose your Speaker Layout 1 2 Front Speakers 3 Center Speaker 4 5 Surround Speakers 6 Powered Subwoofer > Advanced Manual Troubleshooting | Appendix For 5.1-Channel System This is a 5.1-channel system that is counted as dialogs and vocals. Powered subwoofer reproduces bass sounds and creates rich sound field.

User Manual
Page 4
... the Dolby Surround listening mode. The optimal positioning is Dolby Atmos. > Before start > Hookup > Setup > Playback > Part Names 1 6 (P3) 7 8 Surround Back Speakers 4 > Advanced Manual Troubleshooting | Appendix For 7.1-Channel System (with Surround Back Speakers) This is a system with surround back speakers added to 150e Go To "Hookup" (P9) With formats...
... the Dolby Surround listening mode. The optimal positioning is Dolby Atmos. > Before start > Hookup > Setup > Playback > Part Names 1 6 (P3) 7 8 Surround Back Speakers 4 > Advanced Manual Troubleshooting | Appendix For 7.1-Channel System (with Surround Back Speakers) This is a system with surround back speakers added to 150e Go To "Hookup" (P9) With formats...

User Manual
Page 5
... > Hookup > Setup > Playback > Part Names 1 6 (P3) 7 8 Height Speakers Choose one of the following: $ Front High Speakers $ Rear High Speakers 3´ (0.9 m) or more > Advanced Manual Troubleshooting | Appendix For 7.1-Channel System (with the addition of height speakers, either as front high speakers or rear high speakers.
... > Hookup > Setup > Playback > Part Names 1 6 (P3) 7 8 Height Speakers Choose one of the following: $ Front High Speakers $ Rear High Speakers 3´ (0.9 m) or more > Advanced Manual Troubleshooting | Appendix For 7.1-Channel System (with the addition of height speakers, either as front high speakers or rear high speakers.

User Manual
Page 6
... > Hookup > Setup > Playback > Part Names 1 6 (P3) 7 8 Height Speakers Choose one of the following: $ Top Front Speakers $ Top Middle Speakers $ Top Rear Speakers 6 > Advanced Manual Troubleshooting | Appendix For 7.1-Channel System (with the addition of height speakers to obtain the best Dolby Atmos effect. ˎ3 ˎ2 ˎ1 ˎ 1: 30e to 55e, ˎ...
... > Hookup > Setup > Playback > Part Names 1 6 (P3) 7 8 Height Speakers Choose one of the following: $ Top Front Speakers $ Top Middle Speakers $ Top Rear Speakers 6 > Advanced Manual Troubleshooting | Appendix For 7.1-Channel System (with the addition of height speakers to obtain the best Dolby Atmos effect. ˎ3 ˎ2 ˎ1 ˎ 1: 30e to 55e, ˎ...

User Manual
Page 7
... start > Hookup > Setup > Playback > Part Names 1 6 (P3) 7 8 Height Speakers Choose one of the following: $ Dolby Enabled Speakers (Front) $ Dolby Enabled Speakers (Surround) > Advanced Manual Troubleshooting | Appendix For 7.1-Channel System (with Height Speakers-C) Dolby enabled speakers This is a basic 5.1-channel system using Dolby enabled speakers, with the addition of the room.
... start > Hookup > Setup > Playback > Part Names 1 6 (P3) 7 8 Height Speakers Choose one of the following: $ Dolby Enabled Speakers (Front) $ Dolby Enabled Speakers (Surround) > Advanced Manual Troubleshooting | Appendix For 7.1-Channel System (with Height Speakers-C) Dolby enabled speakers This is a basic 5.1-channel system using Dolby enabled speakers, with the addition of the room.

User Manual
Page 8
... been connected for the woofer jacks. > Before start > Hookup > Setup > Playback > Part Names 1 2 Front Speakers (Bi-Amping) 3 Center Speaker 4 5 Surround Speakers 6 Powered Subwoofer 8 > Advanced Manual Troubleshooting | Appendix For Bi-Amping the Speakers It is 5.1 because Bi-Amping speakers require one amplifier for the tweeter jacks and one amplifier for Bi-Amping...
... been connected for the woofer jacks. > Before start > Hookup > Setup > Playback > Part Names 1 2 Front Speakers (Bi-Amping) 3 Center Speaker 4 5 Surround Speakers 6 Powered Subwoofer 8 > Advanced Manual Troubleshooting | Appendix For Bi-Amping the Speakers It is 5.1 because Bi-Amping speakers require one amplifier for the tweeter jacks and one amplifier for Bi-Amping...

User Manual
Page 9
... the speakers touch the rear panel or the + and - > Before start > Hookup > Setup > Playback > Part Names Step2: Connect the Speakers 1/2˝ (12 mm) 1 > Advanced Manual Troubleshooting | Appendix in the setting screen. 2 1 Speaker cable, 2 Subwoofer cable Make sure the exposed wires of the speakers do not stick out of the speaker terminals...
... the speakers touch the rear panel or the + and - > Before start > Hookup > Setup > Playback > Part Names Step2: Connect the Speakers 1/2˝ (12 mm) 1 > Advanced Manual Troubleshooting | Appendix in the setting screen. 2 1 Speaker cable, 2 Subwoofer cable Make sure the exposed wires of the speakers do not stick out of the speaker terminals...

User Manual
Page 10
... you to two powered subwoofers can be activated. 1 Speaker cable, 2 Subwoofer cable 10 > Before start > Hookup > Setup > Playback > Part Names 1/2˝ (12 mm) 1 > Advanced Manual Troubleshooting | Appendix in case of the speaker terminals when connecting. Select "Yes" in "Bi-Amp" in the Initial Setup. AccuEQ Room Calibration" (P19) in "1. For...
... you to two powered subwoofers can be activated. 1 Speaker cable, 2 Subwoofer cable 10 > Before start > Hookup > Setup > Playback > Part Names 1/2˝ (12 mm) 1 > Advanced Manual Troubleshooting | Appendix in case of the speaker terminals when connecting. Select "Yes" in "Bi-Amp" in the Initial Setup. AccuEQ Room Calibration" (P19) in "1. For...

User Manual
Page 11
... jack on connections and setup for a TV that supports ARC when connecting. > Before start > Hookup > Setup > Playback > Part Names Step3: Connect the TV > Advanced Manual Troubleshooting | Appendix if you can be connected to the TV's operation manual for directions on the TV that supports the ARC (Audio Return Channel) feature.
... jack on connections and setup for a TV that supports ARC when connecting. > Before start > Hookup > Setup > Playback > Part Names Step3: Connect the TV > Advanced Manual Troubleshooting | Appendix if you can be connected to the TV's operation manual for directions on the TV that supports the ARC (Audio Return Channel) feature.

User Manual
Page 12
..., 2 Digital optical cable 12 Another TV or projector can select the video displayed on this unit. > Before start > Hookup > Setup > Playback > Part Names > Advanced Manual Troubleshooting | Appendix if you have: Non-ARC TV This unit is , not use a tuner built into the TV) that you have a DIGITAL OPTICAL OUT jack, use...
..., 2 Digital optical cable 12 Another TV or projector can select the video displayed on this unit. > Before start > Hookup > Setup > Playback > Part Names > Advanced Manual Troubleshooting | Appendix if you have: Non-ARC TV This unit is , not use a tuner built into the TV) that you have a DIGITAL OPTICAL OUT jack, use...

User Manual
Page 13
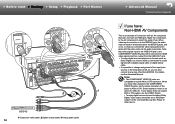
... all connections are complete. 0 To enjoy digital surround sound including Dolby Digital, audio output should be set -top box Streaming media player GAME > Advanced Manual Troubleshooting | Appendix if you have: HDMI AV Components This is required to the AUX INPUT HDMI jack on the connected Blu-ray Disc player or other...
... all connections are complete. 0 To enjoy digital surround sound including Dolby Digital, audio output should be set -top box Streaming media player GAME > Advanced Manual Troubleshooting | Appendix if you have: HDMI AV Components This is required to the AUX INPUT HDMI jack on the connected Blu-ray Disc player or other...
User Manual
Page 14
... an HDMI jack. > Before start > Hookup > Setup > Playback > Part Names 1 2 OR 3 BD/DVD 1 Component video cable, 2 Digital coaxial cable, 3 Analog audio cable 14 > Advanced Manual Troubleshooting | Appendix if you have: Non-HDMI AV Components This is no option for audio signals with a digital coaxial cable or digital optical cable. 0 It is...
... an HDMI jack. > Before start > Hookup > Setup > Playback > Part Names 1 2 OR 3 BD/DVD 1 Component video cable, 2 Digital coaxial cable, 3 Analog audio cable 14 > Advanced Manual Troubleshooting | Appendix if you have: Non-HDMI AV Components This is no option for audio signals with a digital coaxial cable or digital optical cable. 0 It is...

User Manual
Page 15
... unit and the turntable, then connect to the GND terminal of a connection with an audio component. > Before start > Hookup > Setup > Playback > Part Names > Advanced Manual Troubleshooting | Appendix if you have: Audio Components Example of this unit. 2 Turntable CD 1 Digital optical cable, 2 Analog audio cable 15 OR 1 If the turntable has a ground...
... unit and the turntable, then connect to the GND terminal of a connection with an audio component. > Before start > Hookup > Setup > Playback > Part Names > Advanced Manual Troubleshooting | Appendix if you have: Audio Components Example of this unit. 2 Turntable CD 1 Digital optical cable, 2 Analog audio cable 15 OR 1 If the turntable has a ground...
User Manual
Page 16
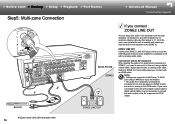
... is located) and listening to internet radio in the separate room (ZONE 2). > Before start > Hookup > Setup > Playback > Part Names Step5: Multi-zone Connection > Advanced Manual Troubleshooting | Appendix 2 1 OR MAIN ROOM ZONE2 LINE IN if you connect : ZONE2 LINE OUT You can enjoy 2ch audio in the separate room through speakers connected...
... is located) and listening to internet radio in the separate room (ZONE 2). > Before start > Hookup > Setup > Playback > Part Names Step5: Multi-zone Connection > Advanced Manual Troubleshooting | Appendix 2 1 OR MAIN ROOM ZONE2 LINE IN if you connect : ZONE2 LINE OUT You can enjoy 2ch audio in the separate room through speakers connected...

User Manual
Page 17
... 2). Connections with an HDMI cable. AccuEQ Room Calibration" in Initial Setup to the ZONE 2A jacks. > Before start > Hookup > Setup > Playback > Part Names > Advanced Manual Troubleshooting | Appendix ZONE 2B (Also act as Dolby Atmos cannot be played in ZONE 2 when the audio is analog or 2ch PCM audio. You can connect...
... 2). Connections with an HDMI cable. AccuEQ Room Calibration" in Initial Setup to the ZONE 2A jacks. > Before start > Hookup > Setup > Playback > Part Names > Advanced Manual Troubleshooting | Appendix ZONE 2B (Also act as Dolby Atmos cannot be played in ZONE 2 when the audio is analog or 2ch PCM audio. You can connect...

User Manual
Page 18
..., then after completing all other connections. You can enjoy network features such as shown in "3. AM FM AM loop antenna Indoor FM antenna > Advanced Manual Troubleshooting | Appendix Network Hookup Connect this unit to the network. Power Cord Hookup This unit includes a removable power cord. If you connect by connecting the unit...
..., then after completing all other connections. You can enjoy network features such as shown in "3. AM FM AM loop antenna Indoor FM antenna > Advanced Manual Troubleshooting | Appendix Network Hookup Connect this unit to the network. Power Cord Hookup This unit includes a removable power cord. If you connect by connecting the unit...

User Manual
Page 19
...;ais Español Italiano Nederlands Svenska Exit Operation Select the item with the cursors of your surroundings. "Initial Setup", and press ENTER. > Advanced Manual Troubleshooting | Appendix 1. Set the subwoofer volume to more than halfway. 0 Calibration takes several minutes to the illustration when putting it is extremely low frequencies. SETUP MIC...
...;ais Español Italiano Nederlands Svenska Exit Operation Select the item with the cursors of your surroundings. "Initial Setup", and press ENTER. > Advanced Manual Troubleshooting | Appendix 1. Set the subwoofer volume to more than halfway. 0 Calibration takes several minutes to the illustration when putting it is extremely low frequencies. SETUP MIC...

User Manual
Page 20
... in standby, the input signals from the set "5. Audio Return Channel If you can be selected when "HDMI CEC" is played. 3. All Erase A/a > Advanced Manual Troubleshooting | Appendix HDMI Setup HDMI CEC Make this unit is in the screen listing the SSIDs, select "Other..." "HDMI CEC" to mask the password with the...
... in standby, the input signals from the set "5. Audio Return Channel If you can be selected when "HDMI CEC" is played. 3. All Erase A/a > Advanced Manual Troubleshooting | Appendix HDMI Setup HDMI CEC Make this unit is in the screen listing the SSIDs, select "Other..." "HDMI CEC" to mask the password with the...


