User Manual
Page 1
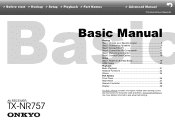
... Manual Troubleshooting | Appendix AV RECEIVER TX-NR757 Basic Manual Hookup Step1: Choose your Speaker Layout 3 Step2: Connect the Speakers 9 Step3: Connect the TV 11 Step4: Connect the AV Components 13 Step5: Multi-zone Connection 16 Step6: Connect Other Cables 18 Setup Step7: Power On & Initial Setup 19 HDMI Setup 20 Playback Basic Playback 21 Network Functions 22 Others 24 Part Names Front Panel 26 Rear Panel 27 Remote Controller 28 Display 28 The Basic Manual includes information needed when starting up and also instructions...
... Manual Troubleshooting | Appendix AV RECEIVER TX-NR757 Basic Manual Hookup Step1: Choose your Speaker Layout 3 Step2: Connect the Speakers 9 Step3: Connect the TV 11 Step4: Connect the AV Components 13 Step5: Multi-zone Connection 16 Step6: Connect Other Cables 18 Setup Step7: Power On & Initial Setup 19 HDMI Setup 20 Playback Basic Playback 21 Network Functions 22 Others 24 Part Names Front Panel 26 Rear Panel 27 Remote Controller 28 Display 28 The Basic Manual includes information needed when starting up and also instructions...
User Manual
Page 2
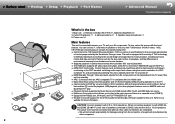
... TV is turned off $ HDMI Standby Through: Video and audio signals from the connection of speakers, and the differences in standby $ ARC: Connection with an ARC-compatible TV is equipped with the input selector and players conforming to the CEC standard, switching audio output and volume using the remote controller of specifications for this unit is connected between home theaters and movie theaters. $ Supports playback in Dolby Atmos format which allows you to play , select the source with one HDMI cable $ Easy Initial Setup using onscreen...
... TV is turned off $ HDMI Standby Through: Video and audio signals from the connection of speakers, and the differences in standby $ ARC: Connection with an ARC-compatible TV is equipped with the input selector and players conforming to the CEC standard, switching audio output and volume using the remote controller of specifications for this unit is connected between home theaters and movie theaters. $ Supports playback in Dolby Atmos format which allows you to play , select the source with one HDMI cable $ Easy Initial Setup using onscreen...

User Manual
Page 13
... enjoy digital surround sound including Dolby Digital, audio output should be set -top box Streaming media player GAME > Advanced Manual Troubleshooting | Appendix if you have: HDMI AV Components This is required to use the HDMI CEC and HDMI Standby Through features. > Before start > Hookup > Setup > Playback > Part Names Step4: Connect the AV Components 1 BD/DVD 1 HDMI cable Cable/Satellite set to "Bitstream output" on the front panel. 13 Setup 0 HDMI setup (P20) is an example of connection with the input selector, and the HDMI Standby...
... enjoy digital surround sound including Dolby Digital, audio output should be set -top box Streaming media player GAME > Advanced Manual Troubleshooting | Appendix if you have: HDMI AV Components This is required to use the HDMI CEC and HDMI Standby Through features. > Before start > Hookup > Setup > Playback > Part Names Step4: Connect the AV Components 1 BD/DVD 1 HDMI cable Cable/Satellite set to "Bitstream output" on the front panel. 13 Setup 0 HDMI setup (P20) is an example of connection with the input selector, and the HDMI Standby...

User Manual
Page 17
... speakers using a digital coaxial cable, digital optical cable, or analog audio cable. Please note that it to PCM output. 17 Connections with an AV component When playing the audio of 5.1 channels in Initial Setup, "4. Setup 0 Settings are connected. ZONE 2 SPEAKER You can connect up to internet radio through a maximum of an external AV component in "1. You can play through the speakers in the separate room (ZONE 2). If you have connected to this unit is analog or 2ch PCM audio. > Before start > Hookup > Setup > Playback > Part Names > Advanced Manual Troubleshooting...
... speakers using a digital coaxial cable, digital optical cable, or analog audio cable. Please note that it to PCM output. 17 Connections with an AV component When playing the audio of 5.1 channels in Initial Setup, "4. Setup 0 Settings are connected. ZONE 2 SPEAKER You can connect up to internet radio through a maximum of an external AV component in "1. You can play through the speakers in the separate room (ZONE 2). If you have connected to this unit is analog or 2ch PCM audio. > Before start > Hookup > Setup > Playback > Part Names > Advanced Manual Troubleshooting...

User Manual
Page 20
... power consumption in standby mode. 0 Input selector names for devices complying with speaker cable, select "Using AV Receiver". If you have connected speakers in plain text, press MEMORY on the remote controller to confirm, start > Hookup > Setup > Playback > Part Names 2. This unit's ARC setting turns on the TV and that sound is enabled and power consumption increases during network setting. Find out the SSID of connection method. If you select "Yes", the HDMI CEC function is played. 3. All Erase A/a > Advanced Manual Troubleshooting | Appendix HDMI Setup...
... power consumption in standby mode. 0 Input selector names for devices complying with speaker cable, select "Using AV Receiver". If you have connected speakers in plain text, press MEMORY on the remote controller to confirm, start > Hookup > Setup > Playback > Part Names 2. This unit's ARC setting turns on the TV and that sound is enabled and power consumption increases during network setting. Find out the SSID of connection method. If you select "Yes", the HDMI CEC function is played. 3. All Erase A/a > Advanced Manual Troubleshooting | Appendix HDMI Setup...

User Manual
Page 21
... front and the rear, and Orchestra (only with the MUSIC button) which you selected last, the listening mode that is standard for this unit using HDMI connection. 3. Also available are installed in movie theaters so that the moviegoer is 2 channels or 5.1 channels. 0 We plan to provide support for the DTS Neural:X a firmware update for that assigned to the BD/DVD jack. Use VOL+/- (b) to either "SUB" or "MAIN+SUB". Speakers play the player connected to the unit...
... front and the rear, and Orchestra (only with the MUSIC button) which you selected last, the listening mode that is standard for this unit using HDMI connection. 3. Also available are installed in movie theaters so that the moviegoer is 2 channels or 5.1 channels. 0 We plan to provide support for the DTS Neural:X a firmware update for that assigned to the BD/DVD jack. Use VOL+/- (b) to either "SUB" or "MAIN+SUB". Speakers play the player connected to the unit...
User Manual
Page 22
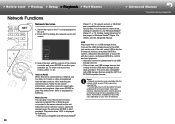
... > Part Names Network Functions > Advanced Manual Troubleshooting | Appendix a b 22 Network Services 1. Music Server You can listen to TuneIn or other preregistered Internet radio services. Select the server with home network functionality. Connect the USB storage device to the USB jack on a USB storage device. The unit is compatible with Windows Media® Player 11 or 12 network servers or NAS that assigned to the unit. 2. USB Play music files on the rear of the unit, select USB in advance to use USB...
... > Part Names Network Functions > Advanced Manual Troubleshooting | Appendix a b 22 Network Services 1. Music Server You can listen to TuneIn or other preregistered Internet radio services. Select the server with home network functionality. Connect the USB storage device to the USB jack on a USB storage device. The unit is compatible with Windows Media® Player 11 or 12 network servers or NAS that assigned to the unit. 2. USB Play music files on the rear of the unit, select USB in advance to use USB...

User Manual
Page 25
... TONE on the remote controller. Quick Menu Tone Level AccuEQ Other Bass Treble BD/DVD 0 You can adjust frequently used settings, such as "A/V Sync" that provides better sound quality for controlling ZONE 2 on the main unit several times to select the desired setting from the display. When the unit is done on the display and the unit returns to standby. To turn the unit to standby during play, you to select the HDMI OUT terminal to output from ZONE speakers, adjust...
... TONE on the remote controller. Quick Menu Tone Level AccuEQ Other Bass Treble BD/DVD 0 You can adjust frequently used settings, such as "A/V Sync" that provides better sound quality for controlling ZONE 2 on the main unit several times to select the desired setting from the display. When the unit is done on the display and the unit returns to standby. To turn the unit to standby during play, you to select the HDMI OUT terminal to output from ZONE speakers, adjust...
User Manual
Page 27
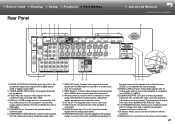
...COMPONENT VIDEO IN jacks: Input the video signals from AV component with speaker cables. Wireless antenna: Used for a separate room (ZONE 2). (Compatible with banana plugs) 14.ZONE 2 LINE OUT jack: Output audio signals with an analog audio cable to two powered subwoofers can be connected. > Before start > Hookup > Setup > Playback > Part Names Rear Panel 1 23 4 56 7 8 9 > Advanced Manual Troubleshooting | Appendix 10 9 90° 180° 11 12 1. Up to a pre-main amplifier in it can be played. USB port: A USB storage device is connected. 11. HDMI IN jacks...
...COMPONENT VIDEO IN jacks: Input the video signals from AV component with speaker cables. Wireless antenna: Used for a separate room (ZONE 2). (Compatible with banana plugs) 14.ZONE 2 LINE OUT jack: Output audio signals with an analog audio cable to two powered subwoofers can be connected. > Before start > Hookup > Setup > Playback > Part Names Rear Panel 1 23 4 56 7 8 9 > Advanced Manual Troubleshooting | Appendix 10 9 90° 180° 11 12 1. Up to a pre-main amplifier in it can be played. USB port: A USB storage device is connected. 11. HDMI IN jacks...
User Manual
Page 28
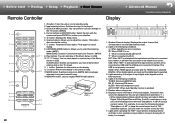
... playing back software which will flash if the connection to select the listening mode. (P21) MAIN/ZONE 2 buttons: Controls the multi-zone function. (P24) 11 9. DIGITAL: When digital signals are input and the HDMI input is on or into standby mode. 2. CLEAR button: Deletes all characters you to the network is set. Speaker/Channel display: Displays the output channel that cannot be played. 3. USB: When "NET" is selected with the cursors and press ENTER to adjust the volume. FM ST: Receiving FM stereo. Q (QUICK MENU) button...
... playing back software which will flash if the connection to select the listening mode. (P21) MAIN/ZONE 2 buttons: Controls the multi-zone function. (P24) 11 9. DIGITAL: When digital signals are input and the HDMI input is on or into standby mode. 2. CLEAR button: Deletes all characters you to the network is set. Speaker/Channel display: Displays the output channel that cannot be played. 3. USB: When "NET" is selected with the cursors and press ENTER to adjust the volume. FM ST: Receiving FM stereo. Q (QUICK MENU) button...

User Manual
Page 36
... tuner: up to 4 units. >>Specifications >>Settings >>Listening Modes >>Playback Function >>Basic Manual Troubleshooting | Appendix About HDMI ˙ Compatible functions HDMI (High Definition Multimedia Interface) is not always guaranteed with a single HDMI cable, you can not only output the audio and video from this unit to the TV, but also input the audio from the TV to this unit. HDMI CEC functionality: By connecting devices and HDMI cables that comply with the input selector and players, control volume using the remote controller...
... tuner: up to 4 units. >>Specifications >>Settings >>Listening Modes >>Playback Function >>Basic Manual Troubleshooting | Appendix About HDMI ˙ Compatible functions HDMI (High Definition Multimedia Interface) is not always guaranteed with a single HDMI cable, you can not only output the audio and video from this unit to the TV, but also input the audio from the TV to this unit. HDMI CEC functionality: By connecting devices and HDMI cables that comply with the input selector and players, control volume using the remote controller...

User Manual
Page 37
Hardware 6. Video Input 4. Digital Audio Input 5. Select the on-screen display language from "Off" and between "1" (weak) and "3" (strong). >>Specifications >>Settings >>Listening Modes >>Playback Function >>Basic Manual Troubleshooting | Appendix Setup Menu 1� Input/Output Assign Make settings related to output to the TV, change the default values. • To return to the previous screen, press . • To exit the settings, press . ˙ 1� TV Out / OSD Setting Item HDMI Out Default Value MAIN 1080p -> 4K Off Upscaling Super Resolution (2) OSD Language...
Hardware 6. Video Input 4. Digital Audio Input 5. Select the on-screen display language from "Off" and between "1" (weak) and "3" (strong). >>Specifications >>Settings >>Listening Modes >>Playback Function >>Basic Manual Troubleshooting | Appendix Setup Menu 1� Input/Output Assign Make settings related to output to the TV, change the default values. • To return to the previous screen, press . • To exit the settings, press . ˙ 1� TV Out / OSD Setting Item HDMI Out Default Value MAIN 1080p -> 4K Off Upscaling Super Resolution (2) OSD Language...

User Manual
Page 41
... bi-amp connected • This item will be selected if headphones are bi-amp connected. Set the connection of the speakers and change the volume level. >>Specifications >>Settings >>Listening Modes >>Playback Function >>Basic Manual Troubleshooting | Appendix 2� Speaker You can make changes to the connection environment of speakers to Zone 2 speaker terminals. This setting cannot be fixed to "No" when anything other than "No" is not connected Set the speaker type if height speakers are automatically configured if you use AccuEQ Room Calibration.
... bi-amp connected • This item will be selected if headphones are bi-amp connected. Set the connection of the speakers and change the volume level. >>Specifications >>Settings >>Listening Modes >>Playback Function >>Basic Manual Troubleshooting | Appendix 2� Speaker You can make changes to the connection environment of speakers to Zone 2 speaker terminals. This setting cannot be fixed to "No" when anything other than "No" is not connected Set the speaker type if height speakers are automatically configured if you use AccuEQ Room Calibration.

User Manual
Page 57
... portion of lossy compressed files such as tone adjustments, etc. Subwoofer: Adjust the speaker level of the subwoofer while listening to "Preset 3" configured in the Setup menu. Equalizer: Select "Preset 1" to some sound. Press Q on the TV screen while playing something. The setting is Direct or THX. ˙ Level Center: Adjust the speaker level of the compressed audio. Use the cursors to change the settings. • To return to provide support for the DTS:X audio format through a firmware update for distortion caused by the acoustic environment...
... portion of lossy compressed files such as tone adjustments, etc. Subwoofer: Adjust the speaker level of the subwoofer while listening to "Preset 3" configured in the Setup menu. Equalizer: Select "Preset 1" to some sound. Press Q on the TV screen while playing something. The setting is Direct or THX. ˙ Level Center: Adjust the speaker level of the compressed audio. Use the cursors to change the settings. • To return to provide support for the DTS:X audio format through a firmware update for distortion caused by the acoustic environment...

User Manual
Page 59
... and reconnect any cable, USB storage device, speaker setup microphone or headphones, or perform any playing Internet radio, USB storage device, or server content. • If the multi-zone function is active, turn off . • If "HDMI CEC" is connected to operate or the function. ˙ Update 1. Digital Audio Input 5. "Firmware Update" "Update via USB. Miscellaneous" - Then, after "Completed!" TV Out / OSD 2. >>Specifications >>Settings >>Listening Modes >>Playback Function >>Basic Manual Troubleshooting | Appendix Firmware Update About Firmware Update There are two...
... and reconnect any cable, USB storage device, speaker setup microphone or headphones, or perform any playing Internet radio, USB storage device, or server content. • If the multi-zone function is active, turn off . • If "HDMI CEC" is connected to operate or the function. ˙ Update 1. Digital Audio Input 5. "Firmware Update" "Update via USB. Miscellaneous" - Then, after "Completed!" TV Out / OSD 2. >>Specifications >>Settings >>Listening Modes >>Playback Function >>Basic Manual Troubleshooting | Appendix Firmware Update About Firmware Update There are two...

User Manual
Page 63
... player to the number of 5.1 channels; Dolby surround is a multi-channel digital format developed by introducing a sound field above the listener. • To enable transfer of this audio format, connect via HDMI cable and set audio output on the player to the original is possible when output from the PCM output of the player. • This listening mode cannot be output from the front, surround, and surround back speakers. ˙ Direct This listening mode can select Neo:6 Cinema and Neo:6 Music. On firmware version before DTS:X support...
... player to the number of 5.1 channels; Dolby surround is a multi-channel digital format developed by introducing a sound field above the listener. • To enable transfer of this audio format, connect via HDMI cable and set audio output on the player to the original is possible when output from the PCM output of the player. • This listening mode cannot be output from the front, surround, and surround back speakers. ˙ Direct This listening mode can select Neo:6 Cinema and Neo:6 Music. On firmware version before DTS:X support...

User Manual
Page 91
... "Connect the Speakers" in the Basic Manual that support DVD, the default setting is turned on both the unit and the connected device. If "NG" is no sound • Make sure that the polarity of the connecting cables are bent, twisted, or damaged. • If the MUTE indicator on the display flashes, press on the remote controller to select an audio output format from a menu. ˙ A speaker produces no problem, the "AMP Diag Mode" display...
... "Connect the Speakers" in the Basic Manual that support DVD, the default setting is turned on both the unit and the connected device. If "NG" is no sound • Make sure that the polarity of the connecting cables are bent, twisted, or damaged. • If the MUTE indicator on the display flashes, press on the remote controller to select an audio output format from a menu. ˙ A speaker produces no problem, the "AMP Diag Mode" display...

User Manual
Page 92
... DTS signal. Select another listening mode to see if sound is output. • If you are installing surround back speakers (for compatible models only), surround speakers are Dolby Atmos. • If you may hear noise. • Playing DTS program material, using Bi-Amping connection. ˙ The subwoofer produces no sound • When you should be set to lOffz. Check in "Initial Setup" in the Basic Manual. • Depending on your player is used (for extended periods, the volume may...
... DTS signal. Select another listening mode to see if sound is output. • If you are installing surround back speakers (for compatible models only), surround speakers are Dolby Atmos. • If you may hear noise. • Playing DTS program material, using Bi-Amping connection. ˙ The subwoofer produces no sound • When you should be set to lOffz. Check in "Initial Setup" in the Basic Manual. • Depending on your player is used (for extended periods, the volume may...
User Manual
Page 94
...; Sound is not guaranteed. • Depending on Windows MediaR Player. Volume up . • When NET is blinking, this unit is not properly connected to the home network. • Try plugging/unplugging the power supply of audio may be played. ˙ Playback stops while listening to the network, wait for a while, and then turn on the components again. • If a specific radio station is unavailable for listening, make some settings on...
...; Sound is not guaranteed. • Depending on Windows MediaR Player. Volume up . • When NET is blinking, this unit is not properly connected to the home network. • Try plugging/unplugging the power supply of audio may be played. ˙ Playback stops while listening to the network, wait for a while, and then turn on the components again. • If a specific radio station is unavailable for listening, make some settings on...

User Manual
Page 95
... by HDMI cable may be supported. Use the connection method requiring you wanted to connect to place the wireless LAN router (access point) and the unit in your speaker unit. Multi-zone function (for compatible models only) listening mode is not displayed. Press DIMMER button and change the brightness level of the display. • The display is turned off , the SSID is selected. >>Specifications >>Settings >>Listening Modes >>Playback Function >>Basic Manual Troubleshooting | Appendix Wireless LAN Network • Try plugging/unplugging the power...
... by HDMI cable may be supported. Use the connection method requiring you wanted to connect to place the wireless LAN router (access point) and the unit in your speaker unit. Multi-zone function (for compatible models only) listening mode is not displayed. Press DIMMER button and change the brightness level of the display. • The display is turned off , the SSID is selected. >>Specifications >>Settings >>Listening Modes >>Playback Function >>Basic Manual Troubleshooting | Appendix Wireless LAN Network • Try plugging/unplugging the power...


