
Owners Manual - English
Page 1
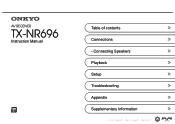
Connecting Speakers ≫ Playback ≫ Setup ≫ Troubleshooting ≫ Appendix ≫ Supplementary Information ≫ Front Panel≫ Rear Panel≫ Remote≫ AV RECEIVER TX-NR696 Instruction Manual En Table of contents ≫ Connections ≫ -
Connecting Speakers ≫ Playback ≫ Setup ≫ Troubleshooting ≫ Appendix ≫ Supplementary Information ≫ Front Panel≫ Rear Panel≫ Remote≫ AV RECEIVER TX-NR696 Instruction Manual En Table of contents ≫ Connections ≫ -
Owners Manual - English
Page 2
...-main Amplifier (ZONE 2) 45 Front Panel 10 Connecting ZONE B 46 Display 12 Connecting a Pre-main Amplifier, etc. (ZONE B) 46 Rear Panel 13 Connecting Antennas 47 Remote Controller 16 Network Connection 48 Connections Connecting speakers Connecting the Power Cord 49 18 Playback Speaker Installation 19 AV Component Playback 51 Speaker Connections and... AV Component with HDMI Jack Playing Back on multiple devices (AirPlay2) 57 Mounted 41 DTS Play-Fi® 58 2 Front Panel≫ Rear Panel≫ Remote≫
...-main Amplifier (ZONE 2) 45 Front Panel 10 Connecting ZONE B 46 Display 12 Connecting a Pre-main Amplifier, etc. (ZONE B) 46 Rear Panel 13 Connecting Antennas 47 Remote Controller 16 Network Connection 48 Connections Connecting speakers Connecting the Power Cord 49 18 Playback Speaker Installation 19 AV Component Playback 51 Speaker Connections and... AV Component with HDMI Jack Playing Back on multiple devices (AirPlay2) 57 Mounted 41 DTS Play-Fi® 58 2 Front Panel≫ Rear Panel≫ Remote≫
Owners Manual - English
Page 3
... 71 Setup Menu 112 Setting Up 71 Menu list 112 Playing Sonos on This Unit 72 Menu operations 114 3 Front Panel≫ Rear Panel≫ Remote≫
... 71 Setup Menu 112 Setting Up 71 Menu list 112 Playing Sonos on This Unit 72 Menu operations 114 3 Front Panel≫ Rear Panel≫ Remote≫
Owners Manual - English
Page 4
... erratically 142 Troubleshooting 144 Appendix Reducing the Power Consumption in Standby State 153 About HDMI 154 General Specifications 156 4 Front Panel≫ Rear Panel≫ Remote≫ Speaker 118 3. Hardware 127 6. Audio Adjust 123 4. Multi Zone 133 7. Contents ≫ Connections ≫ Playback ≫ Setup ≫ 1. Input/Output Assign 115...
... erratically 142 Troubleshooting 144 Appendix Reducing the Power Consumption in Standby State 153 About HDMI 154 General Specifications 156 4 Front Panel≫ Rear Panel≫ Remote≫ Speaker 118 3. Hardware 127 6. Audio Adjust 123 4. Multi Zone 133 7. Contents ≫ Connections ≫ Playback ≫ Setup ≫ 1. Input/Output Assign 115...

Owners Manual - English
Page 5
... other connections are completed. • We will be available if new functions are subject to change without prior notice. 5 Front Panel≫ Rear Panel≫ Remote≫ Remote controller (RC-972R) (1), Batteries (AAA/R03) (2) 3. Power cord (European, Australian, Taiwanese and Asian models) (1) • Quick Start Guide (1) *This is not supplied with the...
... other connections are completed. • We will be available if new functions are subject to change without prior notice. 5 Front Panel≫ Rear Panel≫ Remote≫ Remote controller (RC-972R) (1), Batteries (AAA/R03) (2) 3. Power cord (European, Australian, Taiwanese and Asian models) (1) • Quick Start Guide (1) *This is not supplied with the...

Owners Manual - English
Page 6
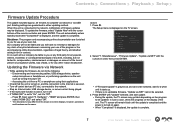
... are added or changed from the start. Supplementary Information ≫ ❏❏Firmware Update Procedure ( p7) 6 Front Panel≫ Rear Panel≫ Remote≫ "Firmware Update" - Depending on the remote controller, and refer to update the firmware. In such a case, new functions may be added from contents described in the Instruction Manual...
... are added or changed from the start. Supplementary Information ≫ ❏❏Firmware Update Procedure ( p7) 6 Front Panel≫ Rear Panel≫ Remote≫ "Firmware Update" - Depending on the remote controller, and refer to update the firmware. In such a case, new functions may be added from contents described in the Instruction Manual...
Owners Manual - English
Page 7
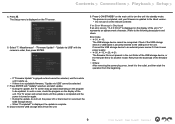
... multi-zone function is active, turn it off -- is displayed, and the update is complete. 7 Front Panel≫ Rear Panel≫ Remote≫ Next, select "5. Source 5. Miscellaneous 1. Select "7. Miscellaneous 1. Firmware Update 4. Press ENTER with the cursors in order, then press ..., the TV screen may be updated. Press . Digital Audio Input 4. Audio Adjust 4. Setup 1. TV Out / OSD 2. Miscellaneous" - Source 5. Remote ID 3. is displayed, the update is completed. "HDMI" and press ENTER, then select "HDMI CEC" and select "Off". * The descriptions may ...
... multi-zone function is active, turn it off -- is displayed, and the update is complete. 7 Front Panel≫ Rear Panel≫ Remote≫ Next, select "5. Source 5. Miscellaneous 1. Select "7. Miscellaneous 1. Firmware Update 4. Press ENTER with the cursors in order, then press ..., the TV screen may be updated. Press . Digital Audio Input 4. Audio Adjust 4. Setup 1. TV Out / OSD 2. Miscellaneous" - Source 5. Remote ID 3. is displayed, the update is completed. "HDMI" and press ENTER, then select "HDMI CEC" and select "Off". * The descriptions may ...
Owners Manual - English
Page 8
... • Stop an Internet radio, USB storage device, or server content being played • If the multi-zone function is displayed on the remote controller. Check the following : -- USB storage devices equipped with a household outlet. • If the USB storage device has been partitioned, each...to copy the unzipped files. 4. Hardware" - Press ON/STANDBY on the unit such as an independent device. 8 Front Panel≫ Rear Panel≫ Remote≫ "HDMI" and press ENTER, then select "HDMI CEC" and select "Off". * Depending on your PC. 2. ONKAVR R.zip...
... • Stop an Internet radio, USB storage device, or server content being played • If the multi-zone function is displayed on the remote controller. Check the following : -- USB storage devices equipped with a household outlet. • If the USB storage device has been partitioned, each...to copy the unzipped files. 4. Hardware" - Press ON/STANDBY on the unit such as an independent device. 8 Front Panel≫ Rear Panel≫ Remote≫ "HDMI" and press ENTER, then select "HDMI CEC" and select "Off". * Depending on your PC. 2. ONKAVR R.zip...
Owners Manual - English
Page 9
... no updatable firmware, "Update via USB" with "Update" selected, and start the operation from the unit. 9 Front Panel≫ Rear Panel≫ Remote≫ Disconnect the USB storage device from the beginning. • If "Firmware Update" is grayed out and cannot be updated. Press . Speaker 3. ... its own power supply. • -05, -13, -20, -21: The firmware file is turned on the remote controller. Tuner 2. Miscellaneous" - Connect the USB storage device to turn the power off, or disconnect or reconnect the USB storage device. •...
... no updatable firmware, "Update via USB" with "Update" selected, and start the operation from the unit. 9 Front Panel≫ Rear Panel≫ Remote≫ Disconnect the USB storage device from the beginning. • If "Firmware Update" is grayed out and cannot be updated. Press . Speaker 3. ... its own power supply. • -05, -13, -20, -21: The firmware file is turned on the remote controller. Tuner 2. Miscellaneous" - Connect the USB storage device to turn the power off, or disconnect or reconnect the USB storage device. •...

Owners Manual - English
Page 11
...unit. When using a stereo mini plug cable (ø1/8″/3.5 mm) or HDMI cable. ( p43) 11 Front Panel≫ Rear Panel≫ Remote≫ RETURN button: Returns the display to confirm your selection. Adjusts the sound quality. SETUP MIC jack: Connect the supplied speaker setup microphone. (...12. using TUNER, use them to tune in to the Pure Audio mode. ( p93) 3. Remote control sensor: Receives signals from the remote controller. • The reception range of the remote controller is minimized by entering the HYBRID STANDBY mode where only the essential circuits operate. -- Input ...
...unit. When using a stereo mini plug cable (ø1/8″/3.5 mm) or HDMI cable. ( p43) 11 Front Panel≫ Rear Panel≫ Remote≫ RETURN button: Returns the display to confirm your selection. Adjusts the sound quality. SETUP MIC jack: Connect the supplied speaker setup microphone. (...12. using TUNER, use them to tune in to the Pure Audio mode. ( p93) 3. Remote control sensor: Receives signals from the remote controller. • The reception range of the remote controller is minimized by entering the HYBRID STANDBY mode where only the essential circuits operate. -- Input ...
Owners Manual - English
Page 12
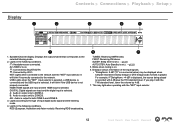
... the selected listening mode. 2. FM ST: Receiving FM stereo. If you play it with the "NET" input selector. 12 Front Panel≫ Rear Panel≫ Remote≫ Display 1 Contents ≫ Connections ≫ Playback ≫ Setup ≫ 2 3 4 5 7 1. HDMI: HDMI signals are input and the HDMI input is not properly connected. Lights in...
... the selected listening mode. 2. FM ST: Receiving FM stereo. If you play it with the "NET" input selector. 12 Front Panel≫ Rear Panel≫ Remote≫ Display 1 Contents ≫ Connections ≫ Playback ≫ Setup ≫ 2 3 4 5 7 1. HDMI: HDMI signals are input and the HDMI input is not properly connected. Lights in...
Owners Manual - English
Page 13
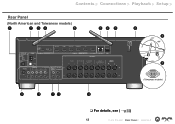
Contents ≫ Connections ≫ Playback ≫ Setup ≫ Rear Panel (North American and Taiwanese models) 90° 180° (Taiwanese models) ❏❏For details, see ( p15) 13 Front Panel≫ Rear Panel≫ Remote≫
Contents ≫ Connections ≫ Playback ≫ Setup ≫ Rear Panel (North American and Taiwanese models) 90° 180° (Taiwanese models) ❏❏For details, see ( p15) 13 Front Panel≫ Rear Panel≫ Remote≫
Owners Manual - English
Page 15
... audio cable connected to a monitor such as that of the turntable. 10. The same signal is not supported.) 15 Front Panel≫ Rear Panel≫ Remote≫ Use a plug 4 mm in a separate room (ZONE 2). Wireless antenna: Used for WI-Fi connection or when using a BLUETOOTH- ZONE 2 LINE OUT jacks: Output audio...
... audio cable connected to a monitor such as that of the turntable. 10. The same signal is not supported.) 15 Front Panel≫ Rear Panel≫ Remote≫ Use a plug 4 mm in a separate room (ZONE 2). Wireless antenna: Used for WI-Fi connection or when using a BLUETOOTH- ZONE 2 LINE OUT jacks: Output audio...

Owners Manual - English
Page 16
...; 3. MODE button: Switches between "CEC MODE" and "RCV MODE" (normal mode). 16 Front Panel≫ Rear Panel≫ Remote≫ Also, when an HDMI CEC function-enabled AV component is used with this button during playback allows you can switch "3. Also, switching... the button again to register AM/FM radio stations. ( p75) 19. HDMI MAIN/SUB button: Select the HDMI OUT jack to the pairing mode. 14. Remote Controller Contents ≫ Connections ≫ Playback ≫ Setup ≫ 1. ...
...; 3. MODE button: Switches between "CEC MODE" and "RCV MODE" (normal mode). 16 Front Panel≫ Rear Panel≫ Remote≫ Also, when an HDMI CEC function-enabled AV component is used with this button during playback allows you can switch "3. Also, switching... the button again to register AM/FM radio stations. ( p75) 19. HDMI MAIN/SUB button: Select the HDMI OUT jack to the pairing mode. 14. Remote Controller Contents ≫ Connections ≫ Playback ≫ Setup ≫ 1. ...
Owners Manual - English
Page 17
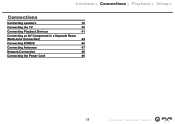
Contents ≫ Connections ≫ Playback ≫ Setup ≫ Connections Connecting speakers 18 Connecting the TV 38 Connecting Playback Devices 41 Connecting an AV Component in a Separate Room (Multi-zone Connection) 44 Connecting ZONE B 46 Connecting Antennas 47 Network Connection 48 Connecting the Power Cord 49 17 Front Panel≫ Rear Panel≫ Remote≫
Contents ≫ Connections ≫ Playback ≫ Setup ≫ Connections Connecting speakers 18 Connecting the TV 38 Connecting Playback Devices 41 Connecting an AV Component in a Separate Room (Multi-zone Connection) 44 Connecting ZONE B 46 Connecting Antennas 47 Network Connection 48 Connecting the Power Cord 49 17 Front Panel≫ Rear Panel≫ Remote≫
Owners Manual - English
Page 18
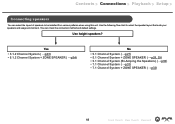
...) • 5.1 Channel System (Bi-Amping the Speakers) ( p30) • 7.1 Channel System ( p31) • 7.1 Channel System + ZONE SPEAKER ( p32) 18 Front Panel≫ Rear Panel≫ Remote≫ You can select the layout of speakers to select the speaker layout that suits your speakers and usage environment. Contents ≫ Connections ≫ Playback...
...) • 5.1 Channel System (Bi-Amping the Speakers) ( p30) • 7.1 Channel System ( p31) • 7.1 Channel System + ZONE SPEAKER ( p32) 18 Front Panel≫ Rear Panel≫ Remote≫ You can select the layout of speakers to select the speaker layout that suits your speakers and usage environment. Contents ≫ Connections ≫ Playback...
Owners Manual - English
Page 19
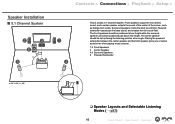
... 6 Powered Subwoofer a: 22° to 30°, b: 120° ❏❏Speaker Layouts and Selectable Listening Modes ( p87) 19 Front Panel≫ Rear Panel≫ Remote≫ Front speakers output the front stereo sound, and a center speaker outputs the sound of the center of the screen, such as dialogs and vocals...
... 6 Powered Subwoofer a: 22° to 30°, b: 120° ❏❏Speaker Layouts and Selectable Listening Modes ( p87) 19 Front Panel≫ Rear Panel≫ Remote≫ Front speakers output the front stereo sound, and a center speaker outputs the sound of the center of the screen, such as dialogs and vocals...
Owners Manual - English
Page 20
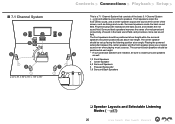
... 3 Center Speaker 4,5 Surround Speakers 6 Powered Subwoofer 7,8 Surround Back Speakers ❏❏Speaker Layouts and Selectable Listening Modes ( p87) 20 Front Panel≫ Rear Panel≫ Remote≫ Surround speakers create the back sound field. The surround back speakers should be positioned at an angle. Surround back speakers improves the sense of...
... 3 Center Speaker 4,5 Surround Speakers 6 Powered Subwoofer 7,8 Surround Back Speakers ❏❏Speaker Layouts and Selectable Listening Modes ( p87) 20 Front Panel≫ Rear Panel≫ Remote≫ Surround speakers create the back sound field. The surround back speakers should be positioned at an angle. Surround back speakers improves the sense of...
Owners Manual - English
Page 21
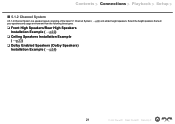
Select the height speakers that suit 21 Front Panel≫ Rear Panel≫ Remote≫ Contents ≫ Connections ≫ Playback ≫ Setup ≫ „„5.1.2 Channel System A 5.1.2 Channel System is a speaker layout consisting of the basic 5.1 Channel System ( your ...
Select the height speakers that suit 21 Front Panel≫ Rear Panel≫ Remote≫ Contents ≫ Connections ≫ Playback ≫ Setup ≫ „„5.1.2 Channel System A 5.1.2 Channel System is a speaker layout consisting of the basic 5.1 Channel System ( your ...
Owners Manual - English
Page 22
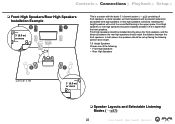
...° to 30°, b: 120° 3´ (0.9 m) or more ❏❏Speaker Layouts and Selectable Listening Modes ( p87) 22 Front Panel≫ Rear Panel≫ Remote≫ In both cases, the speakers should be installed at an angle. 7,8 Height Speakers Choose one of front speakers, a center speaker, surround speakers and a powered...
...° to 30°, b: 120° 3´ (0.9 m) or more ❏❏Speaker Layouts and Selectable Listening Modes ( p87) 22 Front Panel≫ Rear Panel≫ Remote≫ In both cases, the speakers should be installed at an angle. 7,8 Height Speakers Choose one of front speakers, a center speaker, surround speakers and a powered...


