Owner Manual
Page 9
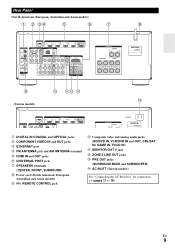
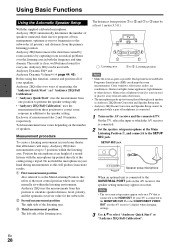
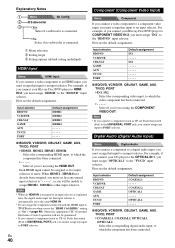
.../DVR IN and OUT, CBL/SAT IN, GAME IN, TV/CD IN) L MONITOR OUT V jack M ZONE 2 LINE OUT jacks N PRE OUT jacks (SURROUND BACK and SUBWOOFER) O AC INLET (Taiwan models) z See "Connecting the AV Receiver" for connection (➔ pages 11 to 18).
.../DVR IN and OUT, CBL/SAT IN, GAME IN, TV/CD IN) L MONITOR OUT V jack M ZONE 2 LINE OUT jacks N PRE OUT jacks (SURROUND BACK and SUBWOOFER) O AC INLET (Taiwan models) z See "Connecting the AV Receiver" for connection (➔ pages 11 to 18).
Owner Manual
Page 12
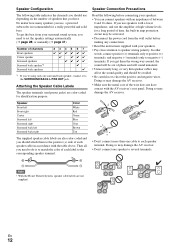
...speakers 234567 ✔ ✔✔✔ ✔✔✔✔ ✔ ✔ *1 If you're using only one surround back speaker, connect it to short the positive and negative wires. Then all you need to set the speaker settings automatically (➔ page 28) or manually (➔... does not have . No matter how many speakers you use, a powered subwoofer is to match the color of each speaker terminal. If you get the best from the wall outlet before making any connections. • Read the instructions supplied with your surround sound system, you need...
...speakers 234567 ✔ ✔✔✔ ✔✔✔✔ ✔ ✔ *1 If you're using only one surround back speaker, connect it to short the positive and negative wires. Then all you need to set the speaker settings automatically (➔ page 28) or manually (➔... does not have . No matter how many speakers you use, a powered subwoofer is to match the color of each speaker terminal. If you get the best from the wall outlet before making any connections. • Read the instructions supplied with your surround sound system, you need...
Owner Manual
Page 13
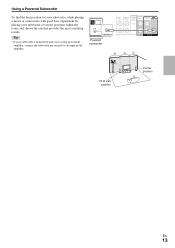
Tip • If your subwoofer at various positions within the room, and choose the one that provides the most satisfying results. LINE INPUT LINE INPUT Powered subwoofer 1/3 of wall position Corner position En 13 Using a Powered Subwoofer To find the best position for your subwoofer, while playing a movie or some music with good bass, experiment by placing your subwoofer is unpowered and you're using an external amplifier, connect the subwoofer pre out jack to an input on the amplifier.
Tip • If your subwoofer at various positions within the room, and choose the one that provides the most satisfying results. LINE INPUT LINE INPUT Powered subwoofer 1/3 of wall position Corner position En 13 Using a Powered Subwoofer To find the best position for your subwoofer, while playing a movie or some music with good bass, experiment by placing your subwoofer is unpowered and you're using an external amplifier, connect the subwoofer pre out jack to an input on the amplifier.
Owner Manual
Page 28
...calibrated microphone, Audyssey 2EQ® automatically determines the number of speakers connected, their size for purposes of speakers. The result is connected. 1 Turn on the number of bass management, optimum crossover frequencies to the subwoofer (if present), and distances from three positions to correct room ...response in your home theater that is connected to the MONITOR OUT V or the COMPONENT VIDEO OUT, use ) or place it to 3 ...
...calibrated microphone, Audyssey 2EQ® automatically determines the number of speakers connected, their size for purposes of speakers. The result is connected. 1 Turn on the number of bass management, optimum crossover frequencies to the subwoofer (if present), and distances from three positions to correct room ...response in your home theater that is connected to the MONITOR OUT V or the COMPONENT VIDEO OUT, use ) or place it to 3 ...
Owner Manual
Page 29
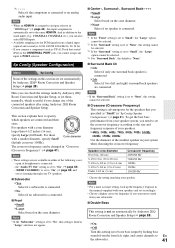
... Speaker Setup. "No" means that of Audyssey 2EQ have changed. Error message 2EQ: Auto Setup Audyssey Subwoofer Front Center Surround Surr Back Surr Back Ch Crossover : Yes : Small : Small : Small : Small... speaker distances, and speaker levels by disconnecting the setup microphone. • Do not connect or disconnect any point in progress, one of the noise and try again. •...• You can manually make changes to the room after 2 or 3 attempts, contact your Onkyo dealer. • Speaker Detect Error This message appears if a speaker is too high. If ...
... Speaker Setup. "No" means that of Audyssey 2EQ have changed. Error message 2EQ: Auto Setup Audyssey Subwoofer Front Center Surround Surr Back Surr Back Ch Crossover : Yes : Small : Small : Small : Small... speaker distances, and speaker levels by disconnecting the setup microphone. • Do not connect or disconnect any point in progress, one of the noise and try again. •...• You can manually make changes to the room after 2 or 3 attempts, contact your Onkyo dealer. • Speaker Detect Error This message appears if a speaker is too high. If ...
Owner Manual
Page 36
...sleep timer, press SLEEP repeatedly until the AV receiver sleeps, press SLEEP. The SLEEP indicator lights on SLEEP as follows (Components connected to the UNIVERSAL PORT jack are grouped in 10 minute steps. Note that are excluded). 1 Press RECEIVER followed by DIMMER repeatedly...selector, the name of the following settings: "Bass", "Treble", "Subwoofer Level", "Center Level", "Audyssey", "Dynamic EQ", "Dynamic Volume", "Late Night", "Music Optimizer", and "Cinema Filter". Information is displayed. If your TV is connected to the MONITOR OUT V or the COMPONENT VIDEO OUT, use the...
...sleep timer, press SLEEP repeatedly until the AV receiver sleeps, press SLEEP. The SLEEP indicator lights on SLEEP as follows (Components connected to the UNIVERSAL PORT jack are grouped in 10 minute steps. Note that are excluded). 1 Press RECEIVER followed by DIMMER repeatedly...selector, the name of the following settings: "Bass", "Treble", "Subwoofer Level", "Center Level", "Audyssey", "Dynamic EQ", "Dynamic Volume", "Late Night", "Music Optimizer", and "Cinema Filter". Information is displayed. If your TV is connected to the MONITOR OUT V or the COMPONENT VIDEO OUT, use the...
Owner Manual
Page 39
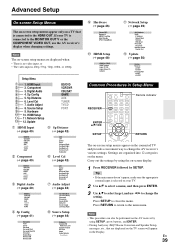
... followed by using SETUP, arrow buttons, and ENTER. • During Audyssey 2EQ® Room Correction and Speaker Setup, messages, etc., that is connected to the MONITOR OUT V or the COMPONENT VIDEO OUT, use F/S to the main menu. Note • This procedure can also be performed on... Width Dolby EX Center Image Listening Angle I 8. Press SETUP to change the setting. Audio Adjust I Source Setup (➔ page 44) Subwoofer Front Center Surround Surround Back Surround Back Ch Crossover Double Bass Wireless SB Wireless SW Audyssey Dynamic EQ Reference Level Dynamic Volume A/V Sync Name...
... followed by using SETUP, arrow buttons, and ENTER. • During Audyssey 2EQ® Room Correction and Speaker Setup, messages, etc., that is connected to the MONITOR OUT V or the COMPONENT VIDEO OUT, use F/S to the main menu. Note • This procedure can also be performed on... Width Dolby EX Center Image Listening Angle I 8. Press SETUP to change the setting. Audio Adjust I Source Setup (➔ page 44) Subwoofer Front Center Surround Surround Back Surround Back Ch Crossover Double Bass Wireless SB Wireless SW Audyssey Dynamic EQ Reference Level Dynamic Volume A/V Sync Name...
Owner Manual
Page 40
... cannot assign any input to the "TV/CD" input selector. Here are the default assignments. Digital Audio (Digital Audio Input) Menu Digital Audio If you connect a component to a digital audio input, you must assign that seated iPod) to UNIVERSAL PORT jack, you must assign "OPTICAL1" to PORT selector. B Menu selection... VCR/DVR, CBL/SAT, GAME, AUX, TV/CD, PORT `IN1, IN2: Select the corresponding video input, to other input selectors. No: Select if no subwoofer is connected. Explanatory Notes B Menu Sp Config C Subwoofer D Yes: Select if a subwoofer is connected.
... cannot assign any input to the "TV/CD" input selector. Here are the default assignments. Digital Audio (Digital Audio Input) Menu Digital Audio If you connect a component to a digital audio input, you must assign that seated iPod) to UNIVERSAL PORT jack, you must assign "OPTICAL1" to PORT selector. B Menu selection... VCR/DVR, CBL/SAT, GAME, AUX, TV/CD, PORT `IN1, IN2: Select the corresponding video input, to other input selectors. No: Select if no subwoofer is connected. Explanatory Notes B Menu Sp Config C Subwoofer D Yes: Select if a subwoofer is connected.
Owner Manual
Page 41
... does not appear. ■ Center*1, Surround*1, Surround Back*1*2*3*4 ` Small: ` Large: Select based on the cone diameter. ` None: Select if no subwoofer is connected. ■ Front ` Small: ` Large: Select based on to boost bass output by feeding bass sounds from a digital input (optical and coaxial) is...; Crossover (Crossover Frequency) This setting is advantageous for PCM signals from the front left and right) surround back speakers are connected. Note • If the "Subwoofer" setting is set to an analog audio input. Note • If the "Surround Back" setting is set to "None...
... does not appear. ■ Center*1, Surround*1, Surround Back*1*2*3*4 ` Small: ` Large: Select based on the cone diameter. ` None: Select if no subwoofer is connected. ■ Front ` Small: ` Large: Select based on to boost bass output by feeding bass sounds from a digital input (optical and coaxial) is...; Crossover (Crossover Frequency) This setting is advantageous for PCM signals from the front left and right) surround back speakers are connected. Note • If the "Subwoofer" setting is set to an analog audio input. Note • If the "Surround Back" setting is set to "None...

Owner Manual
Page 42
... unit. Note • These settings cannot be set to "On" (➔ page 48) and you wish to output the audio from the subwoofer connected to the wireless unit. the AV receiver is muted. • Speakers that it reads 75 dB SPL at the listener's ears as the default...the following cases: - Note • This function can be selected. ■ Wireless SW (Subwoofer) ` Yes: The audio is output from the subwoofer connected to the wireless unit. ` No: The audio is not output from the subwoofer connected to the wireless unit. Note • If the "Surround Back" setting is set in ...
... unit. Note • These settings cannot be set to "On" (➔ page 48) and you wish to output the audio from the subwoofer connected to the wireless unit. the AV receiver is muted. • Speakers that it reads 75 dB SPL at the listener's ears as the default...the following cases: - Note • This function can be selected. ■ Wireless SW (Subwoofer) ` Yes: The audio is output from the subwoofer connected to the wireless unit. ` No: The audio is not output from the subwoofer connected to the wireless unit. Note • If the "Surround Back" setting is set in ...
Owner Manual
Page 50
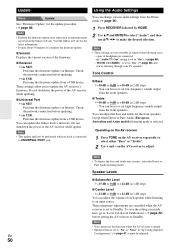
... the firmware update only when such an announcement is posted on the AV receiver to an input source. Check the network connection before updating. `via Internet. You can update the Onkyo dock's firmware. Note • These settings are set to "On" (➔ page 48) and you made here, go to "... You can change various audio settings from the front speakers. ■ Treble `-10 dB to 0 dB to update the AV receiver's firmware. Speaker Levels ■ Subwoofer Level `-15 dB to 0 dB to +12 dB in 1 dB steps ■ Center Level `-12 dB to 0 dB to +12 dB in either "Bass...
... the firmware update only when such an announcement is posted on the AV receiver to an input source. Check the network connection before updating. `via Internet. You can update the Onkyo dock's firmware. Note • These settings are set to "On" (➔ page 48) and you made here, go to "... You can change various audio settings from the front speakers. ■ Treble `-10 dB to 0 dB to update the AV receiver's firmware. Speaker Levels ■ Subwoofer Level `-15 dB to 0 dB to +12 dB in 1 dB steps ■ Center Level `-12 dB to 0 dB to +12 dB in either "Bass...
Owner Manual
Page 60
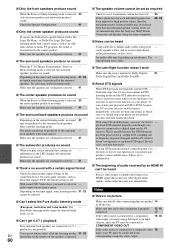
... does not switch formats immediately, you must assign that support DVD, the default setting is selected, 33 only the front speakers and subwoofer produce sound. Make sure the speakers are connected, 6.1/7.1 - Depending on . ■ Can't get 6.1/7.1 playback If no - Select another listening mode. back speakers with a mono source, such as a genuine DTS...
... does not switch formats immediately, you must assign that support DVD, the default setting is selected, 33 only the front speakers and subwoofer produce sound. Make sure the speakers are connected, 6.1/7.1 - Depending on . ■ Can't get 6.1/7.1 playback If no - Select another listening mode. back speakers with a mono source, such as a genuine DTS...


