Owner Manual
Page 5
... Sp Config (Speaker Configuration 41 Sp Distance (Speaker Distance 42 Level Cal (Level Calibration 42 Audio Adjust 43 Source Setup 44 Hardware 46 HDMI Setup 48 Network Setup 49 Update 50 Using the Audio Settings 50 Zone 2 52 Making Zone 2 Connections 52 Controlling Zone 2 Components 52... Controlling Other Components iPod/iPhone Playback via Onkyo Dock 53 Using the Onkyo Dock 53 Controlling Your iPod/iPhone 54 Controlling ...
... Sp Config (Speaker Configuration 41 Sp Distance (Speaker Distance 42 Level Cal (Level Calibration 42 Audio Adjust 43 Source Setup 44 Hardware 46 HDMI Setup 48 Network Setup 49 Update 50 Using the Audio Settings 50 Zone 2 52 Making Zone 2 Connections 52 Controlling Zone 2 Components 52... Controlling Other Components iPod/iPhone Playback via Onkyo Dock 53 Using the Onkyo Dock 53 Controlling Your iPod/iPhone 54 Controlling ...
Owner Manual
Page 22
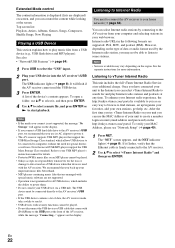
...of data or audio format used with security functions cannot be able to listen to select the "USB" input. 2 Plug your MAC Address, please see "Network Setup" (➔ page 49). 1 Press NET. Note • If the media you connect is not supported, the message "No Storage" will flash if the... is used by connecting to power them. • Do not connect your web browser. En 22 The USB device must be played. • Onkyo accepts no additional charge. Note • Services available may not be played. • Do not disconnect the USB device or USB cable that the...
...of data or audio format used with security functions cannot be able to listen to select the "USB" input. 2 Plug your MAC Address, please see "Network Setup" (➔ page 49). 1 Press NET. Note • If the media you connect is not supported, the message "No Storage" will flash if the... is used by connecting to power them. • Do not connect your web browser. En 22 The USB device must be played. • Onkyo accepts no additional charge. Note • Services available may not be played. • Do not disconnect the USB device or USB cable that the...

Owner Manual
Page 23
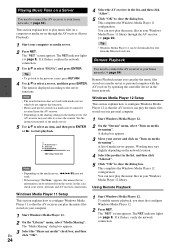
...one currently being played back are displayed. `Add this station: You can 't connect to the AV receiver, recheck the AV receiver's IP address on the "Network Setup" screen. 2 Click on the "My Favorites" tab. 3 Enter the preset name and Internet address (URL). 4 Click "Save" to save the Internet radio... to the "My Favorites". You can toggle between the playback screen and the radio list screen. 3 Use R/X to the AV receiver (WEB Setup Menu). Registering Presets*1 You can preset the stations and songs but cannot listen to start your computer, start playback. *1 From the search results ...
...one currently being played back are displayed. `Add this station: You can 't connect to the AV receiver, recheck the AV receiver's IP address on the "Network Setup" screen. 2 Click on the "My Favorites" tab. 3 Enter the preset name and Internet address (URL). 4 Click "Save" to save the Internet radio... to the "My Favorites". You can toggle between the playback screen and the radio list screen. 3 Use R/X to the AV receiver (WEB Setup Menu). Registering Presets*1 You can preset the stations and songs but cannot listen to start your computer, start playback. *1 From the search results ...
Owner Manual
Page 24
... the AV receiver to configure Windows Media Player 11 so that no information can be retrieved from the server. In this case, check your home network (➔ page 64). Wording may not able to close the dialog box. The "Media Sharing" dialog box appears. 3 Select the "Share my...You need to connect the AV receiver to your server, network, and AV receiver connections. 4 Select the AV receiver in the list, and then click "Allow". 5 Click "OK" to close the dialog box. Using Remote Playback Windows Media Player 11 Setup This section explains how to your computer. 1 Start ...
... the AV receiver to configure Windows Media Player 11 so that no information can be retrieved from the server. In this case, check your home network (➔ page 64). Wording may not able to close the dialog box. The "Media Sharing" dialog box appears. 3 Select the "Share my...You need to connect the AV receiver to your server, network, and AV receiver connections. 4 Select the AV receiver in the list, and then click "Allow". 5 Click "OK" to close the dialog box. Using Remote Playback Windows Media Player 11 Setup This section explains how to your computer. 1 Start ...
Owner Manual
Page 39
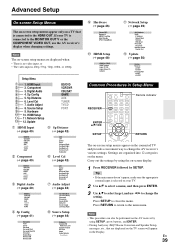
... (➔ page 46) Volume OSD Remote ID AM/FM Freq Step Auto Standby UP-A1 ChargeMode K HDMI Setup (➔ page 48) HDMI Ctrl (RIHD) HDMI Through Audio TV Out Audio Return Ch LipSync L Network Setup (➔ page 49) MAC Address DHCP IP Address Subnet Mask Gateway DNS Server Proxy URL Proxy Port... Control Port M Update (➔ page 50) Version Receiver via NET via USB Universal Port via NET via USB Common Procedures in the Display. Network Setup M 12. If your TV. 2 Use R/X to select a menu, and then press ENTER. 3 Use R/X to select target, and use F/S to the MONITOR OUT V or the...
... (➔ page 46) Volume OSD Remote ID AM/FM Freq Step Auto Standby UP-A1 ChargeMode K HDMI Setup (➔ page 48) HDMI Ctrl (RIHD) HDMI Through Audio TV Out Audio Return Ch LipSync L Network Setup (➔ page 49) MAC Address DHCP IP Address Subnet Mask Gateway DNS Server Proxy URL Proxy Port... Control Port M Update (➔ page 50) Version Receiver via NET via USB Universal Port via NET via USB Common Procedures in the Display. Network Setup M 12. If your TV. 2 Use R/X to select a menu, and then press ENTER. 3 Use R/X to select target, and use F/S to the MONITOR OUT V or the...
Owner Manual
Page 49
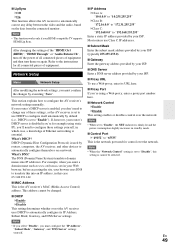
...a proxy port number here. ■ Network Control ` Enable ` Disable This setting enables or disables control over the network. This section explains how to the instructions for control over the network. If, however, your ISP. Network Setup Menu Network Setup After modifying the network settings, you 'll need to change ...is dimly-lit and the power consumption slightly increases in standby mode. ■ Control Port `"49152" to "65535" This is the network port used by default (i.e., DHCP is set to "Enable"). ■ LipSync ` Off ` On This function allows the AV receiver to...
...a proxy port number here. ■ Network Control ` Enable ` Disable This setting enables or disables control over the network. This section explains how to the instructions for control over the network. If, however, your ISP. Network Setup Menu Network Setup After modifying the network settings, you 'll need to change ...is dimly-lit and the power consumption slightly increases in standby mode. ■ Control Port `"49152" to "65535" This is the network port used by default (i.e., DHCP is set to "Enable"). ■ LipSync ` Off ` On This function allows the AV receiver to...
Owner Manual
Page 62
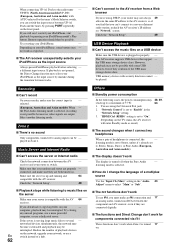
...be interrupted. If playback is turned off when the Pure Audio - Zone 2 ■ There's no video signals are output. played in the "Network Setup" setting. 3. computer, playback may not always 49 allocate the same IP address to Stereo, Mono, Direct, or Pure Audio (European, Australian and... source Always pause iPod/iPhone playback before selecting - If the server is set to the USB mass storage device class. Check the "Network Setup". 49 USB Device Playback ■ Can't access the music files on . be interrupted. receiver and your iPod/iPhone model's Play ...
...be interrupted. If playback is turned off when the Pure Audio - Zone 2 ■ There's no video signals are output. played in the "Network Setup" setting. 3. computer, playback may not always 49 allocate the same IP address to Stereo, Mono, Direct, or Pure Audio (European, Australian and... source Always pause iPod/iPhone playback before selecting - If the server is set to the USB mass storage device class. Check the "Network Setup". 49 USB Device Playback ■ Can't access the music files on . be interrupted. receiver and your iPod/iPhone model's Play ...
Owner Manual
Page 64
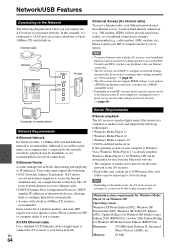
If you want to configure these settings manually, see "Network Setup" (➔ page 49). • The AV receiver does not support PPPoE settings, so if you have a built-in modem, and some ISPs require you may... the Microsoft web site. • The computer or media server must support the following: • NAT (Network Address Translation). Computer or media server Network Requirements ■ Ethernet Network For the best results, a 100Base-TX switched Ethernet network is strongly recommended (e.g., cable modem, xDSL modem, etc). The AV receiver needs Internet access for Windows XP...
If you want to configure these settings manually, see "Network Setup" (➔ page 49). • The AV receiver does not support PPPoE settings, so if you have a built-in modem, and some ISPs require you may... the Microsoft web site. • The computer or media server must support the following: • NAT (Network Address Translation). Computer or media server Network Requirements ■ Ethernet Network For the best results, a 100Base-TX switched Ethernet network is strongly recommended (e.g., cable modem, xDSL modem, etc). The AV receiver needs Internet access for Windows XP...
Owner Manual
Page 66
... update is complete, and upon turning the AV receiver off the AV receiver while it is partitioned, each section will retain all your use its SETUP, arrow and ENTER buttons. 2 Select "Update" and press ENTER. Before you start • Set the "HDMI Ctrl (RIHD)" setting to power it ...to , compensation, reimbursement or damages on the rear panel. Note • Check the network connection before updating. • Do not touch the any other reason whatsoever. Limitation of a USB device with the AV receiver. Onkyo will be liable and you can still view the update progress on . Note •...
... update is complete, and upon turning the AV receiver off the AV receiver while it is partitioned, each section will retain all your use its SETUP, arrow and ENTER buttons. 2 Select "Update" and press ENTER. Before you start • Set the "HDMI Ctrl (RIHD)" setting to power it ...to , compensation, reimbursement or damages on the rear panel. Note • Check the network connection before updating. • Do not touch the any other reason whatsoever. Limitation of a USB device with the AV receiver. Onkyo will be liable and you can still view the update progress on . Note •...


