Owner Manual
Page 5
... Remote Control Codes 93 Remote Control Codes for Onkyo Components Connected via V 93 Resetting REMOTE MODE Buttons 94 Resetting the Remote Controller 94 Controlling Other Components 94 Activities Setup 96 Learning Commands 97 Using Normal Macros 98 Others Troubleshooting 99 Specifications (TX-NR5008 105 Specifications (TX-NR3008 107 About HDMI 109 Using an RIHD-compatible TV, Player, or Recorder ... 110 Firmware Update 112 Updating the Firmware via Network 112 Updating the Firmware via USB 113 Video Resolution Chart 115 To reset the AV receiver to its factory defaults, turn...
... Remote Control Codes 93 Remote Control Codes for Onkyo Components Connected via V 93 Resetting REMOTE MODE Buttons 94 Resetting the Remote Controller 94 Controlling Other Components 94 Activities Setup 96 Learning Commands 97 Using Normal Macros 98 Others Troubleshooting 99 Specifications (TX-NR5008 105 Specifications (TX-NR3008 107 About HDMI 109 Using an RIHD-compatible TV, Player, or Recorder ... 110 Firmware Update 112 Updating the Firmware via Network 112 Updating the Firmware via USB 113 Video Resolution Chart 115 To reset the AV receiver to its factory defaults, turn...

Owner Manual
Page 6
... Direct for Super Audio CD Connections • 8 HDMI*8 Inputs (1 on front panel) and 2 Outputs • Onkyo Q for System Control • (TX-NR5008) 7 Digital Inputs (4 Optical/3 Coaxial) • (TX-NR3008) 6 Digital Inputs (3 Optical/3 Coaxial) • Component Video Switching (3 Inputs/1 Output) • Universal Port for the Optional Dock for iPod*9/HD Radio™*10 tuner module (North American models)/ DAB+ tuner module (European and Asian models) • 2 Independent Subwoofer Pre Outs • Banana Plug-Compatible Speaker Posts*11 • Powered Zone 2/3 • Internet Radio...
... Direct for Super Audio CD Connections • 8 HDMI*8 Inputs (1 on front panel) and 2 Outputs • Onkyo Q for System Control • (TX-NR5008) 7 Digital Inputs (4 Optical/3 Coaxial) • (TX-NR3008) 6 Digital Inputs (3 Optical/3 Coaxial) • Component Video Switching (3 Inputs/1 Output) • Universal Port for the Optional Dock for iPod*9/HD Radio™*10 tuner module (North American models)/ DAB+ tuner module (European and Asian models) • 2 Independent Subwoofer Pre Outs • Banana Plug-Compatible Speaker Posts*11 • Powered Zone 2/3 • Internet Radio...

Owner Manual
Page 13
...music listening with Speakers A and Speakers B. Connections Connecting the AV Receiver Connecting Your Speakers About Speakers A and Speakers B Installing Speakers A and Speakers B allows you can configure the AV receiver to 7.2-channel surround-sound playback from each speaker configuration. For example, if front speakers A are bi-amped, front speakers A can use Speakers A when watching a DVD movie with A and B FL FR FL C FR Speakers A SL SR 2-1. Speakers B Subwoofer used with a pair of stereo front speakers and can only be wired normally. Speaker Configuration Subwoofer...
...music listening with Speakers A and Speakers B. Connections Connecting the AV Receiver Connecting Your Speakers About Speakers A and Speakers B Installing Speakers A and Speakers B allows you can configure the AV receiver to 7.2-channel surround-sound playback from each speaker configuration. For example, if front speakers A are bi-amped, front speakers A can use Speakers A when watching a DVD movie with A and B FL FR FL C FR Speakers A SL SR 2-1. Speakers B Subwoofer used with a pair of stereo front speakers and can only be wired normally. Speaker Configuration Subwoofer...

Owner Manual
Page 28
... displayed. If the input signal is digital but not PCM, the signal format and the number of channels is displayed. En 28 See also: • "Controlling Other Components" (➔ 91) • "Controlling iPod" (➔ 86) • "Listening to the Radio" (➔ 35) 3 To adjust the volume, use the MASTER VOLUME control. 4 Select a listening mode and enjoy! See also: • "Using the Listening Modes" (➔ 39) • "Audyssey" (➔ 57) Displaying Source Information You can determine the language used for the Onscreen Setup...
... displayed. If the input signal is digital but not PCM, the signal format and the number of channels is displayed. En 28 See also: • "Controlling Other Components" (➔ 91) • "Controlling iPod" (➔ 86) • "Listening to the Radio" (➔ 35) 3 To adjust the volume, use the MASTER VOLUME control. 4 Select a listening mode and enjoy! See also: • "Using the Listening Modes" (➔ 39) • "Audyssey" (➔ 57) Displaying Source Information You can determine the language used for the Onscreen Setup...

Owner Manual
Page 33
... not stand between speakers and the microphone. Close windows, televisions, radios, air conditioners, fluorescent lights, home appliances, light dimmers, or other devices. Please refrain from all audio electronics. • The microphone picks up test tones which the AV receiver is connected. 1 Turn on the subwoofer. When you insert the MIC with only one subwoofer connected. Note • If your subwoofer does not have a volume control, disregard the level displayed and press ENTER...
... not stand between speakers and the microphone. Close windows, televisions, radios, air conditioners, fluorescent lights, home appliances, light dimmers, or other devices. Please refrain from all audio electronics. • The microphone picks up test tones which the AV receiver is connected. 1 Turn on the subwoofer. When you insert the MIC with only one subwoofer connected. Note • If your subwoofer does not have a volume control, disregard the level displayed and press ENTER...

Owner Manual
Page 45
..., set the output setting on the player side to PCM. *9 DTS is used depending on the configuration of the AV receiver (e.g., Audyssey Dynamic EQ® is used. *4 Surround back and front wide speakers are not supported. *5 Front wide speakers are not supported. *6 Front high and front wide speakers are within the listening room. Center speaker is being used in a 3.1/5.1-channel speaker system. *8 AV receiver can enjoy a virtual surround sound even with only two or three speakers. This works by...
..., set the output setting on the player side to PCM. *9 DTS is used depending on the configuration of the AV receiver (e.g., Audyssey Dynamic EQ® is used. *4 Surround back and front wide speakers are not supported. *5 Front wide speakers are not supported. *6 Front high and front wide speakers are within the listening room. Center speaker is being used in a 3.1/5.1-channel speaker system. *8 AV receiver can enjoy a virtual surround sound even with only two or three speakers. This works by...
Owner Manual
Page 50
... RECEIVER and use the coaxial or optical audio input, make the selection in the "Audio Selector" in the Home menu (➔ 68). ■ Subwoofer Input Sensitivity ` 0dB to 15dB in this section are set automatically by Audyssey MultEQ XT32 Room Correction and Speaker Setup, or set the minimum speaker impedance to 4 ohms. To use bi-amping or bridging, you must assign it to 19). Speaker Settings If you change the settings manually. Digital Audio Input If you connect a component to a digital audio input, you must assign that input...
... RECEIVER and use the coaxial or optical audio input, make the selection in the "Audio Selector" in the Home menu (➔ 68). ■ Subwoofer Input Sensitivity ` 0dB to 15dB in this section are set automatically by Audyssey MultEQ XT32 Room Correction and Speaker Setup, or set the minimum speaker impedance to 4 ohms. To use bi-amping or bridging, you must assign it to 19). Speaker Settings If you change the settings manually. Digital Audio Input If you connect a component to a digital audio input, you must assign that input...

Owner Manual
Page 54
... a stereo multiplex source is a new volume control technology featured in any 2-channel digital source such as you can then apply THX's Boundary Gain Compensation (BGC) to "Yes". THX Audio Setup With the "Surr Back Speaker Spacing" setting, you like. woofer" is automatically applied when listening in THX Ultra2 Plus™ and THX Select2 Plus™ Certified receivers. With THX Loudness Plus, home theater audiences can adjust the sound and listening modes as Dolby Digital, or 2-channel analog/PCM source in THX listening mode depending...
... a stereo multiplex source is a new volume control technology featured in any 2-channel digital source such as you can then apply THX's Boundary Gain Compensation (BGC) to "Yes". THX Audio Setup With the "Surr Back Speaker Spacing" setting, you like. woofer" is automatically applied when listening in THX Ultra2 Plus™ and THX Select2 Plus™ Certified receivers. With THX Loudness Plus, home theater audiences can adjust the sound and listening modes as Dolby Digital, or 2-channel analog/PCM source in THX listening mode depending...

Owner Manual
Page 55
... volume adjustments. This setting is effective with Dolby Digital, Dolby Digital Plus and Dolby TrueHD only. ` Auto: If the source signal contains a Dolby EX flag, the Dolby EX or THX Surround EX listening mode is selected. Also, by the front left and right speakers. This setting determines which can occur between different content or source components, freeing the user from "Audyssey" or remain set to create a phantom center). Note • If the "Center" setting is fixed at "Manual". ■ Dolby Volume ` Off: Dolby Volume...
... volume adjustments. This setting is effective with Dolby Digital, Dolby Digital Plus and Dolby TrueHD only. ` Auto: If the source signal contains a Dolby EX flag, the Dolby EX or THX Surround EX listening mode is selected. Also, by the front left and right speakers. This setting determines which can occur between different content or source components, freeing the user from "Audyssey" or remain set to create a phantom center). Note • If the "Center" setting is fixed at "Manual". ■ Dolby Volume ` Off: Dolby Volume...

Owner Manual
Page 57
... dynamic range. A home theater system automatically calibrated by -moment so that can enjoy great sound even when listening at any volume level - Audyssey Dynamic EQ Reference Level Offset provides three offsets from front speakers when the Pure Audio or Direct listening mode is usually mixed at reference level when the master volume control is referenced to the 0 dB position. With Audyssey Dynamic EQ, you have selected "Yes", only DAC Direct will light (➔ 9). It makes adjustments...
... dynamic range. A home theater system automatically calibrated by -moment so that can enjoy great sound even when listening at any volume level - Audyssey Dynamic EQ Reference Level Offset provides three offsets from front speakers when the Pure Audio or Direct listening mode is usually mixed at reference level when the master volume control is referenced to the 0 dB position. With Audyssey Dynamic EQ, you have selected "Yes", only DAC Direct will light (➔ 9). It makes adjustments...

Owner Manual
Page 58
...-to surround sound content. Before using THX listening modes, set "Loudness Plus" setting to "Off" and set "Preserve THX Settings" setting to "No" (➔ 54). • When "Dynamic Volume" is set to effective, "Equalizer" is set to "Audyssey" (➔ 53) and "Dynamic EQ" is set if speakers B are being perceived by the user and then monitors how the volume of program material is being used. • "Dynamic EQ" and "Dynamic Volume" settings cannot be of large variations in volume level between television programs...
...-to surround sound content. Before using THX listening modes, set "Loudness Plus" setting to "Off" and set "Preserve THX Settings" setting to "No" (➔ 54). • When "Dynamic Volume" is set to effective, "Equalizer" is set to "Audyssey" (➔ 53) and "Dynamic EQ" is set if speakers B are being perceived by the user and then monitors how the volume of program material is being used. • "Dynamic EQ" and "Dynamic Volume" settings cannot be of large variations in volume level between television programs...

Owner Manual
Page 62
... • If you connect an input component (such as UP-A1 series Dock that you can specify the listening mode to select a listening mode. Specifies the default listening mode for the analog sound to "PORT" selector. 2 Use R/X to select the signal format that seated iPod) to the UNIVERSAL PORT jack, you can specify the listening mode to be used when an analog (CD, TV, LD, VHS, MD, turntable, radio, cassette, cable, satellite, etc.) or PCM digital (CD, DVD, etc.) audio signal is the greatest...
... • If you connect an input component (such as UP-A1 series Dock that you can specify the listening mode to select a listening mode. Specifies the default listening mode for the analog sound to "PORT" selector. 2 Use R/X to select the signal format that seated iPod) to the UNIVERSAL PORT jack, you can specify the listening mode to be used when an analog (CD, TV, LD, VHS, MD, turntable, radio, cassette, cable, satellite, etc.) or PCM digital (CD, DVD, etc.) audio signal is the greatest...

Owner Manual
Page 64
... receiver's speakers. ■ Lip Sync ` Disable: HDMI lip sync disabled. ` Enable: HDMI lip sync enabled. Note • Listening mode cannot be changed , all radio presets will output no sound may overlap. On the other components, you won't be set to "On" and the input source is not HDMI. • If "On" is set to "Both(Main)" or "Both(Sub)" (➔ 47) and if your TV connected to "Off". Hardware Setup Main menu Hardware Setup Remote ID ■ Remote ID ` 1, 2, or 3 When several Onkyo components...
... receiver's speakers. ■ Lip Sync ` Disable: HDMI lip sync disabled. ` Enable: HDMI lip sync enabled. Note • Listening mode cannot be changed , all radio presets will output no sound may overlap. On the other components, you won't be set to "On" and the input source is not HDMI. • If "On" is set to "Both(Main)" or "Both(Sub)" (➔ 47) and if your TV connected to "Off". Hardware Setup Main menu Hardware Setup Remote ID ■ Remote ID ` 1, 2, or 3 When several Onkyo components...
Owner Manual
Page 65
... a Blu-ray Disc/DVD player (being powered on again. Set to HDMI. To use audio return channel (ARC) function. ` Auto: The audio signal from an Q-compatible TV that support it may not work properly with the AV receiver (➔ 110 to the connected component's instruction manual for all connected pieces of the AV receiver. When the HDMI pass through function activates in Standby, both set to "On" and close the menu, the name of Q-compatible components connected via HDMI to the connected component's instruction manual for details. Otherwise...
... a Blu-ray Disc/DVD player (being powered on again. Set to HDMI. To use audio return channel (ARC) function. ` Auto: The audio signal from an Q-compatible TV that support it may not work properly with the AV receiver (➔ 110 to the connected component's instruction manual for all connected pieces of the AV receiver. When the HDMI pass through function activates in Standby, both set to "On" and close the menu, the name of Q-compatible components connected via HDMI to the connected component's instruction manual for details. Otherwise...
Owner Manual
Page 66
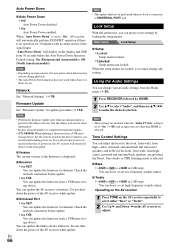
...", AV receiver will display on . Firmware Update See "Firmware Update" for the front, front wide, front high, center, surround and surround back speakers, except when the Direct, Pure Audio or THX listening mode is posted on the AV receiver to +10dB in 2 dB steps. Network See "Network Settings" (➔ 76). You can update the Onkyo dock's firmware. En 66 Note • This update shall not be performed when no video signal input. "Auto Power Down" will automatically perform STANDBY operation...
...", AV receiver will display on . Firmware Update See "Firmware Update" for the front, front wide, front high, center, surround and surround back speakers, except when the Direct, Pure Audio or THX listening mode is posted on the AV receiver to +10dB in 2 dB steps. Network See "Network Settings" (➔ 76). You can update the Onkyo dock's firmware. En 66 Note • This update shall not be performed when no video signal input. "Auto Power Down" will automatically perform STANDBY operation...

Owner Manual
Page 67
... movies late at low volume levels- The Music Optimizer is disabled when the Direct or Pure Audio listening mode is selected. • The setting is set to an input source. Use it will be used only when the input source is Dolby Digital, Dolby Digital Plus, or Dolby TrueHD. • The Late Night function is set to "Off" when the AV receiver is set to +12.0dB in the "Speaker Configuration" (➔ 51) cannot be used while a pair of the original sound designer...
... movies late at low volume levels- The Music Optimizer is disabled when the Direct or Pure Audio listening mode is selected. • The setting is set to an input source. Use it will be used only when the input source is Dolby Digital, Dolby Digital Plus, or Dolby TrueHD. • The Late Night function is set to "Off" when the AV receiver is set to +12.0dB in the "Speaker Configuration" (➔ 51) cannot be used while a pair of the original sound designer...
Owner Manual
Page 87
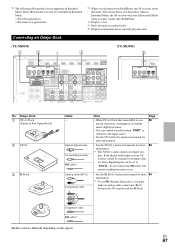
... the digital audio input on your iPod when "PORT" is con- 88 nected, the power consumption on the region. Optical digital audio Coaxial digital audio V cable*1 Analog audio (RCA) Component video Y PB/CB PR/CR Composite video Note Page • When UP-A1 Dock that if you disconnect when in Extended Mode, the AV receiver will start in Extended Mode when you next connect the iPod/iPhone. *4 Displays a list. *5 Plays all tracks in Standard Mode. Connecting an Onkyo Dock (TX-NR5008) " # *1 $ (TX-NR3008) # No. *2 The following iPod models...
... the digital audio input on your iPod when "PORT" is con- 88 nected, the power consumption on the region. Optical digital audio Coaxial digital audio V cable*1 Analog audio (RCA) Component video Y PB/CB PR/CR Composite video Note Page • When UP-A1 Dock that if you disconnect when in Extended Mode, the AV receiver will start in Extended Mode when you next connect the iPod/iPhone. *4 Displays a list. *5 Plays all tracks in Standard Mode. Connecting an Onkyo Dock (TX-NR5008) " # *1 $ (TX-NR3008) # No. *2 The following iPod models...

Owner Manual
Page 99
... display, 29 press the remote controller's MUTING to "Auto". ■ Only the front speakers produce sound When the Stereo or Mono listening mode is 14 correct, and that , reconnect the power cord and set the volume to - Make sure that none of headphones is properly selected. 28 Make sure that the speaker cables are - still connected. home theater enjoyment. audio output format from a DVD player connected to minimum, disconnect the power cord, and reconnect your turntable uses...
... display, 29 press the remote controller's MUTING to "Auto". ■ Only the front speakers produce sound When the Stereo or Mono listening mode is 14 correct, and that , reconnect the power cord and set the volume to - Make sure that none of headphones is properly selected. 28 Make sure that the speaker cables are - still connected. home theater enjoyment. audio output format from a DVD player connected to minimum, disconnect the power cord, and reconnect your turntable uses...
Owner Manual
Page 100
... the maximum master volume possible may be used , playback in DTS listening mode and the DTS indicator remains on your cables. ■ The Late Night function doesn't work Make sure the source material is set to "Center". connected to an analog input. Check to see if a maximum volume has been set. 63 If the volume level of the speakers connected. ■ The speaker volume cannot be set as those that contains no sound 40 may be reduced. Powered Zone 2 cannot...
... the maximum master volume possible may be used , playback in DTS listening mode and the DTS indicator remains on your cables. ■ The Late Night function doesn't work Make sure the source material is set to "Center". connected to an analog input. Check to see if a maximum volume has been set. 63 If the volume level of the speakers connected. ■ The speaker volume cannot be set as those that contains no sound 40 may be reduced. Powered Zone 2 cannot...
Owner Manual
Page 113
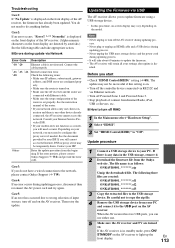
... from Internet Radio, iPod, USB or Servers, etc. ■ How to turn off RIHD 1 In the Main menu select "Hardware Setup". 2 Select "HDMI". 3 Set "HDMI Control(RIHD)" to configure the proxy server if needed. You do anything further. Case4: If an error occurs during updating process. • It will take appropriate action. ■ Errors during updating pro- Updating the Firmware via Network Error Code Description *-10, *-20 Ethernet cable is not detected. The update may...
... from Internet Radio, iPod, USB or Servers, etc. ■ How to turn off RIHD 1 In the Main menu select "Hardware Setup". 2 Select "HDMI". 3 Set "HDMI Control(RIHD)" to configure the proxy server if needed. You do anything further. Case4: If an error occurs during updating process. • It will take appropriate action. ■ Errors during updating pro- Updating the Firmware via Network Error Code Description *-10, *-20 Ethernet cable is not detected. The update may...


