

Owner Manual
Page 1
AV Receiver TX-DS575X Instruction Manual Contents Before using Important Safeguards 2 Precautions 3 Features 4 Supplied accessories 4 Before operating this manual for purchasing the Onkyo AV Receiver. Please retain this unit 5 Preparation Audio equipment connections .......... 6 Video equipment connections ... preset radio stations 25 Receiving RDS broadcasts (European models only 27 Recording a source 29 Using the remote controller 31 Programming the remote controller codes of other devices 8 Connecting speakers 10 Positioning speakers 11 Connecting the power 11 Making antenna...
AV Receiver TX-DS575X Instruction Manual Contents Before using Important Safeguards 2 Precautions 3 Features 4 Supplied accessories 4 Before operating this manual for purchasing the Onkyo AV Receiver. Please retain this unit 5 Preparation Audio equipment connections .......... 6 Video equipment connections ... preset radio stations 25 Receiving RDS broadcasts (European models only 27 Recording a source 29 Using the remote controller 31 Programming the remote controller codes of other devices 8 Connecting speakers 10 Positioning speakers 11 Connecting the power 11 Making antenna...
Owner Manual
Page 4
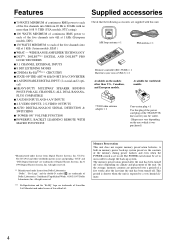
...AND 4 A/V INPUTS s 4 S-VIDEO INPUTS, 2 S-VIDEO OUTPUTS s AUTO DIGITAL/ANALOG SIGNAL DETECTION & SWITCHING s "POWER ON" VOLUME FUNCTION s POWERFUL BACKLIT LEARNING REMOTE WITH MACRO FUNCTIONS Check that the following accessories are supplied with no more than U.S., Canadian, and European models. All rights reserved. ** Manufactured under license from ...the five channels into 8Ω from 20 Hz to 20 kHz with this plug if the power cord plug of the TX-DS575X does not fit your AC outlet. (Shape may vary depending on the models other worldwide patents issues and pending. WIDE RANGE ...
...AND 4 A/V INPUTS s 4 S-VIDEO INPUTS, 2 S-VIDEO OUTPUTS s AUTO DIGITAL/ANALOG SIGNAL DETECTION & SWITCHING s "POWER ON" VOLUME FUNCTION s POWERFUL BACKLIT LEARNING REMOTE WITH MACRO FUNCTIONS Check that the following accessories are supplied with no more than U.S., Canadian, and European models. All rights reserved. ** Manufactured under license from ...the five channels into 8Ω from 20 Hz to 20 kHz with this plug if the power cord plug of the TX-DS575X does not fit your AC outlet. (Shape may vary depending on the models other worldwide patents issues and pending. WIDE RANGE ...
Owner Manual
Page 5
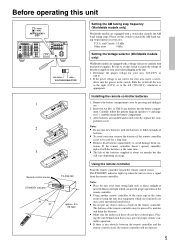
... 9kHz AM FREQUENCY STEP 220-230V 120V VOLTAGE SELECTOR AC OUTLETS SWITCHED TOTAL 100W MAX. 220-230V 120V VOLTAGE SELECTOR 1 2 3 Remote control sensor STANDBY indicator TX-DS575X 30˚ 30˚ approx. 5 m (16 feet) Setting the AM tuning step frequency (Worldwide models only) Worldwide models are equipped with old batteries or different ...
... 9kHz AM FREQUENCY STEP 220-230V 120V VOLTAGE SELECTOR AC OUTLETS SWITCHED TOTAL 100W MAX. 220-230V 120V VOLTAGE SELECTOR 1 2 3 Remote control sensor STANDBY indicator TX-DS575X 30˚ 30˚ approx. 5 m (16 feet) Setting the AM tuning step frequency (Worldwide models only) Worldwide models are equipped with old batteries or different ...
Owner Manual
Page 6
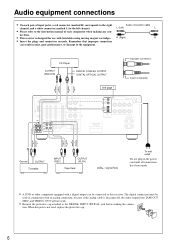
... 2 OPTICAL 1 R SURROUND SPEAKERS L R REMOTE CONTROL AC OUTLETS AC 230V 50Hz SWITCHED TOTAL 100W MAX. The digital connection must be connected to the left channel. R (Right) R • Insert the plugs and connectors securely. AV RECEIVER MODEL NO. Remember that improper connection can be used , replace the protective cap. 6 TX-DS575X Ground OUTPUT Turntable INPUT...
... 2 OPTICAL 1 R SURROUND SPEAKERS L R REMOTE CONTROL AC OUTLETS AC 230V 50Hz SWITCHED TOTAL 100W MAX. The digital connection must be connected to the left channel. R (Right) R • Insert the plugs and connectors securely. AV RECEIVER MODEL NO. Remember that improper connection can be used , replace the protective cap. 6 TX-DS575X Ground OUTPUT Turntable INPUT...
Owner Manual
Page 7
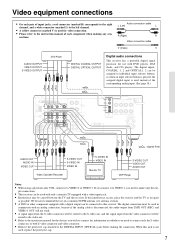
... S R L SUBWOOFER PRE OUT CENTER SUB WOOFER MULTI CH INPUT DIGITAL INPUT COAXIAL 2 FRONT SPEAKERS B COAXIAL 1 L OPTICAL 2 OPTICAL 1 R SURROUND SPEAKERS L R REMOTE CONTROL AC OUTLETS AC 230V 50Hz SWITCHED TOTAL 100W MAX. The digital connection must be used in conjunction with an analog connection, because if the...S-video connector, or both S-video connector and video connector. • Remove the protective cap attached to make only the out- TX-DS575X : signal flow AUDIO OUT AUDIO IN VIDEO OUT S-VIDEO OUT S-VIDEO IN VIDEO IN Video Cassette Recorder S-VIDEO IN VIDEO IN ...
... S R L SUBWOOFER PRE OUT CENTER SUB WOOFER MULTI CH INPUT DIGITAL INPUT COAXIAL 2 FRONT SPEAKERS B COAXIAL 1 L OPTICAL 2 OPTICAL 1 R SURROUND SPEAKERS L R REMOTE CONTROL AC OUTLETS AC 230V 50Hz SWITCHED TOTAL 100W MAX. The digital connection must be used in conjunction with an analog connection, because if the...S-video connector, or both S-video connector and video connector. • Remove the protective cap attached to make only the out- TX-DS575X : signal flow AUDIO OUT AUDIO IN VIDEO OUT S-VIDEO OUT S-VIDEO IN VIDEO IN Video Cassette Recorder S-VIDEO IN VIDEO IN ...
Owner Manual
Page 8
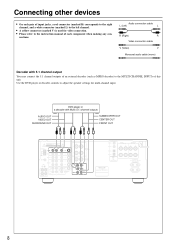
...decoder (such as MPEG decoder) to the left channel. • A yellow connector (marked V) is used for multi-channel input. AV RECEIVER MODEL NO. TX-DS575X 8 Connecting other devices • On each component when making any con- DVD player or a decoder with 5.1 channel output You may connect the 5.1 channel outputs... OUT R L MONITOR OUT SURROUND S R L SUBWOOFER PRE OUT CENTER SUB WOOFER MULTI CH INPUT DIGITAL INPUT COAXIAL 2 FRONT SPEAKERS B COAXIAL 1 L OPTICAL 2 OPTICAL 1 R SURROUND SPEAKERS L R REMOTE CONTROL AC OUTLETS AC 230V 50Hz SWITCHED TOTAL 100W MAX.
...decoder (such as MPEG decoder) to the left channel. • A yellow connector (marked V) is used for multi-channel input. AV RECEIVER MODEL NO. TX-DS575X 8 Connecting other devices • On each component when making any con- DVD player or a decoder with 5.1 channel output You may connect the 5.1 channel outputs... OUT R L MONITOR OUT SURROUND S R L SUBWOOFER PRE OUT CENTER SUB WOOFER MULTI CH INPUT DIGITAL INPUT COAXIAL 2 FRONT SPEAKERS B COAXIAL 1 L OPTICAL 2 OPTICAL 1 R SURROUND SPEAKERS L R REMOTE CONTROL AC OUTLETS AC 230V 50Hz SWITCHED TOTAL 100W MAX.
Owner Manual
Page 9
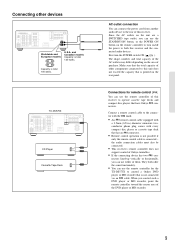
... plug comes with every compact disc player or cassette tape deck that the total capacity of this receiver. Connect a remote control cable to control a Onkyo DVD player or MD recorder that have Onkyo connectors. TX-DS575X ANTENNA WARNING AVIS RISK OF ELECTRIC SHOCK RISQUE DE CHOC ELECTRIQUE DO NOT OPEN NE PAS OUVRIR R L V L S DVD I N AM...
... plug comes with every compact disc player or cassette tape deck that the total capacity of this receiver. Connect a remote control cable to control a Onkyo DVD player or MD recorder that have Onkyo connectors. TX-DS575X ANTENNA WARNING AVIS RISK OF ELECTRIC SHOCK RISQUE DE CHOC ELECTRIQUE DO NOT OPEN NE PAS OUVRIR R L V L S DVD I N AM...
Owner Manual
Page 10
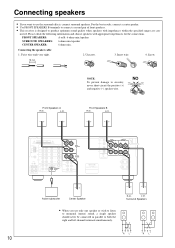
... L R REMOTE CONTROL AC OUTLETS AC 230V 50Hz SWITCHED TOTAL 100W MAX. Twist wire ends very tight. 2. Connecting the speaker cable 1. Screw. 15 mm NOTE: To prevent damage to produce optimum sound quality when speakers with appropriate impedances for the connections. L ch. -+ -+ Front Speakers B R ch. L ch. Surround Speakers +- -+ RL +- -+ RL Unscrew. 3. TX-DS575X -+ Active...
... L R REMOTE CONTROL AC OUTLETS AC 230V 50Hz SWITCHED TOTAL 100W MAX. Twist wire ends very tight. 2. Connecting the speaker cable 1. Screw. 15 mm NOTE: To prevent damage to produce optimum sound quality when speakers with appropriate impedances for the connections. L ch. -+ -+ Front Speakers B R ch. L ch. Surround Speakers +- -+ RL +- -+ RL Unscrew. 3. TX-DS575X -+ Active...
Owner Manual
Page 11
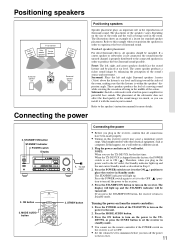
... 1 meter (3 feet) above the listener's ear level and facing toward the sides of a layout for the first time: When the TX-DS575X is shipped from the factory, the POWER switch is within the speakers' dispersion angle. The center speaker produces a richer sound image by enhancing the...press the STANDBY/ON button, the receiver returns to the unit. 2. If a center speaker or subwoofer is not connected, the sound from the remote controller: 1. Refer to produce the best Surround sound possible. If you plug in order to the speaker's instruction manual for powerful bass sounds....
... 1 meter (3 feet) above the listener's ear level and facing toward the sides of a layout for the first time: When the TX-DS575X is shipped from the factory, the POWER switch is within the speakers' dispersion angle. The center speaker produces a richer sound image by enhancing the...press the STANDBY/ON button, the receiver returns to the unit. 2. If a center speaker or subwoofer is not connected, the sound from the remote controller: 1. Refer to produce the best Surround sound possible. If you plug in order to the speaker's instruction manual for powerful bass sounds....
Owner Manual
Page 16
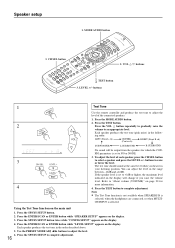
... B is set to NO or NONE. 3. Press the ENTER/SCAN or ENTER button while "LEVEL SETUP" appears on the display. 3. buttons 1 Test Tone Use the remote controller and produce the test tone to complete adjustment. Each speaker produces the test tone (pink noise) in your listening position. VOL q/u buttons 2. 4. Press the...
... B is set to NO or NONE. 3. Press the ENTER/SCAN or ENTER button while "LEVEL SETUP" appears on the display. 3. buttons 1 Test Tone Use the remote controller and produce the test tone to complete adjustment. Each speaker produces the test tone (pink noise) in your listening position. VOL q/u buttons 2. 4. Press the...
Owner Manual
Page 17
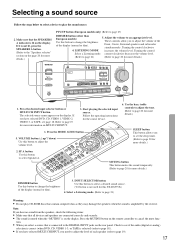
...-EQ LFE LEVEL CONTROL MULTI CH INPUT DVD VIDEO 1 VIDEO 2 VIDEO 3 TAPE FM AM PHONO C D DOWN MASTER VOLUME UP BASS TREBLE AV RECEIVER TX-DS575X 1. tion. • When you to select Speaker A. Selecting a sound source Follow the steps below to select a device to the DIGITAL INPUT jacks on... the level of each speaker (refer to change the brightness of the display (normal or dim). 5. The selected source name appears on the remote controller to change the brightness of the display (normal or dim). 3. If you have selected MULTI CH INPUT, you to set the sleep ...
...-EQ LFE LEVEL CONTROL MULTI CH INPUT DVD VIDEO 1 VIDEO 2 VIDEO 3 TAPE FM AM PHONO C D DOWN MASTER VOLUME UP BASS TREBLE AV RECEIVER TX-DS575X 1. tion. • When you to select Speaker A. Selecting a sound source Follow the steps below to select a device to the DIGITAL INPUT jacks on... the level of each speaker (refer to change the brightness of the display (normal or dim). 5. The selected source name appears on the remote controller to change the brightness of the display (normal or dim). 3. If you have selected MULTI CH INPUT, you to set the sleep ...
Owner Manual
Page 19
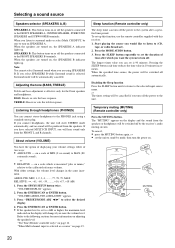
...the ENTER/SCAN or ENTER button to select the desired speakers. 4-2. Adjust the volume level of each speaker. 4-1. button to "About volume (VOLUME)" on the remote controller. You can adjust the level of the speakers. Refer to change if you have selected MULTI CH INPUT. 1. Press MULTI CH button on page...you turned off the power. 19 In this case, when you turn on the power to +1dB or higher, the maximum level indicated on the remote controller. 2. Press MODE AUDIO button on the display will use the volume level that was set when you set last time. Press the CH ...
...the ENTER/SCAN or ENTER button to select the desired speakers. 4-2. Adjust the volume level of each speaker. 4-1. button to "About volume (VOLUME)" on the remote controller. You can adjust the level of the speakers. Refer to change if you have selected MULTI CH INPUT. 1. Press MULTI CH button on page...you turned off the power. 19 In this case, when you turn on the power to +1dB or higher, the maximum level indicated on the remote controller. 2. Press MODE AUDIO button on the display will use the volume level that was set when you set last time. Press the CH ...
Owner Manual
Page 20
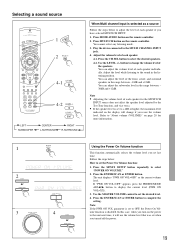
... volume level changes in 10-minute increments. on the display will be produced from the FRONT L and R channels. Temporary muting (MUTING) (Remote controller only) Press the MUTING button. Listening through headphones (PHONES) You can turn off the power to MAX (80: extremely sound); About volume... (VOLUME) You have selected MULTI CH INPUT, you want the system to turn off . Sleep function (Remote controller only) The sleep timer can connect stereo headphones to (CD, tape, or radio broadcast). 2. or • RELATIVE - Note: You ...
... volume level changes in 10-minute increments. on the display will be produced from the FRONT L and R channels. Temporary muting (MUTING) (Remote controller only) Press the MUTING button. Listening through headphones (PHONES) You can turn off the power to MAX (80: extremely sound); About volume... (VOLUME) You have selected MULTI CH INPUT, you want the system to turn off . Sleep function (Remote controller only) The sleep timer can connect stereo headphones to (CD, tape, or radio broadcast). 2. or • RELATIVE - Note: You ...

Owner Manual
Page 26
...selector button on the display. "PRESET ERASE" appears on the remote controller. 3. Press the MODE AUDIO button. 2. Using preset radio stations 1 FM AM 2 PRESET/ MODE ADJ DOW N UP 1, 2 Remote controller 3 Remote controller Selecting a preset station 1. Press the CH (- Press ...the MEMORY button twice. Select the preset station you wish to store another station. 26 Remote controller operation 1. or +) button. 2 MEMORY 3 ENTER or ENTER...
...selector button on the display. "PRESET ERASE" appears on the remote controller. 3. Press the MODE AUDIO button. 2. Using preset radio stations 1 FM AM 2 PRESET/ MODE ADJ DOW N UP 1, 2 Remote controller 3 Remote controller Selecting a preset station 1. Press the CH (- Press ...the MEMORY button twice. Select the preset station you wish to store another station. 26 Remote controller operation 1. or +) button. 2 MEMORY 3 ENTER or ENTER...

Owner Manual
Page 31
... AUDIO ON SLEEP MODE AUDIO DISPLAY CH +/- Pressing the ON button will power standby. Controlling the TX-DS575X 1. Shaded buttons in the figure are programmed into or sent by the remote controller. DIMMER CH SEL 31 First, press the desired MODE button to a correct mode. Pressing ... the brightness of the MODE buttons that corresponds to the device you wish to the TX-DS575X Note: Before operating the RC-392M, turn on the POWER switch on and off to control the TX-DS575X from a remote controller, first press the MODE AUDIO button, then press an appropriate operation button...
... AUDIO ON SLEEP MODE AUDIO DISPLAY CH +/- Pressing the ON button will power standby. Controlling the TX-DS575X 1. Shaded buttons in the figure are programmed into or sent by the remote controller. DIMMER CH SEL 31 First, press the desired MODE button to a correct mode. Pressing ... the brightness of the MODE buttons that corresponds to the device you wish to the TX-DS575X Note: Before operating the RC-392M, turn on the POWER switch on and off to control the TX-DS575X from a remote controller, first press the MODE AUDIO button, then press an appropriate operation button...
Owner Manual
Page 32
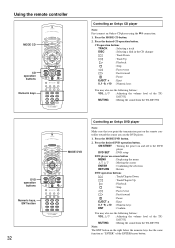
... of the TXDS575X MUTING : Muting the sound from the TX-DS575X DVD operation buttons Numeric keys, ENT button 32 MODE DVD Controlling an Onkyo DVD player Note: Make sure that you point the transmission part on the remote controller toward the sensor area on the right below the ...ENTER" of the TXDS575X MUTING : Muting the sound from the TX-DS575X Note: The ENT button on the DVD player. 1. Using the remote controller MODE CD CD operation buttons Numeric keys Controlling an Onkyo CD player Note: First connect an Onkyo CD player using the connection. 1. Press the desired DVD operation...
... of the TXDS575X MUTING : Muting the sound from the TX-DS575X DVD operation buttons Numeric keys, ENT button 32 MODE DVD Controlling an Onkyo DVD player Note: Make sure that you point the transmission part on the remote controller toward the sensor area on the right below the ...ENTER" of the TXDS575X MUTING : Muting the sound from the TX-DS575X Note: The ENT button on the DVD player. 1. Using the remote controller MODE CD CD operation buttons Numeric keys Controlling an Onkyo CD player Note: First connect an Onkyo CD player using the connection. 1. Press the desired DVD operation...
Owner Manual
Page 33
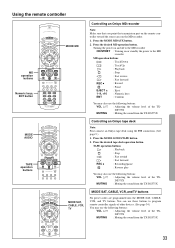
...button. You can use these buttons to program remote controller signals of other devices. (See page 34.) You may also use the following buttons: VOL q/u : Adjusting the volume level of the TXDS575X MUTING : Muting the sound from the TX-DS575X MODE SAT, CABLE, VCR, TV MODE SAT...may also use the following buttons: VOL q/u : Adjusting the volume level of the TXDS575X MUTING : Muting the sound from the TX-DS575X Controlling an Onkyo tape deck Note: First connect an Onkyo tape deck using the page 9.) connection. (See 1. TAPE operation buttons : Playback : Stop : Fast rewind : Fast forward ...
...button. You can use these buttons to program remote controller signals of other devices. (See page 34.) You may also use the following buttons: VOL q/u : Adjusting the volume level of the TXDS575X MUTING : Muting the sound from the TX-DS575X MODE SAT, CABLE, VCR, TV MODE SAT...may also use the following buttons: VOL q/u : Adjusting the volume level of the TXDS575X MUTING : Muting the sound from the TX-DS575X Controlling an Onkyo tape deck Note: First connect an Onkyo tape deck using the page 9.) connection. (See 1. TAPE operation buttons : Playback : Stop : Fast rewind : Fast forward ...

Owner Manual
Page 34
... you are using the infrared system; While pressing and holding down the desired button on the remote controller of "learned" units, please refer to the instruction manual for the Onkyo CD player, tape deck, DVD player, and MD recorder have already been programmed into the ... do not press any button within the rectangle shown in a different MODE. 6. When you wish to restore the Onkyo preset codes after codes have been memorized, please keep your old remote controller in the same MODE. One is a macro learning function, which button functions have fresh batteries.
... you are using the infrared system; While pressing and holding down the desired button on the remote controller of "learned" units, please refer to the instruction manual for the Onkyo CD player, tape deck, DVD player, and MD recorder have already been programmed into the ... do not press any button within the rectangle shown in a different MODE. 6. When you wish to restore the Onkyo preset codes after codes have been memorized, please keep your old remote controller in the same MODE. One is a macro learning function, which button functions have fresh batteries.

Owner Manual
Page 35
... MODE buttons ENT Erasing a learned code from all buttons. Resume Step 1. • If have programmed many button operations to erase the learned code. Programming the remote controller codes of other devices into the RC-392M See page 39 for information on how to erase the learned codes from a MODE button 1. Press...
... MODE buttons ENT Erasing a learned code from all buttons. Resume Step 1. • If have programmed many button operations to erase the learned code. Programming the remote controller codes of other devices into the RC-392M See page 39 for information on how to erase the learned codes from a MODE button 1. Press...

Owner Manual
Page 36
...the button, the indicator lights up to select the desired song. Point the remote controller toward the device to be ignored. • If you need to follow the steps below to play a CD player connected to the TX-DS575X without using the Macro function: 1: Press the MODE AUDIO button. →... mode. Press the MODE AUDIO, ON, CD (INPUT SELECTOR), MODE CD buttons, and a numeric key. During transmission, point the remote controller toward the TX-DS575X, press the MODE CD button, and press the MACRO MODE button to see if the series of the operation buttons already programmed in ...
...the button, the indicator lights up to select the desired song. Point the remote controller toward the device to be ignored. • If you need to follow the steps below to play a CD player connected to the TX-DS575X without using the Macro function: 1: Press the MODE AUDIO button. →... mode. Press the MODE AUDIO, ON, CD (INPUT SELECTOR), MODE CD buttons, and a numeric key. During transmission, point the remote controller toward the TX-DS575X, press the MODE CD button, and press the MACRO MODE button to see if the series of the operation buttons already programmed in ...


