Stylus Verve Advanced Manual (English)
Page 1
Advanced Manual DIGITAL CAMERA 1 Taking Pictures 2 Viewing 3 Setting Up 4 Printing Pictures 5 Connecting Computer 6 Appendix
Advanced Manual DIGITAL CAMERA 1 Taking Pictures 2 Viewing 3 Setting Up 4 Printing Pictures 5 Connecting Computer 6 Appendix
Stylus Verve Advanced Manual (English)
Page 2
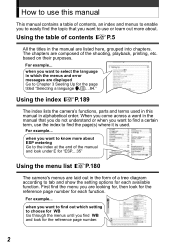
... language in this manual This manual contains a table of the shooting, playback, printing, etc. For example... Using the index gP.189 The index lists the camera's functions, parts and terms used . when you want to know more about ESP metering Go to use this manual in the manual that you are... are laid out in the form of contents gP.5 All the titles in the manual are displayed Go to tab and show the setting options for each available function. Using the table of a tree diagram according to Chapter 3 Seeting Up for the reference page number. 2 First find the page(s) ...
... language in this manual This manual contains a table of the shooting, playback, printing, etc. For example... Using the index gP.189 The index lists the camera's functions, parts and terms used . when you want to know more about ESP metering Go to use this manual in the manual that you are... are laid out in the form of contents gP.5 All the titles in the manual are displayed Go to tab and show the setting options for each available function. Using the table of a tree diagram according to Chapter 3 Seeting Up for the reference page number. 2 First find the page(s) ...

Stylus Verve Advanced Manual (English)
Page 4
... OK/MENU button again. The arrow mark ( ) at the bottom or top of the menu indicates that appears on the monitor when you turn the camera on and press the OK/MENU button is called the "Top menu." Menu operations The screen that there are three top menus as shown below...;1704 SQ1 2048×1536 SQ2 640×480 SELECT GO Operational buttons (arrow pad and OK/MENU button) White Balance SET CARD CAMERA Press WB AUTO Tab ESP/n ESP DRIVE o ISO AUTO DIGITAL ZOOM OFF AF MODE SPOT Function Use the arrow pad to use the menus. There are more options available. 4
... OK/MENU button again. The arrow mark ( ) at the bottom or top of the menu indicates that appears on the monitor when you turn the camera on and press the OK/MENU button is called the "Top menu." Menu operations The screen that there are three top menus as shown below...;1704 SQ1 2048×1536 SQ2 640×480 SELECT GO Operational buttons (arrow pad and OK/MENU button) White Balance SET CARD CAMERA Press WB AUTO Tab ESP/n ESP DRIVE o ISO AUTO DIGITAL ZOOM OFF AF MODE SPOT Function Use the arrow pad to use the menus. There are more options available. 4
Stylus Verve Advanced Manual (English)
Page 5
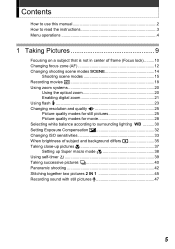
...Changing shooting scene modes l 14 Shooting scene modes 15 Recording movies N 18 Using zoom systems 20 Using the optical zoom 20 Enabling digital zoom 21 Using flash 23 Changing resolution and quality K 25 Picture quality modes for still pictures 25 Picture quality modes for movie 28 ...Selecting white balance according to surrounding lighting 0 ..........30 Setting Exposure Compensation F 32 Changing ISO sensitivities 33 When brightness of subject and background differs 5 35 Taking close-up pictures 37...
...Changing shooting scene modes l 14 Shooting scene modes 15 Recording movies N 18 Using zoom systems 20 Using the optical zoom 20 Enabling digital zoom 21 Using flash 23 Changing resolution and quality K 25 Picture quality modes for still pictures 25 Picture quality modes for movie 28 ...Selecting white balance according to surrounding lighting 0 ..........30 Setting Exposure Compensation F 32 Changing ISO sensitivities 33 When brightness of subject and background differs 5 35 Taking close-up pictures 37...

Stylus Verve Advanced Manual (English)
Page 6
... Protecting pictures 0 77 Erasing one picture S 79 Erasing all pictures R 80 3 Setting Up 83 Selecting a language W 84 Setting date and time X 86 Saving settings 88 Checking the picture you have just taken 90 Setting beep/alert sound 8 92 Setting shutter sound 94 Setting volume 96 Setting power-on screen and sound 98 Recording power-on screen 100...
... Protecting pictures 0 77 Erasing one picture S 79 Erasing all pictures R 80 3 Setting Up 83 Selecting a language W 84 Setting date and time X 86 Saving settings 88 Checking the picture you have just taken 90 Setting beep/alert sound 8 92 Setting shutter sound 94 Setting volume 96 Setting power-on screen and sound 98 Recording power-on screen 100...
Stylus Verve Advanced Manual (English)
Page 9
To change the shooting settings, refer to use the flash, zoom, etc. 1 Taking Pictures This chapter describes how to take successive pictures, movies and how to "3: Setting Up." 1 Taking Pictures 9
To change the shooting settings, refer to use the flash, zoom, etc. 1 Taking Pictures This chapter describes how to take successive pictures, movies and how to "3: Setting Up." 1 Taking Pictures 9
Stylus Verve Advanced Manual (English)
Page 12
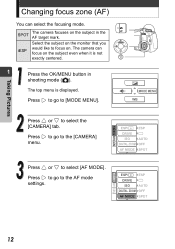
...is not exactly centered. 1 Press the OK/MENU button in the AF target mark. SET CARD CAMERA ESP/n ESP DRIVE o ISO AUTO DIGITAL ZOOM OFF AF MODE SPOT 12 Press to go to [MODE MENU]. The camera can select the focusing mode. Press to go to focus on the subject in shooting ...mode (K). F K MODE MENU WB Press or to select [AF MODE]. SET CARD CAMERA ESP/n ESP DRIVE o ISO AUTO DIGITAL ZOOM OFF AF MODE SPOT Press or to select the [CAMERA] tab. Select the subject on the monitor that you iESP would like to the...
...is not exactly centered. 1 Press the OK/MENU button in the AF target mark. SET CARD CAMERA ESP/n ESP DRIVE o ISO AUTO DIGITAL ZOOM OFF AF MODE SPOT 12 Press to go to [MODE MENU]. The camera can select the focusing mode. Press to go to focus on the subject in shooting ...mode (K). F K MODE MENU WB Press or to select [AF MODE]. SET CARD CAMERA ESP/n ESP DRIVE o ISO AUTO DIGITAL ZOOM OFF AF MODE SPOT Press or to select the [CAMERA] tab. Select the subject on the monitor that you iESP would like to the...

Stylus Verve Advanced Manual (English)
Page 13
ISO DIGITAL ZOOM iESP Press the OK/MENU button again to select [iESP] or SET CARD CAMERA [SPOT] and press the OK/MENU button. ESP/n DRIVE The AF mode is set. Taking Pictures 13 Changing focus zone (AF) Press or to exit AF MODE SPOT the menu. 1 Take the picture using the monitor.
ISO DIGITAL ZOOM iESP Press the OK/MENU button again to select [iESP] or SET CARD CAMERA [SPOT] and press the OK/MENU button. ESP/n DRIVE The AF mode is set. Taking Pictures 13 Changing focus zone (AF) Press or to exit AF MODE SPOT the menu. 1 Take the picture using the monitor.
Stylus Verve Advanced Manual (English)
Page 14
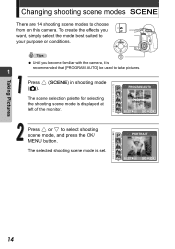
...for selecting the shooting scene mode is set. Taking Pictures Changing shooting scene modes l There are 14 shooting scene modes to select shooting scene mode, and press the OK/ MENU button. For normal shooting SELECT GO Press or to choose from on this camera. To create the effects you become ...familiar with the camera, it is recommended that [PROGRAM AUTO] be used to your purpose or conditions. The selected shooting scene mode is...
...for selecting the shooting scene mode is set. Taking Pictures Changing shooting scene modes l There are 14 shooting scene modes to select shooting scene mode, and press the OK/ MENU button. For normal shooting SELECT GO Press or to choose from on this camera. To create the effects you become ...familiar with the camera, it is recommended that [PROGRAM AUTO] be used to your purpose or conditions. The selected shooting scene mode is...
Stylus Verve Advanced Manual (English)
Page 15
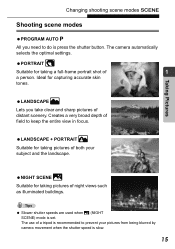
... and sharp pictures of distant scenery. Slower shutter speeds are used when m (NIGHT SCENE) mode is set. Creates a very broad depth of both your pictures from being blurred by camera movement when the shutter speed is press the shutter button. LANDSCAPE L Lets you need to keep the... entire view in focus. The camera automatically selects the optimal settings. Ideal for taking pictures of field to do is slow...
... and sharp pictures of distant scenery. Slower shutter speeds are used when m (NIGHT SCENE) mode is set. Creates a very broad depth of both your pictures from being blurred by camera movement when the shutter speed is press the shutter button. LANDSCAPE L Lets you need to keep the... entire view in focus. The camera automatically selects the optimal settings. Ideal for taking pictures of field to do is slow...
Stylus Verve Advanced Manual (English)
Page 16
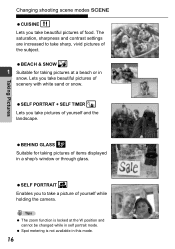
... food. The zoom function is not available in snow. Spot metering is locked at a beach or in this mode. 16 The saturation, sharpness and contrast settings are increased to take a picture of the subject. BEACH & SNOW R 1 Suitable for taking pictures at the W position and cannot be changed while in a shop's window... you to take beautiful pictures of scenery with white sand or snow. SELF PORTRAIT o Enables you take sharp, vivid pictures of yourself while holding the camera.
... food. The zoom function is not available in snow. Spot metering is locked at a beach or in this mode. 16 The saturation, sharpness and contrast settings are increased to take a picture of the subject. BEACH & SNOW R 1 Suitable for taking pictures at the W position and cannot be changed while in a shop's window... you to take beautiful pictures of scenery with white sand or snow. SELF PORTRAIT o Enables you take sharp, vivid pictures of yourself while holding the camera.
Stylus Verve Advanced Manual (English)
Page 17
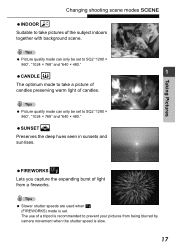
... shooting scene modes l INDOOR H Suitable to take a picture of candles preserving warm light of light from being blurred by camera movement when the shutter speed is set. The use of the subject indoors together with background scene. SUNSET S Preserves the deep hues seen in sunsets and sunrises.... Picture quality mode can only be set to SQ2 "1280 × 960", "1024 × 768" and "640 × 480." Picture quality mode can only be set to take pictures of a tripod is recommended to prevent your pictures from a fireworks. ...
... shooting scene modes l INDOOR H Suitable to take a picture of candles preserving warm light of light from being blurred by camera movement when the shutter speed is set. The use of the subject indoors together with background scene. SUNSET S Preserves the deep hues seen in sunsets and sunrises.... Picture quality mode can only be set to SQ2 "1280 × 960", "1024 × 768" and "640 × 480." Picture quality mode can only be set to take pictures of a tripod is recommended to prevent your pictures from a fireworks. ...
Stylus Verve Advanced Manual (English)
Page 18
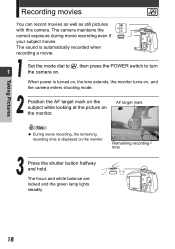
... button halfway and hold. Taking Pictures Recording movies N You can record movies as well as still pictures with this camera. Set the mode dial to n, then press the POWER switch to turn 1 the camera on the monitor. AF target mark N $ During movie recording, the remaining recording time is turned on, the lens ...extends, the monitor turns on the monitor. The focus and white balance are locked and the green lamp lights steadily. 18 The camera maintains the correct exposure during movie recording even if your subject moves. When power is displayed on , and the...
... button halfway and hold. Taking Pictures Recording movies N You can record movies as well as still pictures with this camera. Set the mode dial to n, then press the POWER switch to turn 1 the camera on the monitor. AF target mark N $ During movie recording, the remaining recording time is turned on, the lens ...extends, the monitor turns on the monitor. The focus and white balance are locked and the green lamp lights steadily. 18 The camera maintains the correct exposure during movie recording even if your subject moves. When power is displayed on , and the...
Stylus Verve Advanced Manual (English)
Page 19
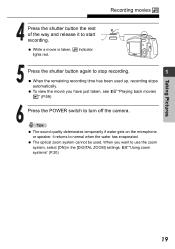
... taken, see g"Playing back movies q" (P.59) Press the POWER switch to use the zoom system, select [ON] in the [DIGITAL ZOOM] settings. To view the movie you want to turn off the camera. The optical zoom system cannot be used up, recording stops automatically. Taking Pictures Recording movies N Press the shutter button the...
... taken, see g"Playing back movies q" (P.59) Press the POWER switch to use the zoom system, select [ON] in the [DIGITAL ZOOM] settings. To view the movie you want to turn off the camera. The optical zoom system cannot be used up, recording stops automatically. Taking Pictures Recording movies N Press the shutter button the...
Stylus Verve Advanced Manual (English)
Page 21
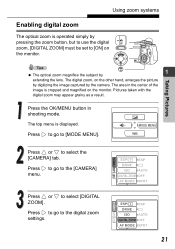
... the other hand, enlarges the picture by digitizing the image captured by extending the lens. Press the OK/MENU button in the center of the image is displayed. Press or to select the [CAMERA] tab. SET CARD CAMERA SET CARD CAMERA ESP/n ESP DRIVE o ISO AUTO DIGITAL ZOOM OFF AF MODE SPOT ESP/n ESP DRIVE... o ISO AUTO DIGITAL ZOOM OFF AF MODE SPOT 21 The area in shooting mode. Press to go to...
... the other hand, enlarges the picture by digitizing the image captured by extending the lens. Press the OK/MENU button in the center of the image is displayed. Press or to select the [CAMERA] tab. SET CARD CAMERA SET CARD CAMERA ESP/n ESP DRIVE o ISO AUTO DIGITAL ZOOM OFF AF MODE SPOT ESP/n ESP DRIVE... o ISO AUTO DIGITAL ZOOM OFF AF MODE SPOT 21 The area in shooting mode. Press to go to...

Stylus Verve Advanced Manual (English)
Page 22
Press the OK/MENU button again to select [ON] and press the OK/MENU button. SET CARD CAMERA ESP/n DRIVE ISO DIGITAL ZOOM AF MODE OFF ON 1 The digital zoom cannot be used when [OFF] is likely to occur at higher magnifications. Taking Pictures Using zoom systems .... Pictures taken with a tripod, etc. Press the zoom button to avoid camera movement. to operate the digital zoom. The zoom systems cannot be used in the self portrait mode. 22 Camera movement is selected. The digital zoom is set. Stabilize the camera with the digital zoom may appear grainy.
Press the OK/MENU button again to select [ON] and press the OK/MENU button. SET CARD CAMERA ESP/n DRIVE ISO DIGITAL ZOOM AF MODE OFF ON 1 The digital zoom cannot be used when [OFF] is likely to occur at higher magnifications. Taking Pictures Using zoom systems .... Pictures taken with a tripod, etc. Press the zoom button to avoid camera movement. to operate the digital zoom. The zoom systems cannot be used in the self portrait mode. 22 Camera movement is selected. The digital zoom is set. Stabilize the camera with the digital zoom may appear grainy.
Stylus Verve Advanced Manual (English)
Page 23
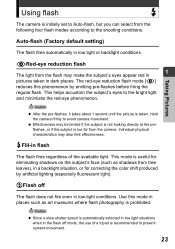
.... The red-eye reduction flash mode [!] reduces this mode in flash The flash fires regardless of a tripod is recommended to prevent camera movement. 23 This mode is useful for correcting the color shift produced by emitting pre-flashes before firing the regular flash. This helps... off mode, the use of the available light. Hold the camera firmly to the bright light and minimizes the red-eye phenomenon. Using flash # The camera is initially set to Auto-flash, but you can select from the camera. Individual physical characteristics may make the subject's eyes appear red ...
.... The red-eye reduction flash mode [!] reduces this mode in flash The flash fires regardless of a tripod is recommended to prevent camera movement. 23 This mode is useful for correcting the color shift produced by emitting pre-flashes before firing the regular flash. This helps... off mode, the use of the available light. Hold the camera firmly to the bright light and minimizes the red-eye phenomenon. Using flash # The camera is initially set to Auto-flash, but you can select from the camera. Individual physical characteristics may make the subject's eyes appear red ...
Stylus Verve Advanced Manual (English)
Page 24
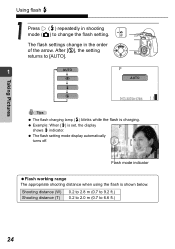
... in shooting mode (K) to change the flash setting. Example: When [#] is shown below. Shooting distance (W) 0.2 to 2.8 m (0.7 to 9.2 ft.) Shooting distance (T) 0.2 to 2.0 m (0.7 to [AUTO]. 1 AUTO P ! After [$], the setting returns to 6.6 ft.) 24 The flash setting mode display automatically turns off. # o HQ 2272...*1704 11a Flash mode indicator Flash working range The appropriate shooting distance when using the flash is set, the display P shows # indicator. AUTO # $ HQ 2272*1704 11a The flash charging lamp (#) blinks while the flash is...
... in shooting mode (K) to change the flash setting. Example: When [#] is shown below. Shooting distance (W) 0.2 to 2.8 m (0.7 to 9.2 ft.) Shooting distance (T) 0.2 to 2.0 m (0.7 to [AUTO]. 1 AUTO P ! After [$], the setting returns to 6.6 ft.) 24 The flash setting mode display automatically turns off. # o HQ 2272...*1704 11a Flash mode indicator Flash working range The appropriate shooting distance when using the flash is set, the display P shows # indicator. AUTO # $ HQ 2272*1704 11a The flash charging lamp (#) blinks while the flash is...

Stylus Verve Advanced Manual (English)
Page 26
... For instance, a picture taken in a low compression record mode are clearer than 1024 × 768 (such as the screen if you set the picture to the number of the picture depends on the card. Press the OK/MENU button in standard compression record mode. Taking Pictures ... and Compression rate Compression rate and picture quality The quality of pixels (vertical × horizontal) used when saving an picture. However, if the monitor setting is displayed. Press to a computer, the size of pixels) is transferred to select [K]. 26 F K MODE MENU WB If the picture will be...
... For instance, a picture taken in a low compression record mode are clearer than 1024 × 768 (such as the screen if you set the picture to the number of the picture depends on the card. Press the OK/MENU button in standard compression record mode. Taking Pictures ... and Compression rate Compression rate and picture quality The quality of pixels (vertical × horizontal) used when saving an picture. However, if the monitor setting is displayed. Press to a computer, the size of pixels) is transferred to select [K]. 26 F K MODE MENU WB If the picture will be...
Stylus Verve Advanced Manual (English)
Page 27
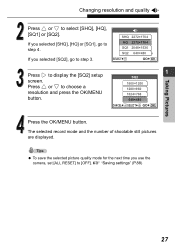
... [SQ2], go to step 3. To save the selected picture quality mode for the next time you selected [SHQ], [HQ] or [SQ1], go to step 4. g "Saving settings" (P.88) 27 Taking Pictures Changing resolution and quality K Press or to display the [SQ2] setup screen. K SHQ 2272×1704 HQ 2272×1704 SQ1... 2048×1536 SQ2 640×480 SELECT GO Press to select [SHQ], [HQ], [SQ1] or [SQ2]. If you use the camera, set [ALL RESET] to choose a resolution and press the OK/MENU button. 1 SQ2 1600×1200 1280×960 1024×768 640×480 CANCEL...
... [SQ2], go to step 3. To save the selected picture quality mode for the next time you selected [SHQ], [HQ] or [SQ1], go to step 4. g "Saving settings" (P.88) 27 Taking Pictures Changing resolution and quality K Press or to display the [SQ2] setup screen. K SHQ 2272×1704 HQ 2272×1704 SQ1... 2048×1536 SQ2 640×480 SELECT GO Press to select [SHQ], [HQ], [SQ1] or [SQ2]. If you use the camera, set [ALL RESET] to choose a resolution and press the OK/MENU button. 1 SQ2 1600×1200 1280×960 1024×768 640×480 CANCEL...


