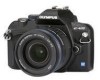
E-420 Instruction Manual (English)
Page 3
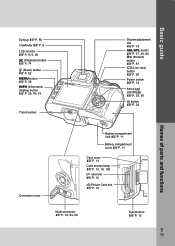
...) button gP. 36 Power switch gP. 14 Arrow pad (acbd) gP. 29, 85 i button gP. 29 Names of parts and functions Connector cover Battery compartment lock gP. 11 Battery compartment cover gP. 11 Card cover gP. 13 Card access lamp gP. 13, 16, 100 CF card slot gP. 13 xD-Picture Card...
...) button gP. 36 Power switch gP. 14 Arrow pad (acbd) gP. 29, 85 i button gP. 29 Names of parts and functions Connector cover Battery compartment lock gP. 11 Battery compartment cover gP. 11 Card cover gP. 13 Card access lamp gP. 13, 16, 100 CF card slot gP. 13 xD-Picture Card...

E-420 Instruction Manual (English)
Page 6
Viewfinder AF target gP. 53 AF confirmation mark gP. 16, 43 , 54 White balance (Displayed when set to a setting other than auto white balance.) gP. 60 Exposure compensation value gP. 48 Metering mode gP. 47 Shooting mode gP. 4 6 EN Aperture value gP. 43-46 Shutter speed gP. 43-46 Flash gP. 66 (blinks: charging in progress, lights up: charging completed) AE lock gP. 49 Battery check (ready for use) (charging required)
Viewfinder AF target gP. 53 AF confirmation mark gP. 16, 43 , 54 White balance (Displayed when set to a setting other than auto white balance.) gP. 60 Exposure compensation value gP. 48 Metering mode gP. 47 Shooting mode gP. 4 6 EN Aperture value gP. 43-46 Shutter speed gP. 43-46 Flash gP. 66 (blinks: charging in progress, lights up: charging completed) AE lock gP. 49 Battery check (ready for use) (charging required)
E-420 Instruction Manual (English)
Page 7
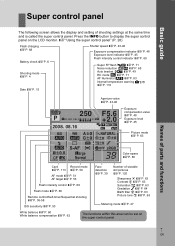
... the INFO button to display the super control panel on the super control panel. 7 EN g"Using the super control panel" (P. 28) Flash charging gP. 68 Battery check gP. 6 Shooting mode gP. 4 Date gP. 15 Shutter speed gP. 43-46 Exposure compensation indicator gP. 48 Exposure level indicator gP. 45 Flash intensity...
... the INFO button to display the super control panel on the super control panel. 7 EN g"Using the super control panel" (P. 28) Flash charging gP. 68 Battery check gP. 6 Shooting mode gP. 4 Date gP. 15 Shutter speed gP. 43-46 Exposure compensation indicator gP. 48 Exposure level indicator gP. 45 Flash intensity...
E-420 Instruction Manual (English)
Page 8
... q gP. 71 Super FP flash s gP. 71 Auto bracket t gP. 49 AE lock u gP. 49 Live view AF mode po gP. 37 Shooting mode gP. 4 Battery check gP. 6 Metering mode gP. 47 Flash mode gP. 66 Flash gP. 68 (blinks: charging in progress, lights up: charging completed) Exposure compensation value gP...
... q gP. 71 Super FP flash s gP. 71 Auto bracket t gP. 49 AE lock u gP. 49 Live view AF mode po gP. 37 Shooting mode gP. 4 Battery check gP. 6 Metering mode gP. 47 Flash mode gP. 66 Flash gP. 68 (blinks: charging in progress, lights up: charging completed) Exposure compensation value gP...

E-420 Instruction Manual (English)
Page 9
Basic guide LCD monitor (Playback) You can switch the monitor display using the INFO button. g"Information display" (P. 76) Record mode gP. 59 Battery check gP. 6 Focal length gP. 115 (The focal length is displayed in 1 mm units.) Shooting mode gP. 4 Card gP. 113 Print reservation Number of prints ...
Basic guide LCD monitor (Playback) You can switch the monitor display using the INFO button. g"Information display" (P. 76) Record mode gP. 59 Battery check gP. 6 Focal length gP. 115 (The focal length is displayed in 1 mm units.) Shooting mode gP. 4 Card gP. 113 Print reservation Number of prints ...
E-420 Instruction Manual (English)
Page 10
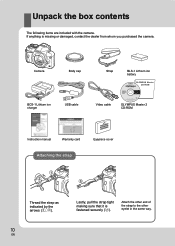
Unpack the box contents The following items are included with the camera. Attach the other end of the strap to the other eyelet in the same way. If anything is fastened securely (3). Camera Body cap Strap BLS-1 Lithium ion battery BCS-1 Lithium ion charger USB cable Video cable OLYMPUS Master 2 CD-ROM Instruction manual Warranty card Eyepiece cover Attaching the strap 1 2 3 Thread the strap as indicated by the arrows (1, 2). 10 EN Lastly, pull the strap tight making sure that it is missing or damaged, contact the dealer from whom you purchased the camera.
Unpack the box contents The following items are included with the camera. Attach the other end of the strap to the other eyelet in the same way. If anything is fastened securely (3). Camera Body cap Strap BLS-1 Lithium ion battery BCS-1 Lithium ion charger USB cable Video cable OLYMPUS Master 2 CD-ROM Instruction manual Warranty card Eyepiece cover Attaching the strap 1 2 3 Thread the strap as indicated by the arrows (1, 2). 10 EN Lastly, pull the strap tight making sure that it is missing or damaged, contact the dealer from whom you purchased the camera.
E-420 Instruction Manual (English)
Page 11
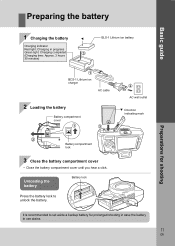
... progress Green light: Charging completed 3 (Charging time: Approx. 3 hours 30 minutes) BLS-1 Lithium ion battery Preparations for shooting 1 BCS-1 Lithium ion charger AC cable 2 Loading the battery Battery compartment cover 1 3 2 Battery compartment lock 3 Close the battery compartment cover • Close the battery compartment cover until you hear a click. W 2 AC wall outlet Direction indicating mark It is...
... progress Green light: Charging completed 3 (Charging time: Approx. 3 hours 30 minutes) BLS-1 Lithium ion battery Preparations for shooting 1 BCS-1 Lithium ion charger AC cable 2 Loading the battery Battery compartment cover 1 3 2 Battery compartment lock 3 Close the battery compartment cover • Close the battery compartment cover until you hear a click. W 2 AC wall outlet Direction indicating mark It is...

E-420 Instruction Manual (English)
Page 16
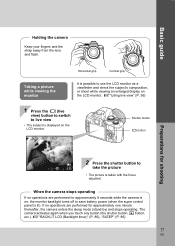
...button all the way (fully). • The shutter sounds and the picture is taken. • The card access lamp blinks and the camera starts recording the picture. Shooting 1 Place the AF target on the subject while viewing through the viewfinder Viewfinder Shutter button 2 Adjust the focus... Card access lamp Press the shutter button halfway. Never remove the battery or card while the card access lamp is output. Viewfinder Aperture value Shutter speed Super control panel 250 AUTO 2008. 08.16 F5...
...button all the way (fully). • The shutter sounds and the picture is taken. • The card access lamp blinks and the camera starts recording the picture. Shooting 1 Place the AF target on the subject while viewing through the viewfinder Viewfinder Shutter button 2 Adjust the focus... Card access lamp Press the shutter button halfway. Never remove the battery or card while the card access lamp is output. Viewfinder Aperture value Shutter speed Super control panel 250 AUTO 2008. 08.16 F5...
E-420 Instruction Manual (English)
Page 17
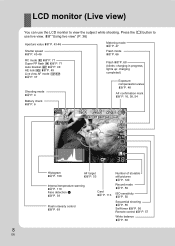
... grip It is possible to live view • The subject is lit). When the camera stops operating If no operations are performed for shooting LN 2 Press the shutter button to save battery power (when the super control panel is displayed on the LCD monitor. If no operations... are performed for approximately one minute thereafter, the camera enters the sleep mode (stand-by) and stops operating. Basic guide...
... grip It is possible to live view • The subject is lit). When the camera stops operating If no operations are performed for shooting LN 2 Press the shutter button to save battery power (when the super control panel is displayed on the LCD monitor. If no operations... are performed for approximately one minute thereafter, the camera enters the sleep mode (stand-by) and stops operating. Basic guide...
E-420 Instruction Manual (English)
Page 20
... Resetting to functions for various shooting situations. Names of the camera. Table of Contents Basic guide 2 Identifies the camera part names and describes the basic steps for shooting 11 Preparing the battery 11 Attaching a lens to the camera 12 Loading the card 13 Power on ...14 Setting the ...date/time 15 Shooting ...16 Playback/Erasing 18 Indications used in this manual 19 1 Basic camera operations 26 Describes the basic operations of...
... Resetting to functions for various shooting situations. Names of the camera. Table of Contents Basic guide 2 Identifies the camera part names and describes the basic steps for shooting 11 Preparing the battery 11 Attaching a lens to the camera 12 Loading the card 13 Power on ...14 Setting the ...date/time 15 Shooting ...16 Playback/Erasing 18 Indications used in this manual 19 1 Basic camera operations 26 Describes the basic operations of...
E-420 Instruction Manual (English)
Page 25
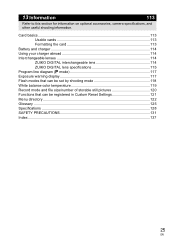
Card basics...113 Usable cards 113 Formatting the card 113 Battery and charger 114 Using your charger abroad 114 Interchangeable lenses 114 ZUIKO DIGITAL interchangeable lens 114 ZUIKO DIGITAL lens specifications 115 Program line diagram (P mode 117 Exposure warning display 117 Flash modes that can be set by shooting mode 118 White balance ...directory ...122 Glossary ...125 Specifications ...128 SAFETY PRECAUTIONS 131 Index ...137 25 EN 13 Information 113 Refer to this section for information on optional accessories, camera specifications, and other useful shooting information.
Card basics...113 Usable cards 113 Formatting the card 113 Battery and charger 114 Using your charger abroad 114 Interchangeable lenses 114 ZUIKO DIGITAL interchangeable lens 114 ZUIKO DIGITAL lens specifications 115 Program line diagram (P mode 117 Exposure warning display 117 Flash modes that can be set by shooting mode 118 White balance ...directory ...122 Glossary ...125 Specifications ...128 SAFETY PRECAUTIONS 131 Index ...137 25 EN 13 Information 113 Refer to this section for information on optional accessories, camera specifications, and other useful shooting information.
E-420 Instruction Manual (English)
Page 55
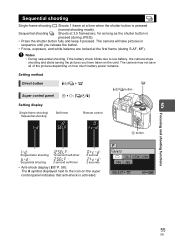
x Notes • During sequential shooting, if the battery check blinks due to low battery, the camera stops shooting and starts saving the pictures you release the button. • Focus, exposure, and white balance are locked at the first frame (during JPEG). &#.... for as long as the shutter button is pressed (normal shooting mode). The camera may not save all of the pictures depending on the card. The camera will take pictures in sequence until you have taken on how much battery power remains. Setting method Direct button Sequential shooting j Shoots at a time when the...
x Notes • During sequential shooting, if the battery check blinks due to low battery, the camera stops shooting and starts saving the pictures you release the button. • Focus, exposure, and white balance are locked at the first frame (during JPEG). &#.... for as long as the shutter button is pressed (normal shooting mode). The camera may not save all of the pictures depending on the card. The camera will take pictures in sequence until you have taken on how much battery power remains. Setting method Direct button Sequential shooting j Shoots at a time when the...
E-420 Instruction Manual (English)
Page 86
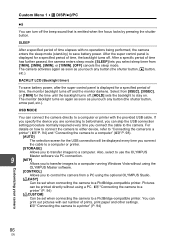
...you are connecting to a computer running Windows Vista without using the OLYMPUS Master software. [CONTROL] Allows you select sleep timer from a PC using the optional OLYMPUS Studio. [ For details on . Also, select to use the OLYMPUS 9 Master software via PC connection. [MTP] Allows you to transfer...pressing the shutter button. SLEEP After a specified period of time has further passed, the camera enters sleep mode. [SLEEP] lets you to the camera. BACKLIT LCD (Backlight timer) To save battery power. The monitor backlight turns on again as soon as you connect the cable to...
...you are connecting to a computer running Windows Vista without using the OLYMPUS Master software. [CONTROL] Allows you select sleep timer from a PC using the optional OLYMPUS Studio. [ For details on . Also, select to use the OLYMPUS 9 Master software via PC connection. [MTP] Allows you to transfer...pressing the shutter button. SLEEP After a specified period of time has further passed, the camera enters sleep mode. [SLEEP] lets you to the camera. BACKLIT LCD (Backlight timer) To save battery power. The monitor backlight turns on again as soon as you connect the cable to...
E-420 Instruction Manual (English)
Page 93
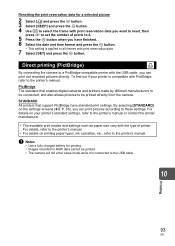
Resetting the print reservation data for a selected picture 2 Select [
Resetting the print reservation data for a selected picture 2 Select [
E-420 Instruction Manual (English)
Page 101
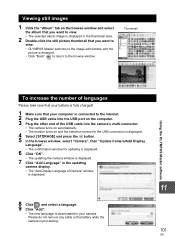
... Please take care that your camera. Thumbnail Using the OLYMPUS Master software To increase the number of Camera" window is displayed. 11 8 Click and select a language. 9 Click "Add". • The new language is downloaded to the browse window. Please do not remove any cable or the battery while the camera is fully charged! 1 Make sure...
... Please take care that your camera. Thumbnail Using the OLYMPUS Master software To increase the number of Camera" window is displayed. 11 8 Click and select a language. 9 Click "Add". • The new language is downloaded to the browse window. Please do not remove any cable or the battery while the camera is fully charged! 1 Make sure...
E-420 Instruction Manual (English)
Page 103
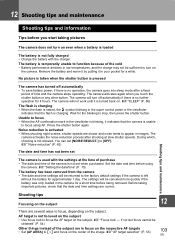
...When the flash is temporarily unable to R and focus on the subject. You can set Shooting tips and maintenance The camera is not fully charged • Charge the battery with the settings at slow shutter speeds. Set the date and time before being removed. Noise reduction is not focused ...8226; Use focus lock to focus, depending on the subject There are correct. The battery is raised, the # symbol blinking in your pocket for the blinking to focus using the camera. Remove the battery and warm it by putting it in the super control panel or the viewfinder indicates ...
...When the flash is temporarily unable to R and focus on the subject. You can set Shooting tips and maintenance The camera is not fully charged • Charge the battery with the settings at slow shutter speeds. Set the date and time before being removed. Noise reduction is not focused ...8226; Use focus lock to focus, depending on the subject There are correct. The battery is raised, the # symbol blinking in your pocket for the blinking to focus using the camera. Remove the battery and warm it by putting it in the super control panel or the viewfinder indicates ...
E-420 Instruction Manual (English)
Page 107
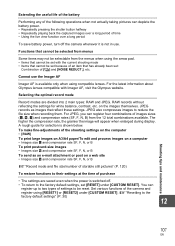
..., turn off . • To return to the factory default settings, set with Imager AF, visit the Olympus website. Extending the useful life of the battery Performing any of the following operations when not actually taking pictures can register up to two types of settings to be ...-size images • Images size X and compression rate SF, F, N, or B To send as images that has already been set because of the camera and register using compatible lenses. Cannot use . JPEG also compresses images to the factory default settings" (P. 30) 12 107 EN RAW records without reflecting ...
..., turn off . • To return to the factory default settings, set with Imager AF, visit the Olympus website. Extending the useful life of the battery Performing any of the following operations when not actually taking pictures can register up to two types of settings to be ...-size images • Images size X and compression rate SF, F, N, or B To send as images that has already been set because of the camera and register using compatible lenses. Cannot use . JPEG also compresses images to the factory default settings" (P. 30) 12 107 EN RAW records without reflecting ...
E-420 Instruction Manual (English)
Page 110
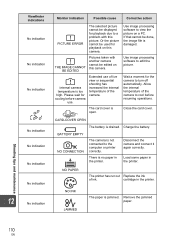
... computer or printer correctly. Please wait for playback on this camera. CARD-COVER OPEN The battery is too high. BATTERY EMPTY NO CONNECTION The camera is not connected to a problem with another camera cannot be edited on a PC. Disconnect the camera and connect it again correctly. Internal camera temperature is drained. The card cover is jammed. Wait...
... computer or printer correctly. Please wait for playback on this camera. CARD-COVER OPEN The battery is too high. BATTERY EMPTY NO CONNECTION The camera is not connected to a problem with another camera cannot be edited on a PC. Disconnect the camera and connect it again correctly. Internal camera temperature is drained. The card cover is jammed. Wait...
E-420 Instruction Manual (English)
Page 111
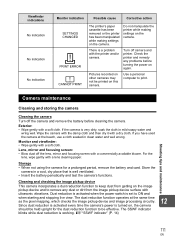
... or the printer has been manipulated while making settings on this camera. Turn off the lens, mirror and focusing screen with a commercially available blower. Shooting tips and maintenance Camera maintenance Cleaning and storing the camera Cleaning the camera Turn off the camera and remove the battery before turning the power on the image pickup device and...
... or the printer has been manipulated while making settings on this camera. Turn off the lens, mirror and focusing screen with a commercially available blower. Shooting tips and maintenance Camera maintenance Cleaning and storing the camera Cleaning the camera Turn off the camera and remove the battery before turning the power on the image pickup device and...
E-420 Instruction Manual (English)
Page 112
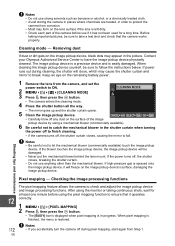
...or dirt gets on the remaining battery power. 1 Remove the lens from Step 1. If the blower touches the image pickup device, the image pickup device will close, which may appear in progress. If high-pressure gas is in the picture. Contact your Olympus Authorized Service Center to break.... Keep an eye on the image pickup device, black dots may cause the shutter curtain and mirror to have the image pickup device physically cleaned. CLEANING MODE • The camera enters the cleaning mode. 4 Press ...
...or dirt gets on the remaining battery power. 1 Remove the lens from Step 1. If the blower touches the image pickup device, the image pickup device will close, which may appear in progress. If high-pressure gas is in the picture. Contact your Olympus Authorized Service Center to break.... Keep an eye on the image pickup device, black dots may cause the shutter curtain and mirror to have the image pickup device physically cleaned. CLEANING MODE • The camera enters the cleaning mode. 4 Press ...


