
EVOLT E-300 Basic Manual (English)
Page 5
...Provided accessories 33 For other functions not described here, read first to learn basic camera operation Safety precautions 6 Attaching the strap 12 Charging the battery 13 Loading the battery 15 Attaching a lens to a computer ⅷ Printing recorded images 5 Contents This manual explains shooting ... Transferring recorded images to the camera 17 Usable lenses 17 Inserting a card 20 Usable cards 20 Power on 23 Adjusting the viewfinder's diopter 25 En Shooting 26 Playback 28 Power off 29 What you can do with OLYMPUS Master software 30 Information 31 ...
...Provided accessories 33 For other functions not described here, read first to learn basic camera operation Safety precautions 6 Attaching the strap 12 Charging the battery 13 Loading the battery 15 Attaching a lens to a computer ⅷ Printing recorded images 5 Contents This manual explains shooting ... Transferring recorded images to the camera 17 Usable lenses 17 Inserting a card 20 Usable cards 20 Power on 23 Adjusting the viewfinder's diopter 25 En Shooting 26 Playback 28 Power off 29 What you can do with OLYMPUS Master software 30 Information 31 ...
EVOLT E-300 Basic Manual (English)
Page 17
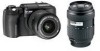
... remove the body cap and lens from the camera, keep the lens mount on optic engineering exclusively for a fast lens to the camera toward the sun. This may not work either. *Four Thirds mount: Standard developed by Olympus. The Four Thirds system makes it En possible for digital cameras. Developed from getting inside the camera. ● Do not remove...
... remove the body cap and lens from the camera, keep the lens mount on optic engineering exclusively for a fast lens to the camera toward the sun. This may not work either. *Four Thirds mount: Standard developed by Olympus. The Four Thirds system makes it En possible for digital cameras. Developed from getting inside the camera. ● Do not remove...
EVOLT E-300 Basic Manual (English)
Page 18
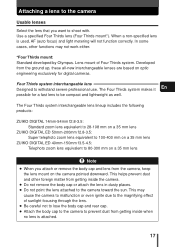
Power switch Rear cap 18 Attaching a lens to the camera 1 Make sure the power switch is set to OFF. 2 Remove the body cap from the lens. En Body cap 3 Remove the rear cap from the camera.
Power switch Rear cap 18 Attaching a lens to the camera 1 Make sure the power switch is set to OFF. 2 Remove the body cap from the lens. En Body cap 3 Remove the rear cap from the camera.

EVOLT E-300 Basic Manual (English)
Page 19
Lens release button 19 Lens cap Removing the lens from the camera 1 Make sure the power switch is set to the camera 4 Align the lens attachment mark (red) on the camera with the alignment mark (red) on the lens, then insert the lens into the camera's body. Lens attachment mark (Red) Alignment mark (Red) En 5 Remove the lens cap. Attaching a lens to OFF. 2 While pressing the lens release button, remove the lens from the camera by rotating it click. Rotate the lens clockwise until you hear it counterclockwise.
Lens release button 19 Lens cap Removing the lens from the camera 1 Make sure the power switch is set to the camera 4 Align the lens attachment mark (red) on the camera with the alignment mark (red) on the lens, then insert the lens into the camera's body. Lens attachment mark (Red) Alignment mark (Red) En 5 Remove the lens cap. Attaching a lens to OFF. 2 While pressing the lens release button, remove the lens from the camera by rotating it click. Rotate the lens clockwise until you hear it counterclockwise.

EVOLT E-300 Basic Manual (English)
Page 24
Power on Holding the camera 1 Hold the camera's grip with your right hand and keep your elbow at your side. 2 Rest your elbow gently against your body and hold the lens section firmly from underneath with your left hand. 3 Take a picture. ● Putting one leg a little forward helps stabilize your fingers and the strap away from the front of the lens. Vertical grip Note Bad technique Lens 24 En ● Keep your upper body.
Power on Holding the camera 1 Hold the camera's grip with your right hand and keep your elbow at your side. 2 Rest your elbow gently against your body and hold the lens section firmly from underneath with your left hand. 3 Take a picture. ● Putting one leg a little forward helps stabilize your fingers and the strap away from the front of the lens. Vertical grip Note Bad technique Lens 24 En ● Keep your upper body.
EVOLT E-300 Basic Manual (English)
Page 31
... pixels : Approx. 8,880,000 pixels No. of focusing point AF illuminator : TTL phase-contrast detection system : 3-point multiple AF (left, center, right) : EV 0 - Information Specifications -Camera Ⅵ Product type Product type : Single-lens reflex digital camera with the OK button (when PREVIEW registered) : Fixed : Interchangeable Ⅵ Monitor Product type Total no .
... pixels : Approx. 8,880,000 pixels No. of focusing point AF illuminator : TTL phase-contrast detection system : 3-point multiple AF (left, center, right) : EV 0 - Information Specifications -Camera Ⅵ Product type Product type : Single-lens reflex digital camera with the OK button (when PREVIEW registered) : Fixed : Interchangeable Ⅵ Monitor Product type Total no .
EVOLT E-300 Quick Start Guide (English)
Page 1
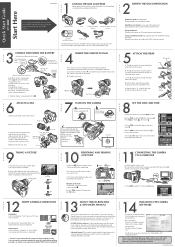
... your computer. Carefully remove the battery without dropping it is strongly recommended that digital photography brings to the computer using the standard drag and drop procedure, or enhance your new Olympus Digital Camera! Body cap c. lens. e. INSERT THE COMPACT FLASH ATTACH THE STRAP S T Strap eyelet E P Ring a. AF frame Viewfinder REVIEWING AND ERASING S T A PICTURE E P a. Advanced Manual...
... your computer. Carefully remove the battery without dropping it is strongly recommended that digital photography brings to the computer using the standard drag and drop procedure, or enhance your new Olympus Digital Camera! Body cap c. lens. e. INSERT THE COMPACT FLASH ATTACH THE STRAP S T Strap eyelet E P Ring a. AF frame Viewfinder REVIEWING AND ERASING S T A PICTURE E P a. Advanced Manual...
EVOLT E-300 Quick Start Guide (English)
Page 2
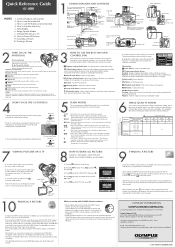
...Lens lock pin Lens release button Mount (Attach the lens after a few seconds. You can select the appropriate flash mode to the menu's CUSTOM OK. Press the button for capturing fast-moving action without using a computer. * For detailed instructions on using an aperture and shutter speed that the camera... • Fill-in flash + Slow synchronization (2nd curtain) - The flash fires regardless of the light conditions at : http://www.olympus.com/digital © 2004 to select CARD SETUP, then press . Press to select , c. e. Your default e-mail program will automatically be ...
...Lens lock pin Lens release button Mount (Attach the lens after a few seconds. You can select the appropriate flash mode to the menu's CUSTOM OK. Press the button for capturing fast-moving action without using a computer. * For detailed instructions on using an aperture and shutter speed that the camera... • Fill-in flash + Slow synchronization (2nd curtain) - The flash fires regardless of the light conditions at : http://www.olympus.com/digital © 2004 to select CARD SETUP, then press . Press to select , c. e. Your default e-mail program will automatically be ...
EVOLT E-300 System Chart (English)
Page 1
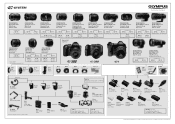
... Flash TF-22 Twin Flash ZUIKO DIGITAL ED 90-250mm 1:2.8 Telephoto Zoom (Top Pro Lens) Compatible with EX-25 EC-14 Extension Tube Tele Converter Digital SLR Cameras ZUIKO DIGITAL ED 8mm 1:3.5 Fisheye Lens (Pro Lens) Compatible with EC-14 Tele Converter *1 Only with HLD-3 (only for E-300) AC-1 AC Adapter (only for E-1/E-300) BLM-1 Li-ion Battery Pack HLD...
... Flash TF-22 Twin Flash ZUIKO DIGITAL ED 90-250mm 1:2.8 Telephoto Zoom (Top Pro Lens) Compatible with EX-25 EC-14 Extension Tube Tele Converter Digital SLR Cameras ZUIKO DIGITAL ED 8mm 1:3.5 Fisheye Lens (Pro Lens) Compatible with EC-14 Tele Converter *1 Only with HLD-3 (only for E-300) AC-1 AC Adapter (only for E-1/E-300) BLM-1 Li-ion Battery Pack HLD...
EVOLT E-300 Advanced Manual (English)
Page 6
... BOOST 92 White balance - Preventing accidental erasure 119 Erasing images 120 Single-frame erase 120 All-frame erase 121 8 Customizing the settings/functions of your camera 123 AEL METERING 124 EV STEP 124 MANUAL FLASH 124 CUSTOM OK 125 RESET...
... BOOST 92 White balance - Preventing accidental erasure 119 Erasing images 120 Single-frame erase 120 All-frame erase 121 8 Customizing the settings/functions of your camera 123 AEL METERING 124 EV STEP 124 MANUAL FLASH 124 CUSTOM OK 125 RESET...
EVOLT E-300 Advanced Manual (English)
Page 8
... 167 Viewing still images 168 Printing images 169 Transferring images to your computer 166 Downloading images to a computer 163 Starting OLYMPUS Master 165 Displaying the camera's images on your computer without using OLYMPUS Master . . . . 170 11 Appendix 171 Card basics 172 Lens basics 173 If you encounter problems 174 Error codes 174 Troubleshooting 176...
... 167 Viewing still images 168 Printing images 169 Transferring images to your computer 166 Downloading images to a computer 163 Starting OLYMPUS Master 165 Displaying the camera's images on your computer without using OLYMPUS Master . . . . 170 11 Appendix 171 Card basics 172 Lens basics 173 If you encounter problems 174 Error codes 174 Troubleshooting 176...

EVOLT E-300 Advanced Manual (English)
Page 44
... and shutter speeds in the P mode, you are selected automatically according to the subject brightness as shown below diagram depends on the attached lens. The below . Selecting the right mode for shooting conditions Program shift (Ps) By rotating the control dial in the P (Program) ...mode In the P (Program) mode, the camera is programed so that the viewfinder Viewfinder indication Ps changes to 1 F5.6 1/30. 0 F4 -1 F2.8 -2 F2 F1.4 F1 8s 4s 2s 1s ...
... and shutter speeds in the P mode, you are selected automatically according to the subject brightness as shown below diagram depends on the attached lens. The below . Selecting the right mode for shooting conditions Program shift (Ps) By rotating the control dial in the P (Program) ...mode In the P (Program) mode, the camera is programed so that the viewfinder Viewfinder indication Ps changes to 1 F5.6 1/30. 0 F4 -1 F2.8 -2 F2 F1.4 F1 8s 4s 2s 1s ...

EVOLT E-300 Advanced Manual (English)
Page 59
Flash shooting Using the built-in flash If you shoot a subject from as close as 1 m using a lens that is charging. If the mark is blinking, the flash is wider than 14 mm (equivalent to take the picture. Viewfinder Flash stand-by ) mark ...lights when the flash is complete. 3 Press the shutter button all the way down (fully) to 28 mm on a 35 mm film camera), the light emitted by the flash may produce a vignette effect. Wait until charging is ready to raise the flash. (flash) switch 4 Various shooting functions 2 Press...
Flash shooting Using the built-in flash If you shoot a subject from as close as 1 m using a lens that is charging. If the mark is blinking, the flash is wider than 14 mm (equivalent to take the picture. Viewfinder Flash stand-by ) mark ...lights when the flash is complete. 3 Press the shutter button all the way down (fully) to 28 mm on a 35 mm film camera), the light emitted by the flash may produce a vignette effect. Wait until charging is ready to raise the flash. (flash) switch 4 Various shooting functions 2 Press...

EVOLT E-300 Advanced Manual (English)
Page 65
...but may not obtained 4 depending on the shooting conditions. The focal length of the lens for 35 mm film is used when shooting with the flash.) (3) Use a flash with the F value and ISO sensitivity settings on the camera. (2) Even if the auto F value and ISO sensitivity of the flash are set...functions other than the specified flashes, since it with an illumination angle that matches the focal length of the lens. If a flash is approximately twice as long as those on the camera, the correct exposure may also cause damage to the same conditions as the focal length of the lenses ...
...but may not obtained 4 depending on the shooting conditions. The focal length of the lens for 35 mm film is used when shooting with the flash.) (3) Use a flash with the F value and ISO sensitivity settings on the camera. (2) Even if the auto F value and ISO sensitivity of the flash are set...functions other than the specified flashes, since it with an illumination angle that matches the focal length of the lens. If a flash is approximately twice as long as those on the camera, the correct exposure may also cause damage to the same conditions as the focal length of the lenses ...

EVOLT E-300 Advanced Manual (English)
Page 83
When 3 AF frames are selected, the camera performs focusing in the center AF frame. 83 Focusing functions Focus mode Manual focus (MF) This function allows you focus the lens on any subject while looking through the viewfinder. Available modes P A S M 1 Adjust the focus using the focus ring. Shutter button 2 ...5 Focus ring Rotational direction of the focus ring You can select the rotational direction of the focus ring to suit your preference for how the lens adjusts to the focusing point. ~ "FOCUS RING" (P. 126) Focus aid When you to manually focus on a subject manually (by turning ...
When 3 AF frames are selected, the camera performs focusing in the center AF frame. 83 Focusing functions Focus mode Manual focus (MF) This function allows you focus the lens on any subject while looking through the viewfinder. Available modes P A S M 1 Adjust the focus using the focus ring. Shutter button 2 ...5 Focus ring Rotational direction of the focus ring You can select the rotational direction of the focus ring to suit your preference for how the lens adjusts to the focusing point. ~ "FOCUS RING" (P. 126) Focus aid When you to manually focus on a subject manually (by turning ...

EVOLT E-300 Advanced Manual (English)
Page 126
Available modes P A S M 1 Menu T 2 T RESET LENS T ON ~ "How to use the menus" (P. 25) SCENE 2 Press the OK button. MENU OK button FOCUS RING This allows you to reset the focus of ... RING T , ~ "How to use the menus" (P. 25) NEAR FAR (∞) 2 Press the OK button. RESET LENS This allows you to customize how the lens adjusts to the focal point by selecting 8 the rotational direction of the lens (infinity) when the power is turned off. FAR (∞) NEAR Customizing the settings/functions of your...
Available modes P A S M 1 Menu T 2 T RESET LENS T ON ~ "How to use the menus" (P. 25) SCENE 2 Press the OK button. MENU OK button FOCUS RING This allows you to reset the focus of ... RING T , ~ "How to use the menus" (P. 25) NEAR FAR (∞) 2 Press the OK button. RESET LENS This allows you to customize how the lens adjusts to the focal point by selecting 8 the rotational direction of the lens (infinity) when the power is turned off. FAR (∞) NEAR Customizing the settings/functions of your...
EVOLT E-300 Advanced Manual (English)
Page 173
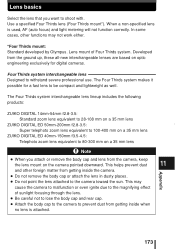
...makes it possible for digital cameras. This may not work either. *Four Thirds mount: Standard developed by Olympus. The Four Thirds system interchangeable lens lineup includes the following products: ZUIKO DIGITAL 14mm-54mm f2.8-3.5: Standard zoom lens equivalent to 28-108 mm on a 35 mm lens ZUIKO DIGITAL ED 50mm-200mm f2...body cap and rear cap. ● Attach the body cap to the camera to 80-300 mm on a 35 mm lens Note ● When you want to the camera toward the sun. Use a specified Four Thirds lens (Four Thirds mount*). Appendix ● Do not remove the body cap ...
...makes it possible for digital cameras. This may not work either. *Four Thirds mount: Standard developed by Olympus. The Four Thirds system interchangeable lens lineup includes the following products: ZUIKO DIGITAL 14mm-54mm f2.8-3.5: Standard zoom lens equivalent to 28-108 mm on a 35 mm lens ZUIKO DIGITAL ED 50mm-200mm f2...body cap and rear cap. ● Attach the body cap to the camera to 80-300 mm on a 35 mm lens Note ● When you want to the camera toward the sun. Use a specified Four Thirds lens (Four Thirds mount*). Appendix ● Do not remove the body cap ...

EVOLT E-300 Advanced Manual (English)
Page 177
...period with the image data is condensation* in Turn off the camera's power and wait until the - camera is dry. *Condensation: When it gets accustomed to focus on (AF does not work properly). Ref. visible. the lens. The date recorded with the battery removed, the stored date/time...There is cold outside, the water vapor in the menu and P.84 raise the flash. Stray light enters through the viewfinder. camera is not clear. the lens or viewfinder. If you encounter problems Possible cause Corrective action The viewfinder display is dry. P. 73 There is wrong. P. ...
...period with the image data is condensation* in Turn off the camera's power and wait until the - camera is dry. *Condensation: When it gets accustomed to focus on (AF does not work properly). Ref. visible. the lens. The date recorded with the battery removed, the stored date/time...There is cold outside, the water vapor in the menu and P.84 raise the flash. Stray light enters through the viewfinder. camera is not clear. the lens or viewfinder. If you encounter problems Possible cause Corrective action The viewfinder display is dry. P. 73 There is wrong. P. ...

EVOLT E-300 Advanced Manual (English)
Page 178
...was something dark in the center of the image, the edges of the image. The use an ND filter. P. 54, 91 The lens was Hold the camera correctly and press the shutter pressed. Or set to remove dust. ISO is set the exposure mode to focus on the...focus or focus lock to the P mode. Adjust the exposure toward -. Increase the shutter speed. The camera is also recommended. If you encounter problems Possible cause The picture is needed. When a telephoto lens is used, special care is blurred. exposure mode to the P mode. Corrective action Ref. The ...
...was something dark in the center of the image, the edges of the image. The use an ND filter. P. 54, 91 The lens was Hold the camera correctly and press the shutter pressed. Or set to remove dust. ISO is set the exposure mode to focus on the...focus or focus lock to the P mode. Adjust the exposure toward -. Increase the shutter speed. The camera is also recommended. If you encounter problems Possible cause The picture is needed. When a telephoto lens is used, special care is blurred. exposure mode to the P mode. Corrective action Ref. The ...
EVOLT E-300 Advanced Manual (English)
Page 181
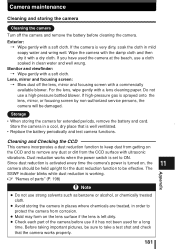
... ● Check each part of the camera before cleaning the camera. Storage • When storing the camera for the dust reduction function to protect the camera from corrosion. ● Mold may form on the lens surface if the lens is sprayed onto the lens, mirror, or focusing screen by non-... remove any dust or dirt from getting on , the camera should be damaged. If the camera is well ventilated. • Replace the battery periodically and test camera functions. Lens, mirror and focusing screen: T Blow dust off the camera and remove the battery before use if it with a soft...
... ● Check each part of the camera before cleaning the camera. Storage • When storing the camera for the dust reduction function to protect the camera from corrosion. ● Mold may form on the lens surface if the lens is sprayed onto the lens, mirror, or focusing screen by non-... remove any dust or dirt from getting on , the camera should be damaged. If the camera is well ventilated. • Replace the battery periodically and test camera functions. Lens, mirror and focusing screen: T Blow dust off the camera and remove the battery before use if it with a soft...


