D-150/C-1 Zoom Reference Manual (2.7MB)
Page 4
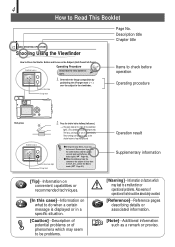
... as long as a remark or proviso. Green lamp 1. Release your finger from the shutter button, hold the camera securely again and half-press the button again ( Page 40). ⅷ When the distance from the camera to the subject is less than 0.5 m/1.6 ft., select the Macro mode ( Page 61). [Tip]···...). [The green lamp on factors which may be problems. Operation result Supplementary information [Warning]···Information on the right of operations that the lens barrier is kept half-pressed.
... as long as a remark or proviso. Green lamp 1. Release your finger from the shutter button, hold the camera securely again and half-press the button again ( Page 40). ⅷ When the distance from the camera to the subject is less than 0.5 m/1.6 ft., select the Macro mode ( Page 61). [Tip]···...). [The green lamp on factors which may be problems. Operation result Supplementary information [Warning]···Information on the right of operations that the lens barrier is kept half-pressed.
D-150/C-1 Zoom Reference Manual (2.7MB)
Page 16
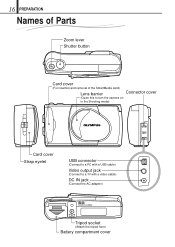
16 PREPARATION Names of Parts Zoom lever Shutter button Card cover (For insertion and removal of the SmartMedia card) Lens barrier Connector cover (Open this to turn the camera on in the Shooting mode) Card cover Strap eyelet USB connector (Connect to a PC with a USB cable) Video output jack (Connect to a TV with a video cable) DC IN jack (Connect the AC adapter) Tripod socket (Attach the tripod here) Battery compartment cover
16 PREPARATION Names of Parts Zoom lever Shutter button Card cover (For insertion and removal of the SmartMedia card) Lens barrier Connector cover (Open this to turn the camera on in the Shooting mode) Card cover Strap eyelet USB connector (Connect to a PC with a USB cable) Video output jack (Connect to a TV with a video cable) DC IN jack (Connect the AC adapter) Tripod socket (Attach the tripod here) Battery compartment cover
D-150/C-1 Zoom Reference Manual (2.7MB)
Page 17
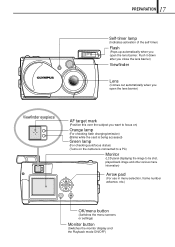
...) Viewfinder eyepiece AF target mark (Position this over the subject you open the lens barrier. 17 PREPARATION Self-timer lamp (Indicates activation of the self-timer) Flash (Pops up automatically when you want to focus on) Orange lamp (For ...checking flash charging/emission) (Blinks while the card is being accessed) Green lamp (For checking autofocus status) (Turns on the camera is connected to a PC) Monitor (LCD panel displaying the image to be shot, played-back image and other various menu information) Arrow pad (For use...
...) Viewfinder eyepiece AF target mark (Position this over the subject you open the lens barrier. 17 PREPARATION Self-timer lamp (Indicates activation of the self-timer) Flash (Pops up automatically when you want to focus on) Orange lamp (For ...checking flash charging/emission) (Blinks while the card is being accessed) Green lamp (For checking autofocus status) (Turns on the camera is connected to a PC) Monitor (LCD panel displaying the image to be shot, played-back image and other various menu information) Arrow pad (For use...
D-150/C-1 Zoom Reference Manual (2.7MB)
Page 19
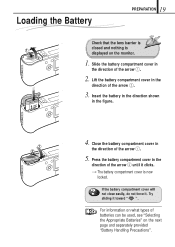
... toward " ". Try sliding it . Insert the battery in the direction shown in the direction of the arrow 1. 2. Loading the Battery 19 PREPARATION Check that the lens barrier is closed and nothing is now locked. Lift the battery compartment cover in the direction of batteries can be used, see "Selecting the Appropriate...
... toward " ". Try sliding it . Insert the battery in the direction shown in the direction of the arrow 1. 2. Loading the Battery 19 PREPARATION Check that the lens barrier is closed and nothing is now locked. Lift the battery compartment cover in the direction of batteries can be used, see "Selecting the Appropriate...
D-150/C-1 Zoom Reference Manual (2.7MB)
Page 22
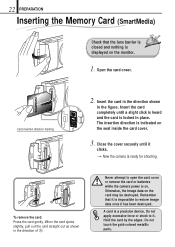
.... 1. To remove the card: Press the card gently. A card is indicated on . Do not apply excessive force or shock to it clicks. [Now the camera is on the seal inside the card cover. 3. Insert the card in the direction shown in the direction of A. Insert the card completely until it... . Close the cover securely until a slight click is heard and the card is displayed on the card may be destroyed. Remember that the lens barrier is closed and nothing is locked in place. Card insertion direction marking 2. Hold the card by the edges. 22 PREPARATION Inserting the Memory Card...
.... 1. To remove the card: Press the card gently. A card is indicated on . Do not apply excessive force or shock to it clicks. [Now the camera is on the seal inside the card cover. 3. Insert the card in the direction shown in the direction of A. Insert the card completely until it... . Close the cover securely until a slight click is heard and the card is displayed on the card may be destroyed. Remember that the lens barrier is closed and nothing is locked in place. Card insertion direction marking 2. Hold the card by the edges. 22 PREPARATION Inserting the Memory Card...
D-150/C-1 Zoom Reference Manual (2.7MB)
Page 28
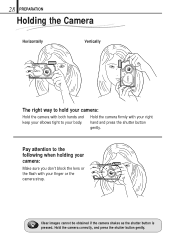
Clear images cannot be obtained if the camera shakes as the shutter button is pressed. Hold the camera correctly, and press the shutter button gently. Pay attention to the following when holding your camera: Make sure you don't block the lens or the flash with your right hand and press the shutter button gently. Hold the camera firmly with both hands and keep your elbows tight to your body. 28 PREPARATION Holding the Camera Horizontally Vertically The right way to hold your camera: Hold the camera with your finger or the camera strap.
Clear images cannot be obtained if the camera shakes as the shutter button is pressed. Hold the camera correctly, and press the shutter button gently. Pay attention to the following when holding your camera: Make sure you don't block the lens or the flash with your right hand and press the shutter button gently. Hold the camera firmly with both hands and keep your elbows tight to your body. 28 PREPARATION Holding the Camera Horizontally Vertically The right way to hold your camera: Hold the camera with your finger or the camera strap.
D-150/C-1 Zoom Reference Manual (2.7MB)
Page 30
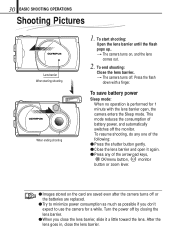
... the arrow pad keys, OK/menu button, monitor button or zoom lever. ⅷ Images stored on , and the lens comes out. 2. To start shooting: Open the lens barrier until the flash pops up. [The camera turns on the card are saved even after the camera turns off . To resume shooting, do any of battery power...
... the arrow pad keys, OK/menu button, monitor button or zoom lever. ⅷ Images stored on , and the lens comes out. 2. To start shooting: Open the lens barrier until the flash pops up. [The camera turns on the card are saved even after the camera turns off . To resume shooting, do any of battery power...
D-150/C-1 Zoom Reference Manual (2.7MB)
Page 31
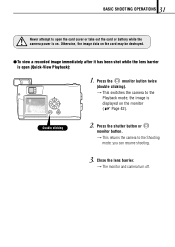
... recorded image immediately after it has been shot while the lens barrier is open the card cover or take out the card or battery while the camera power is displayed on . Close the lens barrier. [The monitor and camera turn off. 31 BASIC SHOOTING OPERATIONS Never attempt to open... (Quick-View Playback): 1. Press the monitor button twice (double clicking). [This switches the camera to the Shooting mode; you...
... recorded image immediately after it has been shot while the lens barrier is open the card cover or take out the card or battery while the camera power is displayed on . Close the lens barrier. [The monitor and camera turn off. 31 BASIC SHOOTING OPERATIONS Never attempt to open... (Quick-View Playback): 1. Press the monitor button twice (double clicking). [This switches the camera to the Shooting mode; you...
D-150/C-1 Zoom Reference Manual (2.7MB)
Page 32
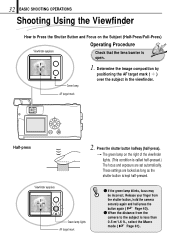
... blinks, focus may be incorrect. Release your finger from the shutter button, hold the camera securely again and half-press the button again ( Page 40). ⅷ When the distance from the camera to Press the Shutter Button and Focus on the right of the viewfinder lights. (This...the shutter button halfway (half-press). [The green lamp on the Subject (Half-Press/Full-Press) Operating Procedure Viewfinder eyepiece Check that the lens barrier is open. These settings are set automatically. Green lamp 1. 32 BASIC SHOOTING OPERATIONS Shooting Using the Viewfinder How to the subject is ...
... blinks, focus may be incorrect. Release your finger from the shutter button, hold the camera securely again and half-press the button again ( Page 40). ⅷ When the distance from the camera to Press the Shutter Button and Focus on the right of the viewfinder lights. (This...the shutter button halfway (half-press). [The green lamp on the Subject (Half-Press/Full-Press) Operating Procedure Viewfinder eyepiece Check that the lens barrier is open. These settings are set automatically. Green lamp 1. 32 BASIC SHOOTING OPERATIONS Shooting Using the Viewfinder How to the subject is ...
D-150/C-1 Zoom Reference Manual (2.7MB)
Page 34
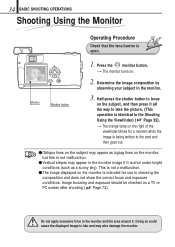
34 BASIC SHOOTING OPERATIONS Shooting Using the Monitor Operating Procedure Check that the lens barrier is shot under bright conditions (such as a sunny sky). Half-press the shutter button to focus on the subject, and then press it all ...
34 BASIC SHOOTING OPERATIONS Shooting Using the Monitor Operating Procedure Check that the lens barrier is shot under bright conditions (such as a sunny sky). Half-press the shutter button to focus on the subject, and then press it all ...

D-150/C-1 Zoom Reference Manual (2.7MB)
Page 37
...button, and wait until the orange lamp goes out. ). When the orange The camera is ready and will fire. 37 BASIC SHOOTING OPERATIONS Checking the Camera Status Indication Next to the Viewfinder or on the Monitor (in the camera. ⅷ When the write protect seal is attached to the card. ⅷ... of the following cases: ⅷ When no card is inserted in Shooting Mode) Viewfinder Orange lamp Green lamp Operating Procedure Check that the lens barrier is not ready in the following . When the orange lamp is locked. Press the shutter button all the way to start shooting with...
...button, and wait until the orange lamp goes out. ). When the orange The camera is ready and will fire. 37 BASIC SHOOTING OPERATIONS Checking the Camera Status Indication Next to the Viewfinder or on the Monitor (in the camera. ⅷ When the write protect seal is attached to the card. ⅷ... of the following cases: ⅷ When no card is inserted in Shooting Mode) Viewfinder Orange lamp Green lamp Operating Procedure Check that the lens barrier is not ready in the following . When the orange lamp is locked. Press the shutter button all the way to start shooting with...
D-150/C-1 Zoom Reference Manual (2.7MB)
Page 40
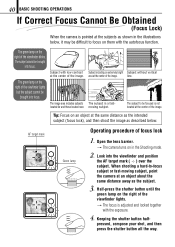
... pressed, compose your shot, and then press the shutter button all the way. Tip: Focus on them with the autofocus function. Open the lens barrier. [The camera turns on the right of the viewfinder blinks. The subject cannot be focused is pointed at the subjects as shown in the Shooting mode...AF target mark Green lamp Operating procedure of the image. 40 BASIC SHOOTING OPERATIONS If Correct Focus Cannot Be Obtained (Focus Lock) When the camera is not located at the center of the image. Half-press the shutter button until the green lamp on the right of the viewfinder lights...
... pressed, compose your shot, and then press the shutter button all the way. Tip: Focus on them with the autofocus function. Open the lens barrier. [The camera turns on the right of the viewfinder blinks. The subject cannot be focused is pointed at the subjects as shown in the Shooting mode...AF target mark Green lamp Operating procedure of the image. 40 BASIC SHOOTING OPERATIONS If Correct Focus Cannot Be Obtained (Focus Lock) When the camera is not located at the center of the image. Half-press the shutter button until the green lamp on the right of the viewfinder lights...
D-150/C-1 Zoom Reference Manual (2.7MB)
Page 42
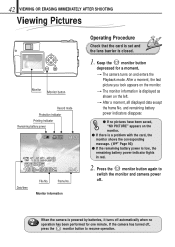
... power indicators disappear. ⅷ If no operation has been performed for a moment. [The camera turns on and enters the Playback mode. Press the monitor button again to switch the monitor and camera power off , press the monitor button to resume operation. After a moment, the last picture...left. [After a moment, all displayed data except the frame No. When the camera is closed. 1. If the camera has turned off . Monitor information Operating Procedure Check that the card is set and the lens barrier is powered by batteries, it turns off automatically when no pictures have been ...
... power indicators disappear. ⅷ If no operation has been performed for a moment. [The camera turns on and enters the Playback mode. Press the monitor button again to switch the monitor and camera power off , press the monitor button to resume operation. After a moment, the last picture...left. [After a moment, all displayed data except the frame No. When the camera is closed. 1. If the camera has turned off . Monitor information Operating Procedure Check that the card is set and the lens barrier is powered by batteries, it turns off automatically when no pictures have been ...
D-150/C-1 Zoom Reference Manual (2.7MB)
Page 43
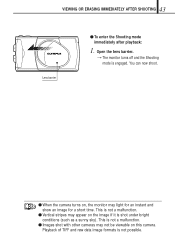
...time. 43 VIEWING OR ERASING IMMEDIATELY AFTER SHOOTING Lens barrier ⅷ To enter the Shooting mode immediately after playback: 1. This is shot under bright conditions (such as a sunny sky). You can now shoot. ⅷ When the camera turns on this camera. Playback of TIFF and raw data image ...formats is engaged. Open the lens barrier. [The monitor turns off and the Shooting mode is not possible.
...time. 43 VIEWING OR ERASING IMMEDIATELY AFTER SHOOTING Lens barrier ⅷ To enter the Shooting mode immediately after playback: 1. This is shot under bright conditions (such as a sunny sky). You can now shoot. ⅷ When the camera turns on this camera. Playback of TIFF and raw data image ...formats is engaged. Open the lens barrier. [The monitor turns off and the Shooting mode is not possible.
D-150/C-1 Zoom Reference Manual (2.7MB)
Page 44
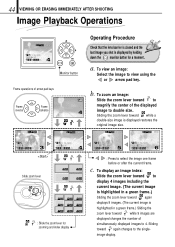
...images including the current image. (The current image is highlighted in a green frame.) Sliding the zoom lever toward again displays 9 images. (The current image is highlighted in a green frame.) Sliding the zoom lever toward again changes to view using the or arrow pad key. To view an image: ...keys 2 Frame Frame reverse advance 4 HQ HQ Operating Procedure Check that the lens barrier is closed and the last image you shot is displayed restores the original image size. To zoom an image: Slide the zoom lever toward while a double-size image is displayed by holding down the ...
...images including the current image. (The current image is highlighted in a green frame.) Sliding the zoom lever toward again displays 9 images. (The current image is highlighted in a green frame.) Sliding the zoom lever toward again changes to view using the or arrow pad key. To view an image: ...keys 2 Frame Frame reverse advance 4 HQ HQ Operating Procedure Check that the lens barrier is closed and the last image you shot is displayed restores the original image size. To zoom an image: Slide the zoom lever toward while a double-size image is displayed by holding down the ...
D-150/C-1 Zoom Reference Manual (2.7MB)
Page 46
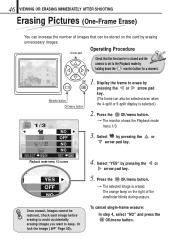
... "NO" and press the OK/menu button. Operating Procedure Arrow pad Check that can be stored on the right of images that the lens barrier is closed and the camera is set to the Playback mode by holding down the monitor button for a moment. Display the frame to keep. Press the OK...
... "NO" and press the OK/menu button. Operating Procedure Arrow pad Check that can be stored on the right of images that the lens barrier is closed and the camera is set to the Playback mode by holding down the monitor button for a moment. Display the frame to keep. Press the OK...
D-150/C-1 Zoom Reference Manual (2.7MB)
Page 47
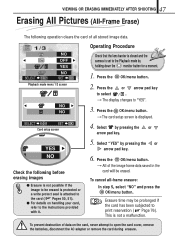
... OFF YES SELECT NO SET OK Playback mode menu 1/3 screen NO NO SELECT SET OK Card setup screen Operating Procedure Check that the lens barrier is closed and the camera is set to the Playback mode by pressing the or arrow pad key. Press the or arrow pad key to select / . [The...
... OFF YES SELECT NO SET OK Playback mode menu 1/3 screen NO NO SELECT SET OK Card setup screen Operating Procedure Check that the lens barrier is closed and the camera is set to the Playback mode by pressing the or arrow pad key. Press the or arrow pad key to select / . [The...
D-150/C-1 Zoom Reference Manual (2.7MB)
Page 48
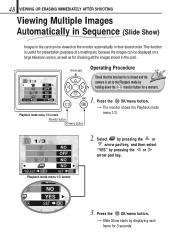
.... 1/3 SELECT NO OFF NO NO SET OK Arrow pad Playback mode menu 1/3 screen Monitor button OK/menu button Operating Procedure Check that the lens barrier is closed and the camera is useful for 3 seconds. Select by pressing the or arrow pad key, and then select "YES" by displaying each frame for presentation...
.... 1/3 SELECT NO OFF NO NO SET OK Arrow pad Playback mode menu 1/3 screen Monitor button OK/menu button Operating Procedure Check that the lens barrier is closed and the camera is useful for 3 seconds. Select by pressing the or arrow pad key, and then select "YES" by displaying each frame for presentation...
D-150/C-1 Zoom Reference Manual (2.7MB)
Page 50
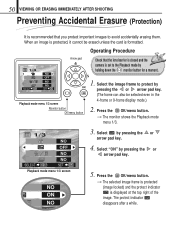
... Procedure 1/3 SELECT NO OFF NO NO SET OK Arrow pad Playback mode menu 1/3 screen Monitor button OK/menu button Check that the lens barrier is closed and the camera is recommended that you protect important images to avoid accidentally erasing them. 50 VIEWING OR ERASING IMMEDIATELY AFTER SHOOTING Preventing Accidental Erasure (Protection...
... Procedure 1/3 SELECT NO OFF NO NO SET OK Arrow pad Playback mode menu 1/3 screen Monitor button OK/menu button Check that the lens barrier is closed and the camera is recommended that you protect important images to avoid accidentally erasing them. 50 VIEWING OR ERASING IMMEDIATELY AFTER SHOOTING Preventing Accidental Erasure (Protection...
D-150/C-1 Zoom Reference Manual (2.7MB)
Page 52
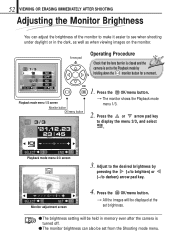
... Brightness You can adjust the brightness of the monitor to make it easier to see when shooting under daylight or in memory even after the camera is turned off. ⅷ The monitor brightness can also be held in the dark, as well as when viewing images on the monitor. 1/3 SELECT NO... OFF NO NO SET OK Arrow pad Playback mode menu 1/3 screen Monitor button OK/menu button 3/3 Operating Procedure Check that the lens barrier is closed and the camera is set from the Shooting mode menu. SELECT SET OK Monitor adjustment screen 4. Press the OK/menu button. [All the images will be...
... Brightness You can adjust the brightness of the monitor to make it easier to see when shooting under daylight or in memory even after the camera is turned off. ⅷ The monitor brightness can also be held in the dark, as well as when viewing images on the monitor. 1/3 SELECT NO... OFF NO NO SET OK Arrow pad Playback mode menu 1/3 screen Monitor button OK/menu button 3/3 Operating Procedure Check that the lens barrier is closed and the camera is set from the Shooting mode menu. SELECT SET OK Monitor adjustment screen 4. Press the OK/menu button. [All the images will be...


