D-150/C-1 Zoom Reference Manual (2.7MB)
Page 6
... Erasure (Protection 50 Adjusting the Monitor Brightness 52 ADVANCED SHOOTING FEATURES Selecting the Image Quality (Record Mode 54 Using the Flash 56 Magnifying the Subject (Zooming 59 Shooting a Close Subject (Macro Shooting 61 Using the Self-Timer 62 Shooting Images Sequentially (Sequential Shooting 63 Varying the Image Brightness (Exposure Compensation).......65...
... Erasure (Protection 50 Adjusting the Monitor Brightness 52 ADVANCED SHOOTING FEATURES Selecting the Image Quality (Record Mode 54 Using the Flash 56 Magnifying the Subject (Zooming 59 Shooting a Close Subject (Macro Shooting 61 Using the Self-Timer 62 Shooting Images Sequentially (Sequential Shooting 63 Varying the Image Brightness (Exposure Compensation).......65...

D-150/C-1 Zoom Reference Manual (2.7MB)
Page 8
... Shooting group shots (Self-Timer P.62 Shooting a moving forward to find the page reference for that operation. ࡗShooting Images Ordinary shooting P.32 Shooting with zoom P.59 Shooting close-ups (Macro Shooting P.61 Shooting two persons side by side (Focus Lock P.40 Shooting with flash P.56 Shooting in a concert hall or...
... Shooting group shots (Self-Timer P.62 Shooting a moving forward to find the page reference for that operation. ࡗShooting Images Ordinary shooting P.32 Shooting with zoom P.59 Shooting close-ups (Macro Shooting P.61 Shooting two persons side by side (Focus Lock P.40 Shooting with flash P.56 Shooting in a concert hall or...
D-150/C-1 Zoom Reference Manual (2.7MB)
Page 12
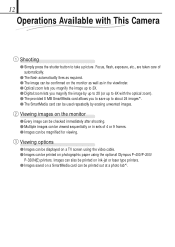
.... ⅷ Images can be printed on photographic paper using the optional Olympus P-400/P-200/ P-330N(E) printers. 12 Operations Available with the optical zoom). ⅷ The provided 8 MB SmartMedia card allows you to save ... The SmartMedia card can be used repeatedly by up to 2X (or up to 3X. ⅷ Digital zoom lets you magnify the image by erasing unwanted images. 2 Viewing images on the monitor ⅷ Every... or in the viewfinder. ⅷ Optical zoom lets you magnify the image up to 6X with This Camera 1 Shooting ⅷ Simply press the shutter button to take a picture.
.... ⅷ Images can be printed on photographic paper using the optional Olympus P-400/P-200/ P-330N(E) printers. 12 Operations Available with the optical zoom). ⅷ The provided 8 MB SmartMedia card allows you to save ... The SmartMedia card can be used repeatedly by up to 2X (or up to 3X. ⅷ Digital zoom lets you magnify the image by erasing unwanted images. 2 Viewing images on the monitor ⅷ Every... or in the viewfinder. ⅷ Optical zoom lets you magnify the image up to 6X with This Camera 1 Shooting ⅷ Simply press the shutter button to take a picture.
D-150/C-1 Zoom Reference Manual (2.7MB)
Page 16
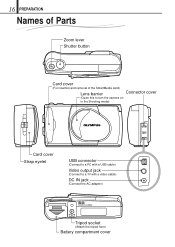
16 PREPARATION Names of Parts Zoom lever Shutter button Card cover (For insertion and removal of the SmartMedia card) Lens barrier Connector cover (Open this to turn the camera on in the Shooting mode) Card cover Strap eyelet USB connector (Connect to a PC with a USB cable) Video output jack (Connect to a TV with a video cable) DC IN jack (Connect the AC adapter) Tripod socket (Attach the tripod here) Battery compartment cover
16 PREPARATION Names of Parts Zoom lever Shutter button Card cover (For insertion and removal of the SmartMedia card) Lens barrier Connector cover (Open this to turn the camera on in the Shooting mode) Card cover Strap eyelet USB connector (Connect to a PC with a USB cable) Video output jack (Connect to a TV with a video cable) DC IN jack (Connect the AC adapter) Tripod socket (Attach the tripod here) Battery compartment cover
D-150/C-1 Zoom Reference Manual (2.7MB)
Page 30
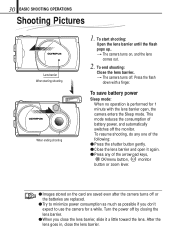
... automatically switches off . To resume shooting, do any of the following: ⅷ Press the shutter button gently. ⅷ Close the lens barrier and open , the camera enters the Sleep mode. After the lens goes in, close the lens barrier, slide it again. ⅷ Press any one of the arrow pad keys..., OK/menu button, monitor button or zoom lever. ⅷ Images stored on , and the lens comes out. 2. To save battery power Sleep mode: When no operation is performed for a while. 30 BASIC...
... automatically switches off . To resume shooting, do any of the following: ⅷ Press the shutter button gently. ⅷ Close the lens barrier and open , the camera enters the Sleep mode. After the lens goes in, close the lens barrier, slide it again. ⅷ Press any one of the arrow pad keys..., OK/menu button, monitor button or zoom lever. ⅷ Images stored on , and the lens comes out. 2. To save battery power Sleep mode: When no operation is performed for a while. 30 BASIC...
D-150/C-1 Zoom Reference Manual (2.7MB)
Page 39
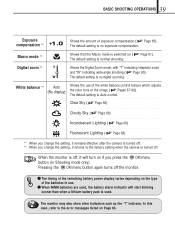
... on Page 93. When the monitor is no digital zooming. Page 61). Digital zoom *2 T W Shows the Digital Zoom mode, with "T" indicating telephoto zoom and "W" indicating wide-angle shooting ( Page 60). indicator. In this case, refer to the factory setting when the camera is no exposure compensation. The default setting is ...The monitor may also show other indicators such as the "!" The default setting is turned off , it remains effective after the camera is turned off. *2 When you press the OK/menu button (in use of the white balance control feature which adjusts (No...
... on Page 93. When the monitor is no digital zooming. Page 61). Digital zoom *2 T W Shows the Digital Zoom mode, with "T" indicating telephoto zoom and "W" indicating wide-angle shooting ( Page 60). indicator. In this case, refer to the factory setting when the camera is no exposure compensation. The default setting is ...The monitor may also show other indicators such as the "!" The default setting is turned off , it remains effective after the camera is turned off. *2 When you press the OK/menu button (in use of the white balance control feature which adjusts (No...
D-150/C-1 Zoom Reference Manual (2.7MB)
Page 44
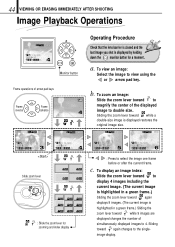
...ERASING IMMEDIATELY AFTER SHOOTING Image Playback Operations HQ .12.23 4 23 45 4 Monitor button Frame operations of simultaneously displayed images to 4. Sliding the zoom lever toward while 9 images are displayed changes the number of arrow pad keys 2 Frame Frame reverse advance 4 HQ HQ Operating Procedure Check that the... the image one frame before or after the current frame. HQ HQ .12.23 3 23 45 3 .12.23 4 23 45 4 Slide zoom lever 1 2 3 4 : Slide the zoom lever for a moment. Sliding toward to magnify the center of the displayed image to the singleimage display. To...
...ERASING IMMEDIATELY AFTER SHOOTING Image Playback Operations HQ .12.23 4 23 45 4 Monitor button Frame operations of simultaneously displayed images to 4. Sliding the zoom lever toward while 9 images are displayed changes the number of arrow pad keys 2 Frame Frame reverse advance 4 HQ HQ Operating Procedure Check that the... the image one frame before or after the current frame. HQ HQ .12.23 3 23 45 3 .12.23 4 23 45 4 Slide zoom lever 1 2 3 4 : Slide the zoom lever for a moment. Sliding toward to magnify the center of the displayed image to the singleimage display. To...
D-150/C-1 Zoom Reference Manual (2.7MB)
Page 45
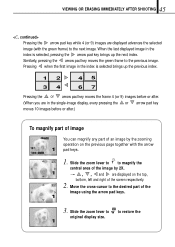
... pad key moves the frame 4 (or 9) images before or after. (When you are in the index is selected brings up the next index. Slide the zoom lever to original display size. 1 to the desired part of the screen respectively. 2. Similarly, pressing the arrow pad key moves the green frame to magnify... the central area of the image by the zooming operation on the top, bottom, left and right of the image using the arrow pad keys. 3. Slide the zoom lever to to the previous image. 45 VIEWING OR ERASING IMMEDIATELY AFTER SHOOTING Pressing the arrow...
... pad key moves the frame 4 (or 9) images before or after. (When you are in the index is selected brings up the next index. Slide the zoom lever to original display size. 1 to the desired part of the screen respectively. 2. Similarly, pressing the arrow pad key moves the green frame to magnify... the central area of the image by the zooming operation on the top, bottom, left and right of the image using the arrow pad keys. 3. Slide the zoom lever to to the previous image. 45 VIEWING OR ERASING IMMEDIATELY AFTER SHOOTING Pressing the arrow...
D-150/C-1 Zoom Reference Manual (2.7MB)
Page 53
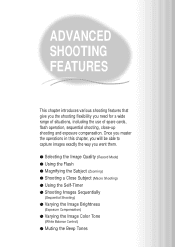
... features that give you the shooting flexibility you want them. ⅷ Selecting the Image Quality (Record Mode) ⅷ Using the Flash ⅷ Magnifying the Subject (Zooming) ⅷ Shooting a Close Subject (Macro Shooting) ⅷ Using the Self-Timer ⅷ Shooting Images Sequentially (Sequential Shooting) ⅷ Varying the Image Brightness (Exposure Compensation) ⅷ...
... features that give you the shooting flexibility you want them. ⅷ Selecting the Image Quality (Record Mode) ⅷ Using the Flash ⅷ Magnifying the Subject (Zooming) ⅷ Shooting a Close Subject (Macro Shooting) ⅷ Using the Self-Timer ⅷ Shooting Images Sequentially (Sequential Shooting) ⅷ Varying the Image Brightness (Exposure Compensation) ⅷ...
D-150/C-1 Zoom Reference Manual (2.7MB)
Page 54
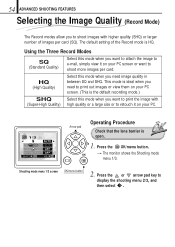
... this mode when you to shoot images with (Super-High Quality) high quality or a large size or to retouch it on your PC. 1/3 AUTO OFF DIGITAL ZOOM OFF SELECT END OK Arrow pad Operating Procedure Check that the lens barrier is HQ. Shooting mode menu 1/3 screen OK/menu button 2. Using the Three...
... this mode when you to shoot images with (Super-High Quality) high quality or a large size or to retouch it on your PC. 1/3 AUTO OFF DIGITAL ZOOM OFF SELECT END OK Arrow pad Operating Procedure Check that the lens barrier is HQ. Shooting mode menu 1/3 screen OK/menu button 2. Using the Three...
D-150/C-1 Zoom Reference Manual (2.7MB)
Page 56
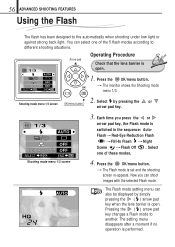
The Flash mode setting menu can also be displayed by pressing the or arrow pad key. 1/3 AUTO OFF DIGITAL ZOOM OFF SELECT END OK Shooting mode menu 1/3 screen AUTO 3. Select by simply pressing the ( ) arrow pad key when the lens barrier is open . 1. Each time ...you can select one of the 5 flash modes according to different shooting situations. 1/3 AUTO OFF DIGITAL ZOOM OFF SELECT END OK Arrow pad Operating Procedure Check that the lens barrier is switched in the sequence: AutoFlash[Red-Eye Reduction Flash [Fill-In...
The Flash mode setting menu can also be displayed by pressing the or arrow pad key. 1/3 AUTO OFF DIGITAL ZOOM OFF SELECT END OK Shooting mode menu 1/3 screen AUTO 3. Select by simply pressing the ( ) arrow pad key when the lens barrier is open . 1. Each time ...you can select one of the 5 flash modes according to different shooting situations. 1/3 AUTO OFF DIGITAL ZOOM OFF SELECT END OK Arrow pad Operating Procedure Check that the lens barrier is switched in the sequence: AutoFlash[Red-Eye Reduction Flash [Fill-In...
D-150/C-1 Zoom Reference Manual (2.7MB)
Page 59
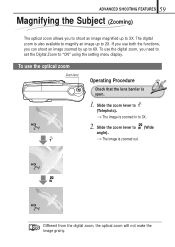
... shoot an image magnified up to 2X. If you use the digital zoom, you need to set the Digital Zoom to angle). [The image is open. 1. Slide the zoom lever to "ON" using the setting menu display. The digital zoom is zoomed in to 3X. Slide the zoom lever to (Telephoto). [The image is also available to magnify an...
... shoot an image magnified up to 2X. If you use the digital zoom, you need to set the Digital Zoom to angle). [The image is open. 1. Slide the zoom lever to "ON" using the setting menu display. The digital zoom is zoomed in to 3X. Slide the zoom lever to (Telephoto). [The image is also available to magnify an...
D-150/C-1 Zoom Reference Manual (2.7MB)
Page 60
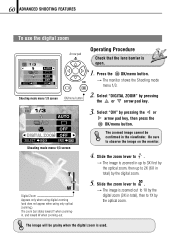
...the or arrow pad key, then press the OK/menu button. Operating Procedure Check that the lens barrier is zoomed in the viewfinder. Select "DIGITAL ZOOM" by the digital zoom. 5. Be sure to . [The image is open. 1. The image will be confirmed in up to... the digital zoom 1/3 AUTO OFF DIGITAL ZOOM OFF SELECT END OK Arrow pad Shooting mode menu 1/3 screen OK/menu button 1/3 AUTO OFF DIGITAL ZOOM OFF SELECT END OK Shooting mode menu 1/3 screen T W Digital Zoom Appears only when using digital zooming (and does not appear when using only optical zooming.) The zoom bar ...
...the or arrow pad key, then press the OK/menu button. Operating Procedure Check that the lens barrier is zoomed in the viewfinder. Select "DIGITAL ZOOM" by the digital zoom. 5. Be sure to . [The image is open. 1. The image will be confirmed in up to... the digital zoom 1/3 AUTO OFF DIGITAL ZOOM OFF SELECT END OK Arrow pad Shooting mode menu 1/3 screen OK/menu button 1/3 AUTO OFF DIGITAL ZOOM OFF SELECT END OK Shooting mode menu 1/3 screen T W Digital Zoom Appears only when using digital zooming (and does not appear when using only optical zooming.) The zoom bar ...
D-150/C-1 Zoom Reference Manual (2.7MB)
Page 61
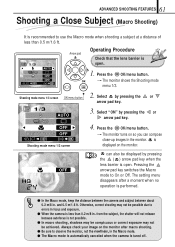
... be conspicuous or correct exposure may not be possible due to errors in focus and exposure. ⅷ When the camera is less than 0.5 m/1.6 ft. 1/3 AUTO OFF DIGITAL ZOOM OFF SELECT END OK Arrow pad Operating Procedure Check that the lens barrier is open . Always check your image on...The Macro mode is automaticaly canceled when the camera is displayed on so you can also be achieved. Select by pressing the or arrow pad key. and 0.5 m/1.6 ft. Press the OK/menu button. [The monitor shows the Shooting mode menu 1/3. OFF DIGITAL ZOOM OFF SELECT END OK Shooting mode menu 1/3 ...
... be conspicuous or correct exposure may not be possible due to errors in focus and exposure. ⅷ When the camera is less than 0.5 m/1.6 ft. 1/3 AUTO OFF DIGITAL ZOOM OFF SELECT END OK Arrow pad Operating Procedure Check that the lens barrier is open . Always check your image on...The Macro mode is automaticaly canceled when the camera is displayed on so you can also be achieved. Select by pressing the or arrow pad key. and 0.5 m/1.6 ft. Press the OK/menu button. [The monitor shows the Shooting mode menu 1/3. OFF DIGITAL ZOOM OFF SELECT END OK Shooting mode menu 1/3 ...
D-150/C-1 Zoom Reference Manual (2.7MB)
Page 62
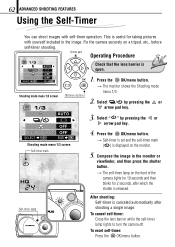
...timer is open. 1. To cancel self-timer: Close the lens barrier while the self-timer lamp lights to turn the camera off. Fix the camera securely on the monitor. 5. 62 ADVANCED SHOOTING FEATURES Using the Self-Timer You can shoot images with yourself included in the...timer lamp on the front of the camera lights for 10 seconds and then blinks for 2 seconds, after shooting a single image. Arrow pad Operating Procedure 1/3 AUTO OFF DIGITAL ZOOM OFF SELECT END OK Shooting mode menu 1/3 screen OK/menu button 1/3 AUTO OFF DIGITAL ZOOM OFF SELECT END OK Shooting mode ...
...timer is open. 1. To cancel self-timer: Close the lens barrier while the self-timer lamp lights to turn the camera off. Fix the camera securely on the monitor. 5. 62 ADVANCED SHOOTING FEATURES Using the Self-Timer You can shoot images with yourself included in the...timer lamp on the front of the camera lights for 10 seconds and then blinks for 2 seconds, after shooting a single image. Arrow pad Operating Procedure 1/3 AUTO OFF DIGITAL ZOOM OFF SELECT END OK Shooting mode menu 1/3 screen OK/menu button 1/3 AUTO OFF DIGITAL ZOOM OFF SELECT END OK Shooting mode ...
D-150/C-1 Zoom Reference Manual (2.7MB)
Page 63
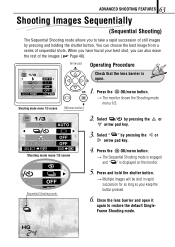
...[Multiple images will be shot in rapid succession for as long as your best shot, you to restore the default SingleFrame Shooting mode. OFF DIGITAL ZOOM OFF SELECT END OK Shooting mode menu 1/3 screen OK/menu button 1. Close the lens barrier and open . When you have found your ...pad key. 3. You can also erase the rest of the images ( Page 46). OFF L ZOOM OFF Sequential Shooting mode 5. Press the OK/menu button. [The monitor shows the Shooting mode menu 1/3. 1/3 AUTO OFF DIGITAL ZOOM OFF SELECT END OK / 3Shooting mode menu 1/3 screen 2. Press the OK/menu button. [The...
...[Multiple images will be shot in rapid succession for as long as your best shot, you to restore the default SingleFrame Shooting mode. OFF DIGITAL ZOOM OFF SELECT END OK Shooting mode menu 1/3 screen OK/menu button 1. Close the lens barrier and open . When you have found your ...pad key. 3. You can also erase the rest of the images ( Page 46). OFF L ZOOM OFF Sequential Shooting mode 5. Press the OK/menu button. [The monitor shows the Shooting mode menu 1/3. 1/3 AUTO OFF DIGITAL ZOOM OFF SELECT END OK / 3Shooting mode menu 1/3 screen 2. Press the OK/menu button. [The...
D-150/C-1 Zoom Reference Manual (2.7MB)
Page 65
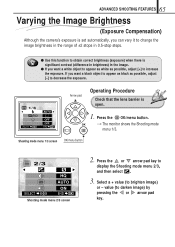
... and then select . 3. If you want a white object to appear as white as possible, adjust [-] to decrease the exposure. 1/3 AUTO OFF DIGITAL ZOOM OFF SELECT END OK Arrow pad Operating Procedure Check that the lens barrier is significant contrast (difference in brightness) in the image. ⅷ If you...to darken image) by pressing the or arrow pad key. 65 ADVANCED SHOOTING FEATURES Varying the Image Brightness (Exposure Compensation) Although the camera's exposure is set automatically, you want a black object to appear as black as possible, adjust [+] to increase the exposure.
... and then select . 3. If you want a white object to appear as white as possible, adjust [-] to decrease the exposure. 1/3 AUTO OFF DIGITAL ZOOM OFF SELECT END OK Arrow pad Operating Procedure Check that the lens barrier is significant contrast (difference in brightness) in the image. ⅷ If you...to darken image) by pressing the or arrow pad key. 65 ADVANCED SHOOTING FEATURES Varying the Image Brightness (Exposure Compensation) Although the camera's exposure is set automatically, you want a black object to appear as black as possible, adjust [+] to increase the exposure.
D-150/C-1 Zoom Reference Manual (2.7MB)
Page 67
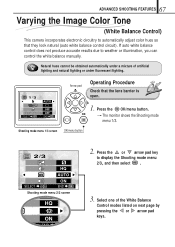
...that the lens barrier is open. 1. Select one of artificial lighting and natural lighting or under fluorescent lighting. 1/3 AUTO OFF DIGITAL ZOOM OFF SELECT END OK Arrow pad Operating Procedure Check that they look natural (auto white balance control circuit). 67 ADVANCED SHOOTING ...FEATURES Varying the Image Color Tone (White Balance Control) This camera incorporates electronic circuitry to display the Shooting mode menu 2/3, and then select . 3. Shooting mode menu 1/3 screen OK/menu button 2/3...
...that the lens barrier is open. 1. Select one of artificial lighting and natural lighting or under fluorescent lighting. 1/3 AUTO OFF DIGITAL ZOOM OFF SELECT END OK Arrow pad Operating Procedure Check that they look natural (auto white balance control circuit). 67 ADVANCED SHOOTING ...FEATURES Varying the Image Color Tone (White Balance Control) This camera incorporates electronic circuitry to display the Shooting mode menu 2/3, and then select . 3. Shooting mode menu 1/3 screen OK/menu button 2/3...
D-150/C-1 Zoom Reference Manual (2.7MB)
Page 69
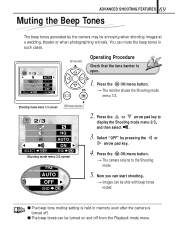
... off . ⅷ The beep tones can mute the beep tones in memory even after the camera is open. 1. Press the or arrow pad key to the Shooting mode. 5. Press the OK/menu button. [The camera returns to display the Shooting mode menu 2/3, and then select . 3. 69 ADVANCED SHOOTING FEATURES...tones generated by pressing the or arrow pad key. 4. Select "OFF" by the camera may be shot with beep tones muted. ⅷ The beep tone muting setting is held in such cases. 1/3 AUTO OFF DIGITAL ZOOM OFF SELECT END OK Arrow pad Operating Procedure Check that the lens barrier is turned...
... off . ⅷ The beep tones can mute the beep tones in memory even after the camera is open. 1. Press the or arrow pad key to the Shooting mode. 5. Press the OK/menu button. [The camera returns to display the Shooting mode menu 2/3, and then select . 3. 69 ADVANCED SHOOTING FEATURES...tones generated by pressing the or arrow pad key. 4. Select "OFF" by the camera may be shot with beep tones muted. ⅷ The beep tone muting setting is held in such cases. 1/3 AUTO OFF DIGITAL ZOOM OFF SELECT END OK Arrow pad Operating Procedure Check that the lens barrier is turned...
D-150/C-1 Zoom Reference Manual (2.7MB)
Page 92
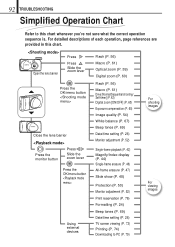
... you're not sure what the correct operation sequence is. Open the lens barrier Press Press Slide the zoom lever Flash (P. 56) Macro (P. 61) Optical zoom (P. 59) Digital zoom (P. 60) Press the OK/menu button Close the lens barrier Press the monitor button Press Slide the... zoom lever Press the OK/menu button Flash (P. 56) Macro (P. 61) Drive [Normal/Sequential shooting/ Self-timer] (P. 62) Digital zoom [ON/OFF] (P. 60) Exposure compensation (P. 65) Image quality (P. 54) White balance (P. ...
... you're not sure what the correct operation sequence is. Open the lens barrier Press Press Slide the zoom lever Flash (P. 56) Macro (P. 61) Optical zoom (P. 59) Digital zoom (P. 60) Press the OK/menu button Close the lens barrier Press the monitor button Press Slide the... zoom lever Press the OK/menu button Flash (P. 56) Macro (P. 61) Drive [Normal/Sequential shooting/ Self-timer] (P. 62) Digital zoom [ON/OFF] (P. 60) Exposure compensation (P. 65) Image quality (P. 54) White balance (P. ...


