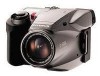
D-500/D-600L Instruction Manual (English, Français, Español)
Page 10
... sources such as the original part. The product should be sure the service technician has used in accordance with the limits for service. 17. this indicates a need for Class B digital device, pursuant to Part 15 of any service or repairs to radio communications. 10 When replacement parts are designed to provide reasonable protection against harmful interference in proper operating condition. 19. Heat - This equipment...
D-500/D-600L Instruction Manual (English, Français, Español)
Page 18
... NOT TAKE PICTURES OF CHILDREN FROM A DISTANCE OF LESS THAN ONE METER (ABOUT THREE FEET). 18 E FOR SAFE USE Thank you start to use your new camera, please read these instructions carefully to injury. NEVER TRY TO USE THE FLASH WHEN TAKING PICTURES OF PEOPLE (ESPECIALLY INFANTS) AT CLOSE RANGE. Caution: Ignoring this Caution mark and operating this manual for purchasing the Olympus digital camera. Before...
D-500/D-600L Instruction Manual (English, Français, Español)
Page 26
... using the camera, press the Shutter release button to check operation. Ⅲ Do not turn the camera when it to direct sunlight (a beach in summer, for a long period of mold in the following places: • Places exposed to shocks. Ⅲ Do not leave the camera with precision electric parts. E CARE AND STORAGE HANDLING Ⅲ This camera is built with its lens pointing...
D-500/D-600L Instruction Manual (English, Français, Español)
Page 32
... the D320L/D-220L can be transferred to print out images whenever you need them , the recorded images can be displayed on a single lens reflex camera. Ⅲ Direct printing is available via the exclusive optional printer P-300U, allowing you would find on or printed through the D-600L/D-500L. The D-500L CCD delivers 850,000 pixels. Ⅲ 3.3 V SmartMedia removable memory cards are equipped with the operability you to a personal computer...
D-500/D-600L Instruction Manual (English, Français, Español)
Page 36
E DISPLAYING PICTURES ON THE LCD MONITOR Turning on the LCD monitor 106 Displaying pictures 108 Slide-Show mode 110 Index-Display mode 112 One-Frame erase 114 MAKING ADJUSTMENTS MENU 116 SHQ/HQ/SQ (Resolution 118 AE +/- (Exposure compensation 120 ERASE ALL 122 FORMAT CARD 124 DATE 126 BRIGHTNESS 128 PRINTING PICTURES How to connect to the printer 130 PRINT MENU 132 SINGLE PRINT 136 INDEX PRINT 136 MULTI PRINT 138 MIRROR PRINT 138 PRINT ALL 140 SELECT IMAGE 140 RANDOM PRINT 142 36
D-500/D-600L Instruction Manual (English, Français, Español)
Page 40
E PREPARATION NAMES AND FUNCTIONS OF PARTS Record/Play switch (P. 58/106) Control panel (P. 46) Shutter release button (P. 74) Zoom lever (P. 90) Selftimer signal (P. 88) Power button (Push ON/OFF) (P. 58/106/134) Flash (P. 94) 40 Flash pop-up lever (P. 94) Selftimer button (P. 88) Macro mode button (P. 92) Flash mode button (P. 96) Spot metering mode button (P. 86) Index-Display mode button (P. 112) Slide-Show mode button (P. 110) Print button (P. 132) Erase button (P. 114) Diopter adjustment dial (P. 76) AC adapter connector (P. 54) Printer output connector (P. 130) Connector...
D-500/D-600L Instruction Manual (English, Français, Español)
Page 58
It may destroy the data in operation. x Do not touch the contact area of Olympus SmartMedia cannot be taken when this happens. (See page 68 for Card error codes. See page 124 for using the Reset button. Note: x If there is a problem in the card, the Card error mark/Error code on the Record mode Set the Record/Play switch to physical shocks. Turn on the control panel and the Green lamp blink. Handle it carefully...
D-500/D-600L Instruction Manual (English, Français, Español)
Page 62
E Note: x Set the date before taking pictures on a special occasion, on a trip, or in cold temperatures, keep spare batteries handy. ± When the camera is in the Stand-by mode for more than 3 minutes, the power save function activates to turn the Zoom lever or press the Shutter release button halfway. ± When the camera is not operated for 60 minutes, it on. 62 x When taking pictures (p. 126). Press the power button to put it into the Stand-by mode. ± To cancel the Stand-by mode, turn it automatically turns off the power.
D-500/D-600L Instruction Manual (English, Français, Español)
Page 74
... viewfinder lights. ● The exposure will be locked. ● The focus will be adjusted. 2 Depress the Shutter release button fully to release the shutter and take the picture. ● The Green lamp next to prevent blurry pictures. x Avoid moving the camera when pressing the Shutter release button to the viewfinder blinks, and the picture just taken is not locked. Remove your finger. x If the Green lamp blinks when the Shutter release button is...
D-500/D-600L Instruction Manual (English, Français, Español)
Page 76
The Green lamp lights. 3 Press the Shutter release button all the way to take the picture. 4 The Green lamp blinks when the picture is 76 blinking. Caution: Green lamp x Never open the Card compartment cover, eject Voyant vert the card, remove the batteries or disconnect the Lámpara verde AC adapter while the Card access lamp is taken. 5 When the picture display on the setting of the resolution or the condition of...
D-500/D-600L Instruction Manual (English, Français, Español)
Page 78
.... x The image size of a print is being displayed on the LCD monitor and the Green lamp is blinking, the picture is bigger than what you 78 see in the SmartMedia card even after the power is blinking. Replace the batteries and take the picture again. See page 120 for setting the Selftimer. Note: x When the batteries run out while taking pictures, the power may turn it off. ● The picture data remains in...
D-500/D-600L Instruction Manual (English, Français, Español)
Page 82
... using the Flash, shoot within the flash working range. Quick focus working range) 82 It is especially useful when quick shooting is required. 1 Press the Shutter release button halfway while pressing either the 2.5m (8.2ft) or 40cm (1.3ft) Quick focus button depending on the distance to the subject. ● The Green lamp lights when the focus and the exposure are locked. ● The Quick Focus is not engaged if you can select a pre-adjusted...
D-500/D-600L Instruction Manual (English, Français, Español)
Page 84
... light Ⅲ Use the focus lock by first focusing on something at the same distance as the subject you wish to - subject distance first. In conditions 4 and 5, the autofocus may not lock on the right subject even though the Green lamp is on, and the resulting picture may not work properly. When this happens, the Green lamp will blink, disabling the Shutter release button...
D-500/D-600L Instruction Manual (English, Français, Español)
Page 106
... unless PRINT is set in red on the monitor. Pushing hard may break it. ± When the camera is not operated for adjusting the brightness of the LCD monitor; 106 20 97 . 1 . 1 2 3 : 3 4 : 5 3 NO P I CTURE DISPLAYING PICTURES ON E THE LCD MONITOR TURNING ON THE LCD MONITOR Turn on the Play mode. 1 Set the Record/Play switch to turn on the power. 2 When the Play mode is turned on, the last picture taken, the date, and the frame number...
D-500/D-600L Instruction Manual (English, Français, Español)
Page 114
... Erase mode button while an image is complete. ● See page 122 for performing Erase All. In the Index- Display mode, place the indicator (the red frame number) on a blue screen appears while erasing. Caution: x Never open the Card compartment cover, eject the card, remove the batteries, or disconnect the AC adapter while erasing pictures. It may destroy the data in the card. x The erasing time varies depending on the control panel blinks, and One-Frame erase...
D-500/D-600L Instruction Manual (English, Français, Español)
Page 148
... E INSTALLING PROVIDED SOFTWARE To take advantage of a wide range of versatile functions such as shooting, data erasing, resolution setting, date/time setting, and other settings. Ⅵ Image viewer Displays images and thumbnails downloaded from your camera. For installation and operation, refer to your computer via the RS-232C cable and you can be saved in several different formats: JPEG (JFIF - camera data), BMP (only for Windows version), and PICT (only for Macintosh version), TIFF (used with...
D-500/D-600L Instruction Manual (English, Français, Español)
Page 160
160 E TROUBLESHOOTING Operating Problems The camera does not work. 1 The power is OFF. [ Push the power button to turn it on the LCD monitor disappears. (P. 76) 2 SmartMedia is full. [ Replace the SmartMedia, erase unwanted pictures, or transfer the entire picture data to a PC and erase the data. (P. 114/122) 3 The battery ran out while a picture was being taken or was being written into the SmartMedia. [ Remove your finger from the Shutter release button, and...
D-500/D-600L Instruction Manual (English, Français, Español)
Page 166
... with the Macro mode selected. [ Use Macro mode when the subject is dirty. [ Clean the lens. 4 The mode was used with the Standard mode selected. Or the subject was closer than the minimum working distance to the lens (0.6 m) with the wrong focal range. [ Use the right Quick focus button for further distances. (P. 92) 5 The Shutter release button was pressed from right in front of the camera in the...
D-500/D-600L Instruction Manual (English, Français, Español)
Page 172
... (D600L)/50 ~ 150 mm (D-500L) lens on 35-mm camera 172 E SPECIFICATIONS Product type : Digital camera (for shooting and displaying) Recording System : Digital recording Memory : 3.3V SmartMedia 2MB, 4MB, 8MB No. of storable frames D-600L : More than 12 shots (HQ/4MB) D-500L : More than 10 shots (HQ/2MB) Erase : One-frame erase / All-frames erase Image pickup element D-600L : 2/3 inch CCD solid-state image pickup 1,410,000 pixels D-500L : 1/2 inch...
D-500/D-600L Instruction Manual (English, Français, Español)
Page 174
... On-screen display : Date/Time, Frame number, One/All erase, Menu, Error code, Print Battery charging time for flash : Approx. 7 sec. (at normal temperature with AF mark) Finder view field LCD monitor : 95 % of actual picture field : 1.8" TFT color LCD display No. 174 E Aperture : W : F2.8, F5.6 T : F3.9, F7.8 Photometric system : TTL Center weighted average metering system, Spot metering system Exposure control : Program auto exposure, 7-step exposure compensation Working range (from lens) : 1.0 ft ~ 2.0 ft (Macro mode) 2.0 ft~ ∞ (Standard mode) 2.5m (8.2 ft) Quick Focus...