

Reference Manual
Page 5
... 3 Names of parts 10 Camera 10 Viewfinder and monitor indications 12 Memory gauge 15 Battery check 15 How to use this manual 16 1 Getting started 17 Attaching the strap 17 Battery/card basics 18 Charging the battery 18 Card basics 19 Inserting and removing the battery and card 20 Using an... AC adapter (optional 23 Power on/off 24 Startup/Shutdown screen 25 If the card is not recognized (card check 25 Selecting a language 26 Setting the date and time 28 Adjusting the viewfinder 30 Holding the camera 31 2 Using...
... 3 Names of parts 10 Camera 10 Viewfinder and monitor indications 12 Memory gauge 15 Battery check 15 How to use this manual 16 1 Getting started 17 Attaching the strap 17 Battery/card basics 18 Charging the battery 18 Card basics 19 Inserting and removing the battery and card 20 Using an... AC adapter (optional 23 Power on/off 24 Startup/Shutdown screen 25 If the card is not recognized (card check 25 Selecting a language 26 Setting the date and time 28 Adjusting the viewfinder 30 Holding the camera 31 2 Using...

Reference Manual
Page 12
Names of parts Viewfinder gP.12, 30, 47, 149 Diopter adjustment dial gP.30 AE Lock/Custom button (x) gP.73, 78, 80, 137 Rotation button (y) gP.126 Self-timer button (Y) gP.84 Erase button (S) gP.133 Flash mode button (#) gP.57 Protect button (0) gP.131 Flash button gP.57 Card access lamp gP.47 QUICK VIEW button gP.114 Arrow pad (acbd) gP.32, 113 OK/Menu button (e) gP.32 Monitor button (f) gP.47 Power switch gP.24 Monitor gP.12, 47 Battery compartment/card cover gP.20 Tripod socket 11
Names of parts Viewfinder gP.12, 30, 47, 149 Diopter adjustment dial gP.30 AE Lock/Custom button (x) gP.73, 78, 80, 137 Rotation button (y) gP.126 Self-timer button (Y) gP.84 Erase button (S) gP.133 Flash mode button (#) gP.57 Protect button (0) gP.131 Flash button gP.57 Card access lamp gP.47 QUICK VIEW button gP.114 Arrow pad (acbd) gP.32, 113 OK/Menu button (e) gP.32 Monitor button (f) gP.47 Power switch gP.24 Monitor gP.12, 47 Battery compartment/card cover gP.20 Tripod socket 11

Reference Manual
Page 13
... shown below. Page P.43 P.67 P.66 P.102 P.68 P.15 P.48 P.59 P.82 P.83 P.75 P.110 12 F8.0 4 Exposure compensation -2.0 - +2.0 Exposure differential -3.0 - +3.0 5 Battery check e, f 6 Green lamp 7 Flash stand-by # (Lights) Camera movement # (Blinks) warning/Flash charge 8 Macro mode & Super macro mode % Manual focus MF 9 Noise reduction O Ref. Screens with the Information display set...
... shown below. Page P.43 P.67 P.66 P.102 P.68 P.15 P.48 P.59 P.82 P.83 P.75 P.110 12 F8.0 4 Exposure compensation -2.0 - +2.0 Exposure differential -3.0 - +3.0 5 Battery check e, f 6 Green lamp 7 Flash stand-by # (Lights) Camera movement # (Blinks) warning/Flash charge 8 Macro mode & Super macro mode % Manual focus MF 9 Noise reduction O Ref. Screens with the Information display set...

Reference Manual
Page 15
... HQ 2288*1712 0.0 '04.06.17 15:30 Still picture 6 7 11 '04.06.17 15:30 13 00:00/00:20 14 Movie Item Indications 1 Battery check e, f 2 Switch frame J 3 Print reservation, < × 10 Number of prints Movie 4 Sound record 5 Protect n H 9 6 Record mode TIFF, SHQ, HQ, SQ1, SQ2 7 Resolution 2288 × 1712...
... HQ 2288*1712 0.0 '04.06.17 15:30 Still picture 6 7 11 '04.06.17 15:30 13 00:00/00:20 14 Movie Item Indications 1 Battery check e, f 2 Switch frame J 3 Print reservation, < × 10 Number of prints Movie 4 Sound record 5 Protect n H 9 6 Record mode TIFF, SHQ, HQ, SQ1, SQ2 7 Resolution 2288 × 1712...

Reference Manual
Page 16
...) Remaining power level: high f Blinks (red) Remaining power level: low Charge the battery. Remaining power level: exhausted Charge the battery. 15 While the gauge is lit, the camera is low, the battery check indication changes as shown below depending on the card. Battery check HQ 2288 1712 Memory gauge a Shoot Before shooting (Gauge is in...
...) Remaining power level: high f Blinks (red) Remaining power level: low Charge the battery. Remaining power level: exhausted Charge the battery. 15 While the gauge is lit, the camera is low, the battery check indication changes as shown below depending on the card. Battery check HQ 2288 1712 Memory gauge a Shoot Before shooting (Gauge is in...

Reference Manual
Page 19
... with the battery charger. 1 1 Connect the power cord to charge the battery before use the specified battery charger (LI-10C) to the power connector on both the battery and battery charger. •...Battery polarity terminals Charging indicator 18 The battery is complete, the indicator lights green. Getting started 3 Insert the battery into an AC wall outlet. marks on the battery charger. 2 Plug the power cord into the battery charger while aligning the + - Other types of purchase. Battery/card basics Charging the battery This camera uses an Olympus lithium-ion battery...
... with the battery charger. 1 1 Connect the power cord to charge the battery before use the specified battery charger (LI-10C) to the power connector on both the battery and battery charger. •...Battery polarity terminals Charging indicator 18 The battery is complete, the indicator lights green. Getting started 3 Insert the battery into an AC wall outlet. marks on the battery charger. 2 Plug the power cord into the battery charger while aligning the + - Other types of purchase. Battery/card basics Charging the battery This camera uses an Olympus lithium-ion battery...

Reference Manual
Page 20
... 10°C and 30°C. • When using the battery charger in a foreign country, be sure to operate within an ambient temperature range of the battery may not recognize a non-Olympus card or a card that the battery is being used. Pictures recorded and stored on the card can... write down the card's contents. If this camera. however, this is guaranteed to use , Note be ...
... 10°C and 30°C. • When using the battery charger in a foreign country, be sure to operate within an ambient temperature range of the battery may not recognize a non-Olympus card or a card that the battery is being used. Pictures recorded and stored on the card can... write down the card's contents. If this camera. however, this is guaranteed to use , Note be ...

Reference Manual
Page 21
... finger to slide the cover. B A Getting started 3 Loading the battery Align the battery as shown and insert it out of your fingernail as this could result in position with the battery lock knob. Removing the battery Slide the knob in the direction of power consumed varies considerably depending on the operations performed on the digital camera.
... finger to slide the cover. B A Getting started 3 Loading the battery Align the battery as shown and insert it out of your fingernail as this could result in position with the battery lock knob. Removing the battery Slide the knob in the direction of power consumed varies considerably depending on the operations performed on the digital camera.

Reference Manual
Page 22
...power to last longer. • When the monitor is turned on . • When connected to a computer or printer. • If the camera is in the appropriate direction. • Insert the card while keeping it straight. • Inserting the card the wrong way or at an ... the internal settings may revert to the shooting conditions, etc. Battery/card basics • The life of the battery may not be written to the card. Getting started • Repeated zoom adjustments. • Repeated auto-focus by the camera varies considerably depending on shooting conditions, etc. • Power is...
...power to last longer. • When the monitor is turned on . • When connected to a computer or printer. • If the camera is in the appropriate direction. • Insert the card while keeping it straight. • Inserting the card the wrong way or at an ... the internal settings may revert to the shooting conditions, etc. Battery/card basics • The life of the battery may not be written to the card. Getting started • Repeated zoom adjustments. • Repeated auto-focus by the camera varies considerably depending on shooting conditions, etc. • Power is...

Reference Manual
Page 23
...not press on the card. Hold the card straight and pull it out. 1 Getting started 4 Close the battery compartment/card cover in direction C and then slide it in the direction shown D. Battery/card basics Removing the card Push the card all the way in may cause it to unlock it, then...items such as ballpoint pens. Doing so could prevent the card from being ejected. 22 Note • Never open the battery compartment/card cover, or remove the card or the battery while the camera is ejected a short way and then stops. Once destroyed, data cannot be restored. • Do not place a ...
...not press on the card. Hold the card straight and pull it out. 1 Getting started 4 Close the battery compartment/card cover in direction C and then slide it in the direction shown D. Battery/card basics Removing the card Push the card all the way in may cause it to unlock it, then...items such as ballpoint pens. Doing so could prevent the card from being ejected. 22 Note • Never open the battery compartment/card cover, or remove the card or the battery while the camera is ejected a short way and then stops. Once destroyed, data cannot be restored. • Do not place a ...

Reference Manual
Page 24
...Olympus dealer or Service center for time-consuming tasks such as image downloads to the camera by the AC adapter even if the battery is loaded in the camera. Doing so could affect the camera's internal settings or functions. • When using an AC adapter, power is supplied to a computer. Consult your digital camera... from a common AC wall outlet. Be sure to use the AC adapter when connected to a computer or printer. It is connected to operate on . An optional Olympus CAMEDIA-brand AC adapter allows you use the ...
...Olympus dealer or Service center for time-consuming tasks such as image downloads to the camera by the AC adapter even if the battery is loaded in the camera. Doing so could affect the camera's internal settings or functions. • When using an AC adapter, power is supplied to a computer. Consult your digital camera... from a common AC wall outlet. Be sure to use the AC adapter when connected to a computer or printer. It is connected to operate on . An optional Olympus CAMEDIA-brand AC adapter allows you use the ...
Reference Manual
Page 25
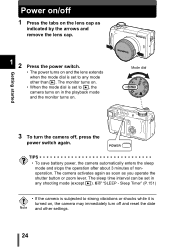
...sleep time interval can be set to any shooting mode (except q). Mode dial Getting started 3 To turn off , press the power switch again. The camera activates again as soon as indicated by the arrows and remove the lens cap. 1 2 Press the power switch. • The power turns on and... the lens extends when the mode dial is turned on . g"SLEEP - TIPS • To save battery power, the camera automatically enters the sleep mode and stops the operation after about 3 minutes of nonoperation. The monitor turns on. • When the mode dial is...
...sleep time interval can be set to any shooting mode (except q). Mode dial Getting started 3 To turn off , press the power switch again. The camera activates again as soon as indicated by the arrows and remove the lens cap. 1 2 Press the power switch. • The power turns on and... the lens extends when the mode dial is turned on . g"SLEEP - TIPS • To save battery power, the camera automatically enters the sleep mode and stops the operation after about 3 minutes of nonoperation. The monitor turns on. • When the mode dial is...

Reference Manual
Page 30
... set the year, then press d to move to the month setting. • To move back to the previous setting, press b. • The first two digits of the following steps show the procedure used when the date and time settings are 1 set . • The time is left without the... battery for a short time before being removed. e button • The date and time settings will be returned to the factory default settings if the camera is displayed in the camera for approximately Note one of the year are fixed. 2004 SELECt SEt...
... set the year, then press d to move to the month setting. • To move back to the previous setting, press b. • The first two digits of the following steps show the procedure used when the date and time settings are 1 set . • The time is left without the... battery for a short time before being removed. e button • The date and time settings will be returned to the factory default settings if the camera is displayed in the camera for approximately Note one of the year are fixed. 2004 SELECt SEt...

Reference Manual
Page 50
...storage of pictures you are replaced or removed. • Never open the battery compartment/card cover, remove the battery or disconnect the AC adapter while the card access lamp is pressed hard, the camera may move and pictures may cause vertical lines (smears) to turn off ... 3 minutes, the monitor and viewfinder turn the viewfinder or monitor on the card regardless of whether the camera is turned off automatically → If the camera is not available in the digital zoom range. g"Monitor/viewfinder brightness adjustment" (P.149) 3 The monitor or viewfinder is hard to see ...
...storage of pictures you are replaced or removed. • Never open the battery compartment/card cover, remove the battery or disconnect the AC adapter while the card access lamp is pressed hard, the camera may move and pictures may cause vertical lines (smears) to turn off ... 3 minutes, the monitor and viewfinder turn the viewfinder or monitor on the card regardless of whether the camera is turned off automatically → If the camera is not available in the digital zoom range. g"Monitor/viewfinder brightness adjustment" (P.149) 3 The monitor or viewfinder is hard to see ...

Reference Manual
Page 72
... ON is selected, the focusing time is used. Focusing applications FULLTIME AF - Arrow pad OK button 5 SEt CARD PIC CAMERA Advanced shooting SLO W NOISE REDUCtION DIGItAL ZOOM FULLtIME AF OFF ON • Battery consumption increases when FULLTIME AF is reduced, letting you take successive snapshots. A reliable time-saving way to focus FULLTIME AF...
... ON is selected, the focusing time is used. Focusing applications FULLTIME AF - Arrow pad OK button 5 SEt CARD PIC CAMERA Advanced shooting SLO W NOISE REDUCtION DIGItAL ZOOM FULLtIME AF OFF ON • Battery consumption increases when FULLTIME AF is reduced, letting you take successive snapshots. A reliable time-saving way to focus FULLTIME AF...

Reference Manual
Page 88
... releasing the shutter button. 5 • Sequential shooting (j, i, k, 7) is not possible in 7 mode. • If the battery power is set during sequential shooting, shooting stops and the camera starts saving the pictures you have set to select ±0.3, ±0.7 or ±1.0, then press d. When NOISE REDUCTION is set... When the TIFF or SHQ record mode is set to max. 1/30 sec., exposure is not enough space available on how much battery power remains. • If there is decreased when shooting a dark subject. • In 7 mode other than 1/30 sec. 2 Select the...
... releasing the shutter button. 5 • Sequential shooting (j, i, k, 7) is not possible in 7 mode. • If the battery power is set during sequential shooting, shooting stops and the camera starts saving the pictures you have set to select ±0.3, ±0.7 or ±1.0, then press d. When NOISE REDUCTION is set... When the TIFF or SHQ record mode is set to max. 1/30 sec., exposure is not enough space available on how much battery power remains. • If there is decreased when shooting a dark subject. • In 7 mode other than 1/30 sec. 2 Select the...

Reference Manual
Page 119
....17 15:30 • You are used, the Note camera will not stop until you cancel it by pressing e. g"Viewing still pictures" (P.113) 2 Press a to use the optional AC adapter when running a slideshow for a long period of movies is played back. If batteries are recommended to start the slideshow. Only the first...
....17 15:30 • You are used, the Note camera will not stop until you cancel it by pressing e. g"Viewing still pictures" (P.113) 2 Press a to use the optional AC adapter when running a slideshow for a long period of movies is played back. If batteries are recommended to start the slideshow. Only the first...

Reference Manual
Page 121
EXIT Leaves the movie playback mode. e : Displays the MOVIE PLAYBACK menu. Do not open the battery compartment/card cover while the card access lamp is blinking, as this may cause not only the data on the card to select PLAYBACK, FRAME ... reverse by holding the button down . c : Displays the last frame of the movie. g"QUICK VIEW" (P.114) Playback • This camera cannot play back sound. • The card access lamp blinks while the camera is selected a : Displays the first frame of the movie. MOVIE%PLAYBACK PLAYBACK Plays back the entire PLAYBACK movie again...
EXIT Leaves the movie playback mode. e : Displays the MOVIE PLAYBACK menu. Do not open the battery compartment/card cover while the card access lamp is blinking, as this may cause not only the data on the card to select PLAYBACK, FRAME ... reverse by holding the button down . c : Displays the last frame of the movie. g"QUICK VIEW" (P.114) Playback • This camera cannot play back sound. • The card access lamp blinks while the camera is selected a : Displays the first frame of the movie. MOVIE%PLAYBACK PLAYBACK Plays back the entire PLAYBACK movie again...

Reference Manual
Page 148
Note Open the battery compartment/card cover. FORMAt CAUtION ERASING%ALL YES NO SELECt GO BUSY • Never do the following during formatting, as they may cause the card to select YES, then press e. • The BUSY bar is displayed and the card is formatted. Connect or disconnect the AC adapter. 8 Useful functions 147 Remove the battery. CARD SETUP - Formatting cards 2 Press a to malfunction.
Note Open the battery compartment/card cover. FORMAt CAUtION ERASING%ALL YES NO SELECt GO BUSY • Never do the following during formatting, as they may cause the card to select YES, then press e. • The BUSY bar is displayed and the card is formatted. Connect or disconnect the AC adapter. 8 Useful functions 147 Remove the battery. CARD SETUP - Formatting cards 2 Press a to malfunction.

Reference Manual
Page 170
... to the USB cable . 10 169 Selecting < STANDARD on the camera's monitor. g"Print setting (DPOF)" (P.158) To find out if your printer for connecting digital cameras and printers of prints on the settings screens (g P.174 to 180), images are recommended to use the battery, make sure that support PictBridge have standard print settings. What...
... to the USB cable . 10 169 Selecting < STANDARD on the camera's monitor. g"Print setting (DPOF)" (P.158) To find out if your printer for connecting digital cameras and printers of prints on the settings screens (g P.174 to 180), images are recommended to use the battery, make sure that support PictBridge have standard print settings. What...


