Reference Manual
Page 2
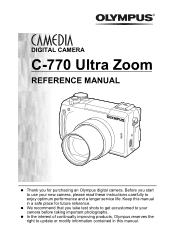
We recommend that you for future reference. In the interest of continually improving products, Olympus reserves the right to update or modify information contained in a safe place for purchasing an Olympus digital camera. Keep this manual in this manual. DIGITAL CAMERA C-770 Ultra Zoom REFERENCE MANUAL Thank you take test shots to get accustomed to your new camera, please read these instructions carefully to enjoy optimum performance and a longer service life. Before you start to use your camera before taking important photographs.
We recommend that you for future reference. In the interest of continually improving products, Olympus reserves the right to update or modify information contained in a safe place for purchasing an Olympus digital camera. Keep this manual in this manual. DIGITAL CAMERA C-770 Ultra Zoom REFERENCE MANUAL Thank you take test shots to get accustomed to your new camera, please read these instructions carefully to enjoy optimum performance and a longer service life. Before you start to use your camera before taking important photographs.

Reference Manual
Page 3
... camera file systems referred to the following two conditions: (1) This device may not cause harmful interference. (2) This device must accept any interference received, including interference that this manual are the "Design Rule for safety, health, environment and customer protection. For customers in Canada This Class B digital apparatus meets all requirements of Conformity Model Number : C-770 Ultra Zoom RM-2 (Remote control) Trade Name : OLYMPUS...
... camera file systems referred to the following two conditions: (1) This device may not cause harmful interference. (2) This device must accept any interference received, including interference that this manual are the "Design Rule for safety, health, environment and customer protection. For customers in Canada This Class B digital apparatus meets all requirements of Conformity Model Number : C-770 Ultra Zoom RM-2 (Remote control) Trade Name : OLYMPUS...

Reference Manual
Page 9
...88 Macro mode shooting 90 Super macro mode shooting 91 Self-timer shooting 92 Remote control shooting 93 Sequential shooting 95 Sequential shooting, high speed sequential shooting and AF sequential shooting . . . . . 95 Auto bracketing 96 PANORAMA - Adding special effects to pictures 102 Recording sound with still pictures 103 Recording sound with movies 104 Using commercially available external microphones 105 6 Adjusting the image quality and exposure 106 Record mode 106 Still Picture Record Modes 106 Movie Record Modes 107 Selecting a record mode 109 ISO...
...88 Macro mode shooting 90 Super macro mode shooting 91 Self-timer shooting 92 Remote control shooting 93 Sequential shooting 95 Sequential shooting, high speed sequential shooting and AF sequential shooting . . . . . 95 Auto bracketing 96 PANORAMA - Adding special effects to pictures 102 Recording sound with still pictures 103 Recording sound with movies 104 Using commercially available external microphones 105 6 Adjusting the image quality and exposure 106 Record mode 106 Still Picture Record Modes 106 Movie Record Modes 107 Selecting a record mode 109 ISO...

Reference Manual
Page 27
... can also adjust the volume of the sound. (P.166) Startup/Shutdown screen (Factory default setting) 26 operation. g"SLEEP - Please wait before using again. (Ex: When shooting MPEG4) • If the camera is subjected to set in any shooting mode. The sleep time interval can register a picture that will record movies or play back pictures regardless of the position of the mode dial. • To save battery power, the camera automatically enters the sleep mode and stops...
... can also adjust the volume of the sound. (P.166) Startup/Shutdown screen (Factory default setting) 26 operation. g"SLEEP - Please wait before using again. (Ex: When shooting MPEG4) • If the camera is subjected to set in any shooting mode. The sleep time interval can register a picture that will record movies or play back pictures regardless of the position of the mode dial. • To save battery power, the camera automatically enters the sleep mode and stops...

Reference Manual
Page 32
... SEt GO • The following date formats: Y-M-D (Year/Month/Day), M-D-Y (Month/ Day/Year), D-M-Y (Day/Month/Year). Power switch 10 To turn the camera off, slide the power switch to select one day. Setting the date and time 6 Press ac to OFF. Then press d. 2004 Y MD • Move to the factory default settings if the camera is left without the battery for a short time before being removed. e button • The date and time settings...
... SEt GO • The following date formats: Y-M-D (Year/Month/Day), M-D-Y (Month/ Day/Year), D-M-Y (Day/Month/Year). Power switch 10 To turn the camera off, slide the power switch to select one day. Setting the date and time 6 Press ac to OFF. Then press d. 2004 Y MD • Move to the factory default settings if the camera is left without the battery for a short time before being removed. e button • The date and time settings...

Reference Manual
Page 43
... power is pressed and adjusts the volume. TV video signal types differ depending on the monitor while saving them to a card. P.147 W Selects a language for errors. P.170 s Adjusts the brightness of the viewfinder or monitor. SHUTTER SOUND Sets the sound made when the shutter button is turned on -screen display. P.149 Sets the beep sound used function to your TV's video signal type. P.152 CUSTOM BUTTON Assigns a frequently used for button 8 operations and warnings, and adjusts P.164 the volume...
... power is pressed and adjusts the volume. TV video signal types differ depending on the monitor while saving them to a card. P.147 W Selects a language for errors. P.170 s Adjusts the brightness of the viewfinder or monitor. SHUTTER SOUND Sets the sound made when the shutter button is turned on -screen display. P.149 Sets the beep sound used function to your TV's video signal type. P.152 CUSTOM BUTTON Assigns a frequently used for button 8 operations and warnings, and adjusts P.164 the volume...

Reference Manual
Page 44
... of the image. P.90 ISO Selects the ISO sensitivity from AUTO, 64, 100, 200 and 400. P.85 & Used to take pictures of images. This function adjusts the sharpness of color depth without having to the white balance. P.104 REDUCE FLICKER Reduces the flickering that occurs when recording movies under fluorescent light. zn mode Mode Menus SEt CARD PIC CAMERA CAMERA tab PICTURE tab CARD tab SETUP tab ESP ISO FULLtIME AF FUNCtION ESP OFF AUtO ON OFF CAMERA tab 2 Using the...
... of the image. P.90 ISO Selects the ISO sensitivity from AUTO, 64, 100, 200 and 400. P.85 & Used to take pictures of images. This function adjusts the sharpness of color depth without having to the white balance. P.104 REDUCE FLICKER Reduces the flickering that occurs when recording movies under fluorescent light. zn mode Mode Menus SEt CARD PIC CAMERA CAMERA tab PICTURE tab CARD tab SETUP tab ESP ISO FULLtIME AF FUNCtION ESP OFF AUtO ON OFF CAMERA tab 2 Using the...

Reference Manual
Page 61
... white area of the optical zoom, the digital zoom is set to ON, a red area appears on the zoom indicator according to exit the menu. 3 Zoom lever Shooting basics In the top menu, select DIGITAL ZOOM Æ ON, and press e. If the digital zoom is enabled. The cursor turns orange when inside the digital zoom field. • Pictures taken with the digital zoom may appear grainy. Using the digital zoom 1 In the top menu, select MODE MENU Æ CAMERA...
... white area of the optical zoom, the digital zoom is set to ON, a red area appears on the zoom indicator according to exit the menu. 3 Zoom lever Shooting basics In the top menu, select DIGITAL ZOOM Æ ON, and press e. If the digital zoom is enabled. The cursor turns orange when inside the digital zoom field. • Pictures taken with the digital zoom may appear grainy. Using the digital zoom 1 In the top menu, select MODE MENU Æ CAMERA...

Reference Manual
Page 96
... use the menus" (P.35) • Press e again to exit the menu. 95 The sequential shooting speed varies depending on the record mode setting. Sequential shooting There are locked at the first frame. Approx. 5 frames at a time when the shutter button is individually locked for normal sequential shooting. Sequential shooting modes can be performed when the record mode is slower than normal sequential shooting. k Focus is pressed. (Normal shooting mode, single-frame shooting) j Focus, exposure and white balance...
... use the menus" (P.35) • Press e again to exit the menu. 95 The sequential shooting speed varies depending on the record mode setting. Sequential shooting There are locked at the first frame. Approx. 5 frames at a time when the shutter button is individually locked for normal sequential shooting. Sequential shooting modes can be performed when the record mode is slower than normal sequential shooting. k Focus is pressed. (Normal shooting mode, single-frame shooting) j Focus, exposure and white balance...

Reference Manual
Page 104
... be changed. Shutter button Arrow pad 5 OK button Advanced shooting Microphone TIPS • H appears when still pictures and movies that have recorded sound are played back. Recorded sound can be recorded when taking still pictures. g"How to use the menus" (P.35) • Press e again to exit the menu. 2 When recording starts, turn the camera microphone towards the source of the sound you take a picture. 1 In the top menu, select MODE MENU Æ CAMERA Æ R Æ ON, and press e. g"VOLUME - g"Recording sound...
... be changed. Shutter button Arrow pad 5 OK button Advanced shooting Microphone TIPS • H appears when still pictures and movies that have recorded sound are played back. Recorded sound can be recorded when taking still pictures. g"How to use the menus" (P.35) • Press e again to exit the menu. 2 When recording starts, turn the camera microphone towards the source of the sound you take a picture. 1 In the top menu, select MODE MENU Æ CAMERA Æ R Æ ON, and press e. g"VOLUME - g"Recording sound...

Reference Manual
Page 110
g"SHORT CUT" (P.152) Arrow pad OK button 109 In certain instances, the number of remaining pictures does not change according to PAL and the AV cable connected, the movie recording time will differ from the time listed in the Movie Record Modes table. Selecting a record mode 6 Adjusting the image quality and exposure 1 In the top menu, select MODE MENU Æ PICTURE Æ K, and press d. Record mode Movie Record Modes Record mode Resolution File format MPEG4 SHQ HQ SQ 640 × 480 (30...
g"SHORT CUT" (P.152) Arrow pad OK button 109 In certain instances, the number of remaining pictures does not change according to PAL and the AV cable connected, the movie recording time will differ from the time listed in the Movie Record Modes table. Selecting a record mode 6 Adjusting the image quality and exposure 1 In the top menu, select MODE MENU Æ PICTURE Æ K, and press d. Record mode Movie Record Modes Record mode Resolution File format MPEG4 SHQ HQ SQ 640 × 480 (30...

Reference Manual
Page 121
... The purpose of these pictures is approximately twice as long as usual. During this time, the next shot cannot be used when the shutter speed is set to illustrate the effects of a tripod is relatively slow, the use the menus" (P.35) • Press e again to appear on images. Adjusting the image quality and exposure 6 1 In the top menu, select MODE MENU Æ CAMERA Æ NOISE REDUCTION...
... The purpose of these pictures is approximately twice as long as usual. During this time, the next shot cannot be used when the shutter speed is set to illustrate the effects of a tripod is relatively slow, the use the menus" (P.35) • Press e again to appear on images. Adjusting the image quality and exposure 6 1 In the top menu, select MODE MENU Æ CAMERA Æ NOISE REDUCTION...

Reference Manual
Page 186
... "Printing pictures" (P.186). • When the USB mode is displayed and the camera and printer are connected. Remove the USB cable, and repeat the Note procedure from Step 1. 185 Make the print settings on and the position of the USB port, refer to the printer's instruction manual. 2 Plug the USB cable into the printer's USB port. • For details of the USB cable into the camera's USB connector. Connecting the camera to a printer Use the USB cable provided to connect the camera to a PictBridgecompatible printer. 1 Turn...
... "Printing pictures" (P.186). • When the USB mode is displayed and the camera and printer are connected. Remove the USB cable, and repeat the Note procedure from Step 1. 185 Make the print settings on and the position of the USB port, refer to the printer's instruction manual. 2 Plug the USB cable into the printer's USB port. • For details of the USB cable into the camera's USB connector. Connecting the camera to a printer Use the USB cable provided to connect the camera to a PictBridgecompatible printer. 1 Turn...
Reference Manual
Page 209
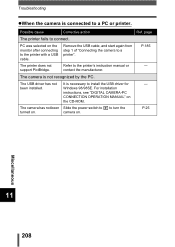
... CONNECTION OPERATION MANUAL" on . page The printer fails to turn the camera on the monitor after connecting to a printer". Troubleshooting zWhen the camera is necessary to install the USB driver for Windows 98/98SE. The USB driver has not been installed. It is connected to the printer's instruction manual or - The camera is not recognized by the PC. The camera has not been turned on the CD-ROM. Slide the power switch to q to connect. Remove the USB cable, and start...
... CONNECTION OPERATION MANUAL" on . page The printer fails to turn the camera on the monitor after connecting to a printer". Troubleshooting zWhen the camera is necessary to install the USB driver for Windows 98/98SE. The USB driver has not been installed. It is connected to the printer's instruction manual or - The camera is not recognized by the PC. The camera has not been turned on the CD-ROM. Slide the power switch to q to connect. Remove the USB cable, and start...

Reference Manual
Page 218
... mm lens on a 35 mm camera) Photometric system : Digital ESP metering, spot metering system 11 Aperture : f2.8 to f8.0 Shutter speed : 15 to 1/1000 sec. 217 Specifications Product type : Digital camera (for Camera File system (DCF)) Applicable standards : Exif 2.2, Digital Print Order Format (DPOF), PRINT Image Matching II, PictBridge Sound with still pictures : Wave format Movie : MPEG-4, QuickTime Motion JPEG support Memory : xD-Picture Card (16 - 512 MB) Resolution : 3200 × 2400 pixels (ENLARGE SIZE...
... mm lens on a 35 mm camera) Photometric system : Digital ESP metering, spot metering system 11 Aperture : f2.8 to f8.0 Shutter speed : 15 to 1/1000 sec. 217 Specifications Product type : Digital camera (for Camera File system (DCF)) Applicable standards : Exif 2.2, Digital Print Order Format (DPOF), PRINT Image Matching II, PictBridge Sound with still pictures : Wave format Movie : MPEG-4, QuickTime Motion JPEG support Memory : xD-Picture Card (16 - 512 MB) Resolution : 3200 × 2400 pixels (ENLARGE SIZE...
Reference Manual
Page 221
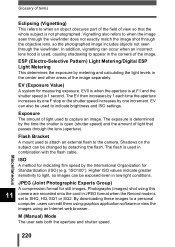
... time the aperture increases by one F stop or the shutter speed increases by metering and calculating the light levels in the corners of the image. Exposure The amount of light used to attach an external flash to the camera. "ISO100"). By downloading these images to a personal computer, users can occur when an incorrect lens hood is set to SHQ, HQ, SQ1 or SQ2. M (Manual) Mode The user sets both the aperture...
... time the aperture increases by one F stop or the shutter speed increases by metering and calculating the light levels in the corners of the image. Exposure The amount of light used to attach an external flash to the camera. "ISO100"). By downloading these images to a personal computer, users can occur when an incorrect lens hood is set to SHQ, HQ, SQ1 or SQ2. M (Manual) Mode The user sets both the aperture...
Reference Manual
Page 223
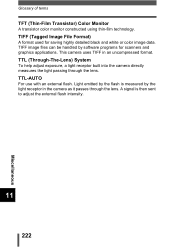
... Image File Format) A format used for scanners and graphics applications. TTL (Through-The-Lens) System To help adjust exposure, a light receptor built into the camera directly measures the light passing through the lens. This camera uses TIFF in the camera as it passes through the lens. A signal is measured by software programs for saving highly detailed black and white or color image data. Glossary of terms TFT (Thin-Film Transistor) Color Monitor A transistor color monitor constructed using thin...
... Image File Format) A format used for scanners and graphics applications. TTL (Through-The-Lens) System To help adjust exposure, a light receptor built into the camera directly measures the light passing through the lens. This camera uses TIFF in the camera as it passes through the lens. A signal is measured by software programs for saving highly detailed black and white or color image data. Glossary of terms TFT (Thin-Film Transistor) Color Monitor A transistor color monitor constructed using thin...
Reference Manual
Page 235
Thank you for purchasing an Olympus digital camera. This manual provides instructions on how to these installation procedures. To ensure correct installation, refer only to install the USB driver. PC CONNECTION OPERATION MANUAL How to use your PC to get the most from images taken with your digital camera. DIGITAL CAMERA PERSONAL COMPUTER DIGITAL CAMERA -
Thank you for purchasing an Olympus digital camera. This manual provides instructions on how to these installation procedures. To ensure correct installation, refer only to install the USB driver. PC CONNECTION OPERATION MANUAL How to use your PC to get the most from images taken with your digital camera. DIGITAL CAMERA PERSONAL COMPUTER DIGITAL CAMERA -
Reference Manual
Page 238
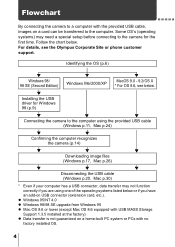
... USB connector (extension card, etc.). Flowchart By connecting the camera to a computer with no factory installed OS. 4 Some OS's (operating systems) may not function correctly if you are using the provided USB cable (Windows p.11, Mac p.24) Confirming the computer recognizes the camera (p.14) Downloading image files (Windows p.17, Mac p.26) Disconnecting the USB cable (Windows p.20, Mac p.30) * Even if your computer has a USB connector, data transfer may need a special setup before connecting to the camera for Windows 98 (p.9) Connecting the camera...
... USB connector (extension card, etc.). Flowchart By connecting the camera to a computer with no factory installed OS. 4 Some OS's (operating systems) may not function correctly if you are using the provided USB cable (Windows p.11, Mac p.24) Confirming the computer recognizes the camera (p.14) Downloading image files (Windows p.17, Mac p.26) Disconnecting the USB cable (Windows p.20, Mac p.30) * Even if your computer has a USB connector, data transfer may need a special setup before connecting to the camera for Windows 98 (p.9) Connecting the camera...

Reference Manual
Page 248
... "Start" menu. 2 Make sure the "Removable Disk" icon appears in the window. In this case, the digital camera is fully installed. 14 Windows Confirming the computer recognizes the camera 1 Double-click the "My Computer" icon on the desktop. There may already be other "Removable Disk" icons for other devices, such as another "Removable Disk". If you cannot find the icon, the camera and computer are not connected properly. For users running Windows XP...
... "Start" menu. 2 Make sure the "Removable Disk" icon appears in the window. In this case, the digital camera is fully installed. 14 Windows Confirming the computer recognizes the camera 1 Double-click the "My Computer" icon on the desktop. There may already be other "Removable Disk" icons for other devices, such as another "Removable Disk". If you cannot find the icon, the camera and computer are not connected properly. For users running Windows XP...


