Users Guide
Page 3
...View 9 Control Panel 10 Individual Switches 10 Combined Switches 12 Control Panel Lights 14 Quick Reference: Control Panel Functions 16 Print Modes 17 Change Print Mode 17 Loading Print Media 18 Individual Sheets/Forms ("MANUAL 18 Continuous Forms ("FRONT 21 Switch between Single Sheets and Continuous Forms 25 The Printer Menu 26 Print the Menu 26 Navigating the Menu 27 Reset to Factory Defaults 28 Print the Menu 29 Menu Summary 32 Explanation of Menu Items 46 Auto Align 66 Disabling Auto Align 66 Set Top of Form (TOF 67 General Information 67 Microline 8810 User's Guide...
...View 9 Control Panel 10 Individual Switches 10 Combined Switches 12 Control Panel Lights 14 Quick Reference: Control Panel Functions 16 Print Modes 17 Change Print Mode 17 Loading Print Media 18 Individual Sheets/Forms ("MANUAL 18 Continuous Forms ("FRONT 21 Switch between Single Sheets and Continuous Forms 25 The Printer Menu 26 Print the Menu 26 Navigating the Menu 27 Reset to Factory Defaults 28 Print the Menu 29 Menu Summary 32 Explanation of Menu Items 46 Auto Align 66 Disabling Auto Align 66 Set Top of Form (TOF 67 General Information 67 Microline 8810 User's Guide...
Users Guide
Page 4
Use the Printer Menu 67 Use 1Chr Set Pos 68 Temporary TOF 71 Form Tear Off 72 Turn On Forms Tear Off 72 Move Continuous Forms Up for Tear Off 72 Tests 73 Rolling ASCII Test 73 Font Sample Test 73 Hex Dump Mode 74 Setting the Printhead Gap 75 General Information 75 Printhead Gap Settings 76 Change to a Manual Printhead Gap Setting 77 Troubleshooting 79 Paper Jams, Individual Sheets/Forms 79 Paper Jams, Continuous Forms 81 Paper Jams, Repetitive 82 Error Messages 85 Maintenance 88 Replace the Ribbon 88 Clean the Housing 93 Specifications 94 Print Method...
Use the Printer Menu 67 Use 1Chr Set Pos 68 Temporary TOF 71 Form Tear Off 72 Turn On Forms Tear Off 72 Move Continuous Forms Up for Tear Off 72 Tests 73 Rolling ASCII Test 73 Font Sample Test 73 Hex Dump Mode 74 Setting the Printhead Gap 75 General Information 75 Printhead Gap Settings 76 Change to a Manual Printhead Gap Setting 77 Troubleshooting 79 Paper Jams, Individual Sheets/Forms 79 Paper Jams, Continuous Forms 81 Paper Jams, Repetitive 82 Error Messages 85 Maintenance 88 Replace the Ribbon 88 Clean the Housing 93 Specifications 94 Print Method...
Users Guide
Page 7
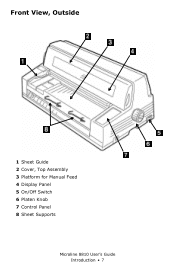
Front View, Outside Front_View with sheet supports.JPG 1 Sheet Guide 2 Cover, Top Assembly 3 Platform for Manual Feed 4 Display Panel 5 On/Off Switch 6 Platen Knob 7 Control Panel 8 Sheet Supports Microline 8810 User's Guide Introduction • 7
Front View, Outside Front_View with sheet supports.JPG 1 Sheet Guide 2 Cover, Top Assembly 3 Platform for Manual Feed 4 Display Panel 5 On/Off Switch 6 Platen Knob 7 Control Panel 8 Sheet Supports Microline 8810 User's Guide Introduction • 7

Users Guide
Page 11
... for single sheets between the front and back of the print path, back to the tractors). • Loaded on the platform, press LOAD to the print position. Menu Mode • Scrolls backward through available items within a group. 8810 LOAD.jpg Toggles the eject direction for repetitive line feeds. Single Forms • If a form is ejected. Microline 8810 User's Guide Control Panel • 11 Continuous Forms • In the print position: form feeds to next TOF position. • Loaded on line.
... for single sheets between the front and back of the print path, back to the tractors). • Loaded on the platform, press LOAD to the print position. Menu Mode • Scrolls backward through available items within a group. 8810 LOAD.jpg Toggles the eject direction for repetitive line feeds. Single Forms • If a form is ejected. Microline 8810 User's Guide Control Panel • 11 Continuous Forms • In the print position: form feeds to next TOF position. • Loaded on line.

Users Guide
Page 12
... changed to SelectAutoALign (the default). Note: Form Tear Off must be engaged. Combined Switches With the Printer Powered Up and Off Line Switches + 8810 MODE.jpg 8810 SHIFT.jpg Memory Auto ALign Cross Ref + 8810 SEL.jpg 8810 SHIFT.jpg Task Performed Select Align 1, Align 2, Align 3, or Align 4: Press and hold the SHIFT and SEL switches to change their function (see table below). Simultaneously press and hold the MODE switch, then press the SHIFT switch repeatedly to the tear off position. Microline 8810 User's Guide Control Panel...
... changed to SelectAutoALign (the default). Note: Form Tear Off must be engaged. Combined Switches With the Printer Powered Up and Off Line Switches + 8810 MODE.jpg 8810 SHIFT.jpg Memory Auto ALign Cross Ref + 8810 SEL.jpg 8810 SHIFT.jpg Task Performed Select Align 1, Align 2, Align 3, or Align 4: Press and hold the SHIFT and SEL switches to change their function (see table below). Simultaneously press and hold the MODE switch, then press the SHIFT switch repeatedly to the tear off position. Microline 8810 User's Guide Control Panel...
Users Guide
Page 14
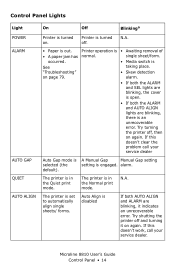
... the Normal print mode. "Troubleshooting" • Skew detection on again. The printer is • Awaiting removal of • A paper jam has normal. If this doesn't work, call your service dealer. N.A. • Paper is selected (the default). Control Panel Lights Light POWER ALARM AUTO GAP QUIET AUTO ALIGN On Off Blinkinga Printer is an unrecoverable error. alarm. • If both the ALARM and SEL lights are blinking, the cover is open. • If both AUTO ALIGN and ALARM are blinking, there is turned on again. A Manual Gap Manual Gap setting setting is...
... the Normal print mode. "Troubleshooting" • Skew detection on again. The printer is • Awaiting removal of • A paper jam has normal. If this doesn't work, call your service dealer. N.A. • Paper is selected (the default). Control Panel Lights Light POWER ALARM AUTO GAP QUIET AUTO ALIGN On Off Blinkinga Printer is an unrecoverable error. alarm. • If both the ALARM and SEL lights are blinking, the cover is open. • If both AUTO ALIGN and ALARM are blinking, there is turned on again. A Manual Gap Manual Gap setting setting is...

Users Guide
Page 16
... to engage the Normal print mode. Press SEL. 2. Press LF to change the paper path. Press SEL. 2. Print the Menu 1. When prompted, load a sheet of paper (minimum letter or A4) on line: 1. Press SEL. 2. Press FF to the tear off . 2. Change Align x Setting 1. Change Paper Paths 1. Park Continuous Forms 1. Press and hold SELECT and MODE while turning the printer on line). Quick Reference: Control Panel Functions Note Unless otherwise specified, these instructions assume that the printer is selected (on . 3. Change the Printhead Gap 1.
... to engage the Normal print mode. Press SEL. 2. Press LF to change the paper path. Press SEL. 2. Print the Menu 1. When prompted, load a sheet of paper (minimum letter or A4) on line: 1. Press SEL. 2. Press FF to the tear off . 2. Change Align x Setting 1. Change Paper Paths 1. Park Continuous Forms 1. Press and hold SELECT and MODE while turning the printer on line). Quick Reference: Control Panel Functions Note Unless otherwise specified, these instructions assume that the printer is selected (on . 3. Change the Printhead Gap 1.
Users Guide
Page 18
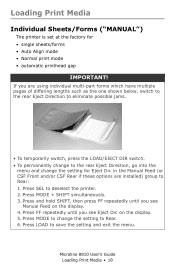
... save the setting and exit the menu. on the display. 4. Press MODE to change the setting for • single sheets/forms • Auto Align mode • Normal print mode • automatic printhead gap IMPORTANT! Press MODE + SHIFT simultaneously. 3. Press FF repeatedly until you see Manual Feed on the display. 5. Microline 8810 User's Guide Loading Print Media • 18 Press and hold SHIFT, then press FF repeatedly until you see Eject Dir. Loading Print Media Individual Sheets/Forms ("MANUAL") The printer...
... save the setting and exit the menu. on the display. 4. Press MODE to change the setting for • single sheets/forms • Auto Align mode • Normal print mode • automatic printhead gap IMPORTANT! Press MODE + SHIFT simultaneously. 3. Press FF repeatedly until you see Manual Feed on the display. 5. Microline 8810 User's Guide Loading Print Media • 18 Press and hold SHIFT, then press FF repeatedly until you see Eject Dir. Loading Print Media Individual Sheets/Forms ("MANUAL") The printer...

Users Guide
Page 28
... FORM TEAR-OFF displays. 9. SPACING displays. 6. MENU INITIALIZE FNC. Microline 8810 User's Guide The Printer Menu • 28 Press MODE repeatedly until FONT displays. 5. Reset to Factory Defaults Note Always print the Menu before you wish to select appears. 10. Press SEL. Simultaneously press SHIFT and MODE. 4. The setting changes to have a record of the settings. Printing the Menu is the only way to YES. 7. Press and hold SHIFT, then press FF repeatedly until FRONT FEED...
... FORM TEAR-OFF displays. 9. SPACING displays. 6. MENU INITIALIZE FNC. Microline 8810 User's Guide The Printer Menu • 28 Press MODE repeatedly until FONT displays. 5. Reset to Factory Defaults Note Always print the Menu before you wish to select appears. 10. Press SEL. Simultaneously press SHIFT and MODE. 4. The setting changes to have a record of the settings. Printing the Menu is the only way to YES. 7. Press and hold SHIFT, then press FF repeatedly until FRONT FEED...
Users Guide
Page 29
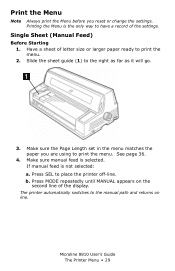
Front_View.JPG 3. Make sure the Page Length set in the menu matches the paper you reset or change the settings. If manual feed is selected. Press SEL to print the menu. 2. b. The printer automatically switches to the manual path and returns on the second line of the display. Single Sheet (Manual Feed) Before Starting 1. Make sure manual feed is not selected: a. Have a sheet of the settings. Microline 8810 User's Guide The Printer Menu • 29 Printing the Menu is the only way to the right as far...
Front_View.JPG 3. Make sure the Page Length set in the menu matches the paper you reset or change the settings. If manual feed is selected. Press SEL to print the menu. 2. b. The printer automatically switches to the manual path and returns on the second line of the display. Single Sheet (Manual Feed) Before Starting 1. Make sure manual feed is not selected: a. Have a sheet of the settings. Microline 8810 User's Guide The Printer Menu • 29 Printing the Menu is the only way to the right as far...
Users Guide
Page 34
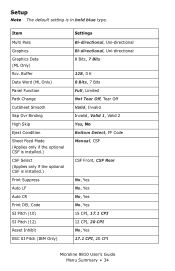
..., 0 K 8 Bits, 7 Bits Full, Limited Not Tear Off, Tear Off Valid, Invalid Invalid, Valid 1, Valid 2 Yes, No Bottom Detect, FF Code Manual, CSF CSF Front, CSF Rear No, Yes No, Yes No, Yes No, Yes 15 CPI, 17.1 CPI 12 CPI, 20 CPI No, Yes 17.1 CPI, 20 CPI Microline 8810 User's Guide Menu Summary • 34 Buffer Data Word (ML Only) Panel Function Path Change CutSheet Smooth Skp Ovr Binding High Skip Eject Condition Sheet Feed Mode...
..., 0 K 8 Bits, 7 Bits Full, Limited Not Tear Off, Tear Off Valid, Invalid Invalid, Valid 1, Valid 2 Yes, No Bottom Detect, FF Code Manual, CSF CSF Front, CSF Rear No, Yes No, Yes No, Yes No, Yes 15 CPI, 17.1 CPI 12 CPI, 20 CPI No, Yes 17.1 CPI, 20 CPI Microline 8810 User's Guide Menu Summary • 34 Buffer Data Word (ML Only) Panel Function Path Change CutSheet Smooth Skp Ovr Binding High Skip Eject Condition Sheet Feed Mode...
Users Guide
Page 51
... with Auto Alignment enabled. Cont. CutSheet Smooth Helps to Invalid, data could print directly on the platen. Microline 8810 User's Guide Explanation of the printhead when an I -Prime signal is outside the normal print area specified for the page prints. If you wish to manual feed from printing on the platen and damage the printhead. The default is installed. Sets the character code and graphics data for paper curl when feeding in a form manually through the platform. Diagnostic Test...
... with Auto Alignment enabled. Cont. CutSheet Smooth Helps to Invalid, data could print directly on the platen. Microline 8810 User's Guide Explanation of the printhead when an I -Prime signal is outside the normal print area specified for the page prints. If you wish to manual feed from printing on the platen and damage the printhead. The default is installed. Sets the character code and graphics data for paper curl when feeding in a form manually through the platform. Diagnostic Test...

Users Guide
Page 52
... optional RS-232C Serial Interface is received. Sets what happens when the printer receives the FF command: Eject [the default] or Form Feed. Change to FF Code if you are using manual feed from the platform or the optional CSF(s): Front [the default] or Rear. To activate Form Tear-Off, change the setting to ignore the DSR signal. For more information, see page 72. Microline 8810 User's Guide Explanation of Menu Items • 52...
... optional RS-232C Serial Interface is received. Sets what happens when the printer receives the FF command: Eject [the default] or Form Feed. Change to FF Code if you are using manual feed from the platform or the optional CSF(s): Front [the default] or Rear. To activate Form Tear-Off, change the setting to ignore the DSR signal. For more information, see page 72. Microline 8810 User's Guide Explanation of Menu Items • 52...

Users Guide
Page 55
...; 55 Impact Mode Selects the print mode, Normal [the default] or Quiet, engaged on power up. Graphics The default is Yes. Host Interface Choose the interface mode: Auto Interface [the default], Parallel, USB, or Option I -Prime signal is set to print 7 Bits [the default] or 8 Bits. If your software spends a long time processing between portions of the form the gap detection begins: 2 inches (51 mm) [the default] or 4 inches (102 mm). High Skip The default is Bi-directional. Gap Pos. Changing to...
...; 55 Impact Mode Selects the print mode, Normal [the default] or Quiet, engaged on power up. Graphics The default is Yes. Host Interface Choose the interface mode: Auto Interface [the default], Parallel, USB, or Option I -Prime signal is set to print 7 Bits [the default] or 8 Bits. If your software spends a long time processing between portions of the form the gap detection begins: 2 inches (51 mm) [the default] or 4 inches (102 mm). High Skip The default is Bi-directional. Gap Pos. Changing to...

Users Guide
Page 60
... ( 0 or 128 Kbytes) devoted to engage proportional spacing of Menu Items • 60 Spacing The default is installed. Sets the protocol used: Ready/Busy [the default] or X-ON/X-OFF. Microline 8810 User's Guide Explanation of characters. Print Dir. Power Saving Sets whether or not the printer enters the energy-saving Power Save Mode after the interval specified under Power Save Time. Print DEL Code IBM emulation only. Protocol Applies only when the optional RS-232C Serial Interface is No.
... ( 0 or 128 Kbytes) devoted to engage proportional spacing of Menu Items • 60 Spacing The default is installed. Sets the protocol used: Ready/Busy [the default] or X-ON/X-OFF. Microline 8810 User's Guide Explanation of characters. Print Dir. Power Saving Sets whether or not the printer enters the energy-saving Power Save Mode after the interval specified under Power Save Time. Print DEL Code IBM emulation only. Protocol Applies only when the optional RS-232C Serial Interface is No.

Users Guide
Page 69
... remove the paper from the manual feed path. 3. Press SEL, then press LOAD to the on-line state. Simultaneously press SHIFT and SEL. Adjust the print start position as the 1Chr. c. In 1/144-inch (0.18 mm) increments: press and hold the SHIFT switch, then press MODE. 5. b. Manual Feed (Single Sheets/Forms) 8810_3_crop.jpg 1. The SEL light starts blinking and the display reads 1CHR. SET MODE INSERT PAPER. 4. The sheet/form advances to the Manual Feed path. 2. Store the TOF position...
... remove the paper from the manual feed path. 3. Press SEL, then press LOAD to the on-line state. Simultaneously press SHIFT and SEL. Adjust the print start position as the 1Chr. c. In 1/144-inch (0.18 mm) increments: press and hold the SHIFT switch, then press MODE. 5. b. Manual Feed (Single Sheets/Forms) 8810_3_crop.jpg 1. The SEL light starts blinking and the display reads 1CHR. SET MODE INSERT PAPER. 4. The sheet/form advances to the Manual Feed path. 2. Store the TOF position...

Users Guide
Page 74
... Hex Dump Mode Turn the printer off . 3. Simultaneously press and hold the MODE + LF + SHIFT switches while turning the printer on again. Microline 8810 User's Guide Tests • 74 Engaging the Hex Dump Mode 1. Be sure paper is loaded. 2. Running a Hex Dump Test To run the test, send data to the printer while it always uses a left margin of the paper. Turn the printer off , then on , until RELEASE SW displays. HEXDUMP displays and "Hex Dump Mode" prints at the top of 5.1 mm (0.2-inch). When the printer...
... Hex Dump Mode Turn the printer off . 3. Simultaneously press and hold the MODE + LF + SHIFT switches while turning the printer on again. Microline 8810 User's Guide Tests • 74 Engaging the Hex Dump Mode 1. Be sure paper is loaded. 2. Running a Hex Dump Test To run the test, send data to the printer while it always uses a left margin of the paper. Turn the printer off , then on , until RELEASE SW displays. HEXDUMP displays and "Hex Dump Mode" prints at the top of 5.1 mm (0.2-inch). When the printer...
Users Guide
Page 79
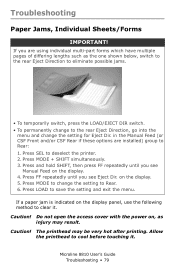
... menu and change the setting to Rear: 1. Microline 8810 User's Guide Troubleshooting • 79 Press and hold SHIFT, then press FF repeatedly until you see Eject Dir. Do not open the access cover with the power on the display. 5. Press SEL to clear it . Caution! Press LOAD to cool before touching it . Caution! Allow the printhead to save the setting and exit the menu. If you are installed) group to Rear...
... menu and change the setting to Rear: 1. Microline 8810 User's Guide Troubleshooting • 79 Press and hold SHIFT, then press FF repeatedly until you see Eject Dir. Do not open the access cover with the power on the display. 5. Press SEL to clear it . Caution! Press LOAD to cool before touching it . Caution! Allow the printhead to save the setting and exit the menu. If you are installed) group to Rear...
Users Guide
Page 85
... Paper Load continuous forms paper on the rear tractor. Load paper in the CSF. Paper Jam Remove paper Remove the jammed paper and press SEL. CSFF Paper End Set Paper to place the printer on line. CSFR Paper End Set Paper to CSF Applies only when the optional CSF is no print media loaded in the selected path. Error Messages Manual paper End Insert Paper Load paper on the platform and press SEL. Paper end alignx insert paper Load paper on the platform and press SEL. See page 79. Microline 8810 User's Guide Troubleshooting...
... Paper Load continuous forms paper on the rear tractor. Load paper in the CSF. Paper Jam Remove paper Remove the jammed paper and press SEL. CSFF Paper End Set Paper to place the printer on line. CSFR Paper End Set Paper to CSF Applies only when the optional CSF is no print media loaded in the selected path. Error Messages Manual paper End Insert Paper Load paper on the platform and press SEL. Paper end alignx insert paper Load paper on the platform and press SEL. See page 79. Microline 8810 User's Guide Troubleshooting...
Users Guide
Page 86
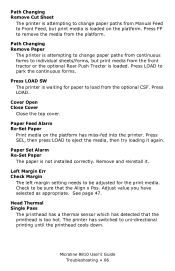
.... Adjust value you have selected as appropriate. Remove and reinstall it again. Microline 8810 User's Guide Troubleshooting • 86 Left Margin Err Check Margin The left margin setting needs to be sure that the printhead is too hot. Press FF to uni-directional printing until the printhead cools down. See page 47. Paper Feed Alarm Re-Set Paper Print media on the platform. Press LOAD. Path Changing Remove Cut Sheet The printer is attempting to change paper paths from continuous forms to individual sheets/forms...
.... Adjust value you have selected as appropriate. Remove and reinstall it again. Microline 8810 User's Guide Troubleshooting • 86 Left Margin Err Check Margin The left margin setting needs to be sure that the printhead is too hot. Press FF to uni-directional printing until the printhead cools down. See page 47. Paper Feed Alarm Re-Set Paper Print media on the platform. Press LOAD. Path Changing Remove Cut Sheet The printer is attempting to change paper paths from continuous forms to individual sheets/forms...


