PrintSuperVision Configuration Guide
Page 15
... email message Method 1 is recommended, but you would like more frequent updates reported from the set up menu and select whether the PSV Services should start automatically, manually or are not successfully sent using SSL/TLS). 2. As an added convenience, PSV allows you specified. 8. Indicate the interval time (in the fields provided. Set to start and stop the PrintSuperVision Service from your print/copy devices. Add...
... email message Method 1 is recommended, but you would like more frequent updates reported from the set up menu and select whether the PSV Services should start automatically, manually or are not successfully sent using SSL/TLS). 2. As an added convenience, PSV allows you specified. 8. Indicate the interval time (in the fields provided. Set to start and stop the PrintSuperVision Service from your print/copy devices. Add...
Installation Instructions: Second Paper Tray (500 Sheets)
Page 1
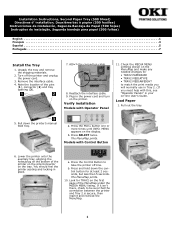
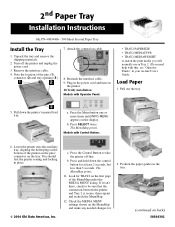
... control button for TRAY2 on the first page of the MenuMap under the MEDIA MENU listing. a. b. The MenuMap prints. 10. Attach the connection cable. 8. Reattach the interface cable. 9. Load Paper 1. You should feel the printer seating and locking in the power cord and turn on -line User's Guide. If it isn't there, check to match the print media you will normally use in Tray 2. (If you need help with this, see "Operator Panels" in your on the printer. Check...
... control button for TRAY2 on the first page of the MenuMap under the MEDIA MENU listing. a. b. The MenuMap prints. 10. Attach the connection cable. 8. Reattach the interface cable. 9. Load Paper 1. You should feel the printer seating and locking in the power cord and turn on -line User's Guide. If it isn't there, check to match the print media you will normally use in Tray 2. (If you need help with this, see "Operator Panels" in your on the printer. Check...
2nd Paper Tray Installation
Page 1
... tray. Check the MEDIA MENU settings shown on the first page of the MenuMap under the MEDIA MENU listing. 2nd Paper Tray Installation Instructions Oki PN-40834406 - 500 Sheet Second Paper Tray Install the Tray 1. Reattach the interface cable. 9. Pull out the tray. 5. Press the Menu button one or more times until INFO. The MenuMap prints. Press and hold down the printer's manual feed tray. b. Press the Control Button to match the print media you will normally use in Tray 2. (If you need help with this, see "Operator Panels...
... tray. Check the MEDIA MENU settings shown on the first page of the MenuMap under the MEDIA MENU listing. 2nd Paper Tray Installation Instructions Oki PN-40834406 - 500 Sheet Second Paper Tray Install the Tray 1. Reattach the interface cable. 9. Pull out the tray. 5. Press the Menu button one or more times until INFO. The MenuMap prints. Press and hold down the printer's manual feed tray. b. Press the Control Button to match the print media you will normally use in Tray 2. (If you need help with this, see "Operator Panels...
B4400/B4500/B4550/B4600 Safety, Warranty and Regulatory Booklet
Page 5
... Product was purchased, by contacting Oki Data directly at 1-800-654-3282 (1-800-OKI-DATA), or WWW.OKIPRINTINGSOLUTIONS.COM. Oki Data Authorized Service Providers For the most comprehensive, up-to-date listing of the service locations listed below. Oki Data Contact Locations United States Oki Data Americas, Inc. 2000 Bishops Gate Blvd. Laurel, NJ 08054 Phone: 1-800-654-3282 Fax: 1-856-222-5247 Canada Oki Data Americas, Inc. 2735 Matheson Blvd...
... Product was purchased, by contacting Oki Data directly at 1-800-654-3282 (1-800-OKI-DATA), or WWW.OKIPRINTINGSOLUTIONS.COM. Oki Data Authorized Service Providers For the most comprehensive, up-to-date listing of the service locations listed below. Oki Data Contact Locations United States Oki Data Americas, Inc. 2000 Bishops Gate Blvd. Laurel, NJ 08054 Phone: 1-800-654-3282 Fax: 1-856-222-5247 Canada Oki Data Americas, Inc. 2735 Matheson Blvd...
B4400/B4500/B4550/B4600 Safety, Warranty and Regulatory Booklet
Page 6
..., when used in a particular installation. Note: It is no issue for times and availability of this device. 220/240-Volt Models WARNING: This equipment has been tested and found to provide reasonable protection against harmful interference in combination with the instructions, may void your product, including: • Product news • Manuals • Drivers and utilities • Material Safety Data Sheets •...
..., when used in a particular installation. Note: It is no issue for times and availability of this device. 220/240-Volt Models WARNING: This equipment has been tested and found to provide reasonable protection against harmful interference in combination with the instructions, may void your product, including: • Product news • Manuals • Drivers and utilities • Material Safety Data Sheets •...
B4400 4500 4550 4600 User Guide (English)
Page 3
... 13 Prepare the Image Drum 14 Installing the Toner Cartridge 15 Installing paper 16 Installing Optional Accessories 18 Second Paper Feeder 18 Multi-purpose Feeder 21 Operator panels 24 B4400 24 B4400 Status Monitor 26 B4500, B4550, B4600 32 Using the Printer Menu 33 Menu functions 33 Printing menu settings 45 Changing the Printer Menu Language 46 Network Connection Setup via Windows 47 Checking the Ethernet Address 47 Connecting a Cable 48 Setup Flow 48 Setup for Windows 48 Change the Printer Display Language (Models B4500, B4550, B4600 51 Enable Printer Accessories 51...
... 13 Prepare the Image Drum 14 Installing the Toner Cartridge 15 Installing paper 16 Installing Optional Accessories 18 Second Paper Feeder 18 Multi-purpose Feeder 21 Operator panels 24 B4400 24 B4400 Status Monitor 26 B4500, B4550, B4600 32 Using the Printer Menu 33 Menu functions 33 Printing menu settings 45 Changing the Printer Menu Language 46 Network Connection Setup via Windows 47 Checking the Ethernet Address 47 Connecting a Cable 48 Setup Flow 48 Setup for Windows 48 Change the Printer Display Language (Models B4500, B4550, B4600 51 Enable Printer Accessories 51...
B4400 4500 4550 4600 User Guide (English)
Page 4
... Automatic feed sequence 68 Printing envelopes 69 Heavyweight paper or cardstock 69 Paper feed, size and media setting 69 B4500, B4550, B4600 70 Interfaces 74 Printer Drivers 75 Windows operating systems 75 Macintosh 76 Operation 77 Printer settings in Windows 77 Printer settings in Macintosh 88 Consumables and maintenance 89 Consumable order details 89 When to replace the toner cartridge 89 Replacing the toner cartridge 89 When to replace the image drum 90 Replacing the image drum 91 B4400/4500/4550/4600 User's Guide 4
... Automatic feed sequence 68 Printing envelopes 69 Heavyweight paper or cardstock 69 Paper feed, size and media setting 69 B4500, B4550, B4600 70 Interfaces 74 Printer Drivers 75 Windows operating systems 75 Macintosh 76 Operation 77 Printer settings in Windows 77 Printer settings in Macintosh 88 Consumables and maintenance 89 Consumable order details 89 When to replace the toner cartridge 89 Replacing the toner cartridge 89 When to replace the image drum 90 Replacing the image drum 91 B4400/4500/4550/4600 User's Guide 4

B4400 4500 4550 4600 User Guide (English)
Page 5
Generating a cleaning page 91 Cleaning the LED array 93 Troubleshooting 94 Status and error messages 94 Paper Jams 94 Input jam 95 Feed jam or exit jam 95 Print quality problems 96 Software problems 97 Hardware problems 98 Installing options 100 Specifications 101 General 101 Overall dimensions 102 Paper and tray information 102 Service and support 105 B4400/4500/4550/4600 User's Guide 5
Generating a cleaning page 91 Cleaning the LED array 93 Troubleshooting 94 Status and error messages 94 Paper Jams 94 Input jam 95 Feed jam or exit jam 95 Print quality problems 96 Software problems 97 Hardware problems 98 Installing options 100 Specifications 101 General 101 Overall dimensions 102 Paper and tray information 102 Service and support 105 B4400/4500/4550/4600 User's Guide 5
B4400 4500 4550 4600 User Guide (English)
Page 26
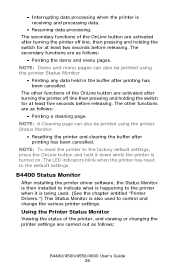
... LED indicators blink when the printer has reset to control and change the various printer settings. NOTE: Demo and menu pages can also be printed using the printer Status Monitor. • Resetting the printer and clearing the buffer after printing has been cancelled. The other functions of the OnLine button are as follows: B4400/4500/4550/4600 User's Guide 26 B4400 Status Monitor After installing the printer driver software, the Status Monitor is then installed to indicate what...
... LED indicators blink when the printer has reset to control and change the various printer settings. NOTE: Demo and menu pages can also be printed using the printer Status Monitor. • Resetting the printer and clearing the buffer after printing has been cancelled. The other functions of the OnLine button are as follows: B4400/4500/4550/4600 User's Guide 26 B4400 Status Monitor After installing the printer driver software, the Status Monitor is then installed to indicate what...
B4400 4500 4550 4600 User Guide (English)
Page 29
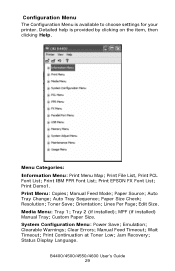
... Power Save; Print Continuation at Toner Low; B4400/4500/4550/4600 User's Guide 29 Detailed help is available to choose settings for your printer. Paper Size Check; Resolution; Clearable Warnings; Print File List, Print PCL Font List; Orientation; Custom Paper Size. Manual Feed Timeout; Print IBM PPR Font List; Manual Feed Mode; B4400 Menu.jpg Menu Categories: Information Menu: Print Menu Map; Print Menu: Copies; Clear Errors; Paper Source; Lines Per Page; Print Demo1. Jam Recovery; Auto Tray Sequence; Tray 2 (if installed); Wait Timeout; Auto Tray Change...
... Power Save; Print Continuation at Toner Low; B4400/4500/4550/4600 User's Guide 29 Detailed help is available to choose settings for your printer. Paper Size Check; Resolution; Clearable Warnings; Print File List, Print PCL Font List; Orientation; Custom Paper Size. Manual Feed Timeout; Print IBM PPR Font List; Manual Feed Mode; B4400 Menu.jpg Menu Categories: Information Menu: Print Menu Map; Print Menu: Copies; Clear Errors; Paper Source; Lines Per Page; Print Demo1. Jam Recovery; Auto Tray Sequence; Tray 2 (if installed); Wait Timeout; Auto Tray Change...

B4400 4500 4550 4600 User Guide (English)
Page 34
... toner amount. Set print orientation. OFF: No optional tray installed ON: Tray2 or multi purpose feeder is selected. Sets whether to check a paper size. B4400/4500/4550/4600 User's Guide 34 Specifies a paper feed tray. *Displays installed trays only. Sets paper size when not specified by the computer. If Cassette is selected, paper size in Auto tray. Sets the number of lines per inch). *When printing with V2400, print time doubles. Sets dpi (dots per page. This value is automatically adjusted when print orientation is changed. PRINT MENU item COPIES MANUAL PAPER...
... toner amount. Set print orientation. OFF: No optional tray installed ON: Tray2 or multi purpose feeder is selected. Sets whether to check a paper size. B4400/4500/4550/4600 User's Guide 34 Specifies a paper feed tray. *Displays installed trays only. Sets paper size when not specified by the computer. If Cassette is selected, paper size in Auto tray. Sets the number of lines per inch). *When printing with V2400, print time doubles. Sets dpi (dots per page. This value is automatically adjusted when print orientation is changed. PRINT MENU item COPIES MANUAL PAPER...

B4400 4500 4550 4600 User Guide (English)
Page 35
... M LIGHT, TRAY 2 PAPER SIZE LETTER* When tray 2 is installed TRAY 2 MEDIA TYPE PLAIN* When tray 2 is installed TRAY 2 MEDIA WEIGHT MEDIUM* When tray 2 is installed MFP PAPER SIZE LETTER* When multi purpose feeder is installed. Value is calculated by Unit of Measure setting. MANUAL MEDIA TYPE PLAIN*, LETTERHEAD, Set paper type for Tray 1. TRAY 1 MEDIA TYPE PLAIN*, LETTERHEAD, Sets media type for manual tray. Value is installed. X DIMENSION 8.5* 3.5 to 14.0 Set paper length for Tray 1. B4400/4500/4550/4600 User's Guide 35 Media Menu This menu provides adjustment...
... M LIGHT, TRAY 2 PAPER SIZE LETTER* When tray 2 is installed TRAY 2 MEDIA TYPE PLAIN* When tray 2 is installed TRAY 2 MEDIA WEIGHT MEDIUM* When tray 2 is installed MFP PAPER SIZE LETTER* When multi purpose feeder is installed. Value is calculated by Unit of Measure setting. MANUAL MEDIA TYPE PLAIN*, LETTERHEAD, Set paper type for Tray 1. TRAY 1 MEDIA TYPE PLAIN*, LETTERHEAD, Sets media type for manual tray. Value is installed. X DIMENSION 8.5* 3.5 to 14.0 Set paper length for Tray 1. B4400/4500/4550/4600 User's Guide 35 Media Menu This menu provides adjustment...
B4400 4500 4550 4600 User Guide (English)
Page 36
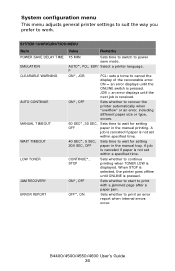
... manual tray. B4400/4500/4550/4600 User's Guide 36 ON = an error displays until the ONLINE switch is displayed. ON*, OFF Sets whether to start to work. System configuration menu This menu adjusts general printer settings to suit the way you prefer to print with a jammed page after a paper jam. A job is canceled if paper is pressed. When STOP is selected, the printer goes offline until the next job is not set within a specified time. OFF*, ON Sets whether to power save mode. AUTO...
... manual tray. B4400/4500/4550/4600 User's Guide 36 ON = an error displays until the ONLINE switch is displayed. ON*, OFF Sets whether to start to work. System configuration menu This menu adjusts general printer settings to suit the way you prefer to print with a jammed page after a paper jam. A job is canceled if paper is pressed. When STOP is selected, the printer goes offline until the next job is not set within a specified time. OFF*, ON Sets whether to power save mode. AUTO...
B4400 4500 4550 4600 User Guide (English)
Page 44
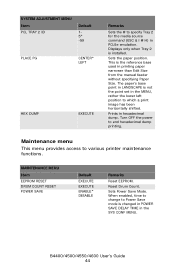
... POWER SAVE DELAY TIME in the SYS CONF MENU. Prints in printing paper narrower than Edit Size from the manual feeder without specifying Paper Size. Reset Drum Count. This is not the point set in PCL5e emulation. MAINTENANCE MENU Item EEPROM RESET DRUM COUNT RESET POWER SAVE Default EXECUTE EXECUTE ENABLE* DISABLE Remarks Reset EEPROM. B4400/4500/4550/4600 User's Guide 44 The paper's base point in LANDSCAPE is the reference base used in hexadecimal dump. SYSTEM ADJUSTMENT MENU Item PCL TRAY 2 ID Default...
... POWER SAVE DELAY TIME in the SYS CONF MENU. Prints in printing paper narrower than Edit Size from the manual feeder without specifying Paper Size. Reset Drum Count. This is not the point set in PCL5e emulation. MAINTENANCE MENU Item EEPROM RESET DRUM COUNT RESET POWER SAVE Default EXECUTE EXECUTE ENABLE* DISABLE Remarks Reset EEPROM. B4400/4500/4550/4600 User's Guide 44 The paper's base point in LANDSCAPE is the reference base used in hexadecimal dump. SYSTEM ADJUSTMENT MENU Item PCL TRAY 2 ID Default...
B4400 4500 4550 4600 User Guide (English)
Page 47
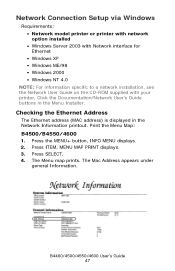
... the MENU+ button, INFO MENU displays. 2. Press ITEM, MENU MAP PRINT displays. 3. The Menu map prints. The Mac Address appears under general Information. Network Connection Setup via Windows Requirements: • Network model printer or printer with network option installed • Windows Server 2003 with Network interface for Ethernet • Windows XP • Windows ME/98 • Windows 2000 • Windows NT 4.0 NOTE: For information specific to a network installation, see the Network User Guide on the CD-ROM supplied with your printer. Press SELECT. 4. S M Printer State...
... the MENU+ button, INFO MENU displays. 2. Press ITEM, MENU MAP PRINT displays. 3. The Menu map prints. The Mac Address appears under general Information. Network Connection Setup via Windows Requirements: • Network model printer or printer with network option installed • Windows Server 2003 with Network interface for Ethernet • Windows XP • Windows ME/98 • Windows 2000 • Windows NT 4.0 NOTE: For information specific to a network installation, see the Network User Guide on the CD-ROM supplied with your printer. Press SELECT. 4. S M Printer State...

B4400 4500 4550 4600 User Guide (English)
Page 52
S M Printer State tab.jpg 1 2. Setup for Windows via USB Connection Requirements: • Windows Server 2003 • Windows XP • Windows ME/98 • Windows 2000 Connecting a Cable A printer cable is not supplied with the printer. Setup NOTE: Install the printer driver before connecting the USB cable to the printer. 4. Turn off the printer and Computer. Select the language. 3. Insert a USB cable into the USB connector of the printer. 3. B4400/4500/4550/4600 User's Guide 52 You will autorun. 2. Turn the printer OFF. 1. Accept the license...
S M Printer State tab.jpg 1 2. Setup for Windows via USB Connection Requirements: • Windows Server 2003 • Windows XP • Windows ME/98 • Windows 2000 Connecting a Cable A printer cable is not supplied with the printer. Setup NOTE: Install the printer driver before connecting the USB cable to the printer. 4. Turn off the printer and Computer. Select the language. 3. Insert a USB cable into the USB connector of the printer. 3. B4400/4500/4550/4600 User's Guide 52 You will autorun. 2. Turn the printer OFF. 1. Accept the license...

B4400 4500 4550 4600 User Guide (English)
Page 71
... User's Guide 71 Paper size Set the paper size as a guide only. NOTE: 1. Some software applications require the paper feed, size and media settings to ON and more than one paper tray is displayed. 4. Although media properties can be set manually on your computer, the printer will not print and the LCD will display an error message. 2. The following printer settings are recognized automatically with media you manually set to be set in the printer differ from within the application (page setup). 3. Press the Menu button...
... User's Guide 71 Paper size Set the paper size as a guide only. NOTE: 1. Some software applications require the paper feed, size and media settings to ON and more than one paper tray is displayed. 4. Although media properties can be set manually on your computer, the printer will not print and the LCD will display an error message. 2. The following printer settings are recognized automatically with media you manually set to be set in the printer differ from within the application (page setup). 3. Press the Menu button...
B4400 4500 4550 4600 User Guide (English)
Page 96
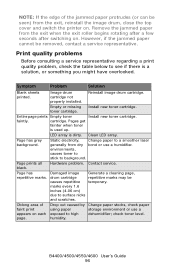
..., Change paper to see if there is a solution, or something you might have overlooked. Print quality problems Before consulting a service representative regarding a print quality problem, check the table below to a smoother laser generally from the exit, reinstall the image drum, close the top cover and switch the printer on . Page has Damaged image Generate a cleaning page, repetitive marks. environments, causes toner to stick to background. Entire page prints Empty toner Install new toner cartridge. Page prints all black. cartridge. Reinstall image drum cartridge...
..., Change paper to see if there is a solution, or something you might have overlooked. Print quality problems Before consulting a service representative regarding a print quality problem, check the table below to a smoother laser generally from the exit, reinstall the image drum, close the top cover and switch the printer on . Page has Damaged image Generate a cleaning page, repetitive marks. environments, causes toner to stick to background. Entire page prints Empty toner Install new toner cartridge. Page prints all black. cartridge. Reinstall image drum cartridge...

B4400 4500 4550 4600 User Guide (English)
Page 97
... storage. Install toner cartridge correctly. Replace toner cartridge. Vertical black lines. Paper path, lamp assembly, or fusing unit problem. Clean LED array. Install paper print side down in tray. (Note arrow on paper package). Contact service. Is paper meant for laser printers? Use recommended paper. Turn paper over in tray. Toner low. Bold characters and dark lines are smeared. Generate cleaning page. Clean LED array. Make sure you B4400/4500/4550/4600 User's Guide 97 LED array is dirty. toner dropped inside printer or image drum problem.
... storage. Install toner cartridge correctly. Replace toner cartridge. Vertical black lines. Paper path, lamp assembly, or fusing unit problem. Clean LED array. Install paper print side down in tray. (Note arrow on paper package). Contact service. Is paper meant for laser printers? Use recommended paper. Turn paper over in tray. Toner low. Bold characters and dark lines are smeared. Generate cleaning page. Clean LED array. Make sure you B4400/4500/4550/4600 User's Guide 97 LED array is dirty. toner dropped inside printer or image drum problem.
B4400 4500 4550 4600 User Guide (English)
Page 98
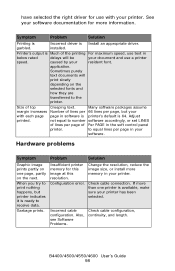
... driver for this image at this resolution. caused by your software documentation for more memory in below rated delays will print slowly depending on the next. not equal to receive data. Hardware problems Symptom Problem Solution Graphic image prints partly on one printer is garbled. Garbage prints. Configuration error. Check cable connection. installed. Size of Per PAGE in the soft control panel printer. to the printer. Incorrect cable configuration. B4400/4500/4550/4600 User's Guide 98 Insufficient printer memory for use with each page page...
... driver for this image at this resolution. caused by your software documentation for more memory in below rated delays will print slowly depending on the next. not equal to receive data. Hardware problems Symptom Problem Solution Graphic image prints partly on one printer is garbled. Garbage prints. Configuration error. Check cable connection. installed. Size of Per PAGE in the soft control panel printer. to the printer. Incorrect cable configuration. B4400/4500/4550/4600 User's Guide 98 Insufficient printer memory for use with each page page...


