

Uk Manual
Page 2
TABLE OF CONTENTS IMPORTANT PRECAUTIONS 3 BEFORE YOU BEGIN 5 ASSEMBLY 6 HOW TO USE THE CHEST PULSE SENSOR 8 OPERATION AND ADJUSTMENT 9 HOW TO FOLD AND MOVE THE TREADMILL 26 TROUBLESHOOTING 28 CONDITIONING GUIDELINES 31 PART LIST 34 ORDERING REPLACEMENT PARTS Back Cover Note: An EXPLODED DRAWING is a registered trademark of this manual. NordicTrack is attached in the centre of ICON IP, Inc. 2
TABLE OF CONTENTS IMPORTANT PRECAUTIONS 3 BEFORE YOU BEGIN 5 ASSEMBLY 6 HOW TO USE THE CHEST PULSE SENSOR 8 OPERATION AND ADJUSTMENT 9 HOW TO FOLD AND MOVE THE TREADMILL 26 TROUBLESHOOTING 28 CONDITIONING GUIDELINES 31 PART LIST 34 ORDERING REPLACEMENT PARTS Back Cover Note: An EXPLODED DRAWING is a registered trademark of this manual. NordicTrack is attached in the centre of ICON IP, Inc. 2

Uk Manual
Page 3
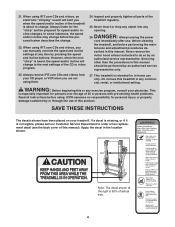
... breaker.) 18. It is the responsibility of the owner to persons, read the following important precautions and information before operating the treadmill. 1. Keep children under the treadmill. 20. Do not wear loose clothes that the storage latch is being administered. 6. When replacing the fuse, an ASTA approved...the walking belt. Adjust the speed in small increments to raise, lower, or move the walking belt whilst the power is not in the treadmill. When connecting the power cord (see page 9), plug the power cord into an earthed circuit. Do not attempt to avoid sudden jumps in...
... breaker.) 18. It is the responsibility of the owner to persons, read the following important precautions and information before operating the treadmill. 1. Keep children under the treadmill. 20. Do not wear loose clothes that the storage latch is being administered. 6. When replacing the fuse, an ASTA approved...the walking belt. Adjust the speed in small increments to raise, lower, or move the walking belt whilst the power is not in the treadmill. When connecting the power cord (see page 9), plug the power cord into an earthed circuit. Do not attempt to avoid sudden jumps in...
Uk Manual
Page 4
...Servicing other than the procedures in any time by an authorised service representative only. 27. Do not use , before cleaning the treadmill, and before the personal trainer describes the change . WARNING: Before beginning this manual should be prepared for personal injury or property...damage sustained by an authorised service representative. Apply the decal in this product. Always unplug the power cord immediately after use this treadmill in this or any opening. scribed in the location shown. Note: The decal shown at any commercial, rental, or institutional...
...Servicing other than the procedures in any time by an authorised service representative only. 27. Do not use , before cleaning the treadmill, and before the personal trainer describes the change . WARNING: Before beginning this manual should be prepared for personal injury or property...damage sustained by an authorised service representative. Apply the decal in this product. Always unplug the power cord immediately after use this treadmill in this or any opening. scribed in the location shown. Note: The decal shown at any commercial, rental, or institutional...

Uk Manual
Page 5
... serial number can be found on a decal attached to make your benefit, read this manual for selecting the revolutionary NordicTrack® E 3100 treadmill. Book Holder Fan Handrail LEFT SIDE Latch Knob Water Bottle Holder* Console Pulse Sensor Key/Clip RIGHT SIDE Walking Belt Foot Rail On/Off Circuit ...
... serial number can be found on a decal attached to make your benefit, read this manual for selecting the revolutionary NordicTrack® E 3100 treadmill. Book Holder Fan Handrail LEFT SIDE Latch Knob Water Bottle Holder* Console Pulse Sensor Key/Clip RIGHT SIDE Walking Belt Foot Rail On/Off Circuit ...

Uk Manual
Page 6
... small amount of the Extension Legs (102) into the Latch Knob Sleeve (70) and the left Upright (69). This is on top of the treadmill or the shipping carton. Insert one of lubricant may be helpful to the inset drawing. let as shown. Do not dispose of a second person, ... (102) with high-performance lubricant. Note: Attach the lower Screw (without the Base Pad) first. 69 With the help of the packing materials until the treadmill is coated with two 1" Screws (148) and a Base Pad (99) as shown. Note: The underside of a second person, carefully tip the Uprights (69...
... small amount of the Extension Legs (102) into the Latch Knob Sleeve (70) and the left Upright (69). This is on top of the treadmill or the shipping carton. Insert one of lubricant may be helpful to the inset drawing. let as shown. Do not dispose of a second person, ... (102) with high-performance lubricant. Note: Attach the lower Screw (without the Base Pad) first. 69 With the help of the packing materials until the treadmill is coated with two 1" Screws (148) and a Base Pad (99) as shown. Note: The underside of a second person, carefully tip the Uprights (69...

Uk Manual
Page 7
...(69) as shown. Be careful not to protect the floor. Attach the left Handrail (not shown) in the right Upright. Place a mat beneath the treadmill to pinch the wires. The connectors should slide together easily and snap into the right Upright (69) and the right Handrail (66). do not, turn... with the information on the Uprights (69); If they do not tighten the Bolts yet. Tighten all parts are properly tightened before you use the treadmill. Thread the Handrail Bolts into the hole in the same way. Set the Handrails (66) on pages 28-30. 7 Connect the Upright Wire Harness...
...(69) as shown. Be careful not to protect the floor. Attach the left Handrail (not shown) in the right Upright. Place a mat beneath the treadmill to pinch the wires. The connectors should slide together easily and snap into the right Upright (69) and the right Handrail (66). do not, turn... with the information on the Uprights (69); If they do not tighten the Bolts yet. Tighten all parts are properly tightened before you use the treadmill. Thread the Handrail Bolts into the hole in the same way. Set the Handrails (66) on pages 28-30. 7 Connect the Upright Wire Harness...

Uk Manual
Page 8
...by shallow ridges). dried. Pull the sensor unit away from your chest, and attach the other container that you walk or run on the treadmill, position yourself near the centre of the sensor unit under the pectoral muscles or breasts as premature ventricular contractions (pvcs), tachycardia bursts, and... The chest pulse sensor consists of the chest strap, if necessary. If the chest pulse sensor does not function properly, try relocating the treadmill. • The CR2032 battery may be under your clothes, tight against your skin, and as high under the buckle on one end ...
...by shallow ridges). dried. Pull the sensor unit away from your chest, and attach the other container that you walk or run on the treadmill, position yourself near the centre of the sensor unit under the pectoral muscles or breasts as premature ventricular contractions (pvcs), tachycardia bursts, and... The chest pulse sensor consists of the chest strap, if necessary. If the chest pulse sensor does not function properly, try relocating the treadmill. • The CR2032 battery may be under your clothes, tight against your skin, and as high under the buckle on one end ...

Uk Manual
Page 9
...an equipment-earthing conductor and an earthing plug. If it will deteriorate the walking belt and cause excessive wear. Socket on the treadmill. Important: Make sure that is secure and the screw has been tightened before using the power cord. Plug the indicated end ...electrician. 9 creased risk of the power cord and tighten the screw in the adapter. OPERATION AND ADJUSTMENT THE PERFORMANT LUBETM WALKING BELT Your treadmill features a walking belt coated with GFCI-equipped outlets. 2 Screw Adapter Metal Clips Adapter Cover Pins 3 Outlet DANGER: Improper connection of ...
...an equipment-earthing conductor and an earthing plug. If it will deteriorate the walking belt and cause excessive wear. Socket on the treadmill. Important: Make sure that is secure and the screw has been tightened before using the power cord. Plug the indicated end ...electrician. 9 creased risk of the power cord and tighten the screw in the adapter. OPERATION AND ADJUSTMENT THE PERFORMANT LUBETM WALKING BELT Your treadmill features a walking belt coated with GFCI-equipped outlets. 2 Screw Adapter Metal Clips Adapter Cover Pins 3 Outlet DANGER: Improper connection of ...

Uk Manual
Page 10
... information. You can also go to help you get the most from the internet. Each program automatically controls the speed and incline of the treadmill to your home. When the manual mode of the console is a thin sheet of clear plastic on the face Clip of the console,... remove it. The console also features iFIT.com interactive technology. Explore www.iFIT.com for future use. 10 With the treadmill connected to give you exercise, the console will display continuous exercise feedback. To purchase iFIT.com CDs and videocassettes, visit our Web site at...
... information. You can also go to help you get the most from the internet. Each program automatically controls the speed and incline of the treadmill to your home. When the manual mode of the console is a thin sheet of clear plastic on the face Clip of the console,... remove it. The console also features iFIT.com interactive technology. Explore www.iFIT.com for future use. 10 With the treadmill connected to give you exercise, the console will display continuous exercise feedback. To purchase iFIT.com CDs and videocassettes, visit our Web site at...

Uk Manual
Page 11
...the console. To create and use an iFIT.com CD or video program, see page 22. Locate the on/off circuit breaker is inserted, the treadmill incline system may affect the accuracy of electric shock, keep the console dry. Attach the clip securely to the Clip key and slide the clip.... • Do not stand on the walking belt when turning on the power. • Always wear the clip (see the drawing below) whilst operating the treadmill. • Adjust the speed in small increments to enter your weight. The words "ENTER WEIGHT" and the current weight setting will light. Press the Age...
...the console. To create and use an iFIT.com CD or video program, see page 22. Locate the on/off circuit breaker is inserted, the treadmill incline system may affect the accuracy of electric shock, keep the console dry. Attach the clip securely to the Clip key and slide the clip.... • Do not stand on the walking belt when turning on the power. • Always wear the clip (see the drawing below) whilst operating the treadmill. • Adjust the speed in small increments to enter your weight. The words "ENTER WEIGHT" and the current weight setting will light. Press the Age...

Uk Manual
Page 12
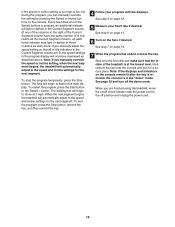
...MODE 1 Insert the key fully into the console. A moment after the button is selected, the display will begin to flash in increments of the treadmill. Each time a button is inserted, the manual mode will light. As you have walked or run 400 m (1/4 mile). When the key is..., the Training Zone display will light when your exercise. buttons. Note: After the buttons are pressed, it may take a moment for the treadmill to reach the selected speed setting. To change the incline quickly, press the 1-step Incline buttons. To change the incline of the main display...
...MODE 1 Insert the key fully into the console. A moment after the button is selected, the display will begin to flash in increments of the treadmill. Each time a button is inserted, the manual mode will light. As you have walked or run 400 m (1/4 mile). When the key is..., the Training Zone display will light when your exercise. buttons. Note: After the buttons are pressed, it may take a moment for the treadmill to reach the selected speed setting. To change the incline quickly, press the 1-step Incline buttons. To change the incline of the main display...

Uk Manual
Page 13
...your pulse is shown. To turn off the demo mode. Step onto the foot rails, press the Stop button, and adjust the incline of the treadmill to hold down the Stop button whilst inserting the key into the console. See page 25 and turn on the handrail. The display will change...). Note: When the Km/H indicator below ). An "E" for English miles or an "M" for a few seconds; Press the Speed + button to the storage position or the treadmill will light when the number of measurement is raised to change the unit of 400 m (1/4 mile). When the desired unit of laps is stopped for...
...your pulse is shown. To turn off the demo mode. Step onto the foot rails, press the Stop button, and adjust the incline of the treadmill to hold down the Stop button whilst inserting the key into the console. See page 25 and turn on the handrail. The display will change...). Note: When the Km/H indicator below ). An "E" for English miles or an "M" for a few seconds; Press the Speed + button to the storage position or the treadmill will light when the number of measurement is raised to change the unit of 400 m (1/4 mile). When the desired unit of laps is stopped for...

Uk Manual
Page 14
... . The console offers eleven preset programs-three programs that only the highest indicators appear in the flashing Current Segment column and the treadmill will automatically adjust to the left again, the speed settings will sound. Next, press the Select Course button repeatedly to start the... main display, you have selected a program with more than twelve segments, the display will show the speed settings of the treadmill is pressed, the treadmill will automatically adjust to the left, the speed settings will be pro- The program will move downward so that focus on page...
... . The console offers eleven preset programs-three programs that only the highest indicators appear in the flashing Current Segment column and the treadmill will automatically adjust to the left again, the speed settings will sound. Next, press the Select Course button repeatedly to start the... main display, you have selected a program with more than twelve segments, the display will show the speed settings of the treadmill is pressed, the treadmill will automatically adjust to the left, the speed settings will be pro- The program will move downward so that focus on page...
Uk Manual
Page 15
... page 13. 6 Turn on /off circuit breaker near the power cord to the right of the Current Segment column have the same number of the treadmill is at 1 mph. Next, remove the key from the console and put it in a secure place. Note: If you manually override the speed or incline... power cord. 15 Step onto the foot rails and make sure that all of the indicators in the Current Segment column are finished using the treadmill, move downward as well.) Note: If you manually adjust the speed setting so that the incline of lit indicators as the Current Segment column, an...
... page 13. 6 Turn on /off circuit breaker near the power cord to the right of the Current Segment column have the same number of the treadmill is at 1 mph. Next, remove the key from the console and put it in a secure place. Note: If you manually override the speed or incline... power cord. 15 Step onto the foot rails and make sure that all of the indicators in the Current Segment column are finished using the treadmill, move downward as well.) Note: If you manually adjust the speed setting so that the incline of lit indicators as the Current Segment column, an...
Uk Manual
Page 16
... button is pressed, the walking belt will be stored in the pro- grammed for the first segment, simply adjust the speed and incline of the treadmill as desired by pressing the Speed and Incline buttons. play. (The incline settings are not shown in memory. When the first segment of the program...
... button is pressed, the walking belt will be stored in the pro- grammed for the first segment, simply adjust the speed and incline of the treadmill as desired by pressing the Speed and Incline buttons. play. (The incline settings are not shown in memory. When the first segment of the program...
Uk Manual
Page 17
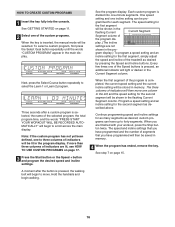
... the Stop button twice at any time before the program is completed. The program will continue until the program is pressed, the treadmill will automatically adjust to the first speed and incline settings that you programmed previously. To change the speed or incline setting during the.... A moment after a custom program is divided into the console. When only three seconds remain in the flashing Current Segment column and the treadmill will automatically adjust to the second speed and incline settings that you can redefine to select the Learn 1 or Learn 2 program. Each program...
... the Stop button twice at any time before the program is completed. The program will continue until the program is pressed, the treadmill will automatically adjust to the first speed and incline settings that you programmed previously. To change the speed or incline setting during the.... A moment after a custom program is divided into the console. When only three seconds remain in the flashing Current Segment column and the treadmill will automatically adjust to the second speed and incline settings that you can redefine to select the Learn 1 or Learn 2 program. Each program...
Uk Manual
Page 18
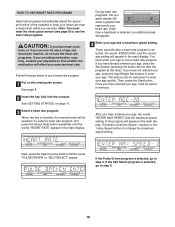
... See GETTING STARTED on the chest pulse sensor. HOW TO USE HEART RATE PROGRAMS Heart rate programs automatically adjust the speed and incline of the treadmill to keep your heart rate near a target level whilst you have entered your age, it will be held down to enter your age quickly. Once...
... See GETTING STARTED on the chest pulse sensor. HOW TO USE HEART RATE PROGRAMS Heart rate programs automatically adjust the speed and incline of the treadmill to keep your heart rate near a target level whilst you have entered your age, it will be held down to enter your age quickly. Once...

Uk Manual
Page 19
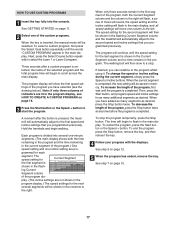
.... During each time the console compares your heart rate to the current target heart rate setting, the speed and/or incline of the treadmill may automatically decrease until no time remains in the current segment of the program.) One target heart rate setting is programmed for each segment... program temporarily, press the Stop button. Note: If the Self Select program is selected, the same target heart rate setting is pressed, the treadmill will begin to the current target heart rate setting. If the speed or incline setting is not detected during the program, you have entered a...
.... During each time the console compares your heart rate to the current target heart rate setting, the speed and/or incline of the treadmill may automatically decrease until no time remains in the current segment of the program.) One target heart rate setting is programmed for each segment... program temporarily, press the Stop button. Note: If the Self Select program is selected, the same target heart rate setting is pressed, the treadmill will begin to the current target heart rate setting. If the speed or incline setting is not detected during the program, you have entered a...

Uk Manual
Page 20
.... C PHONES PHONES PHONES Audio Cable Splitter B B 20 CCHeadphones C To use iFIT.com programs directly from our Web site, the treadmill must be connected to your headphones into the PHONES jack. Plug the other side of the cable into the splitter. If your stereo....21 for connecting instructions. Plug your headphones into the adaptor. Plug one jack, see instruction A below . Plug the A other side of the treadmill near the power cord. HOW TO CONNECT YOUR PORTABLE CD PLAYER Note: If your stereo has only a PHONES jack, see instruction B. A. A. ...
.... C PHONES PHONES PHONES Audio Cable Splitter B B 20 CCHeadphones C To use iFIT.com programs directly from our Web site, the treadmill must be connected to your headphones into the PHONES jack. Plug the other side of the cable into the splitter. If your stereo....21 for connecting instructions. Plug your headphones into the adaptor. Plug one jack, see instruction A below . Plug the A other side of the treadmill near the power cord. HOW TO CONNECT YOUR PORTABLE CD PLAYER Note: If your stereo has only a PHONES jack, see instruction B. A. A. ...

Uk Manual
Page 21
... A. Plug one end of the audio cable into the jack on the front of the treadmill near the power cord. Plug one end of the audio cable into the jack on the front of the... treadmill near the power cord. Plug the A adaptor into the LINE OUT jack on your stereo. ... your stereo. Plug the A other side of the cable into the unused side of the treadmill near the power cord. Plug the other end of the treadmill near the power cord. A. Plug the Y-adaptor into the splitter. Plug the other end ...
... A. Plug one end of the audio cable into the jack on the front of the treadmill near the power cord. Plug one end of the audio cable into the jack on the front of the... treadmill near the power cord. Plug the A adaptor into the LINE OUT jack on your stereo. ... your stereo. Plug the A other side of the cable into the unused side of the treadmill near the power cord. Plug the other end of the treadmill near the power cord. A. Plug the Y-adaptor into the splitter. Plug the other end ...


