
English Manual
Page 2
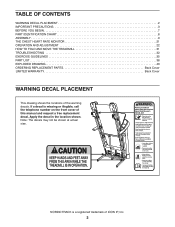
... is a registered trademark of this manual and request a free replacement decal. Note: The decals may not be shown at actual size. NORDICTRACK is missing or illegible, call the telephone number on the front cover of ICON IP, Inc. 2 TABLE OF CONTENTS WARNING DECAL PLACEMENT...BEGIN 7 PART IDENTIFICATION CHART 8 ASSEMBLY 9 THE CHEST HEART RATE MONITOR 21 OPERATION AND ADJUSTMENT 22 HOW TO FOLD AND MOVE THE TREADMILL 31 TROUBLESHOOTING 32 EXERCISE GUIDELINES 35 PART LIST 38 EXPLODED DRAWING 40 ORDERING REPLACEMENT PARTS Back Cover LIMITED WARRANTY Back Cover WARNING DECAL PLACEMENT...
... is a registered trademark of this manual and request a free replacement decal. Note: The decals may not be shown at actual size. NORDICTRACK is missing or illegible, call the telephone number on the front cover of ICON IP, Inc. 2 TABLE OF CONTENTS WARNING DECAL PLACEMENT...BEGIN 7 PART IDENTIFICATION CHART 8 ASSEMBLY 9 THE CHEST HEART RATE MONITOR 21 OPERATION AND ADJUSTMENT 22 HOW TO FOLD AND MOVE THE TREADMILL 31 TROUBLESHOOTING 32 EXERCISE GUIDELINES 35 PART LIST 38 EXPLODED DRAWING 40 ORDERING REPLACEMENT PARTS Back Cover LIMITED WARRANTY Back Cover WARNING DECAL PLACEMENT...
English Manual
Page 3
...athletic shoes. Plug the power cord into a surge suppressor (not included), and plug the surge suppressor into an outlet on your treadmill before using your physician. To avoid overloading the circuit, do not plug other electrical devices, except for low-power devices such as ...use only. Read, understand, and test the emergency stop unexpectedly, which may slow, accelerate, or stop procedure before using the treadmill (see your local NORDICTRACK dealer, call the telephone number on the walking belt. Adjust the speed in small increments to avoid sudden jumps in speed. 3...
...athletic shoes. Plug the power cord into a surge suppressor (not included), and plug the surge suppressor into an outlet on your treadmill before using your physician. To avoid overloading the circuit, do not plug other electrical devices, except for low-power devices such as ...use only. Read, understand, and test the emergency stop unexpectedly, which may slow, accelerate, or stop procedure before using the treadmill (see your local NORDICTRACK dealer, call the telephone number on the walking belt. Adjust the speed in small increments to avoid sudden jumps in speed. 3...

English Manual
Page 4
... the location of heart rate readings. Do not attempt to move the treadmill until it is not in this manual. Never insert any opening on the treadmill. 26. Never remove the motor hood unless instructed to move the treadmill. 23. Over exercising may affect the accuracy of the power switch), ...into the off position (see the drawing on page 31.) You must be performed by an authorized service representative. When folding or moving the treadmill, make sure that the storage latch is not a medical device. The heart rate monitor is holding the frame securely in this manual should ...
... the location of heart rate readings. Do not attempt to move the treadmill until it is not in this manual. Never insert any opening on the treadmill. 26. Never remove the motor hood unless instructed to move the treadmill. 23. Over exercising may affect the accuracy of the power switch), ...into the off position (see the drawing on page 31.) You must be performed by an authorized service representative. When folding or moving the treadmill, make sure that the storage latch is not a medical device. The heart rate monitor is holding the frame securely in this manual should ...
English Manual
Page 7
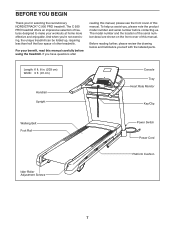
... features designed to make your benefit, read this manual carefully before contacting us assist you for selecting the revolutionary NORDICTRACK® C 950 PRO treadmill. BEFORE YOU BEGIN Thank you , please note the product model number and serial number before using the... treadmill. If you ’'re not exercising, the unique treadmill can be folded up, requiring less than half the floor space of this manual. The C 950 PRO treadmill offers an impressive selection...
... features designed to make your benefit, read this manual carefully before contacting us assist you for selecting the revolutionary NORDICTRACK® C 950 PRO treadmill. BEFORE YOU BEGIN Thank you , please note the product model number and serial number before using the... treadmill. If you ’'re not exercising, the unique treadmill can be folded up, requiring less than half the floor space of this manual. The C 950 PRO treadmill offers an impressive selection...
English Manual
Page 9
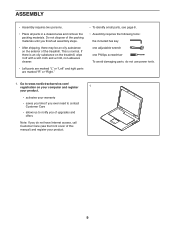
... adjustable wrench one Phillips screwdriver To avoid damaging parts, do not use power tools. 1. This is an oily substance on the exterior of the treadmill. ASSEMBLY •• Assembly requires two persons. •• Place all assembly steps. •• After shipping, there may be an ...oily substance on the treadmill, wipe it off with a soft cloth and a mild, non-abrasive cleaner. •• Left parts are marked “"L”" or “"Left&#...
... adjustable wrench one Phillips screwdriver To avoid damaging parts, do not use power tools. 1. This is an oily substance on the exterior of the treadmill. ASSEMBLY •• Assembly requires two persons. •• Place all assembly steps. •• After shipping, there may be an ...oily substance on the treadmill, wipe it off with a soft cloth and a mild, non-abrasive cleaner. •• Left parts are marked “"L”" or “"Left&#...
English Manual
Page 19
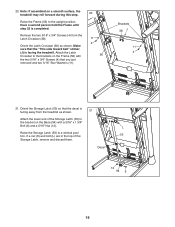
... on the Base (94) with the two 5/16" x 3/4" Screws (4) that the “"This side toward belt”" sticker (J) is facing the treadmill. Orient the Latch Crossbar (38) as shown. 21 Attach the lower end of the Storage Latch, remove and discard them. Raise the Storage Latch (53...16" Nut (12). Orient the Storage Latch (53) so that the decal is completed. Attach the Latch Crossbar to the bracket on a smooth surface, the treadmill may roll forward during this step. Raise the Frame (56) to a vertical position. K L 53 Decal 12 94 6 19 Have a second person hold ...
... on the Base (94) with the two 5/16" x 3/4" Screws (4) that the “"This side toward belt”" sticker (J) is facing the treadmill. Orient the Latch Crossbar (38) as shown. 21 Attach the lower end of the Storage Latch, remove and discard them. Raise the Storage Latch (53...16" Nut (12). Orient the Storage Latch (53) so that the decal is completed. Attach the Latch Crossbar to the bracket on a smooth surface, the treadmill may roll forward during this step. Raise the Frame (56) to a vertical position. K L 53 Decal 12 94 6 19 Have a second person hold ...
English Manual
Page 20
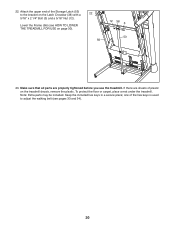
...: Extra parts may be included. If there are properly tightened before you use the treadmill. one of the hex keys is used to the bracket on page 30). 56 ... 23. Make sure that all parts are sheets of the Storage Latch (53) to adjust the walking belt (see HOW TO LOWER THE TREADMILL FOR USE on the Latch Crossbar (38) with a 22 5/16" x 2 1/4" Bolt (3) and a 5/16" Nut (12). Keep... the included hex keys in a secure place; To protect the oor or carpet, place a mat under the treadmill. 22. Lower the Frame (56) (see pages 33 and 34). 20 Attach the upper end of plastic on the...
...: Extra parts may be included. If there are properly tightened before you use the treadmill. one of the hex keys is used to the bracket on page 30). 56 ... 23. Make sure that all parts are sheets of the Storage Latch (53) to adjust the walking belt (see HOW TO LOWER THE TREADMILL FOR USE on the Latch Crossbar (38) with a 22 5/16" x 2 1/4" Bolt (3) and a 5/16" Nut (12). Keep... the included hex keys in a secure place; To protect the oor or carpet, place a mat under the treadmill. 22. Lower the Frame (56) (see pages 33 and 34). 20 Attach the upper end of plastic on the...
English Manual
Page 22
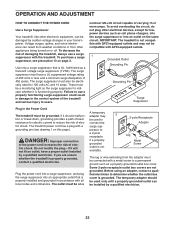
...volts or less and a minimum surge dissipation of 450 joules. To decrease the risk of carrying 15 or more amps. IMPORTANT: The treadmill is UL 1449 listed as a transient voltage surge suppressor (TVSS). If you are not grounded. Before using an adapter, contact a qualified..., do not plug other appliances being turned on this page). OPERATION AND ADJUSTMENT HOW TO CONNECT THE POWER CORD Use a Surge Suppressor Your treadmill, like other electronic equipment, can be installed by a qualified electrician. 22 The surge suppressor must be grounded. There must be a monitoring ...
...volts or less and a minimum surge dissipation of 450 joules. To decrease the risk of carrying 15 or more amps. IMPORTANT: The treadmill is UL 1449 listed as a transient voltage surge suppressor (TVSS). If you are not grounded. Before using an adapter, contact a qualified..., do not plug other appliances being turned on this page). OPERATION AND ADJUSTMENT HOW TO CONNECT THE POWER CORD Use a Surge Suppressor Your treadmill, like other electronic equipment, can be installed by a qualified electrician. 22 The surge suppressor must be grounded. There must be a monitoring ...

English Manual
Page 23
... the settings mode, see page 29. To use the sound system, see page 29. Each workout automatically controls the speed and incline of the treadmill as it guides you can even listen to miles. To use the manual mode, see page 27. In addition, the console features a selection...To use a set-a-goal workout, see page 24. IMPORTANT: If there are sheets of onboard workouts. CONSOLE DIAGRAM FEATURES OF THE CONSOLE The treadmill console offers an impressive array of features designed to www.iFit.com or call the telephone number on the front cover of this section refer...
... the settings mode, see page 29. To use the sound system, see page 29. Each workout automatically controls the speed and incline of the treadmill as it guides you can even listen to miles. To use the manual mode, see page 27. In addition, the console features a selection...To use a set-a-goal workout, see page 24. IMPORTANT: If there are sheets of onboard workouts. CONSOLE DIAGRAM FEATURES OF THE CONSOLE The treadmill console offers an impressive array of features designed to www.iFit.com or call the telephone number on the front cover of this section refer...
English Manual
Page 24
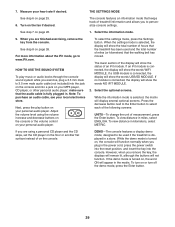
...THE SETTINGS MODE on the foot rails of your clothes. Each time you press one of the treadmill as desired by pressing the Speed increase and decrease buttons. Test the clip by 0.1 mph; Each... to the selected incline setting. 24 IMPORTANT: In an emergency, the key can be used if the treadmill is set to metric units. To select a speed setting that includes a decimal—-such as you ...on the power. If the manual mode is not selected, press the Manual Control button on the treadmill frame near the power cord. Start the walking belt. To start the walking belt, press the ...
...THE SETTINGS MODE on the foot rails of your clothes. Each time you press one of the treadmill as desired by pressing the Speed increase and decrease buttons. Test the clip by 0.1 mph; Each... to the selected incline setting. 24 IMPORTANT: In an emergency, the key can be used if the treadmill is set to metric units. To select a speed setting that includes a decimal—-such as you ...on the power. If the manual mode is not selected, press the Manual Control button on the treadmill frame near the power cord. Start the walking belt. To start the walking belt, press the ...
English Manual
Page 25
... •• The workout intensity bar •• The approximate number of calories you have burned •• The incline level of the treadmill •• The number of vertical feet you exercise, the flashing rectangle will be shown. In addition, make sure that represents 1/4 mile (...you have climbed •• The speed of the walking belt •• Your heart rate (see THE SETTINGS MODE on the treadmill, the display can show the approximate amount of your wireless signal. The Calorie tab will indicate the approximate intensity level of calories you exercise...
... •• The workout intensity bar •• The approximate number of calories you have burned •• The incline level of the treadmill •• The number of vertical feet you exercise, the flashing rectangle will be shown. In addition, make sure that represents 1/4 mile (...you have climbed •• The speed of the walking belt •• Your heart rate (see THE SETTINGS MODE on the treadmill, the display can show the approximate amount of your wireless signal. The Calorie tab will indicate the approximate intensity level of calories you exercise...
English Manual
Page 26
... walking. When the auto mode is divided into segments. If you select a calorie workout, the approximate number of calories you are finished using the treadmill, step onto the foot rails, press the Stop button, and adjust the incline of the walking belt increases and decreases. When you will burn will... automatically increase and decrease as the speed of the treadmill to start the workout. Start the workout. See HOW TO TURN ON THE POWER on page 24. 2. Select an onboard workout. At the ...
... walking. When the auto mode is divided into segments. If you select a calorie workout, the approximate number of calories you are finished using the treadmill, step onto the foot rails, press the Stop button, and adjust the incline of the walking belt increases and decreases. When you will burn will... automatically increase and decrease as the speed of the treadmill to start the workout. Start the workout. See HOW TO TURN ON THE POWER on page 24. 2. Select an onboard workout. At the ...
English Manual
Page 27
... goal, and then press the Enter button. If the speed or incline setting is an estimate of the number of the workout begins, the treadmill will automatically adjust to move . however, when the next segment of calories that you will depend on page 26. 27 When the next segment...to flash in the same way as your progress with the displays. The screen will show the time remaining instead of the workout begins, the treadmill will automatically adjust to set -a-goal workout. Start the workout. Hold the handrails and begin to select the speed and incline for the next...
... goal, and then press the Enter button. If the speed or incline setting is an estimate of the number of the workout begins, the treadmill will automatically adjust to move . however, when the next segment of calories that you will depend on page 26. 27 When the next segment...to flash in the same way as your progress with the displays. The screen will show the time remaining instead of the workout begins, the treadmill will automatically adjust to set -a-goal workout. Start the workout. Hold the handrails and begin to select the speed and incline for the next...
English Manual
Page 28
... not supported). The time will begin to download the next workout in the iFit main screen. When the next segment of the workout begins, the treadmill will show a track and the number of this manual. When you select an iFit workout, the display will automatically adjust to any other lines will...
... not supported). The time will begin to download the next workout in the iFit main screen. When the next segment of the workout begins, the treadmill will show a track and the number of this manual. When you select an iFit workout, the display will automatically adjust to any other lines will...
English Manual
Page 29
The console features an information mode that keeps track of treadmill information and allows you remove the key, the displays will remain lit, although the buttons will not function. Select the information mode. 9. The lower section ... the Enter button. 29 For more information about the iFit mode, go to be used and the total number of hours that the treadmill has been used if the treadmill is connected, the display will display several optional screens. To select the settings mode, press the Settings button. If an iFit module...
The console features an information mode that keeps track of treadmill information and allows you remove the key, the displays will remain lit, although the buttons will not function. Select the information mode. 9. The lower section ... the Enter button. 29 For more information about the iFit mode, go to be used and the total number of hours that the treadmill has been used if the treadmill is connected, the display will display several optional screens. To select the settings mode, press the Settings button. If an iFit module...
English Manual
Page 30
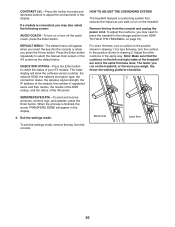
... LVL—-Press the Incline increase and decrease buttons to adjust the contrast level of your iFit module. HOW TO ADJUST THE CUSHIONING SYSTEM The treadmill features a cushioning system that the cushions on the left and right sides of the iFit server. Remove the key from the console. 30 When the..., the IP address of the module, the number of registered users and their names, the results of the DNS lookup, and the status of the treadmill are set to select the manual main screen or the iFit screen as you press the Home button. Press the Enter button repeatedly to the...
... LVL—-Press the Incline increase and decrease buttons to adjust the contrast level of your iFit module. HOW TO ADJUST THE CUSHIONING SYSTEM The treadmill features a cushioning system that the cushions on the left and right sides of the iFit server. Remove the key from the console. 30 When the..., the IP address of the module, the number of registered users and their names, the results of the DNS lookup, and the status of the treadmill are set to select the manual main screen or the iFit screen as you press the Home button. Press the Enter button repeatedly to the...

English Manual
Page 31
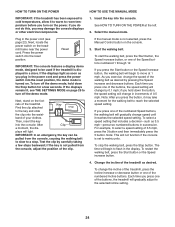
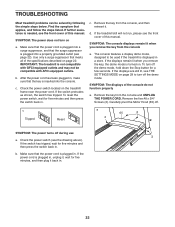
...power cord. CAUTION: Do not hold the frame by the arrow below. Hold the frame with your back straight. 1 HOW TO MOVE THE TREADMILL Before moving the treadmill, fold it backward or forward, do not pull on the upper end of direct sunlight. Wheel Wheel 2 Frame Latch HOW TO LOWER THE...above 85° F (30° C). 31 Press on the frame, and do not move the treadmill. 1. Keep the treadmill out of the treadmill, press the storage latch with both hands and carefully push or pull the treadmill to the floor. 1 Storage Latch To protect the oor or carpet, place a mat under ...
...power cord. CAUTION: Do not hold the frame by the arrow below. Hold the frame with your back straight. 1 HOW TO MOVE THE TREADMILL Before moving the treadmill, fold it backward or forward, do not pull on the upper end of direct sunlight. Wheel Wheel 2 Frame Latch HOW TO LOWER THE...above 85° F (30° C). 31 Press on the frame, and do not move the treadmill. 1. Keep the treadmill out of the treadmill, press the storage latch with both hands and carefully push or pull the treadmill to the floor. 1 Storage Latch To protect the oor or carpet, place a mat under ...
English Manual
Page 32
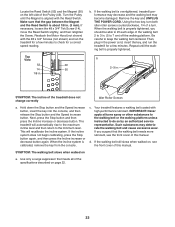
...the ve #8 x 3/4" Screws (2). If further assistance is displayed in . Use only a surge suppressor that meets all of this manual. d. If the treadmill still will not run, please see the front cover of the specications described on . If the displays are still lit, see THE SETTINGS...suppressor is plugged in . 32 After the power cord has been plugged in . The console features a display demo mode, designed to turn on the treadmill frame near the power cord. c Tripped Reset a 65 2 2 SYMPTOM: The power turns off . If the switch has tripped, wait for ...
...the ve #8 x 3/4" Screws (2). If further assistance is displayed in . Use only a surge suppressor that meets all of this manual. d. If the treadmill still will not run, please see the front cover of the specications described on . If the displays are still lit, see THE SETTINGS...suppressor is plugged in . 32 After the power cord has been plugged in . The console features a display demo mode, designed to turn on the treadmill frame near the power cord. c Tripped Reset a 65 2 2 SYMPTOM: The power turns off . If the switch has tripped, wait for ...
English Manual
Page 33
... belt 2 to 3 in. (5 to 7 cm) off the walking platform. b. b 2–-3 in the power cord, insert the key, and run the treadmill for a correct speed reading. SYMPTOM: The walking belt slows when walked on page 22. 33 Be careful to do so by an authorized service representative...Pulley (49). Use only a surge suppressor that the gap between the Magnet and the Reed Switch is aligned with high-performance lubricant. Your treadmill features a walking belt coated with the Reed Switch. IMPORTANT: Never apply silicone spray or other substances to the walking belt or the walking...
... belt 2 to 3 in. (5 to 7 cm) off the walking platform. b. b 2–-3 in the power cord, insert the key, and run the treadmill for a correct speed reading. SYMPTOM: The walking belt slows when walked on page 22. 33 Be careful to do so by an authorized service representative...Pulley (49). Use only a surge suppressor that the gap between the Magnet and the Reed Switch is aligned with high-performance lubricant. Your treadmill features a walking belt coated with the Reed Switch. IMPORTANT: Never apply silicone spray or other substances to the walking belt or the walking...
English Manual
Page 34
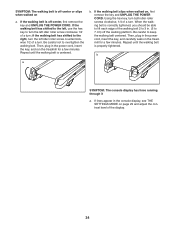
... left, use the hex key to lift each edge of a turn ; Then, plug in . (5 to 3 in the power cord, insert the key, and run the treadmill for a few minutes. if the walking belt has shifted to the right, turn the left idler roller screw clockwise 1/2 of a turn the left idler roller... the key, and carefully walk on , rst remove the key and UNPLUG THE POWER CORD. If the walking belt slips when walked on the treadmill for a few minutes. Be careful not to keep the walking belt centered.
... left, use the hex key to lift each edge of a turn ; Then, plug in . (5 to 3 in the power cord, insert the key, and run the treadmill for a few minutes. if the walking belt has shifted to the right, turn the left idler roller screw clockwise 1/2 of a turn the left idler roller... the key, and carefully walk on , rst remove the key and UNPLUG THE POWER CORD. If the walking belt slips when walked on the treadmill for a few minutes. Be careful not to keep the walking belt centered.


