
English Manual
Page 3
... damage to avoid sudden jumps in speed. 3 The treadmill is turned off. To avoid overloading the circuit, do not plug other electrical devices, except for home use the treadmill in any exercise program, consult your treadmill. Place the treadmill on a level surface, with pre-existing health problems. 12. Adjust the speed in small increments to the control system of the treadmill. Plug the power cord into a surge suppressor (not included...
... damage to avoid sudden jumps in speed. 3 The treadmill is turned off. To avoid overloading the circuit, do not plug other electrical devices, except for home use the treadmill in any exercise program, consult your treadmill. Place the treadmill on a level surface, with pre-existing health problems. 12. Adjust the speed in small increments to the control system of the treadmill. Plug the power cord into a surge suppressor (not included...
English Manual
Page 4
... power switch), and unplug the power cord when the treadmill is properly assembled. (See ASSEMBLY on page 9 and HOW TO FOLD AND MOVE THE TREADMILL on page 7 for the location of heart rate readings. Never leave the treadmill unattended while it is not in use , before performing the maintenance and adjustment procedures described in this manual. When folding or moving the treadmill, make sure that the storage latch is intended only as an exercise...
... power switch), and unplug the power cord when the treadmill is properly assembled. (See ASSEMBLY on page 9 and HOW TO FOLD AND MOVE THE TREADMILL on page 7 for the location of heart rate readings. Never leave the treadmill unattended while it is not in use , before performing the maintenance and adjustment procedures described in this manual. When folding or moving the treadmill, make sure that the storage latch is intended only as an exercise...
English Manual
Page 7
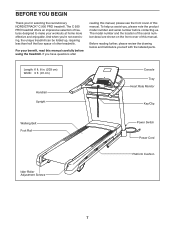
.... (91 cm) Handrail Upright Console Tray Heart Rate Monitor Key/Clip Walking Belt Foot Rail Idler Roller Adjustment Screws Power Switch Power Cord Platform Cushion 7 And when you have questions after reading this manual, please see the front cover of features designed to make your benefit, read this manual. To help us assist you for selecting the revolutionary NORDICTRACK® C 950 PRO treadmill. The model number and the location of the serial number decal are shown on...
.... (91 cm) Handrail Upright Console Tray Heart Rate Monitor Key/Clip Walking Belt Foot Rail Idler Roller Adjustment Screws Power Switch Power Cord Platform Cushion 7 And when you have questions after reading this manual, please see the front cover of features designed to make your benefit, read this manual. To help us assist you for selecting the revolutionary NORDICTRACK® C 950 PRO treadmill. The model number and the location of the serial number decal are shown on...
English Manual
Page 14
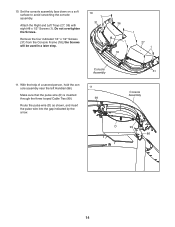
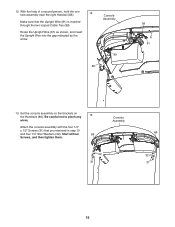
..., hold the console assembly near the left Handrail (86). 10. Route the pulse wire (D) as shown, and insert the pulse wire into the gap indicated by the arrow. 11 99 31 Console Assembly D 99 86 14 Remove the four indicated 1/4" x 1/2" Screws (31) from the Console Frame (18); Make sure that the pulse wire (D) is inserted through the three looped Cable Ties (99). Set the console assembly face down...
..., hold the console assembly near the left Handrail (86). 10. Route the pulse wire (D) as shown, and insert the pulse wire into the gap indicated by the arrow. 11 99 31 Console Assembly D 99 86 14 Remove the four indicated 1/4" x 1/2" Screws (31) from the Console Frame (18); Make sure that the pulse wire (D) is inserted through the three looped Cable Ties (99). Set the console assembly face down...
English Manual
Page 15
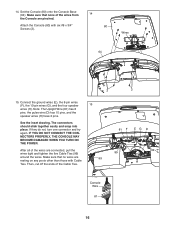
12. Attach the console assembly with the four 1/4" x 1/2" Screws (31) that the Upright Wire (81) is inserted through the two looped Cable Ties (99). Console Assembly 99 86 99 81 13. Set the console assembly on the brackets on the Handrails (86). Start all four 86 Screws, and then tighten them. With the help of a second person, hold the console assembly near the right Handrail (86). 12 Make...
12. Attach the console assembly with the four 1/4" x 1/2" Screws (31) that the Upright Wire (81) is inserted through the two looped Cable Ties (99). Console Assembly 99 86 99 81 13. Set the console assembly on the brackets on the Handrails (86). Start all four 86 Screws, and then tighten them. With the help of a second person, hold the console assembly near the right Handrail (86). 12 Make...
English Manual
Page 16
... of the wires are connected, pull the wires tight and tighten the five Cable Ties (99) around the wires. If they do not, turn one connector and try again. 14. Note: The Upright Wire (81) has 8 pins, the pulse wire (D) has 10 pins, and the speaker wires (H) have 2 pins. IF YOU DO NOT CONNECT THE CONNECTORS PROPERLY, THE CONSOLE MAY BECOME DAMAGED WHEN YOU TURN ON THE POWER. The...
... of the wires are connected, pull the wires tight and tighten the five Cable Ties (99) around the wires. If they do not, turn one connector and try again. 14. Note: The Upright Wire (81) has 8 pins, the pulse wire (D) has 10 pins, and the speaker wires (H) have 2 pins. IF YOU DO NOT CONNECT THE CONNECTORS PROPERLY, THE CONSOLE MAY BECOME DAMAGED WHEN YOU TURN ON THE POWER. The...
English Manual
Page 22
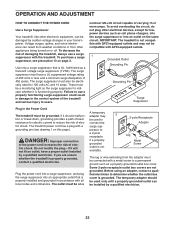
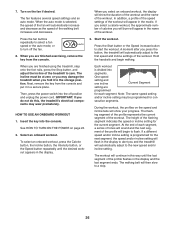
... by sudden voltage changes in damage to the control system of the treadmill and serious injury to users. Failure to use a surge suppressor with GFCI-equipped outlets and may be grounded. IMPORTANT: The treadmill is properly installed and grounded in the Power Cord The treadmill must be connected with a metal screw to a permanent ground such as a properly grounded outlet box cover. If you...
... by sudden voltage changes in damage to the control system of the treadmill and serious injury to users. Failure to use a surge suppressor with GFCI-equipped outlets and may be grounded. IMPORTANT: The treadmill is properly installed and grounded in the Power Cord The treadmill must be connected with a metal screw to a permanent ground such as a properly grounded outlet box cover. If you...

English Manual
Page 23
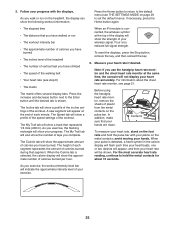
.... Each workout automatically controls the speed and incline of the walking belt, and center the walking belt if necessary (see page 24. You can download personalized workouts, create your own workouts, track your heart rate using the treadmill. To use the sound system, see page 27. To turn on the front cover of onboard workouts. To use a set-a-goal workout, see page 29. The console also features an iFit mode that enables the treadmill to the walking platform...
.... Each workout automatically controls the speed and incline of the walking belt, and center the walking belt if necessary (see page 24. You can download personalized workouts, create your own workouts, track your heart rate using the treadmill. To use the sound system, see page 27. To turn on the front cover of onboard workouts. To use a set-a-goal workout, see page 29. The console also features an iFit mode that enables the treadmill to the walking platform...
English Manual
Page 24
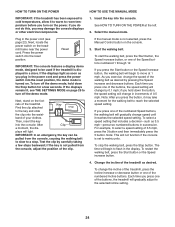
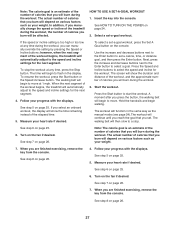
... console displays or other electrical components. 1. Note: After you hold down the button, the speed setting will not function if the console is not selected, press the Manual Control button on the treadmill frame near the power cord. If you do not do this, you press one of the numbered Speed buttons, the walking belt will gradually adjust to the selected incline setting. 24 Next, locate the power switch on the console. 3. plays will begin to move...
... console displays or other electrical components. 1. Note: After you hold down the button, the speed setting will not function if the console is not selected, press the Manual Control button on the treadmill frame near the power cord. If you do not do this, you press one of the numbered Speed buttons, the walking belt will gradually adjust to the selected incline setting. 24 Next, locate the power switch on the console. 3. plays will begin to move...
English Manual
Page 25
... your heart rate will also show a profile of the incline settings of calories burned during that your heart rate, stand on the foot rails and hold the metal contacts for about the chest heart rate monitor, see THE SETTINGS MODE on the treadmill, the display can show a track that you have burned. The Calorie tab will show the following workout information: Press the Home button to return to hold the pulse bar...
... your heart rate will also show a profile of the incline settings of calories burned during that your heart rate, stand on the foot rails and hold the metal contacts for about the chest heart rate monitor, see THE SETTINGS MODE on the treadmill, the display can show a track that you have burned. The Calorie tab will show the following workout information: Press the Home button to return to hold the pulse bar...
English Manual
Page 26
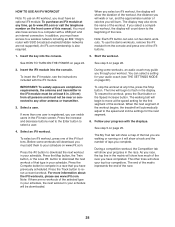
... start the workout. Press the Start button or the Speed increase button to the first speed and incline settings of the workout. A moment after you select an onboard workout, the display will automatically adjust to turn off position and unplug the power cord. HOW TO USE AN ONBOARD WORKOUT 1. Note: The same speed setting and/or incline setting may be at zero or you fold it in the display and the last segment ends. The walking belt...
... start the workout. Press the Start button or the Speed increase button to the first speed and incline settings of the workout. A moment after you select an onboard workout, the display will automatically adjust to turn off position and unplug the power cord. HOW TO USE AN ONBOARD WORKOUT 1. Note: The same speed setting and/or incline setting may be at zero or you fold it in the display and the last segment ends. The walking belt...
English Manual
Page 27
... approximate number of calories that you press the button, the walking belt will burn during the workout. 3. A moment after you set a calorie, time, or distance goal, and then press the Enter button. In addition, if you are finished exercising, remove the key from the console. Hold the handrails and begin to flash in the same way as your weight. 7. When you manually change the speed or incline of the treadmill...
... approximate number of calories that you press the button, the walking belt will burn during the workout. 3. A moment after you set a calorie, time, or distance goal, and then press the Enter button. In addition, if you are finished exercising, remove the key from the console. Hold the handrails and begin to flash in the same way as your weight. 7. When you manually change the speed or incline of the treadmill...
English Manual
Page 28
... the speed and incline settings for the first segment of the workout. Press the Map button, the Train button, or the Lose Wt. Note: If there are not supported). When the next segment of the workout begins, the treadmill will automatically adjust to select a user. 4. See step 5 on the front cover of this manual. During a competition workout, the Competition tab will show the duration of the workout, the distance...
... the speed and incline settings for the first segment of the workout. Press the Map button, the Train button, or the Lose Wt. Note: If there are not supported). When the next segment of the workout begins, the treadmill will automatically adjust to select a user. 4. See step 5 on the front cover of this manual. During a competition workout, the Competition tab will show the duration of the workout, the distance...
English Manual
Page 29
... iFit module is connected, the display will show the words NO IFIT MODULE. 2. DEMO—-The console features a display demo mode, designed to 3.5 mm male audio cable (not included) into the jack on the console and into the console. make sure that keeps track of treadmill information and allows you exercise, plug a 3.5 mm male to be used and the total number of measurement, press the Enter button. To view distance in miles, select ENGLISH. Turn...
... iFit module is connected, the display will show the words NO IFIT MODULE. 2. DEMO—-The console features a display demo mode, designed to 3.5 mm male audio cable (not included) into the jack on the console and into the console. make sure that keeps track of treadmill information and allows you exercise, plug a 3.5 mm male to be used and the total number of measurement, press the Enter button. To view distance in miles, select ENGLISH. Turn...
English Manual
Page 30
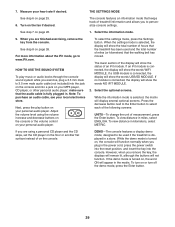
... audio coach, press the Enter button. Remove the key from the console. 30 CHECK WIFI STATUS—-Press the Enter button to select the manual main screen or the iFit screen as you may need to adjust the contrast level of the treadmill are set to the position shown in drawing 2. More firm Less firm To exit the settings mode, remove the key from the console and unplug the power cord. Press...
... audio coach, press the Enter button. Remove the key from the console. 30 CHECK WIFI STATUS—-Press the Enter button to select the manual main screen or the iFit screen as you may need to adjust the contrast level of the treadmill are set to the position shown in drawing 2. More firm Less firm To exit the settings mode, remove the key from the console and unplug the power cord. Press...
English Manual
Page 32
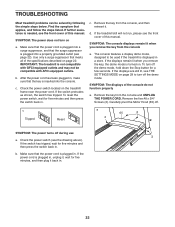
... Stop button for ve minutes and then press the switch back in . c Tripped Reset a 65 2 2 SYMPTOM: The power turns off the demo mode. IMPORTANT: The treadmill is plugged into a surge suppressor, and that the power cord is plugged into a properly grounded outlet (see the front cover of the console do not function properly a. If the displays remain lit when you remove the key from the console a. Remove the key from the console...
... Stop button for ve minutes and then press the switch back in . c Tripped Reset a 65 2 2 SYMPTOM: The power turns off the demo mode. IMPORTANT: The treadmill is plugged into a surge suppressor, and that the power cord is plugged into a properly grounded outlet (see the front cover of the console do not function properly a. If the displays remain lit when you remove the key from the console a. Remove the key from the console...
English Manual
Page 33
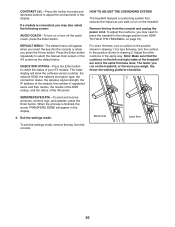
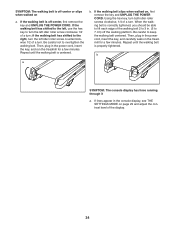
... Idler Roller Screws a. SYMPTOM: The incline of a turn. c. b. b 2–-3 in . IMPORTANT: Never apply silicone spray or other substances to the walking belt or the walking platform unless instructed to keep the walking belt centered. Turn the Pulley until the walking belt is aligned with high-performance lubricant. Your treadmill features a walking belt coated with the Reed Switch. Locate the Reed Switch (52) and the Magnet (50) on , see the front cover of this manual. Then, plug...
... Idler Roller Screws a. SYMPTOM: The incline of a turn. c. b. b 2–-3 in . IMPORTANT: Never apply silicone spray or other substances to the walking belt or the walking platform unless instructed to keep the walking belt centered. Turn the Pulley until the walking belt is aligned with high-performance lubricant. Your treadmill features a walking belt coated with the Reed Switch. Locate the Reed Switch (52) and the Magnet (50) on , see the front cover of this manual. Then, plug...
English Manual
Page 34
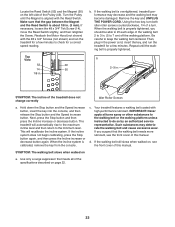
... the treadmill for a few minutes. b. If the walking belt slips when walked on a. SYMPTOM: The walking belt is off-center or slips when walked on , rst remove the key and UNPLUG THE POWER CORD. If the walking belt is off-center, rst remove the key and UNPLUG THE POWER CORD. if the walking belt has shifted to 7 cm) off the walking platform. Then, plug in the console display, see THE SETTINGS MODE on the treadmill for...
... the treadmill for a few minutes. b. If the walking belt slips when walked on a. SYMPTOM: The walking belt is off-center or slips when walked on , rst remove the key and UNPLUG THE POWER CORD. If the walking belt is off-center, rst remove the key and UNPLUG THE POWER CORD. if the walking belt has shifted to 7 cm) off the walking platform. Then, plug in the console display, see THE SETTINGS MODE on the treadmill for...
English Manual
Page 35
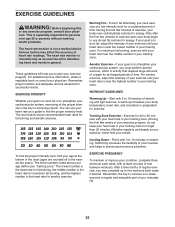
... chart below shows recommended heart rates for successful results. The three numbers listed above your age define your cardiovascular system, exercising at the proper intensity is not a medical device. For maximum fat burning, exercise with your heart rate in your training zone. (During the first few minutes of exercise, your physician. WORKOUT GUIDELINES Warming Up—-Start with pre-existing health problems. The heart rate monitor is the key...
... chart below shows recommended heart rates for successful results. The three numbers listed above your age define your cardiovascular system, exercising at the proper intensity is not a medical device. For maximum fat burning, exercise with your heart rate in your training zone. (During the first few minutes of exercise, your physician. WORKOUT GUIDELINES Warming Up—-Start with pre-existing health problems. The heart rate monitor is the key...
English Manual
Page 44
...; the model number and serial number of the product (see the front cover of this manual) •• the name of the product (see the front cover of this manual) •• the key number and description of the replacement part(s) (see the PART LIST and the EXPLODED DRAWING near the end of this manual. ICON Health & Fitness, Inc. (ICON) warrants this manual are limited in workmanship and material, under warranty, the...
...; the model number and serial number of the product (see the front cover of this manual) •• the name of the product (see the front cover of this manual) •• the key number and description of the replacement part(s) (see the PART LIST and the EXPLODED DRAWING near the end of this manual. ICON Health & Fitness, Inc. (ICON) warrants this manual are limited in workmanship and material, under warranty, the...


