Installation Guide
Page 6
4 About IP390 Appliance Network Interface Cards 37 Four-Port 10/100 Mbps Ethernet Network Interface Card 37 Ethernet NIC Features 37 Ethernet NIC Connectors and Cables 38 Two-... Before You Start 62 Configuring a Hard-Disk Drive for Logging 65 Replacing or Upgrading Memory 66 Before You Start 67 Replacing the Battery 70 7 Troubleshooting 75 General Troubleshooting Information 75 Troubleshooting Routing Problems 82 A Technical Specifications 87 Physical Dimensions 87 Space Requirements 87 Operating Temperature 87 NIC Interfaces 88 6 IP390 Security Platform Installation Guide
4 About IP390 Appliance Network Interface Cards 37 Four-Port 10/100 Mbps Ethernet Network Interface Card 37 Ethernet NIC Features 37 Ethernet NIC Connectors and Cables 38 Two-... Before You Start 62 Configuring a Hard-Disk Drive for Logging 65 Replacing or Upgrading Memory 66 Before You Start 67 Replacing the Battery 70 7 Troubleshooting 75 General Troubleshooting Information 75 Troubleshooting Routing Problems 82 A Technical Specifications 87 Physical Dimensions 87 Space Requirements 87 Operating Temperature 87 NIC Interfaces 88 6 IP390 Security Platform Installation Guide
Installation Guide
Page 13
... install, monitor, and replace network interface cards (NICs). „ Chapter 6, "Installing and Replacing Components Other than Network Interface Cards" describes how to install or replace compact flash memory cards, flash-memory PC cards, RAM memory, and a hard-disk drive. „ Chapter 7, "Troubleshooting" describes problems you might encounter and proposes solutions to and use Nokia IP390 security appliances.
... install, monitor, and replace network interface cards (NICs). „ Chapter 6, "Installing and Replacing Components Other than Network Interface Cards" describes how to install or replace compact flash memory cards, flash-memory PC cards, RAM memory, and a hard-disk drive. „ Chapter 7, "Troubleshooting" describes problems you might encounter and proposes solutions to and use Nokia IP390 security appliances.
Installation Guide
Page 21
... the IP390 appliance-you can occur if you use the product near water. Caution Replace the battery only with the CLI. Do not use controls, make performance adjustments, or follow procedures that enables you are not described in Chapter A, "Technical Specifications." IP390 Security Platform Installation Guide 21 Everything that are using. „ Nokia Horizon Manager-a secure GUI...
... the IP390 appliance-you can occur if you use the product near water. Caution Replace the battery only with the CLI. Do not use controls, make performance adjustments, or follow procedures that enables you are not described in Chapter A, "Technical Specifications." IP390 Security Platform Installation Guide 21 Everything that are using. „ Nokia Horizon Manager-a secure GUI...

Installation Guide
Page 37
.... For information on adding or replacing NICs, see Chapter 5, "Installing and Replacing Network Interface Cards." 4 About IP390 Appliance Network Interface Cards This chapter describes the PMC network interface cards (NICs) available for analysis through tcpdump IP390 Security Platform Installation Guide 37 Four-Port 10/100 Mbps Ethernet Network Interface Card The IP390 appliance supports Nokia-approved, four-port UTP5...
.... For information on adding or replacing NICs, see Chapter 5, "Installing and Replacing Network Interface Cards." 4 About IP390 Appliance Network Interface Cards This chapter describes the PMC network interface cards (NICs) available for analysis through tcpdump IP390 Security Platform Installation Guide 37 Four-Port 10/100 Mbps Ethernet Network Interface Card The IP390 appliance supports Nokia-approved, four-port UTP5...

Installation Guide
Page 49
..., use Nokia Network Voyager to service an IP390 appliance. Deactivating Configured Interfaces If you are covered: „ Deactivating Configured Interfaces „ Removing, Installing, and Replacing NICs „ Configuring and Activating Interfaces „ Monitoring Network Interface Cards For detailed information on the NIC. 5 Installing and Replacing Network Interface Cards Your IP390 appliance comes with any electronic components. IP390 Security Platform...
..., use Nokia Network Voyager to service an IP390 appliance. Deactivating Configured Interfaces If you are covered: „ Deactivating Configured Interfaces „ Removing, Installing, and Replacing NICs „ Configuring and Activating Interfaces „ Monitoring Network Interface Cards For detailed information on the NIC. 5 Installing and Replacing Network Interface Cards Your IP390 appliance comes with any electronic components. IP390 Security Platform...

Installation Guide
Page 50
... tray assembly is still active in the IP390 appliance. For additional information, see "Using Nokia Network Voyager" on page 49. Before You Start To remove, install, or replace a Nokia NIC, you need to shut the appliance down , enter halt at the prompt. 50 IP390 Security Platform Installation Guide Removing, Installing, and Replacing NICs Note Before removing a configured NIC with...
... tray assembly is still active in the IP390 appliance. For additional information, see "Using Nokia Network Voyager" on page 49. Before You Start To remove, install, or replace a Nokia NIC, you need to shut the appliance down , enter halt at the prompt. 50 IP390 Security Platform Installation Guide Removing, Installing, and Replacing NICs Note Before removing a configured NIC with...

Installation Guide
Page 51
... expose the NIC connectors. IP390 Security Platform Installation Guide 51 Gently pull the chassis tray assembly forward to avoid damaging components. Removing, Installing, and Replacing NICs 2. IP390 00537 4. IP390 00525 Chassis tray assembly retaining screws 3. Use your fingers or a screwdriver to loosen the retaining screws that occupies the space in the appliance front panel, retain it...
... expose the NIC connectors. IP390 Security Platform Installation Guide 51 Gently pull the chassis tray assembly forward to avoid damaging components. Removing, Installing, and Replacing NICs 2. IP390 00537 4. IP390 00525 Chassis tray assembly retaining screws 3. Use your fingers or a screwdriver to loosen the retaining screws that occupies the space in the appliance front panel, retain it...

Installation Guide
Page 52
...Insert a blank bezel into the front panel slot formerly occupied by lifting the back of the NIC (as close as possible to step 9. 52 IP390 Security Platform Installation Guide Remove the NIC by the NIC and push it gently into the front panel and that the screw holes on the bottom... with those in the place of the NIC. 00530 6. Insert the new NIC or blank bezel. „ If you have removed. b. 5 Installing and Replacing Network Interface Cards 5. Make sure that the bezel is completely seated into place. From above the chassis tray assembly, remove the NIC retaining screws from...
...Insert a blank bezel into the front panel slot formerly occupied by lifting the back of the NIC (as close as possible to step 9. 52 IP390 Security Platform Installation Guide Remove the NIC by the NIC and push it gently into the front panel and that the screw holes on the bottom... with those in the place of the NIC. 00530 6. Insert the new NIC or blank bezel. „ If you have removed. b. 5 Installing and Replacing Network Interface Cards 5. Make sure that the bezel is completely seated into place. From above the chassis tray assembly, remove the NIC retaining screws from...

Installation Guide
Page 53
a. As shown on the bottom of the NIC (as close as the following figure shows. IP390 Security Platform Installation Guide 53 Removing, Installing, and Replacing NICs „ If you are used for the interface, as possible to the connector locations) down toward the chassis tray assembly. Insert ...the NIC bezel into the connectors on the NIC are installing or replacing a NIC, insert the NIC. Gently push the back of the T1 NIC, only these two NIC connectors are used for the interface 00689...
a. As shown on the bottom of the NIC (as close as the following figure shows. IP390 Security Platform Installation Guide 53 Removing, Installing, and Replacing NICs „ If you are used for the interface, as possible to the connector locations) down toward the chassis tray assembly. Insert ...the NIC bezel into the connectors on the NIC are installing or replacing a NIC, insert the NIC. Gently push the back of the T1 NIC, only these two NIC connectors are used for the interface 00689...

Installation Guide
Page 54
From the top of the NIC. 00531 9. IP390 00538 The appliance automatically restarts when the chassis tray assembly clicks into the standoffs on the back of the chassis tray assembly, screw the NIC retaining screws into place. 54 IP390 Security Platform Installation Guide From beneath the chassis tray assembly, screw in the bezel retaining screws. 00528 10. Gently slide the chassis tray assembly back into the appliance until it clicks into place. 5 Installing and Replacing Network Interface Cards 8.
From the top of the NIC. 00531 9. IP390 00538 The appliance automatically restarts when the chassis tray assembly clicks into the standoffs on the back of the chassis tray assembly, screw the NIC retaining screws into place. 54 IP390 Security Platform Installation Guide From beneath the chassis tray assembly, screw in the bezel retaining screws. 00528 10. Gently slide the chassis tray assembly back into the appliance until it clicks into place. 5 Installing and Replacing Network Interface Cards 8.

Installation Guide
Page 56
5 Installing and Replacing Network Interface Cards 56 IP390 Security Platform Installation Guide
5 Installing and Replacing Network Interface Cards 56 IP390 Security Platform Installation Guide

Installation Guide
Page 57
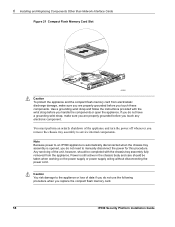
...". Limit service of the compact flash memory card. Replacing the Compact Flash Memory Card In flash-based IP390 appliances, the compact flash memory card stores the Nokia IPSO operating system, Check Point application, and boot manager. Figure 21 shows the location of the appliance to service an IP390 appliance. IP390 Security Platform Installation Guide 57 The compact flash memory...
...". Limit service of the compact flash memory card. Replacing the Compact Flash Memory Card In flash-based IP390 appliances, the compact flash memory card stores the Nokia IPSO operating system, Check Point application, and boot manager. Figure 21 shows the location of the appliance to service an IP390 appliance. IP390 Security Platform Installation Guide 57 The compact flash memory...
Installation Guide
Page 58
... Network Interface Cards Figure 21 Compact Flash Memory Card Slot IP390 00550 Caution To protect the appliance and the compact flash memory card from the appliance. Power is opened, you do not use the following procedure when you replace the compact flash memory card. 58 IP390 Security Platform Installation Guide You must perform an orderly shutdown...
... Network Interface Cards Figure 21 Compact Flash Memory Card Slot IP390 00550 Caution To protect the appliance and the compact flash memory card from the appliance. Power is opened, you do not use the following procedure when you replace the compact flash memory card. 58 IP390 Security Platform Installation Guide You must perform an orderly shutdown...
Installation Guide
Page 59
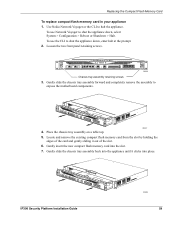
... the edges of the slot. 6. Use Nokia Network Voyager or the CLI to expose the motherboard components. IP390 IP390 Security Platform Installation Guide 00538 59 Gently insert the new compact flash memory card into place. Replacing the Compact Flash Memory Card To replace compact flash memory card in your appliance 1. To use the CLI to shut the...
... the edges of the slot. 6. Use Nokia Network Voyager or the CLI to expose the motherboard components. IP390 IP390 Security Platform Installation Guide 00538 59 Gently insert the new compact flash memory card into place. Replacing the Compact Flash Memory Card To replace compact flash memory card in your appliance 1. To use the CLI to shut the...

Installation Guide
Page 60
...To avoid potential equipment malfunction, Nokia recommends that can support a flash-memory PC card having a capacity of data if you replace the flash-memory PC card. 6 Installing and Replacing Components Other than Network Interface Cards The appliance automatically restarts when the chassis ...The flash-memory PC card comes formatted from Nokia or authorized resellers. The card is firmly seated in Nokia Contact Information on page 3. Caution You risk damage to the appliance by your console connection. 60 IP390 Security Platform Installation Guide Press gently on the power...
...To avoid potential equipment malfunction, Nokia recommends that can support a flash-memory PC card having a capacity of data if you replace the flash-memory PC card. 6 Installing and Replacing Components Other than Network Interface Cards The appliance automatically restarts when the chassis ...The flash-memory PC card comes formatted from Nokia or authorized resellers. The card is firmly seated in Nokia Contact Information on page 3. Caution You risk damage to the appliance by your console connection. 60 IP390 Security Platform Installation Guide Press gently on the power...
Installation Guide
Page 61
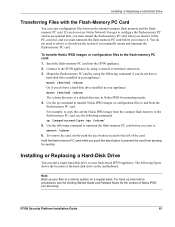
...command to unmount the flash-memory PC card before you manually mount and unmount the flash-memory PC card. IP390 Security Platform Installation Guide 61 Use the cp command to transfer Nokia IPSO images or configuration files to and from ejecting too quickly. Use the following figure shows the location ...not need to reboot or shut down the system if you remove it : umount /cdrom 6. Insert the flash-memory PC card into the IP390 appliance. 2. Installing or Replacing a Hard-Disk Drive Transferring Files with the Flash-Memory PC Card You can add a single hard-disk drive to your files to a...
...command to unmount the flash-memory PC card before you manually mount and unmount the flash-memory PC card. IP390 Security Platform Installation Guide 61 Use the cp command to transfer Nokia IPSO images or configuration files to and from ejecting too quickly. Use the following figure shows the location ...not need to reboot or shut down the system if you remove it : umount /cdrom 6. Insert the flash-memory PC card into the IP390 appliance. 2. Installing or Replacing a Hard-Disk Drive Transferring Files with the Flash-Memory PC Card You can add a single hard-disk drive to your files to a...

Installation Guide
Page 62
.... 62 IP390 Security Platform Installation Guide Use Network Voyager or the CLI to the appliance through Network Voyager „ A Phillips-head screwdriver „ A torque screwdriver capable of a 69.4ozf*in your appliance, you need the following: „ Physical access to the appliance „ A Nokia-approved hard-disk drive „ Access to halt the appliance. 6 Installing and Replacing Components...
.... 62 IP390 Security Platform Installation Guide Use Network Voyager or the CLI to the appliance through Network Voyager „ A Phillips-head screwdriver „ A torque screwdriver capable of a 69.4ozf*in your appliance, you need the following: „ Physical access to the appliance „ A Nokia-approved hard-disk drive „ Access to halt the appliance. 6 Installing and Replacing Components...
Installation Guide
Page 63
... procedure. IP390 Security Platform Installation Guide 63 Power is opened, you can access the hard-disk drive retaining screws from the bottom of the unit, however, should be completed with the chassis tray assembly fully removed from the appliance so you do not need to an IP390 appliance is automatically... supply wiring without disconnecting the power cord. Gently slide the chassis tray assembly forward to remove the tray from the appliance. IP390 00525 Chassis tray assembly retaining screws 3. Any servicing of the tray. Installing or Replacing a Hard-Disk Drive 2.
... procedure. IP390 Security Platform Installation Guide 63 Power is opened, you can access the hard-disk drive retaining screws from the bottom of the unit, however, should be completed with the chassis tray assembly fully removed from the appliance so you do not need to an IP390 appliance is automatically... supply wiring without disconnecting the power cord. Gently slide the chassis tray assembly forward to remove the tray from the appliance. IP390 00525 Chassis tray assembly retaining screws 3. Any servicing of the tray. Installing or Replacing a Hard-Disk Drive 2.

Installation Guide
Page 64
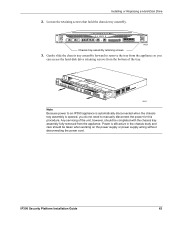
If a you are not keyed. 64 IP390 Security Platform Installation Guide 6 Installing and Replacing Components Other than Network Interface Cards 4. Insert the hard-disk drive unit. 00536 Note Push the hard-disk drive gently into place. Take care to align the connectors correctly as the connectors are replacing a hard-disk drive, remove the retaining screws that hold the hard-disk drive unit from the bottom of the chassis tray assembly. 00534 Gently remove the hard-disk drive from the motherboard, taking care not to damage the connector. 5.
If a you are not keyed. 64 IP390 Security Platform Installation Guide 6 Installing and Replacing Components Other than Network Interface Cards 4. Insert the hard-disk drive unit. 00536 Note Push the hard-disk drive gently into place. Take care to align the connectors correctly as the connectors are replacing a hard-disk drive, remove the retaining screws that hold the hard-disk drive unit from the bottom of the chassis tray assembly. 00534 Gently remove the hard-disk drive from the motherboard, taking care not to damage the connector. 5.

Installation Guide
Page 65
... locally by installing and configuring an optional hard-disk drive. Chassis tray assembly retaining screws IP390 00525 Configuring a Hard-Disk Drive for configuring a Nokia appliance to store Check Point log messages on the disk. IP390 Security Platform Installation Guide 65 Tighten the retaining screws that hold the chassis tray assembly. Installing or Replacing a Hard-Disk Drive 6.
... locally by installing and configuring an optional hard-disk drive. Chassis tray assembly retaining screws IP390 00525 Configuring a Hard-Disk Drive for configuring a Nokia appliance to store Check Point log messages on the disk. IP390 Security Platform Installation Guide 65 Tighten the retaining screws that hold the chassis tray assembly. Installing or Replacing a Hard-Disk Drive 6.
