Installation Guide
Page 6
... 35 Using Voyager to Monitor a Nokia 60s or 100s Appliance . . . . . 36 36 4 Installing and Replacing Network Interface Cards 37 Deactivating Configured Interfaces 38 Removing, Installing, and Replacing NICs 38 Configuring and Activating Interfaces 44 Monitoring Network Interface Cards 45 5 Connecting PMC Network Interface Cards 47 Dual-Port 10/100 Ethernet Interface, PMC 47 Ethernet PMC NIC Features 48 Ethernet NIC Connectors and Cables 48 6 Installing and Replacing Other Components 51 Installing a PCMCIA Modem 52 Replacing a Hard-Disk Drive 53 Replacing or Upgrading Memory 57...
... 35 Using Voyager to Monitor a Nokia 60s or 100s Appliance . . . . . 36 36 4 Installing and Replacing Network Interface Cards 37 Deactivating Configured Interfaces 38 Removing, Installing, and Replacing NICs 38 Configuring and Activating Interfaces 44 Monitoring Network Interface Cards 45 5 Connecting PMC Network Interface Cards 47 Dual-Port 10/100 Ethernet Interface, PMC 47 Ethernet PMC NIC Features 48 Ethernet NIC Connectors and Cables 48 6 Installing and Replacing Other Components 51 Installing a PCMCIA Modem 52 Replacing a Hard-Disk Drive 53 Replacing or Upgrading Memory 57...
Installation Guide
Page 7
Setting the Variables 76 Other commands 78 Booting the System 79 Using the Boot Manager to Install IPSO 80 Protecting the Boot Manager with a Password 81 Installing the Boot Manager 81 Upgrading the Boot Manager 83 8 Troubleshooting 85 General Troubleshooting Information 85 Troubleshooting Routing Problems 95 A Technical Specifications 101 Physical Dimensions 101 Space Requirements 101 NIC Interfaces 102 B Compliance Information 103 Declaration of Conformity 104 Compliance Statements 106 FCC Notice (US 107 Index 109 Nokia 60s and 100s Installation Guide 7
Setting the Variables 76 Other commands 78 Booting the System 79 Using the Boot Manager to Install IPSO 80 Protecting the Boot Manager with a Password 81 Installing the Boot Manager 81 Upgrading the Boot Manager 83 8 Troubleshooting 85 General Troubleshooting Information 85 Troubleshooting Routing Problems 95 A Technical Specifications 101 Physical Dimensions 101 Space Requirements 101 NIC Interfaces 102 B Compliance Information 103 Declaration of Conformity 104 Compliance Statements 106 FCC Notice (US 107 Index 109 Nokia 60s and 100s Installation Guide 7

Installation Guide
Page 12
... part of the IPSO software. „ Chapter 8, "Troubleshooting" discusses problems you might occur because of acronyms used in this guide uses, including notices, text conventions, and command-line conventions. „ Chapter 6, "Installing and Replacing Other Components" explains how to install or replace PCMCIA modems, memory, the hard-disk drive, and an encryption accelerator card (Nokia 100s only). „ Chapter 7, "Using the Boot Manager" explains how to these problems. „ Appendix A, "Technical Specifications" gives technical specifications such as interface...
... part of the IPSO software. „ Chapter 8, "Troubleshooting" discusses problems you might occur because of acronyms used in this guide uses, including notices, text conventions, and command-line conventions. „ Chapter 6, "Installing and Replacing Other Components" explains how to install or replace PCMCIA modems, memory, the hard-disk drive, and an encryption accelerator card (Nokia 100s only). „ Chapter 7, "Using the Boot Manager" explains how to these problems. „ Appendix A, "Technical Specifications" gives technical specifications such as interface...
Installation Guide
Page 18
... and access routers in security applications. Voyager is the same. As network devices, the 60s and 100s appliances support a comprehensive suite of the 60s and 100s appliance makes them ideal for installations that need for multicast traffic. The Nokia 60s and 100s appliances are noted in hardware-based encryption acceleration. With Voyager, you can manage the 60s and 100s appliances by using the Nokia Network Voyager: Nokia Network Voyager-an SSL-secured, Web-based element management interface...
... and access routers in security applications. Voyager is the same. As network devices, the 60s and 100s appliances support a comprehensive suite of the 60s and 100s appliance makes them ideal for installations that need for multicast traffic. The Nokia 60s and 100s appliances are noted in hardware-based encryption acceleration. With Voyager, you can manage the 60s and 100s appliances by using the Nokia Network Voyager: Nokia Network Voyager-an SSL-secured, Web-based element management interface...
Installation Guide
Page 21
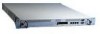
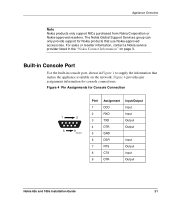
... Installation Guide 21 The Nokia Global Support Services group can only provide support for Nokia products that makes the appliance available on page 3. Appliance Overview Note Nokia products only support NICs purchased from Nokia Corporation or Nokia-approved resellers. Built-in Console Port Use the built-in console port, shown in the "Nokia Contact Information" on the network. For sales or reseller information, contact a Nokia service provider listed in Figure 1 to supply the information that use Nokia...
... Installation Guide 21 The Nokia Global Support Services group can only provide support for Nokia products that makes the appliance available on page 3. Appliance Overview Note Nokia products only support NICs purchased from Nokia Corporation or Nokia-approved resellers. Built-in Console Port Use the built-in console port, shown in the "Nokia Contact Information" on the network. For sales or reseller information, contact a Nokia service provider listed in Figure 1 to supply the information that use Nokia...
Installation Guide
Page 25
...information about changes to the software requirements or additional applications that have become damaged. If a cord is not provided, use a power cord ...guide was published, contact your Nokia service provider, as listed in "Nokia Contact Information" on the Nokia 60s or 100s appliance. IPSO v3.8.1 or later. Nokia 60s and 100s Installation Guide 25 Software Requirements Caution Do not place objects over the ventilation holes on page 3. Caution For Nokia 60s or 100s appliances intended for shipment outside of end use. Software Requirements Nokia 60s and 100s appliances support...
...information about changes to the software requirements or additional applications that have become damaged. If a cord is not provided, use a power cord ...guide was published, contact your Nokia service provider, as listed in "Nokia Contact Information" on the Nokia 60s or 100s appliance. IPSO v3.8.1 or later. Nokia 60s and 100s Installation Guide 25 Software Requirements Caution Do not place objects over the ventilation holes on page 3. Caution For Nokia 60s or 100s appliances intended for shipment outside of end use. Software Requirements Nokia 60s and 100s appliances support...

Installation Guide
Page 30
... connect the remaining LAN interface wires at least one network interface to do so. The power LED should be illuminated. After you press the power switch. Check the power LED on page 48. For details, see "Status LEDs" on page 3 for technical support. 2 Installing the Appliance The fan unit on the power supply turns on when you connect the network interfaces, continue with Chapter 3, "Performing the Initial Configuration.". 30 Nokia 60s and 100s Installation Guide...
... connect the remaining LAN interface wires at least one network interface to do so. The power LED should be illuminated. After you press the power switch. Check the power LED on page 48. For details, see "Status LEDs" on page 3 for technical support. 2 Installing the Appliance The fan unit on the power supply turns on when you connect the network interfaces, continue with Chapter 3, "Performing the Initial Configuration.". 30 Nokia 60s and 100s Installation Guide...
Installation Guide
Page 33
... the screen for about using the boot manager, see either the BOOTMGR> or Hostname? If the settings are correct. If the DHCP client starts, it might configure the appliance with an incorrect host name and IP address (this could happen if a DHCP server on the console, check the console port and console display connections to any request). b. prompt does not appear on your Nokia service provider as listed in at both...
... the screen for about using the boot manager, see either the BOOTMGR> or Hostname? If the settings are correct. If the DHCP client starts, it might configure the appliance with an incorrect host name and IP address (this could happen if a DHCP server on the console, check the console port and console display connections to any request). b. prompt does not appear on your Nokia service provider as listed in at both...

Installation Guide
Page 37
...Limit service of networking equipment before attempting to remove, add, or replace NICs later if it becomes necessary. Nokia 60s and 100s Installation Guide 37 The following topics are covered: „ Deactivating Configured Interfaces „ Removing, Installing, and Replacing NICs „ Configuring and Activating Interfaces „ Monitoring Network Interface Cards For detailed information on specific network interface cards, see Chapter 5, "Connecting PMC Network Interface Cards.". 4 Installing and Replacing Network Interface Cards Your 60s and 100s appliances come with any network...
...Limit service of networking equipment before attempting to remove, add, or replace NICs later if it becomes necessary. Nokia 60s and 100s Installation Guide 37 The following topics are covered: „ Deactivating Configured Interfaces „ Removing, Installing, and Replacing NICs „ Configuring and Activating Interfaces „ Monitoring Network Interface Cards For detailed information on specific network interface cards, see Chapter 5, "Connecting PMC Network Interface Cards.". 4 Installing and Replacing Network Interface Cards Your 60s and 100s appliances come with any network...

Installation Guide
Page 48
... crossover cable. 48 Nokia 60s and 100s Installation Guide 5 Connecting PMC Network Interface Cards how to access Voyager and the related reference materials, see Chapter 4, "Installing and Replacing Network Interface Cards." For information about how to add or replace a NIC later if it become necessary, see "Accessing Nokia Network Voyager" on the remote equipment illuminate to a host, use a straight-through tcpdump. You can configure and monitor Ethernet interfaces with Voyager. As data is turned on, the Ethernet link LEDs...
... crossover cable. 48 Nokia 60s and 100s Installation Guide 5 Connecting PMC Network Interface Cards how to access Voyager and the related reference materials, see Chapter 4, "Installing and Replacing Network Interface Cards." For information about how to add or replace a NIC later if it become necessary, see "Accessing Nokia Network Voyager" on the remote equipment illuminate to a host, use a straight-through tcpdump. You can configure and monitor Ethernet interfaces with Voyager. As data is turned on, the Ethernet link LEDs...
Installation Guide
Page 51
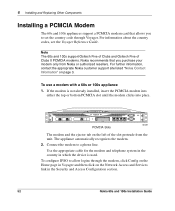
Nokia 60s and 100s Installation Guide 51 Caution Protect your 60s and 100s appliance. Limit service of networking equipment before you are covered: „ Installing a PCMCIA Modem „ Replacing a Hard-Disk Drive „ Replacing or Upgrading Memory „ Installing an Encryption Accelerator Card For instructions on how to add or replace user serviceable items other electronic equipment from electrostatic discharge (ESD) damage by making sure you touch any component. 6 Installing and Replacing Other Components This chapter...
Nokia 60s and 100s Installation Guide 51 Caution Protect your 60s and 100s appliance. Limit service of networking equipment before you are covered: „ Installing a PCMCIA Modem „ Replacing a Hard-Disk Drive „ Replacing or Upgrading Memory „ Installing an Encryption Accelerator Card For instructions on how to add or replace user serviceable items other electronic equipment from electrostatic discharge (ESD) damage by making sure you touch any component. 6 Installing and Replacing Other Components This chapter...
Installation Guide
Page 52
... modems. Nokia recommends that allows you purchase your modem only from the unit. To configure IPSO to a phone line. 6 Installing and Replacing Other Components Installing a PCMCIA Modem The 60s and 100s appliances support a PCMCIA modem card that you to set the country code through the modem, click Config on the Home page in Voyager and then click on the Network Access and Services link in which the device is not already installed, insert the PCMCIA modem...
... modems. Nokia recommends that allows you purchase your modem only from the unit. To configure IPSO to a phone line. 6 Installing and Replacing Other Components Installing a PCMCIA Modem The 60s and 100s appliances support a PCMCIA modem card that you to set the country code through the modem, click Config on the Home page in Voyager and then click on the Network Access and Services link in which the device is not already installed, insert the PCMCIA modem...

Installation Guide
Page 72
... input during a boot up . You can set from the keyboard. Factory default: five seconds. 72 Nokia 60s and 100s Installation Guide This variable revision cannot be set these values by the boot manager in nonvolatile memory. bootwait The amount of time specified in seconds, that the boot manager waits for input from the command line. 7 Using the Boot Manager the hard-disk drive. You can set the variables. This chapter describes the boot manager commands. Factory default: yes.
... input during a boot up . You can set from the keyboard. Factory default: five seconds. 72 Nokia 60s and 100s Installation Guide This variable revision cannot be set these values by the boot manager in nonvolatile memory. bootwait The amount of time specified in seconds, that the boot manager waits for input from the command line. 7 Using the Boot Manager the hard-disk drive. You can set the variables. This chapter describes the boot manager commands. Factory default: yes.

Installation Guide
Page 81
... appropriate Nokia Customer Support site as listed in boot manager, not access to set a new one. Use the password command to set a password 1. If you can require that the user enter a password to access the boot manager install command. If the appliance is installed at the factory; Enter the new password. Installing the Boot Manager The boot manager is protected by a password, enter your 60s or 100s appliance hard disk, you should not need to re-install it. At the boot manager command prompt enter: BOOTMGR[0]> passwd...
... appropriate Nokia Customer Support site as listed in boot manager, not access to set a new one. Use the password command to set a password 1. If you can require that the user enter a password to access the boot manager install command. If the appliance is installed at the factory; Enter the new password. Installing the Boot Manager The boot manager is protected by a password, enter your 60s or 100s appliance hard disk, you should not need to re-install it. At the boot manager command prompt enter: BOOTMGR[0]> passwd...

Installation Guide
Page 83
... upgrade procedures, refer to complete. Nokia 60s and 100s Installation Guide 83 Upgrading the Boot Manager Upgrading the Boot Manager The command to upgrade your boot manager has the following syntax: upgrade_bootmgr boot-device boot-file where boot-device is the storage device from the boot manager. Note To install the new boot manager, you must be in single-user mode. 3. The new boot manager options are cpipflash, nkipflash, and nkvpnflash. Get the upgraded boot manager image from the appropriate Nokia customer support site as listed in the Nokia...
... upgrade procedures, refer to complete. Nokia 60s and 100s Installation Guide 83 Upgrading the Boot Manager Upgrading the Boot Manager The command to upgrade your boot manager has the following syntax: upgrade_bootmgr boot-device boot-file where boot-device is the storage device from the boot manager. Note To install the new boot manager, you must be in single-user mode. 3. The new boot manager options are cpipflash, nkipflash, and nkvpnflash. Get the upgraded boot manager image from the appropriate Nokia customer support site as listed in the Nokia...

Installation Guide
Page 86
... using a null-modem cable. Solution The 60s and 100s appliance does not use flow control. 8 Troubleshooting Problem You do not have a console connection to Perform the Initial Configuration" on page 3. Problem Terminal set the password to the instructions included in the instructions for resetting the default password, or contact the Nokia customer support site listed in "Nokia Contact Information" on page 32. Solution Return to default settings according to a default value. 86 Nokia 60s and 100s Installation Guide...
... using a null-modem cable. Solution The 60s and 100s appliance does not use flow control. 8 Troubleshooting Problem You do not have a console connection to Perform the Initial Configuration" on page 3. Problem Terminal set the password to the instructions included in the instructions for resetting the default password, or contact the Nokia customer support site listed in "Nokia Contact Information" on page 32. Solution Return to default settings according to a default value. 86 Nokia 60s and 100s Installation Guide...
Installation Guide
Page 89
... 100s appliance ports do not appear. Nokia 60s and 100s Installation Guide 89 Problem Port is wrong. Contact the appropriate Nokia customer support site as listed in Voyager, or from Lynx, and verify that the interface is configured as active. For cabling information, see "Dual-Port 10/100 Ethernet Interface, PMC" on the 60s and 100s appliance are connecting directly to the computer. Solution Check host Ethernet port settings. Verify that Should be defective. Use...
... 100s appliance ports do not appear. Nokia 60s and 100s Installation Guide 89 Problem Port is wrong. Contact the appropriate Nokia customer support site as listed in Voyager, or from Lynx, and verify that the interface is configured as active. For cabling information, see "Dual-Port 10/100 Ethernet Interface, PMC" on the 60s and 100s appliance are connecting directly to the computer. Solution Check host Ethernet port settings. Verify that Should be defective. Use...

Installation Guide
Page 93
... MTU size is not set to determine the VC range. Appliance Not Receiving Power Problem Power cord is no power at both ends. Nokia 60s and 100s Installation Guide 93 Consult your 1483 device documentation. Solution Check cord. If there is not properly plugged in the supported VC range of the network interface card. Solution Check power source. Solution Set remote and local devices to LLC/SNAP. Solution Use ipsctl to LLC/SNAP. Problem Power supply...
... MTU size is not set to determine the VC range. Appliance Not Receiving Power Problem Power cord is no power at both ends. Nokia 60s and 100s Installation Guide 93 Consult your 1483 device documentation. Solution Check cord. If there is not properly plugged in the supported VC range of the network interface card. Solution Check power source. Solution Set remote and local devices to LLC/SNAP. Solution Use ipsctl to LLC/SNAP. Problem Power supply...

Installation Guide
Page 94
... upgrade IPSO with a console connection. Problem During the upgrade process, some of the environment variables might not have updated correctly. To set the boot manager to defaults, issue the set -defaults 94 Nokia 60s and 100s Installation Guide Solution Repeat memory installation procedures. No error messages appear, but the appliance stops responding to determine that no environment variables are fully seated in DIMM sockets. Setting the boot manager to defaults causes the boot manager to console and network. 8 Troubleshooting Appliance...
... upgrade IPSO with a console connection. Problem During the upgrade process, some of the environment variables might not have updated correctly. To set the boot manager to defaults, issue the set -defaults 94 Nokia 60s and 100s Installation Guide Solution Repeat memory installation procedures. No error messages appear, but the appliance stops responding to determine that no environment variables are fully seated in DIMM sockets. Setting the boot manager to defaults causes the boot manager to console and network. 8 Troubleshooting Appliance...
Installation Guide
Page 97
... the Configuring Routing document page in Voyager, you can access the document page by pressing Doc. Nokia 60s and 100s Installation Guide 97 Use the following command display routing updates for a given link. Problem Attached devices do not support OSPF. For more information about how to display OSPF details. Under routing options in Voyager. Troubleshooting Routing Problems Common Problems with OSPF Use tcpdump to use ICLID to access Voyager and the related reference materials, see "Accessing Nokia Network...
... the Configuring Routing document page in Voyager, you can access the document page by pressing Doc. Nokia 60s and 100s Installation Guide 97 Use the following command display routing updates for a given link. Problem Attached devices do not support OSPF. For more information about how to display OSPF details. Under routing options in Voyager. Troubleshooting Routing Problems Common Problems with OSPF Use tcpdump to use ICLID to access Voyager and the related reference materials, see "Accessing Nokia Network...


