
Installation Guide
Page 5
...Text Conventions 14 Related Documentation 15 1 Overview 17 About the Nokia IP1200 Series Security Platform 17 About the Nokia IP1200 Series Flash-Based Security Platforms 18 Managing the Nokia IP1200 Series Security Platform 19 Nokia IP1200 Series Security Platform Overview 19 Ethernet Management Ports 20 PMC Expansion Slots ... Requirements 28 Safety Warnings and Cautions 28 Software Requirements 30 Product Disposal 30 2 Installing the Nokia IP1200 Series Appliance 33 Rack Mounting the Appliance 33 Before You Begin 34 IP1220 and IP1260 Security Platforms Installation Guide 5
...Text Conventions 14 Related Documentation 15 1 Overview 17 About the Nokia IP1200 Series Security Platform 17 About the Nokia IP1200 Series Flash-Based Security Platforms 18 Managing the Nokia IP1200 Series Security Platform 19 Nokia IP1200 Series Security Platform Overview 19 Ethernet Management Ports 20 PMC Expansion Slots ... Requirements 28 Safety Warnings and Cautions 28 Software Requirements 30 Product Disposal 30 2 Installing the Nokia IP1200 Series Appliance 33 Rack Mounting the Appliance 33 Before You Begin 34 IP1220 and IP1260 Security Platforms Installation Guide 5

Installation Guide
Page 9
... 20 Figure 2 Ethernet Management Ports Details 20 Figure 3 Pin Assignments for Console and AUX Connections 22 Figure 4 Nokia IP1200 Series Appliance System Status LEDs 23 Figure 5 Hard-Disk Drive Front Pane 24 Figure 6 Power Supply and Fan Unit Locations ...(DC version 27 Figure 9 Rack-Mounting Screw Locations 34 Figure 10 Power Switch Location 41 Figure 11 Nokia Network Voyager Reference Access Points 45 Figure 12 Four-Port 10/100 Ethernet NIC Front Panel Details 59 ...3 PC Card Location 88 Figure 23 DIMM Socket Locations 99 IP1220 and IP1260 Security Platforms Installation Guide 9
... 20 Figure 2 Ethernet Management Ports Details 20 Figure 3 Pin Assignments for Console and AUX Connections 22 Figure 4 Nokia IP1200 Series Appliance System Status LEDs 23 Figure 5 Hard-Disk Drive Front Pane 24 Figure 6 Power Supply and Fan Unit Locations ...(DC version 27 Figure 9 Rack-Mounting Screw Locations 34 Figure 10 Power Switch Location 41 Figure 11 Nokia Network Voyager Reference Access Points 45 Figure 12 Four-Port 10/100 Ethernet NIC Front Panel Details 59 ...3 PC Card Location 88 Figure 23 DIMM Socket Locations 99 IP1220 and IP1260 Security Platforms Installation Guide 9
Installation Guide
Page 13
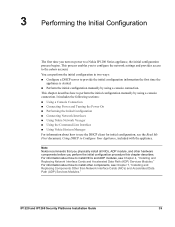
IP1220 and IP1260 Security Platforms Installation Guide 13 About this Guide This guide is organized into the following chapters and appendixes: „ Chapter 1, "Overview" presents a general overview of the Nokia IP1200 Series Security Platform. „ Chapter 2, "Installing the Nokia IP1200 Series Appliance" describes how to install the Nokia IP1200 Series appliance. „ Chapter 3, "Performing the Initial Configuration" describes how...
IP1220 and IP1260 Security Platforms Installation Guide 13 About this Guide This guide is organized into the following chapters and appendixes: „ Chapter 1, "Overview" presents a general overview of the Nokia IP1200 Series Security Platform. „ Chapter 2, "Installing the Nokia IP1200 Series Appliance" describes how to install the Nokia IP1200 Series appliance. „ Chapter 3, "Performing the Initial Configuration" describes how...
Installation Guide
Page 17
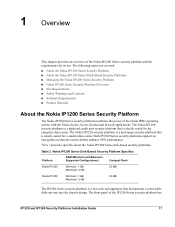
... provides an overview of the Nokia IP1200 Series security platform and the requirements for a smaller data center. The Nokia IP1220 security platform is a mid-range security platform that incorporates a serviceable slide-out tray into the chassis design. The Nokia IP1260 security platform is a high-end, multi port security platform that is a two-rack unit appliance that is ideally suited for...
... provides an overview of the Nokia IP1200 Series security platform and the requirements for a smaller data center. The Nokia IP1220 security platform is a mid-range security platform that incorporates a serviceable slide-out tray into the chassis design. The Nokia IP1260 security platform is a high-end, multi port security platform that is a two-rack unit appliance that is ideally suited for...
Installation Guide
Page 23
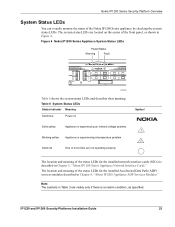
... Modules." Blinking yellow Appliance is experiencing an internal voltage problem. ! IP1220 and IP1260 Security Platforms Installation Guide 23 The system status LEDs are not operating properly. Solid red One or more fans are located on Symbol Solid yellow Appliance is experiencing a temperature problem. ! The location and meaning of the Nokia IP1200 Series appliance by checking the...
... Modules." Blinking yellow Appliance is experiencing an internal voltage problem. ! IP1220 and IP1260 Security Platforms Installation Guide 23 The system status LEDs are not operating properly. Solid red One or more fans are located on Symbol Solid yellow Appliance is experiencing a temperature problem. ! The location and meaning of the Nokia IP1200 Series appliance by checking the...

Installation Guide
Page 24
...Release Notes for the version of Nokia IPSO you can use the hot swap button, shown in the event of a disk failure. Figure 5 Hard-Disk Drive Front Pane l Hard-disk drive LEDs Hot swap button 00319 24 IP1220 and IP1260 Security Platforms Installation Guide The hard-...disk drives support hot swapping, and an optional disk-mirroring feature, described in Figure 5. Disk Mirroring The Nokia disk-mirroring feature provides fault tolerance by allowing the IP1200 Series appliance to create and delete ...
...Release Notes for the version of Nokia IPSO you can use the hot swap button, shown in the event of a disk failure. Figure 5 Hard-Disk Drive Front Pane l Hard-disk drive LEDs Hot swap button 00319 24 IP1220 and IP1260 Security Platforms Installation Guide The hard-...disk drives support hot swapping, and an optional disk-mirroring feature, described in Figure 5. Disk Mirroring The Nokia disk-mirroring feature provides fault tolerance by allowing the IP1200 Series appliance to create and delete ...

Installation Guide
Page 26
... when the power supply unit is plugged in to a tolerance of ± 5 percent of the power supplies. Caution The Nokia IP1200 Series appliance power supply might be turned on for load sharing and redundancy. This is because the internal cooling fan for power sharing and ...Locations Power supplies Grounding studs Status LEDs 00308a Power cord receptacle Power switch Fan unit Power Supplies The Nokia IP1200 Series appliance supports up to two power supplies for each power supply runs only when the unit is turned on. 26 IP1220 and IP1260 Security Platforms Installation Guide
... when the power supply unit is plugged in to a tolerance of ± 5 percent of the power supplies. Caution The Nokia IP1200 Series appliance power supply might be turned on for load sharing and redundancy. This is because the internal cooling fan for power sharing and ...Locations Power supplies Grounding studs Status LEDs 00308a Power cord receptacle Power switch Fan unit Power Supplies The Nokia IP1200 Series appliance supports up to two power supplies for each power supply runs only when the unit is turned on. 26 IP1220 and IP1260 Security Platforms Installation Guide
Installation Guide
Page 30
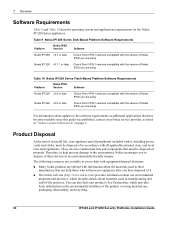
...disposed of the product covering material use, packaging, disassembly, and recycling. 30 IP1220 and IP1260 Security Platforms Installation Guide Therefore, to help prevent damage to the environment, Nokia encourages you to help those who will process equipment after you to dispose of...using For information about the materials used in "Nokia Contact Information" on the environmental attributes of properly. The following resources are available to you have become available since this guide was published, contact your appliance and all applicable national, state, and local laws...
...disposed of the product covering material use, packaging, disassembly, and recycling. 30 IP1220 and IP1260 Security Platforms Installation Guide Therefore, to help prevent damage to the environment, Nokia encourages you to help those who will process equipment after you to dispose of...using For information about the materials used in "Nokia Contact Information" on the environmental attributes of properly. The following resources are available to you have become available since this guide was published, contact your appliance and all applicable national, state, and local laws...

Installation Guide
Page 33
Note To avoid damaging your appliance on the rack. IP1220 and IP1260 Security Platforms Installation Guide 33 The following the instructions provided with four mounting screws, as Figure 9 shows. The grounding plug on page 20) provides...handle the components or open the appliance. Rack Mounting the Appliance The Nokia IP1200 Series appliance mounts in Figure 1 on the front of the appliance (shown in a standard 19-inch equipment rack with the wrist strap before you touch any electronic component. 2 Installing the Nokia IP1200 Series Appliance This chapter describes how to ...
Note To avoid damaging your appliance on the rack. IP1220 and IP1260 Security Platforms Installation Guide 33 The following the instructions provided with four mounting screws, as Figure 9 shows. The grounding plug on page 20) provides...handle the components or open the appliance. Rack Mounting the Appliance The Nokia IP1200 Series appliance mounts in Figure 1 on the front of the appliance (shown in a standard 19-inch equipment rack with the wrist strap before you touch any electronic component. 2 Installing the Nokia IP1200 Series Appliance This chapter describes how to ...

Installation Guide
Page 34
... protruding from the package the #6 ring tongue lugs and kep nuts. 2. Do not over each of your installation site. 34 IP1220 and IP1260 Security Platforms Installation Guide If the space behind the rack is turned on page 26. 4. Locate and remove from the rear panel of...block any ventilation openings. Attach the grounding cable to an earth ground or other grounding point to the lugs. 3. 2 Installing the Nokia IP1200 Series Appliance Figure 9 Rack-Mounting Screw Locations 00307a.3 Rack-mounting screw locations Two rack-mounting positions allow you to finish tightening the nut onto ...
... protruding from the package the #6 ring tongue lugs and kep nuts. 2. Do not over each of your installation site. 34 IP1220 and IP1260 Security Platforms Installation Guide If the space behind the rack is turned on page 26. 4. Locate and remove from the rear panel of...block any ventilation openings. Attach the grounding cable to an earth ground or other grounding point to the lugs. 3. 2 Installing the Nokia IP1200 Series Appliance Figure 9 Rack-Mounting Screw Locations 00307a.3 Rack-mounting screw locations Two rack-mounting positions allow you to finish tightening the nut onto ...

Installation Guide
Page 36
... strap before you handle the components or open the appliance. d. The grounding plug on the front of the appliance (shown in Figure 1 on the back of the IP1200 Series and the two screws that secure it. 00308a Power supplies b. a. Use the handles... to gently pull the power supply out of the appliance. Optionally, remove the chassis tray assembly from the rear of the chassis tray assembly. 00317.1 4. 2 Installing the Nokia IP1200 Series Appliance 3. Locate the power supply on page 20) provides a 36 IP1220 and IP1260 Security...
... strap before you handle the components or open the appliance. d. The grounding plug on the front of the appliance (shown in Figure 1 on the back of the IP1200 Series and the two screws that secure it. 00308a Power supplies b. a. Use the handles... to gently pull the power supply out of the appliance. Optionally, remove the chassis tray assembly from the rear of the chassis tray assembly. 00317.1 4. 2 Installing the Nokia IP1200 Series Appliance 3. Locate the power supply on page 20) provides a 36 IP1220 and IP1260 Security...

Installation Guide
Page 38
2 Installing the Nokia IP1200 Series Appliance 38 IP1220 and IP1260 Security Platforms Installation Guide
2 Installing the Nokia IP1200 Series Appliance 38 IP1220 and IP1260 Security Platforms Installation Guide
Installation Guide
Page 39
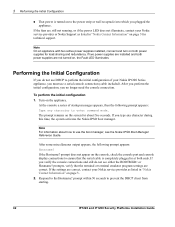
... a DHCP server to provide the initial configuration information the first time the appliance is started. „ Perform the initial configuration manually by using a console connection. For information about how to the admin account. IP1220 and IP1260 Security Platforms Installation Guide 39 Note Nokia recommends that you physically install all NICs, ADP module, and other...
... a DHCP server to provide the initial configuration information the first time the appliance is started. „ Perform the initial configuration manually by using a console connection. For information about how to the admin account. IP1220 and IP1260 Security Platforms Installation Guide 39 Note Nokia recommends that you physically install all NICs, ADP module, and other...

Installation Guide
Page 40
... power supply on the front panel of the IP1200 Series appliance. the serial (AUX) port is Cisco compatible. Connect the other end of the appliance as shown in Figure 10. 40 IP1220 and IP1260 Security Platforms Installation Guide After you perform the initial configuration, you...). 3 Performing the Initial Configuration Using a Console Connection If you do not use DHCP to perform the initial configuration of your Nokia IP1200 Series appliance, you must use a straight-through cable. 00307a.3 Console port For cable pin assignments for the console connection, see "Console ...
... power supply on the front panel of the IP1200 Series appliance. the serial (AUX) port is Cisco compatible. Connect the other end of the appliance as shown in Figure 10. 40 IP1220 and IP1260 Security Platforms Installation Guide After you perform the initial configuration, you...). 3 Performing the Initial Configuration Using a Console Connection If you do not use DHCP to perform the initial configuration of your Nokia IP1200 Series appliance, you must use a straight-through cable. 00307a.3 Console port For cable pin assignments for the console connection, see "Console ...
Installation Guide
Page 42
...information about five seconds. Respond to prevent the DHCP client from starting. 42 IP1220 and IP1260 Security Platforms Installation Guide 3 Performing the Initial Configuration „ That power is completely plugged in "Nokia Contact Information" on to the power strip or wall receptacle into which you... not running, or if the power LED does not illuminate, contact your Nokia service provider or Nokia Support as listed in at both power supplies are correct, contact your Nokia IP1200 Series appliance, you must use the boot manager, see either the BOOTMGR> or Hostname...
...information about five seconds. Respond to prevent the DHCP client from starting. 42 IP1220 and IP1260 Security Platforms Installation Guide 3 Performing the Initial Configuration „ That power is completely plugged in "Nokia Contact Information" on to the power strip or wall receptacle into which you... not running, or if the power LED does not illuminate, contact your Nokia service provider or Nokia Support as listed in at both power supplies are correct, contact your Nokia IP1200 Series appliance, you must use the boot manager, see either the BOOTMGR> or Hostname...

Installation Guide
Page 46
... you can execute only the show form of Nokia IP security platforms. 46 IP1220 and IP1260 Security Platforms Installation Guide For information about how to access and use the Nokia IPSO command-line interface (CLI) to manage and configure Nokia IP security platforms from a text file that you can ...you are using. 2. To access the command-line interface 1. You can now execute CLI commands from To Implement Purpose Nokia IPSO command line Enter the following command to the appliance by using a command-line connection (SSH, console, or Telnet) over a TCP/IP network as an admin, cadmin...
... you can execute only the show form of Nokia IP security platforms. 46 IP1220 and IP1260 Security Platforms Installation Guide For information about how to access and use the Nokia IPSO command-line interface (CLI) to manage and configure Nokia IP security platforms from a text file that you can ...you are using. 2. To access the command-line interface 1. You can now execute CLI commands from To Implement Purpose Nokia IPSO command line Enter the following command to the appliance by using a command-line connection (SSH, console, or Telnet) over a TCP/IP network as an admin, cadmin...

Installation Guide
Page 47
For information about how to obtain Horizon Manager or to manage and configure a large number of Nokia security appliances that reside on page 3. 051115 IP1220 and IP1260 Security Platforms Installation Guide 47 Using Nokia Horizon Manager Using Horizon Manager, an administrator can manage multiple devices simultaneously, perform parallel software upgrades, device verifications, device configuration, file backups, and...
For information about how to obtain Horizon Manager or to manage and configure a large number of Nokia security appliances that reside on page 3. 051115 IP1220 and IP1260 Security Platforms Installation Guide 47 Using Nokia Horizon Manager Using Horizon Manager, an administrator can manage multiple devices simultaneously, perform parallel software upgrades, device verifications, device configuration, file backups, and...
Installation Guide
Page 49
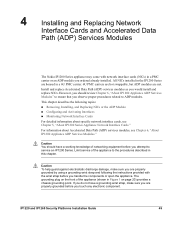
... information about specific network interface cards, see Chapter 6, "About IP1200 Appliance ADP Services Modules." The grounding plug on page 20) provides a chassis grounding point. IP1220 and IP1260 Security Platforms Installation Guide 49 4 Installing and Replacing Network Interface Cards and ...Accelerated Data Path (ADP) Services Modules The Nokia IP1200 Series appliance may come with the wrist strap before you handle the components or open the appliance. However,...
... information about specific network interface cards, see Chapter 6, "About IP1200 Appliance ADP Services Modules." The grounding plug on page 20) provides a chassis grounding point. IP1220 and IP1260 Security Platforms Installation Guide 49 4 Installing and Replacing Network Interface Cards and ...Accelerated Data Path (ADP) Services Modules The Nokia IP1200 Series appliance may come with the wrist strap before you handle the components or open the appliance. However,...

Installation Guide
Page 56
.... The status indicators for each ADP module are explained in your appliance by using Nokia Network Voyager. Use Network Voyager to examine the traffic on a specific port. 56 IP1220 and IP1260 Security Platforms Installation Guide Configuring and Activating Interfaces The Nokia IP1200 Series appliance automatically detects any new NICs or an ADP module when the device...
.... The status indicators for each ADP module are explained in your appliance by using Nokia Network Voyager. Use Network Voyager to examine the traffic on a specific port. 56 IP1220 and IP1260 Security Platforms Installation Guide Configuring and Activating Interfaces The Nokia IP1200 Series appliance automatically detects any new NICs or an ADP module when the device...
Installation Guide
Page 57
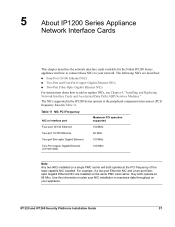
...they both operate at 66 Mhz. 5 About IP1200 Series Appliance Network Interface Cards This chapter describes the network interface cards available for the Nokia IP1200 Series appliance and how to connect those NICs to your appliance. Use this information to plan your NIC installation to ...add or replace NICs, see Chapter 4, "Installing and Replacing Network Interface Cards and Accelerated Data Path (ADP) Services Modules." IP1220 and IP1260 Security ...
...they both operate at 66 Mhz. 5 About IP1200 Series Appliance Network Interface Cards This chapter describes the network interface cards available for the Nokia IP1200 Series appliance and how to connect those NICs to your appliance. Use this information to plan your NIC installation to ...add or replace NICs, see Chapter 4, "Installing and Replacing Network Interface Cards and Accelerated Data Path (ADP) Services Modules." IP1220 and IP1260 Security ...


