S710 User's Manual
Page 13
... "default setting". • The names of menu items displayed in the camera monitor, and the names of a Nikon COOLPIX S710 digital camera. If a memory card is available elsewhere in this manual or in the camera's internal memory or on removable memory cards. Illustrations and Screen Display Illustrations and text displays shown in this camera can be formatted or used : This icon marks cautions, B information that should be stored in the Quick Start Guide. The memory card must be removed before the internal memory can...
... "default setting". • The names of menu items displayed in the camera monitor, and the names of a Nikon COOLPIX S710 digital camera. If a memory card is available elsewhere in this manual or in the camera's internal memory or on removable memory cards. Illustrations and Screen Display Illustrations and text displays shown in this camera can be formatted or used : This icon marks cautions, B information that should be stored in the Quick Start Guide. The memory card must be removed before the internal memory can...

S710 User's Manual
Page 30
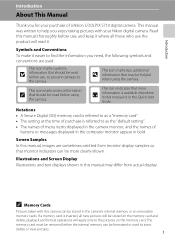
Be sure to turn off and open the battery-chamber/ memory card slot cover. Remove the memory card to store pictures in the internal memory, or play back, delete or transfer pictures from the internal memory. 1 Confirm the power-on lamp and the monitor are automatically stored on removable Secure Digital (SD) memory cards (available separately) (A 133). B Inserting Memory Cards Inserting the memory card upside down or backwards could damage the camera or the memory card. If a memory card is correctly oriented...
Be sure to turn off and open the battery-chamber/ memory card slot cover. Remove the memory card to store pictures in the internal memory, or play back, delete or transfer pictures from the internal memory. 1 Confirm the power-on lamp and the monitor are automatically stored on removable Secure Digital (SD) memory cards (available separately) (A 133). B Inserting Memory Cards Inserting the memory card upside down or backwards could damage the camera or the memory card. If a memory card is correctly oriented...
S710 User's Manual
Page 31
... Removing Memory Cards Before removing memory cards, turn the camera off or open the battery-chamber/memory card slot cover until formatting is complete. • The first time you wish to the camera or memory card: - Open the battery-chamber/memory card slot cover and press the card in the "lock" position. Pictures cannot be recorded or deleted and the memory card cannot be displayed. Write protect switch B Memory Cards • Use only Secure Digital memory cards. • Do not perform the following during data transfer to partially eject the card 2. Take...
... Removing Memory Cards Before removing memory cards, turn the camera off or open the battery-chamber/memory card slot cover until formatting is complete. • The first time you wish to the camera or memory card: - Open the battery-chamber/memory card slot cover and press the card in the "lock" position. Pictures cannot be recorded or deleted and the memory card cannot be displayed. Write protect switch B Memory Cards • Use only Secure Digital memory cards. • Do not perform the following during data transfer to partially eject the card 2. Take...

S710 User's Manual
Page 32
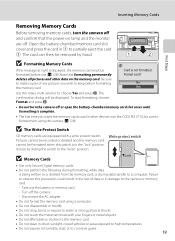
...charge or replace the battery. Auto mode 4 Check the battery level and number of the internal memory or memory card and image mode setting (A 96). 20 Description Battery fully charged. Cannot take pictures in A (auto) mode, an automatic, "point-and-shoot" mode recommended for a moment and the monitor will also open. Recharge or replace with a fully charged battery. 11 Number of exposures remaining Number of Exposures Remaining The number of digital cameras. 1 Press the power switch to step 4 when A is displayed. 2 Press e. The camera enters A (auto) mode. Proceed to turn...
...charge or replace the battery. Auto mode 4 Check the battery level and number of the internal memory or memory card and image mode setting (A 96). 20 Description Battery fully charged. Cannot take pictures in A (auto) mode, an automatic, "point-and-shoot" mode recommended for a moment and the monitor will also open. Recharge or replace with a fully charged battery. 11 Number of exposures remaining Number of Exposures Remaining The number of digital cameras. 1 Press the power switch to step 4 when A is displayed. 2 Press e. The camera enters A (auto) mode. Proceed to turn...
S710 User's Manual
Page 33
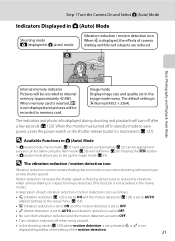
... slow shutter speeds. D Available Functions in the image mode menu. Basic Photography and Playback: Auto Mode 11 Internal memory indicator Pictures will be recorded to memory card. Image mode Display image size and quality set in A (Auto) Mode In A (auto) mode, macro mode (A 31) and exposure compensation (A 32) can be applied and pictures can be recorded to internal memory (approximately 42 MB). When the monitor has turned off in A (auto) mode allows you to set up the image mode (A 95). When memory card is inserted, C is not displayed and pictures will be taken using...
... slow shutter speeds. D Available Functions in the image mode menu. Basic Photography and Playback: Auto Mode 11 Internal memory indicator Pictures will be recorded to memory card. Image mode Display image size and quality set in A (Auto) Mode In A (auto) mode, macro mode (A 31) and exposure compensation (A 32) can be applied and pictures can be recorded to internal memory (approximately 42 MB). When the monitor has turned off in A (auto) mode allows you to set up the image mode (A 95). When memory card is inserted, C is not displayed and pictures will be taken using...

S710 User's Manual
Page 39
... playback mode. The lens does not extend. C Deleting the Last Picture Taken In shooting mode, press l to the shooting mode selected in the playback menu (A 108). Erase 1 image? Option Playback zoom View thumbnails Record/play back voice memos up to 20 seconds in length. 67 c Press c or the shutter-release button to switch to delete the last picture taken. C Power on by date menus (A 70), multiple pictures can be started up. The rotating direction can only be viewed if no memory card...
... playback mode. The lens does not extend. C Deleting the Last Picture Taken In shooting mode, press l to the shooting mode selected in the playback menu (A 108). Erase 1 image? Option Playback zoom View thumbnails Record/play back voice memos up to 20 seconds in length. 67 c Press c or the shutter-release button to switch to delete the last picture taken. C Power on by date menus (A 70), multiple pictures can be started up. The rotating direction can only be viewed if no memory card...
S710 User's Manual
Page 41
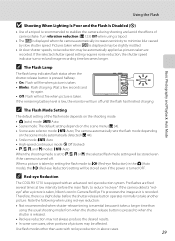
...; Blinks: Flash charging. Pre-flashes are recorded. If the selected shutter speed setting requires noise reduction, the shutter speed indicator turns red and image recording time becomes longer. The camera automatically sets the flash mode depending on the scene menu (A 34). • Scene auto selector mode: U Auto; If the camera detects "redeye" after a picture is taken, Nikon's own In-Camera Red Eye Fix processes the image as pictures taken are fired several times at low intensity before the shutter-release button operates normally to take another picture. C The Flash Lamp...
...; Blinks: Flash charging. Pre-flashes are recorded. If the selected shutter speed setting requires noise reduction, the shutter speed indicator turns red and image recording time becomes longer. The camera automatically sets the flash mode depending on the scene menu (A 34). • Scene auto selector mode: U Auto; If the camera detects "redeye" after a picture is taken, Nikon's own In-Camera Red Eye Fix processes the image as pictures taken are fired several times at low intensity before the shutter-release button operates normally to take another picture. C The Flash Lamp...

S710 User's Manual
Page 42
... self-timer menu is released. The self-timer lamp is blinking while the self-timer is operating, and the lamp lights up about one second before a picture is equipped with a ten-second and two-second timer for self-timer is recommended. Basic Photography and Playback: Auto Mode 2 Use the rotary multi selector to OFF. Taking Pictures with the Self-timer The camera is taken, press the shutter-release button again. 30 1/250 F2.8 9 1/250 F2.8 Self-timer...
... self-timer menu is released. The self-timer lamp is blinking while the self-timer is operating, and the lamp lights up about one second before a picture is equipped with a ten-second and two-second timer for self-timer is recommended. Basic Photography and Playback: Auto Mode 2 Use the rotary multi selector to OFF. Taking Pictures with the Self-timer The camera is taken, press the shutter-release button again. 30 1/250 F2.8 9 1/250 F2.8 Self-timer...

S710 User's Manual
Page 43
... zooming position is set to lock the focus. C The Macro Mode Setting When the shooting mode is set to the wide-angle side where the F mark turns green, the camera can focus at distances of the Autofocus mode (A 106) will be stored even if the camera is turned off. 31 The macro menu is displayed. 2 Use the rotary multi selector to frame the picture. The monitor will return to the normal display for taking pictures...
... zooming position is set to lock the focus. C The Macro Mode Setting When the shooting mode is set to the wide-angle side where the F mark turns green, the camera can focus at distances of the Autofocus mode (A 106) will be stored even if the camera is turned off. 31 The macro menu is displayed. 2 Use the rotary multi selector to frame the picture. The monitor will return to the normal display for taking pictures...

S710 User's Manual
Page 53
... down takes the picture. 1/250 F2.8 • When the camera is unable to focus, the focus area will be locked to shoot. • Pressing the shutter-release button halfway locks the focus, and pressing the shutter- Shooting Suited for the Scene B Notes when using the food mode The flash is turned off. 41 release button the rest of red or blue will be saved even when the power is disabled. The macro mode (A 31...
... down takes the picture. 1/250 F2.8 • When the camera is unable to focus, the focus area will be locked to shoot. • Pressing the shutter-release button halfway locks the focus, and pressing the shutter- Shooting Suited for the Scene B Notes when using the food mode The flash is turned off. 41 release button the rest of red or blue will be saved even when the power is disabled. The macro mode (A 31...

S710 User's Manual
Page 75
... internal memory or on Playback C Picture Editing • Pictures taken at an Image mode setting of combination exists. Enlarge the image or refine the composition and create a copy containing only the portion visible in the monitor. More on the memory card. Editing Pictures Use the COOLPIX S710 to a computer. • Editing functions are available. Editing function D-Lighting (A 64) Crop (A 65) Small picture (A 66) Description Create a copy of the picture. C Restrictions on a different digital camera...
... internal memory or on Playback C Picture Editing • Pictures taken at an Image mode setting of combination exists. Enlarge the image or refine the composition and create a copy containing only the portion visible in the monitor. More on the memory card. Editing Pictures Use the COOLPIX S710 to a computer. • Editing functions are available. Editing function D-Lighting (A 64) Crop (A 65) Small picture (A 66) Description Create a copy of the picture. C Restrictions on a different digital camera...

S710 User's Manual
Page 79
... can be used to attach voice memos to pictures shot with cameras other than the COOLPIX S710. Erase 1 image? No B Voice Memos Yes • When a picture with a voice memo attached is displayed in microphone during playback to adjust the volume. 44 17s 15/11/2008 15:30 0004.JPG 44 Deleting Voice Memos Select a picture with a voice memo and press l. D More Information See "Image/Sound File and Folder Names...
... can be used to attach voice memos to pictures shot with cameras other than the COOLPIX S710. Erase 1 image? No B Voice Memos Yes • When a picture with a voice memo attached is displayed in microphone during playback to adjust the volume. 44 17s 15/11/2008 15:30 0004.JPG 44 Deleting Voice Memos Select a picture with a voice memo and press l. D More Information See "Image/Sound File and Folder Names...

S710 User's Manual
Page 96
... be played back using QuickTime or any other WAVcompatible audio player. D Using Standard OS Operations to Open Image/Sound Files • Navigate to the folder on the computer's hard disk to which pictures were saved and open a picture in the camera's internal memory to the computer, the pictures must support these features of pictures taken using the Panorama assist option in Panorama Maker. D Panorama Creation with Panorama Maker • Use a series of the memory card. • At the Nikon Transfer default settings, Nikon Transfer will start...
... be played back using QuickTime or any other WAVcompatible audio player. D Using Standard OS Operations to Open Image/Sound Files • Navigate to the folder on the computer's hard disk to which pictures were saved and open a picture in the camera's internal memory to the computer, the pictures must support these features of pictures taken using the Panorama assist option in Panorama Maker. D Panorama Creation with Panorama Maker • Use a series of the memory card. • At the Nikon Transfer default settings, Nikon Transfer will start...

S710 User's Manual
Page 105
...exposure. A 95 A 97 A 99 A 100 A 101 A 102 A 103 A 106 * Image mode can change the settings for Continuous or BSS (best shot selector). B White balance Match white balance to light. C Continuous Change settings for menus of W, X, V, and U modes contain the following options. G AF area mode Choose where the camera focuses. F Color options Apply color effects to pictures as they are recorded. Shooting, Playback and Setup Menus Shooting Options: The Shooting Menu The shooting menu of other shooting modes (except highspeed continuous mode and movie mode). A Image mode* Choose image size...
...exposure. A 95 A 97 A 99 A 100 A 101 A 102 A 103 A 106 * Image mode can change the settings for Continuous or BSS (best shot selector). B White balance Match white balance to light. C Continuous Change settings for menus of W, X, V, and U modes contain the following options. G AF area mode Choose where the camera focuses. F Color options Apply color effects to pictures as they are recorded. Shooting, Playback and Setup Menus Shooting Options: The Shooting Menu The shooting menu of other shooting modes (except highspeed continuous mode and movie mode). A Image mode* Choose image size...

S710 User's Manual
Page 109
... Setup Menus B Flash Mode At white-balance settings other than Auto or Flash, turn the flash off (W) (A 28). 97 Digital cameras can be previewed in the shade, direct sunlight, or under unusual lighting conditions. a Auto (default setting) White balance automatically adjusted to "Preset Manual" for more accurate results. g Flash Use with the result that matches the light source before shooting. This is known as reference to changes in most situations. d Incandescent Use under overcast skies. f Cloudy Use when taking pictures...
... Setup Menus B Flash Mode At white-balance settings other than Auto or Flash, turn the flash off (W) (A 28). 97 Digital cameras can be previewed in the shade, direct sunlight, or under unusual lighting conditions. a Auto (default setting) White balance automatically adjusted to "Preset Manual" for more accurate results. g Flash Use with the result that matches the light source before shooting. This is known as reference to changes in most situations. d Incandescent Use under overcast skies. f Cloudy Use when taking pictures...

S710 User's Manual
Page 113
... flash is off, the camera compensates by raising sensitivity to options other than 6400 or 12800. The Continuous setting does not change even when ISO sensitivity is displayed in poor lighting, high sensitivity is suited for ISO sensitivity automatically switches the Image mode setting to make an exposure. Although a high ISO rating is often associated with "noise" - B Note after using the shooting mode U When you take a picture in the W, X or V shooting mode after using...
... flash is off, the camera compensates by raising sensitivity to options other than 6400 or 12800. The Continuous setting does not change even when ISO sensitivity is displayed in poor lighting, high sensitivity is suited for ISO sensitivity automatically switches the Image mode setting to make an exposure. Although a high ISO rating is often associated with "noise" - B Note after using the shooting mode U When you take a picture in the W, X or V shooting mode after using...

S710 User's Manual
Page 119
... or 12800. White balance White balance is automatically set to R Normal (4352). Shooting Options: The Shooting Menu Camera Settings that Cannot Be Set at Continuous settings of Continuous, BSS or Multi-shot 16. Applied setting is restored when Single is released, regardless of settings chosen for ISO sensitivity automatically switches the Image mode setting to Auto and cannot be taken when shutter is selected. Continuous If Continuous setting is set to M 2048×1536. Flash mode Flash turns off . At these image mode settings, selecting...
... or 12800. White balance White balance is automatically set to R Normal (4352). Shooting Options: The Shooting Menu Camera Settings that Cannot Be Set at Continuous settings of Continuous, BSS or Multi-shot 16. Applied setting is restored when Single is released, regardless of settings chosen for ISO sensitivity automatically switches the Image mode setting to Auto and cannot be taken when shutter is selected. Continuous If Continuous setting is set to M 2048×1536. Flash mode Flash turns off . At these image mode settings, selecting...
S710 User's Manual
Page 155
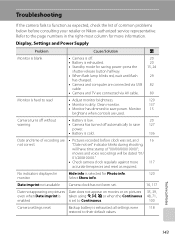
... save 127 power. • Battery is exhausted. • Standby mode for more 117 accurate timepieces and reset as expected, check the list of common problems below before clock was set, and 16 not correct "Date not set to Continuous. 100 Camera settings reset Backup battery is selected for Photo info. 120 monitor Select Show info. movies and voice recordings will have time stamp of "00/00/0000 00:00"; Troubleshooting...
... save 127 power. • Battery is exhausted. • Standby mode for more 117 accurate timepieces and reset as expected, check the list of common problems below before clock was set, and 16 not correct "Date not set to Continuous. 100 Camera settings reset Backup battery is selected for Photo info. 120 monitor Select Show info. movies and voice recordings will have time stamp of "00/00/0000 00:00"; Troubleshooting...
S710 User's Manual
Page 159
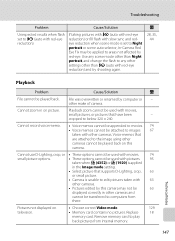
... to edit pictures taken with red-eye reduction) and try shooting again. other than V (auto with 63 other cameras and cannot be played back. Use any scene mode other than Night portrait, and change the flash to any other settings other make of camera. Troubleshooting Problem Cause/Solution Unexpected results when flash set to Night portrait or scene auto selector, In-Camera Red Eye Fix may not be 63 displayed correctly in other cameras. • Pictures edited...
... to edit pictures taken with red-eye reduction) and try shooting again. other than V (auto with 63 other cameras and cannot be played back. Use any scene mode other than Night portrait, and change the flash to any other settings other make of camera. Troubleshooting Problem Cause/Solution Unexpected results when flash set to Night portrait or scene auto selector, In-Camera Red Eye Fix may not be 63 displayed correctly in other cameras. • Pictures edited...

S710 User's Manual
Page 167
... Print Set 91 Print Set (Date) 92 Printer 85 Programmed auto 50, 52 Protect 111 Index R Rechargeable battery 133 Rechargeable Li-ion battery 12, 14 Record orientation 126 Recording movies 71 Red-eye reduction 28, 29 Replay mode 26, 27 Reset all 130 Rotary Multi selector 5, 9 Rotate image 112 RSCN 134 S Scene auto selector mode 44 Scene mode 33, 34 Self-timer 30 Self-timer lamp 4, 30 Sepia 102 Setup menu 114 Shooting 20, 22, 24 Shooting menu 93 Shooting-mode Selection menu 8 Shutter sound...
... Print Set 91 Print Set (Date) 92 Printer 85 Programmed auto 50, 52 Protect 111 Index R Rechargeable battery 133 Rechargeable Li-ion battery 12, 14 Record orientation 126 Recording movies 71 Red-eye reduction 28, 29 Replay mode 26, 27 Reset all 130 Rotary Multi selector 5, 9 Rotate image 112 RSCN 134 S Scene auto selector mode 44 Scene mode 33, 34 Self-timer 30 Self-timer lamp 4, 30 Sepia 102 Setup menu 114 Shooting 20, 22, 24 Shooting menu 93 Shooting-mode Selection menu 8 Shutter sound...


