S200 User's Manual
Page 13
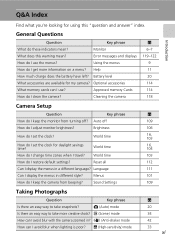
...? Help 11 How much charge does the battery have left? Battery level 20 What accessories are available for daylight savings time? Optional accessories 114 What memory cards can I display the menus in a different language? Cleaning the camera 118 Camera Setup Question Key phrase c How do I keep the camera from turning off 109 How do I change time zones when I set the clock? World time 103 How do I restore default settings? Sound Settings 109 Taking Photographs...
...? Help 11 How much charge does the battery have left? Battery level 20 What accessories are available for daylight savings time? Optional accessories 114 What memory cards can I display the menus in a different language? Cleaning the camera 118 Camera Setup Question Key phrase c How do I keep the camera from turning off 109 How do I change time zones when I set the clock? World time 103 How do I restore default settings? Sound Settings 109 Taking Photographs...
S200 User's Manual
Page 16
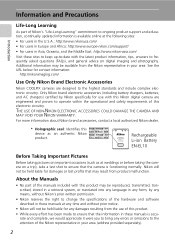
... a trip), take a test shot to ensure that the camera is functioning normally. THE USE OF NON-NIKON ELECTRONIC ACCESSORIES COULD DAMAGE THE CAMERA AND MAY VOID YOUR NIKON WARRANTY. Information and Precautions Introduction Life-Long Learning As part of Nikon's "Life-Long Learning" commitment to ongoing product support and education, continually updated information is available online at the following sites: • For users in the...
... a trip), take a test shot to ensure that the camera is functioning normally. THE USE OF NON-NIKON ELECTRONIC ACCESSORIES COULD DAMAGE THE CAMERA AND MAY VOID YOUR NIKON WARRANTY. Information and Precautions Introduction Life-Long Learning As part of Nikon's "Life-Long Learning" commitment to ongoing product support and education, continually updated information is available online at the following sites: • For users in the...
S200 User's Manual
Page 22
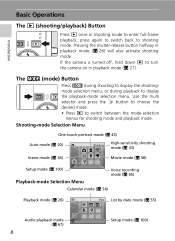
... Movie mode (c 58) Setup mode (c 100) Voice recording mode (c 65) Playback-mode Selection Menu Calendar mode (c 54) Playback mode (c 26) Play List by date mode (c 55) Audio playback mode (c 67) 8 Setup mode (c 100) The C (mode) Button Press C during shooting to display the shootingmode selection menu, or during playback to shooting mode. press again to switch back to display the playback-mode selection menu. Use the multi selector and press the d button to choose the desired mode. • Press i to enter full-frame playback; Introduction Basic Operations The i (shooting...
... Movie mode (c 58) Setup mode (c 100) Voice recording mode (c 65) Playback-mode Selection Menu Calendar mode (c 54) Playback mode (c 26) Play List by date mode (c 55) Audio playback mode (c 67) 8 Setup mode (c 100) The C (mode) Button Press C during shooting to display the shootingmode selection menu, or during playback to shooting mode. press again to switch back to display the playback-mode selection menu. Use the multi selector and press the d button to choose the desired mode. • Press i to enter full-frame playback; Introduction Basic Operations The i (shooting...
S200 User's Manual
Page 23
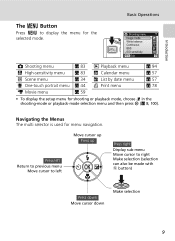
Navigating the Menus The multi selector is used for shooting or playback mode, choose Z in the shooting-mode or playback-mode selection menu and then press d (c 8, 100). Shooting menu Image mode White balance Continuous BSS ISO sensitivity Exit L Shooting menu c 83 i Playback menu c 94 K High-sensitivity menu c 83 J Calendar menu c 57 n Scene menu c 34 L List by date menu c 57 A One-touch portrait menu c 44 w Print menu c 78 T Movie menu c 59 • To display the setup menu for menu navigation. Move cursor up Press up Press left...
Navigating the Menus The multi selector is used for shooting or playback mode, choose Z in the shooting-mode or playback-mode selection menu and then press d (c 8, 100). Shooting menu Image mode White balance Continuous BSS ISO sensitivity Exit L Shooting menu c 83 i Playback menu c 94 K High-sensitivity menu c 83 J Calendar menu c 57 n Scene menu c 34 L List by date menu c 57 A One-touch portrait menu c 44 w Print menu c 78 T Movie menu c 59 • To display the setup menu for menu navigation. Move cursor up Press up Press left...
S200 User's Manual
Page 32
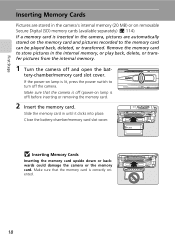
... the power switch to store pictures in until it clicks into place. Slide the memory card in the internal memory, or play back, delete, or transfer pictures from the internal memory. 1 Turn the camera off (power-on removable Secure Digital (SD) memory cards (available separately) (c 114). First Steps Inserting Memory Cards Pictures are automatically stored on lamp is off) before inserting or removing the memory card. 2 Insert the memory card. Make sure that the camera is off and open the battery-chamber/memory card...
... the power switch to store pictures in until it clicks into place. Slide the memory card in the internal memory, or play back, delete, or transfer pictures from the internal memory. 1 Turn the camera off (power-on removable Secure Digital (SD) memory cards (available separately) (c 114). First Steps Inserting Memory Cards Pictures are automatically stored on lamp is off) before inserting or removing the memory card. 2 Insert the memory card. Make sure that the camera is off and open the battery-chamber/memory card...
S200 User's Manual
Page 33
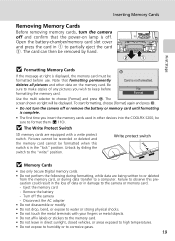
... memory card - Turn off or remove the battery or memory card until formatting is displayed, the memory card must be formatted before formatting the memory card. First Steps j Formatting Memory Cards If the message at right will be removed by sliding the switch to choose [Format] and press d. Inserting Memory Cards Removing Memory Cards Before removing memory cards, turn the camera off the camera - Be sure to make copies of data or in damage to format them (c 110). Card is off. j The Write Protect Switch SD memory cards are being written to or deleted...
... memory card - Turn off or remove the battery or memory card until formatting is displayed, the memory card must be formatted before formatting the memory card. First Steps j Formatting Memory Cards If the message at right will be removed by sliding the switch to choose [Format] and press d. Inserting Memory Cards Removing Memory Cards Before removing memory cards, turn the camera off the camera - Be sure to make copies of data or in damage to format them (c 110). Card is off. j The Write Protect Switch SD memory cards are being written to or deleted...
S200 User's Manual
Page 34
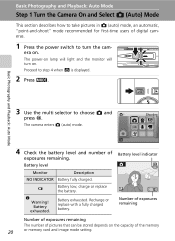
... exposures remaining. Basic Photography and Playback: Auto Mode Step 1 Turn the Camera On and Select L (Auto) Mode This section describes how to take pictures in L (auto) mode, an automatic, "point-and-shoot" mode recommended for first-time users of digital cameras. 1 Press the power switch to turn on. Battery exhausted. K Warning! Recharge or replace with a fully charged battery. Shooting 4 Check the battery level and number of the memory 20 or memory card and image mode setting. Battery exhausted. The camera enters L (auto) mode. w Battery low; The power-on lamp will light...
... exposures remaining. Basic Photography and Playback: Auto Mode Step 1 Turn the Camera On and Select L (Auto) Mode This section describes how to take pictures in L (auto) mode, an automatic, "point-and-shoot" mode recommended for first-time users of digital cameras. 1 Press the power switch to turn on. Battery exhausted. K Warning! Recharge or replace with a fully charged battery. Shooting 4 Check the battery level and number of the memory 20 or memory card and image mode setting. Battery exhausted. The camera enters L (auto) mode. w Battery low; The power-on lamp will light...

S200 User's Manual
Page 35
.... The default setting is not displayed, and pictures will enter stand-by mode, further reducing the drain on how you to specify the image mode (c 84), white balance setting (c 86), and to apply continuous shooting (c 88), BSS (c 90), ISO sensitivity (c 91), and color options (c 91) to memory card. 12 Image mode Choose from seven image-mode options depending on the battery (c 109). Basic Photography and Playback: Auto Mode l Available Functions in L (auto) mode displays the shooting menu. This menu allows you...
.... The default setting is not displayed, and pictures will enter stand-by mode, further reducing the drain on how you to specify the image mode (c 84), white balance setting (c 86), and to apply continuous shooting (c 88), BSS (c 90), ISO sensitivity (c 91), and color options (c 91) to memory card. 12 Image mode Choose from seven image-mode options depending on the battery (c 109). Basic Photography and Playback: Auto Mode l Available Functions in L (auto) mode displays the shooting menu. This menu allows you...
S200 User's Manual
Page 43
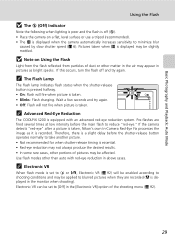
... than auto with an advanced red-eye reduction system. Electronic VR can be slightly mottled. Basic Photography and Playback: Auto Mode Using the Flash j The B (Off) Indicator Note the following when lighting is poor and the flash is off and try again. • Off: Flash will fire when picture is taken. • Blinks: Flash charging. If the camera detects "red-eye" after a picture is taken, Nikon's own In-Camera Red-Eye Fix processes the image as...
... than auto with an advanced red-eye reduction system. Electronic VR can be slightly mottled. Basic Photography and Playback: Auto Mode Using the Flash j The B (Off) Indicator Note the following when lighting is poor and the flash is off and try again. • Off: Flash will fire when picture is taken. • Blinks: Flash charging. If the camera detects "red-eye" after a picture is taken, Nikon's own In-Camera Red-Eye Fix processes the image as...

S200 User's Manual
Page 44
... seconds): suited for important occasions (such as weddings) Self-timer [3s] (three seconds): suited for preventing camera shake The mode selected for selfportraits. The lamp stops blinking one sec- The self-timer starts and the self-timer lamp will be set. 12 4 Press the shutter-release button the rest of a tripod is recommended. 1 Press H (self-timer). The self-timer menu is equipped with the Self-Timer The camera is displayed. Taking Pictures with a ten-second...
... seconds): suited for important occasions (such as weddings) Self-timer [3s] (three seconds): suited for preventing camera shake The mode selected for selfportraits. The lamp stops blinking one sec- The self-timer starts and the self-timer lamp will be set. 12 4 Press the shutter-release button the rest of a tripod is recommended. 1 Press H (self-timer). The self-timer menu is equipped with the Self-Timer The camera is displayed. Taking Pictures with a ten-second...
S200 User's Manual
Page 45
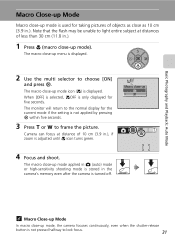
... 4 Focus and shoot. The macro close-up mode, the camera focuses continuously, even when the shutter-release button is not pressed halfway to light entire subject at distance of less than 30 cm (11.8 in the camera's memory even after the camera is turned off. The macro close-up mode is used for taking pictures of objects as close as 10 cm (3.9 in .), if zoom is adjusted until F icon turns green. Basic Photography and Playback: Auto Mode 2 Use...
... 4 Focus and shoot. The macro close-up mode, the camera focuses continuously, even when the shutter-release button is not pressed halfway to light entire subject at distance of less than 30 cm (11.8 in the camera's memory even after the camera is turned off. The macro close-up mode is used for taking pictures of objects as close as 10 cm (3.9 in .), if zoom is adjusted until F icon turns green. Basic Photography and Playback: Auto Mode 2 Use...

S200 User's Manual
Page 56
... the shutter-release button is held down, camera takes shots to a maxi- 12 mum of the high-sensitivity shooting mode (c 33) is recommended for dark subjects. • Use of ten, they are compared and sharpest picture (picture with telephoto zoom when you are enabled. the flash is not available. The camera enters anti-shake mode. the self-timer is disabled. Anti-shake Mode 2 Frame the subject and take the picture. Changes...
... the shutter-release button is held down, camera takes shots to a maxi- 12 mum of the high-sensitivity shooting mode (c 33) is recommended for dark subjects. • Use of ten, they are compared and sharpest picture (picture with telephoto zoom when you are enabled. the flash is not available. The camera enters anti-shake mode. the self-timer is disabled. Anti-shake Mode 2 Frame the subject and take the picture. Changes...
S200 User's Manual
Page 59
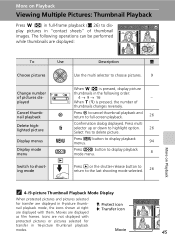
... shooting mode selected. 26 More on Playback Viewing Multiple Pictures: Thumbnail Playback Press t (j) in full-frame playback (c 26) to dis- 15/05/2007 30 M play pictures in "contact sheets" of thumbnail images. Q: Protect icon P: Transfer icon Movie 15/05/2007 30 M 45 Press m button to display playback menus. 94 Press C button to display playback mode menu. 8 Press i or the shutter-release button to return to delete picture. Movies are displayed: To Use Description c Choose pictures Use the multi selector to choose pictures. 9 Change number of thumbnails changes...
... shooting mode selected. 26 More on Playback Viewing Multiple Pictures: Thumbnail Playback Press t (j) in full-frame playback (c 26) to dis- 15/05/2007 30 M play pictures in "contact sheets" of thumbnail images. Q: Protect icon P: Transfer icon Movie 15/05/2007 30 M 45 Press m button to display playback menus. 94 Press C button to display playback mode menu. 8 Press i or the shutter-release button to return to delete picture. Movies are displayed: To Use Description c Choose pictures Use the multi selector to choose pictures. 9 Change number of thumbnails changes...
S200 User's Manual
Page 85
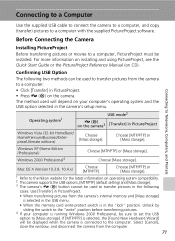
... Quick Start Guide or the PictureProject Reference Manual (on the camera3 [Transfer] in the "lock" position. Choose [MTP/PTP] or [Mass storage]. 1 Refer to the Nikon website for the latest information on the camera. Before Connecting the Camera Installing PictureProject Before transferring pictures or movies to transfer pictures in PictureProject. • Press E (d) on operating system compatibility. 2 This camera supports the USB options, [MTP/PTP] (default setting) and [Mass storage]. 3 The camera's E (d) button cannot be used to transfer pictures...
... Quick Start Guide or the PictureProject Reference Manual (on the camera3 [Transfer] in the "lock" position. Choose [MTP/PTP] or [Mass storage]. 1 Refer to the Nikon website for the latest information on the camera. Before Connecting the Camera Installing PictureProject Before transferring pictures or movies to transfer pictures in PictureProject. • Press E (d) on operating system compatibility. 2 This camera supports the USB options, [MTP/PTP] (default setting) and [Mass storage]. 3 The camera's E (d) button cannot be used to transfer pictures...
S200 User's Manual
Page 100
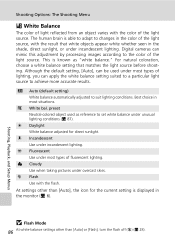
...conditions. Digital cameras can be used as "white balance." preset Neutral-colored object used under most situations. The human brain is able to adapt to the color of fluorescent lighting. G Auto (default setting) White balance automatically adjusted to set white balance under incandescent lighting. Best choice in the color of the light source, with the flash. At settings other than [Auto], the icon for direct sunlight. j Flash Mode 86 At white-balance settings other than [Auto] or [Flash], turn the flash off (B) (c 28). Shooting, Playback, and Setup Menus...
...conditions. Digital cameras can be used as "white balance." preset Neutral-colored object used under most situations. The human brain is able to adapt to the color of fluorescent lighting. G Auto (default setting) White balance automatically adjusted to set white balance under incandescent lighting. Best choice in the color of the light source, with the flash. At settings other than [Auto], the icon for direct sunlight. j Flash Mode 86 At white-balance settings other than [Auto] or [Flash], turn the flash off (B) (c 28). Shooting, Playback, and Setup Menus...
S200 User's Manual
Page 113
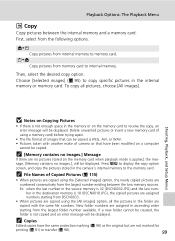
...newly copied pictures are copied with another make of camera or that can be displayed. Shooting, Playback, and Setup Menus j Notes on the memory card when playback mode is 18 (DSCN0018.JPG), the copied pictures are assigned numbers starting from internal memory to internal memory. Delete unwanted pictures or insert a new memory card (if using a memory card) before trying again. • The file format of Copied Pictures (c 115) • When pictures are copied using the [All images] option, all pictures, choose [All images]. New folder numbers are not marked for printing...
...newly copied pictures are copied with another make of camera or that can be displayed. Shooting, Playback, and Setup Menus j Notes on the memory card when playback mode is 18 (DSCN0018.JPG), the copied pictures are assigned numbers starting from internal memory to internal memory. Delete unwanted pictures or insert a new memory card (if using a memory card) before trying again. • The file format of Copied Pictures (c 115) • When pictures are copied using the [All images] option, all pictures, choose [All images]. New folder numbers are not marked for printing...

S200 User's Manual
Page 135
Error Messages Display Problem Solution K File contains no image data. Picture is connected. K No pictures selected for transfer in the current time zone. I Transfer error Transfer error. • Check battery level. • Check that USB cable is protected. If error persists, contact retailer or Nikon representative. K New city is in the playback menu and try again. Disable protection. - PictureProject did not start. - marked for pictures to exit. Select pictures for No images are hidden. File not created with COOLPIX S200 View file on again. I ...
Error Messages Display Problem Solution K File contains no image data. Picture is connected. K No pictures selected for transfer in the current time zone. I Transfer error Transfer error. • Check battery level. • Check that USB cable is protected. If error persists, contact retailer or Nikon representative. K New city is in the playback menu and try again. Disable protection. - PictureProject did not start. - marked for pictures to exit. Select pictures for No images are hidden. File not created with COOLPIX S200 View file on again. I ...
S200 User's Manual
Page 138
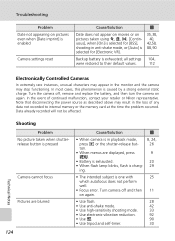
... the power source as described above may stop functioning. Troubleshooting Problem Date not appearing on pictures even when [Date imprint] is enabled Camera settings reset Cause/Solution c Date does not appear on movies or on again. Turn the camera off and then 11 on again. • Use flash. 28 • Use anti-shake mode. 42 • Use high-sensitivity shooting mode. 33 • Use electronic vibration reduction. 92 • Use A. 90 • Use tripod and self-timer...
... the power source as described above may stop functioning. Troubleshooting Problem Date not appearing on pictures even when [Date imprint] is enabled Camera settings reset Cause/Solution c Date does not appear on movies or on again. Turn the camera off and then 11 on again. • Use flash. 28 • Use anti-shake mode. 42 • Use high-sensitivity shooting mode. 33 • Use electronic vibration reduction. 92 • Use A. 90 • Use tripod and self-timer...
S200 User's Manual
Page 140
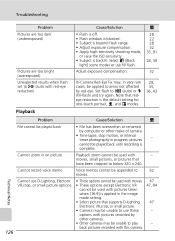
... In-Camera Red-Eye Fix may, in progress: pictures - Voice memos cannot be played back Cannot zoom in the image mode setting. • Select picture that supports D-Lighting, Electronic VR,crop, or small picture. • Camera may be unable to below 320 × 240. eye reduction is the default setting for one-touch portrait, B, and D modes. 28, 35, 36, 43 Problem Cause/Solution c Technical Notes 126 File cannot be appended to use fill flash. Playback zoom...
... In-Camera Red-Eye Fix may, in progress: pictures - Voice memos cannot be played back Cannot zoom in the image mode setting. • Select picture that supports D-Lighting, Electronic VR,crop, or small picture. • Camera may be unable to below 320 × 240. eye reduction is the default setting for one-touch portrait, B, and D modes. 28, 35, 36, 43 Problem Cause/Solution c Technical Notes 126 File cannot be appended to use fill flash. Playback zoom...
S200 User's Manual
Page 141
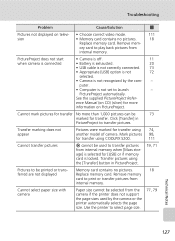
... pictures Pictures were marked for transfer. Memory card contains no pictures. 18 Replace memory card. Cannot select paper size with camera Paper size cannot be printed or trans- Use the printer to launch - Mark pictures for transfer using the [Transfer] button in PictureProject to play back pictures from internal memory when [Mass storage] is locked. Transfer pictures using COOLPIX S200. ory card to transfer pictures. PictureProject does not start when camera is connected • Camera is off. 11 • Battery is exhausted. 20 • USB cable...
... pictures Pictures were marked for transfer. Memory card contains no pictures. 18 Replace memory card. Cannot select paper size with camera Paper size cannot be printed or trans- Use the printer to launch - Mark pictures for transfer using the [Transfer] button in PictureProject to play back pictures from internal memory when [Mass storage] is locked. Transfer pictures using COOLPIX S200. ory card to transfer pictures. PictureProject does not start when camera is connected • Camera is off. 11 • Battery is exhausted. 20 • USB cable...


