
S1000pj User's Manual
Page 2
... Systems Inc. • The SD logo is a trademark of the SD Card Association. • PictBridge is a trademark. • All other trade names mentioned in this manual or the other documentation provided with your Nikon product are trademarks or registered trademarks of their respective holders.
... Systems Inc. • The SD logo is a trademark of the SD Card Association. • PictBridge is a trademark. • All other trade names mentioned in this manual or the other documentation provided with your Nikon product are trademarks or registered trademarks of their respective holders.

S1000pj User's Manual
Page 9
Table of Contents For Your Safety ...ii WARNINGS...ii Notices ...v Introduction ...1 About This Manual ...1 Information and Precautions...2 Parts of the Camera...4 The Camera Body ...4 Remote Control ML-L4...6 Attaching the Camera Strap ...7 The Monitor...8 Basic Operations...10 The A (Shooting Mode) Button...10 The c (Playback) Button... Date and Time 18 Inserting Memory Cards ...20 Removing Memory Cards...20 A Basic Photography and Playback: Auto Mode 22 Step 1 Turn the Camera On and Select A (Auto) Mode 22 Indicators Displayed in A (Auto) Mode 23 Step 2 Frame a Picture ...24 Using the Zoom...
Table of Contents For Your Safety ...ii WARNINGS...ii Notices ...v Introduction ...1 About This Manual ...1 Information and Precautions...2 Parts of the Camera...4 The Camera Body ...4 Remote Control ML-L4...6 Attaching the Camera Strap ...7 The Monitor...8 Basic Operations...10 The A (Shooting Mode) Button...10 The c (Playback) Button... Date and Time 18 Inserting Memory Cards ...20 Removing Memory Cards...20 A Basic Photography and Playback: Auto Mode 22 Step 1 Turn the Camera On and Select A (Auto) Mode 22 Indicators Displayed in A (Auto) Mode 23 Step 2 Frame a Picture ...24 Using the Zoom...

S1000pj User's Manual
Page 13
... or accessed for your Nikon digital camera. Read this manual, images are used: This icon marks cautions, B information that should be more A information is inserted, all those who use , to prevent damage to as the "default setting." • The names of menu items displayed in the camera monitor, and the names of a Nikon COOLPIX S1000pj digital camera. This icon marks...
... or accessed for your Nikon digital camera. Read this manual, images are used: This icon marks cautions, B information that should be more A information is inserted, all those who use , to prevent damage to as the "default setting." • The names of menu items displayed in the camera monitor, and the names of a Nikon COOLPIX S1000pj digital camera. This icon marks...
S1000pj User's Manual
Page 14
...translated into any language in any form, by Nikon specifically for contact information. http://imaging.nikon.com/ Use Only Nikon Brand Electronic Accessories Nikon COOLPIX cameras are engineered and proven to the attention of the manuals included with this product may be held liable for... result from the Nikon representative in these manuals is functioning normally. Holographic seal: Identifies this device as at any time and without Nikon's prior written permission. • Nikon reserves the right to change the specifications of this Nikon digital camera are designed to ...
...translated into any language in any form, by Nikon specifically for contact information. http://imaging.nikon.com/ Use Only Nikon Brand Electronic Accessories Nikon COOLPIX cameras are engineered and proven to the attention of the manuals included with this product may be held liable for... result from the Nikon representative in these manuals is functioning normally. Holographic seal: Identifies this device as at any time and without Nikon's prior written permission. • Nikon reserves the right to change the specifications of this Nikon digital camera are designed to ...

S1000pj User's Manual
Page 23
... screen) Move cursor down Beach/snow Shooting menu Image mode White balance Continuous ISO sensitivity Color options Exit C Note on the Multi Selector In the manual, the button indicating up, down, left and right of the multi selector to select modes, select menu options and to apply selection.
... screen) Move cursor down Beach/snow Shooting menu Image mode White balance Continuous ISO sensitivity Color options Exit C Note on the Multi Selector In the manual, the button indicating up, down, left and right of the multi selector to select modes, select menu options and to apply selection.

S1000pj User's Manual
Page 24
... selector to navigate the menus (A 11). • Choose a tab on the left to switch to the menu of options AF area mode Face priority Auto Manual Center Exit Press the k button or the multi selector K to apply selection Switching Between Tabs Shooting menu Image mode White balance Continuous ISO sensitivity Color...
... selector to navigate the menus (A 11). • Choose a tab on the left to switch to the menu of options AF area mode Face priority Auto Manual Center Exit Press the k button or the multi selector K to apply selection Switching Between Tabs Shooting menu Image mode White balance Continuous ISO sensitivity Color...

S1000pj User's Manual
Page 52
... the camera steadily. m W n Off* p Off o 0.0* * Default setting can be modified. Press the k button to choose the focus area in which it can focus at distance of 3 cm (1.2 in.) at the zoom position at distances of K). • AF area mode is set to Manual (A ... to the zoom position. The focus area or focus indicator (A 8) always glows green when the shutter-release button is enabled and the camera automatically zooms to stabilize the camera. k Close-up Photograph flowers, insects and other small objects at close range. • Macro mode (A 33) is pressed halfway. ...
... the camera steadily. m W n Off* p Off o 0.0* * Default setting can be modified. Press the k button to choose the focus area in which it can focus at distance of 3 cm (1.2 in.) at the zoom position at distances of K). • AF area mode is set to Manual (A ... to the zoom position. The focus area or focus indicator (A 8) always glows green when the shutter-release button is enabled and the camera automatically zooms to stabilize the camera. k Close-up Photograph flowers, insects and other small objects at close range. • Macro mode (A 33) is pressed halfway. ...

S1000pj User's Manual
Page 53
...green when the shutter-release button is enabled and hold the camera steadily. • AF-assist illuminator (A 128) does not light. l Museum Use indoors where flash photography is prohibited (for details. • AF area mode is set to Manual (A 106). Note, however, that Vibration reduction (A 126)... is pressed halfway. See "Taking Pictures in Food Mode" (A 45) for example, in museums and art galleries) or in other settings in which the camera focuses. m Fireworks show O Slow shutter ...
...green when the shutter-release button is enabled and hold the camera steadily. • AF-assist illuminator (A 128) does not light. l Museum Use indoors where flash photography is prohibited (for details. • AF area mode is set to Manual (A 106). Note, however, that Vibration reduction (A 126)... is pressed halfway. See "Taking Pictures in Food Mode" (A 45) for example, in museums and art galleries) or in other settings in which the camera focuses. m Fireworks show O Slow shutter ...

S1000pj User's Manual
Page 55
... that face. See "Face Priority" (A 108) for more information. • When the shooting mode indicator d or i is displayed, the camera automatically selects the focus area (one of the following scene modes: • Auto (general shooting) • Portrait (A 37) • Night...camera automatically selects the optimum scene mode for one of nine) containing the subject closest to the camera as same as when Auto is selected for the scene mode currently enabled. Press the shutter-release button the rest of the way down to A (auto) mode (A 22) or select the desired scene mode manually...
... that face. See "Face Priority" (A 108) for more information. • When the shooting mode indicator d or i is displayed, the camera automatically selects the focus area (one of the following scene modes: • Auto (general shooting) • Portrait (A 37) • Night...camera automatically selects the optimum scene mode for one of nine) containing the subject closest to the camera as same as when Auto is selected for the scene mode currently enabled. Press the shutter-release button the rest of the way down to A (auto) mode (A 22) or select the desired scene mode manually...

S1000pj User's Manual
Page 57
... zooms to the position at the closest distance at which the camera can focus. 2 Press the multi selector H or I to activate the selected focus area. Press the k button to Manual (A 106). Macro mode (A 33) will be adjusted while the focus area is set to move the focus area. Press... the multi selector H, I to focus, the focus area blinks red. When the camera is pressed the rest of 3 cm (1.2 in shooting...
... zooms to the position at the closest distance at which the camera can focus. 2 Press the multi selector H or I to activate the selected focus area. Press the k button to Manual (A 106). Macro mode (A 33) will be adjusted while the focus area is set to move the focus area. Press... the multi selector H, I to focus, the focus area blinks red. When the camera is pressed the rest of 3 cm (1.2 in shooting...

S1000pj User's Manual
Page 65
... 106) to all shooting modes (except those available from the camera as expected (A 27) , the subject may not perform as the actual portrait subject, and use focus lock (A 107). Changes made to the image mode setting apply to Manual or Center, refocus on Subject Tracking Mode • Adjust zoom... been selected, subject selection will be cancelled. • It may be impossible to select the desired subject, or the camera may be in Subject Tracking Mode • Digital zoom is locked by pressing the d button to track the selected subject or may begin tracking a different subject, if ...
... 106) to all shooting modes (except those available from the camera as expected (A 27) , the subject may not perform as the actual portrait subject, and use focus lock (A 107). Changes made to the image mode setting apply to Manual or Center, refocus on Subject Tracking Mode • Adjust zoom... been selected, subject selection will be cancelled. • It may be impossible to select the desired subject, or the camera may be in Subject Tracking Mode • Digital zoom is locked by pressing the d button to track the selected subject or may begin tracking a different subject, if ...
S1000pj User's Manual
Page 100
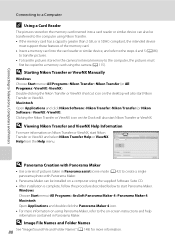
... Starting Nikon Transfer or ViewNX Manually Windows Choose Start menu>All Programs>Nikon Transfer>Nikon Transfer (or All Programs>ViewNX>ViewNX). D Viewing Nikon Transfer and ViewNX Help Information For more information. D Image File Names and Folder Names 88 See "Image/Sound File and Folder Names" (A 148) for more information on Nikon Transfer or... Software Suite CD. • After installation is SDHC-compliant, the intended device must first be copied to a memory card using the camera (A 115). Double-clicking the Nikon Transfer or ViewNX shortcut icon on the desktop will also start...
... Starting Nikon Transfer or ViewNX Manually Windows Choose Start menu>All Programs>Nikon Transfer>Nikon Transfer (or All Programs>ViewNX>ViewNX). D Viewing Nikon Transfer and ViewNX Help Information For more information. D Image File Names and Folder Names 88 See "Image/Sound File and Folder Names" (A 148) for more information on Nikon Transfer or... Software Suite CD. • After installation is SDHC-compliant, the intended device must first be copied to a memory card using the camera (A 115). Double-clicking the Nikon Transfer or ViewNX shortcut icon on the desktop will also start...

S1000pj User's Manual
Page 113
... reflected from an object varies with which this adjustment by processing images according to the color of the light source. Digital cameras can be specified manually to achieve more accurate results. This is able to adapt to changes in the color of lighting, the white balance.... f Cloudy Use when taking pictures under incandescent lighting. At settings other than Auto, the icon for more information (A 102). b Preset manual Neutral-colored object used under incandescent lighting. Best choice in the shade, direct sunlight, or under most types of the light source. g ...
... reflected from an object varies with which this adjustment by processing images according to the color of the light source. Digital cameras can be specified manually to achieve more accurate results. This is able to adapt to changes in the color of lighting, the white balance.... f Cloudy Use when taking pictures under incandescent lighting. At settings other than Auto, the icon for more information (A 102). b Preset manual Neutral-colored object used under incandescent lighting. Best choice in the shade, direct sunlight, or under most types of the light source. g ...

S1000pj User's Manual
Page 114
The camera zooms in the White balance menu and press the k button. The shutter is released and the new white-balance value is impossible to measure a value for preset manual that will be used during shooting. 2 Display shooting menu (A 98), use the multi selector to make pictures taken under ... under the lighting that takes flash lighting into account. Shooting, Playback and Setup Menus Shooting Options: The Shooting Menu Preset Manual Preset manual is effective with mixed lighting or to compensate for light sources with a strong color cast (for example, to choose b Preset...
The camera zooms in the White balance menu and press the k button. The shutter is released and the new white-balance value is impossible to measure a value for preset manual that will be used during shooting. 2 Display shooting menu (A 98), use the multi selector to make pictures taken under ... under the lighting that takes flash lighting into account. Shooting, Playback and Setup Menus Shooting Options: The Shooting Menu Preset Manual Preset manual is effective with mixed lighting or to compensate for light sources with a strong color cast (for example, to choose b Preset...

S1000pj User's Manual
Page 118
... end focus-area selection and adjust the flash, macro, self-timer and exposure compensation settings, press the k button. When digital zoom is in effect, the camera always focuses at the center of the frame regardless of the specified setting. When the shutter-release button is pressed halfway, the ... no face is 12 recognized, the AF area mode setting switches to Auto, and the camera will be displayed in the monitor. 12 Focus areas x Manual This option is suited to determine how the camera selects the focus area for more than people, or framing a subject with which the intended...
... end focus-area selection and adjust the flash, macro, self-timer and exposure compensation settings, press the k button. When digital zoom is in effect, the camera always focuses at the center of the frame regardless of the specified setting. When the shutter-release button is pressed halfway, the ... no face is 12 recognized, the AF area mode setting switches to Auto, and the camera will be displayed in the monitor. 12 Focus areas x Manual This option is suited to determine how the camera selects the focus area for more than people, or framing a subject with which the intended...

S1000pj User's Manual
Page 121
...Setup Menus Shooting Options: The Shooting Menu B Notes on Face Priority • If the camera is unable to recognize any faces when the shutter-release button is pressed halfway with AF area mode set AF area mode to Manual or Center, refocus on another subject positioned at the same distance from the... camera as the actual portrait subject, and use focus lock (A 107). • When pictures in which a face was ...
...Setup Menus Shooting Options: The Shooting Menu B Notes on Face Priority • If the camera is unable to recognize any faces when the shutter-release button is pressed halfway with AF area mode set AF area mode to Manual or Center, refocus on another subject positioned at the same distance from the... camera as the actual portrait subject, and use focus lock (A 107). • When pictures in which a face was ...
S1000pj User's Manual
Page 148
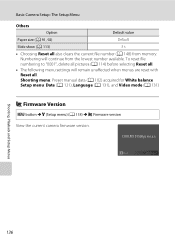
COOLPIX S1000pj ver.x.x Back Shooting, Playback and Setup Menus 136 To reset file numbering to "0001", delete all pictures (A 114) before selecting Reset all. • The following menu settings will continue from memory. Shooting menu: Preset manual data (A 102) acquired for White balance Setup menu: ...Date (A 121), Language (A 131), and Video mode (A 131) r Firmware Version d button M z (Setup menu) (A 118) M r Firmware version View the current camera firmware version. Basic Camera Setup: The Setup ...
COOLPIX S1000pj ver.x.x Back Shooting, Playback and Setup Menus 136 To reset file numbering to "0001", delete all pictures (A 114) before selecting Reset all. • The following menu settings will continue from memory. Shooting menu: Preset manual data (A 102) acquired for White balance Setup menu: ...Date (A 121), Language (A 131), and Video mode (A 131) r Firmware Version d button M z (Setup menu) (A 118) M r Firmware version View the current camera firmware version. Basic Camera Setup: The Setup ...
S1000pj User's Manual
Page 155
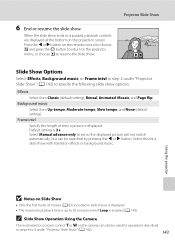
Press the J or K button on the camera can be used for a slide show . Effects Select from Up-tempo, Moderate tempo, Slow tempo, and None (default setting). Select Manual advance only to set so the displayed picture will not switch automatically, but can also be switched by pressing the J or K button....in steps 4 to 6 under "Projector Slide Show" (A 142) to 30 minutes even if Loop is enabled (A 145). C Slide Show Operation Using the Camera The multi selector or zoom control g or f on the remote control to choose Q and press the Q button to return to the projector menu, or choose...
Press the J or K button on the camera can be used for a slide show . Effects Select from Up-tempo, Moderate tempo, Slow tempo, and None (default setting). Select Manual advance only to set so the displayed picture will not switch automatically, but can also be switched by pressing the J or K button....in steps 4 to 6 under "Projector Slide Show" (A 142) to 30 minutes even if Loop is enabled (A 145). C Slide Show Operation Using the Camera The multi selector or zoom control g or f on the remote control to choose Q and press the Q button to return to the projector menu, or choose...
S1000pj User's Manual
Page 174
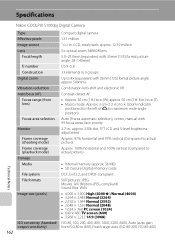
... indicator positioned to the left of G to maximum wide-angle position) Focus-area selection Auto (9-area automatic selection), center, manual with 99 focus areas, face priority Monitor 2.7-in., approx. 230k-dot, TFT LCD and 5-level brightness adjustment Frame coverage ...135] format picture angle: 28-140mm) f/-number f/3.9-5.8 Construction 13 elements in . Specifications Nikon COOLPIX S1000pj Digital Camera Type Compact digital camera Effective pixels Image sensor 12.1 million 1/2.3-in 9 groups Digital zoom Up to 4× (equivalent with 35mm [135] format picture angle: approx. ...
... indicator positioned to the left of G to maximum wide-angle position) Focus-area selection Auto (9-area automatic selection), center, manual with 99 focus areas, face priority Monitor 2.7-in., approx. 230k-dot, TFT LCD and 5-level brightness adjustment Frame coverage ...135] format picture angle: 28-140mm) f/-number f/3.9-5.8 Construction 13 elements in . Specifications Nikon COOLPIX S1000pj Digital Camera Type Compact digital camera Effective pixels Image sensor 12.1 million 1/2.3-in 9 groups Digital zoom Up to 4× (equivalent with 35mm [135] format picture angle: approx. ...

S1000pj User's Manual
Page 175
... steps (f/3.9 and f/7.8 [W]) Self-timer Can be selected from NTSC and PAL I/O terminal Audio video output/digital I/O (USB) Projector Projection system Single lamp/single LCD panel LCD panel One 0.4-in. Specifications Exposure Metering 256-segment matrix, center...-weighted (digital zoom less than 2×), spot (digital zoom 2× or more) Exposure control Programmed auto exposure with motion detection and exposure compensation (-2.0 to +2.0 EV...
... steps (f/3.9 and f/7.8 [W]) Self-timer Can be selected from NTSC and PAL I/O terminal Audio video output/digital I/O (USB) Projector Projection system Single lamp/single LCD panel LCD panel One 0.4-in. Specifications Exposure Metering 256-segment matrix, center...-weighted (digital zoom less than 2×), spot (digital zoom 2× or more) Exposure control Programmed auto exposure with motion detection and exposure compensation (-2.0 to +2.0 EV...


