
S1000pj User's Manual
Page 9
...17 Turning On and Off the Camera...17 Setting Display Language, Date and Time 18 Inserting Memory Cards ...20 Removing Memory Cards...20 A Basic Photography and Playback: Auto Mode 22 Step 1 Turn the Camera On and Select A (Auto) Mode 22 Indicators Displayed in A (Auto) Mode 23 Step 2 Frame a Picture ...24 Using the Zoom...25 Step 3 Focus and Shoot ...26 Shutter-release Button ...27 Step 4 Playing Back and Deleting Pictures 28 Playing Back Pictures (Playback Mode 28 Deleting Pictures...28 Using the Flash...30 Setting the Flash Mode...30 Taking Pictures with the Self-timer 32 Macro Mode...
...17 Turning On and Off the Camera...17 Setting Display Language, Date and Time 18 Inserting Memory Cards ...20 Removing Memory Cards...20 A Basic Photography and Playback: Auto Mode 22 Step 1 Turn the Camera On and Select A (Auto) Mode 22 Indicators Displayed in A (Auto) Mode 23 Step 2 Frame a Picture ...24 Using the Zoom...25 Step 3 Focus and Shoot ...26 Shutter-release Button ...27 Step 4 Playing Back and Deleting Pictures 28 Playing Back Pictures (Playback Mode 28 Deleting Pictures...28 Using the Flash...30 Setting the Flash Mode...30 Taking Pictures with the Self-timer 32 Macro Mode...

S1000pj User's Manual
Page 13
... the pictures on the memory card. Illustrations and Screen Display Illustrations and text displays shown in this manual, images are used: This icon marks cautions, B information that should be stored on the memory card and delete, playback and format operations will be read before use , to prevent damage to as a "memory card." • The setting at the time of buttons or messages displayed on removable memory cards. Screen Samples In this manual may be formatted or accessed for your Nikon digital camera. If a memory card...
... the pictures on the memory card. Illustrations and Screen Display Illustrations and text displays shown in this manual, images are used: This icon marks cautions, B information that should be stored on the memory card and delete, playback and format operations will be read before use , to prevent damage to as a "memory card." • The setting at the time of buttons or messages displayed on removable memory cards. Screen Samples In this manual may be formatted or accessed for your Nikon digital camera. If a memory card...
S1000pj User's Manual
Page 33
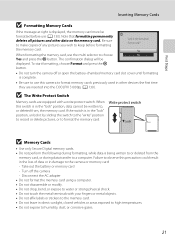
... to format memory cards previously used in the "lock" position, data cannot be displayed. If the switch is not formatted. Take out the battery or memory card - Turn off or open the battery-chamber/memory card slot cover until formatting is in other data on the memory card. First Steps Inserting Memory Cards B Formatting Memory Cards If the message at right is being written to or deleted from , the memory card. Note that formatting permanently deletes all pictures and other devices the first time they...
... to format memory cards previously used in the "lock" position, data cannot be displayed. If the switch is not formatted. Take out the battery or memory card - Turn off or open the battery-chamber/memory card slot cover until formatting is in other data on the memory card. First Steps Inserting Memory Cards B Formatting Memory Cards If the message at right is being written to or deleted from , the memory card. Note that formatting permanently deletes all pictures and other devices the first time they...
S1000pj User's Manual
Page 34
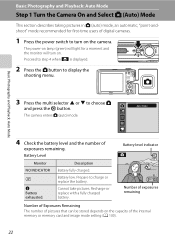
... internal memory or memory card and image mode setting (A 100). 22 Prepare to choose A and press the k button. Cannot take pictures. Basic Photography and Playback: Auto Mode 3 Press the multi selector H or I to charge or replace the battery. Basic Photography and Playback: Auto Mode Step 1 Turn the Camera On and Select A (Auto) Mode This section describes taking pictures in A (auto) mode, an automatic, "point-andshoot" mode recommended for a moment and the monitor will light for first-time users of digital cameras. 1 Press the power switch...
... internal memory or memory card and image mode setting (A 100). 22 Prepare to choose A and press the k button. Cannot take pictures. Basic Photography and Playback: Auto Mode 3 Press the multi selector H or I to charge or replace the battery. Basic Photography and Playback: Auto Mode Step 1 Turn the Camera On and Select A (Auto) Mode This section describes taking pictures in A (auto) mode, an automatic, "point-andshoot" mode recommended for a moment and the monitor will light for first-time users of digital cameras. 1 Press the power switch...

S1000pj User's Manual
Page 35
...) in the setup menu (A 117) for all shooting menu items (A 98) according to the shooting conditions. Image mode The combination of image size and image quality (compression) is I Normal (4,000 × 3,000). • The indicators and photo info displayed during shooting. 23 D Functions Available in A (Auto) Mode In A (auto) mode, the flash mode (A 30) can be selected, macro mode (A 33) and exposure compensation (A 34) can be applied and pictures can be stored on the camera's internal memory (approximately...
...) in the setup menu (A 117) for all shooting menu items (A 98) according to the shooting conditions. Image mode The combination of image size and image quality (compression) is I Normal (4,000 × 3,000). • The indicators and photo info displayed during shooting. 23 D Functions Available in A (Auto) Mode In A (auto) mode, the flash mode (A 30) can be selected, macro mode (A 33) and exposure compensation (A 34) can be applied and pictures can be stored on the camera's internal memory (approximately...
S1000pj User's Manual
Page 41
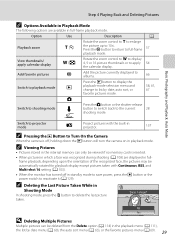
... picture Erase 1 image? A Switch to shooting mode Press the A button or the shutter-release button to switch back to reactivate it (A 129). No Yes D Deleting Multiple Pictures Multiple pictures can only be automatically rotated for playback display except pictures taken with the built-in projector. 137 C Pressing the c Button to projector mode P Project pictures with Continuous, BSS, and Multi-shot 16 setting (A 103). • When the monitor has turned off , holding down the c button will turn the camera...
... picture Erase 1 image? A Switch to shooting mode Press the A button or the shutter-release button to switch back to reactivate it (A 129). No Yes D Deleting Multiple Pictures Multiple pictures can only be automatically rotated for playback display except pictures taken with the built-in projector. 137 C Pressing the c Button to projector mode P Project pictures with Continuous, BSS, and Multi-shot 16 setting (A 103). • When the monitor has turned off , holding down the c button will turn the camera...

S1000pj User's Manual
Page 43
.... • There is a slight lag between the shutter-release button being pressed and the picture being shot because of camera shake. Using the Flash Basic Photography and Playback: Auto Mode B Shooting When the Flash is Disabled (W) or Lighting is Poor • Use of a tripod is recommended to red-eye may be affected by advanced red-eye reduction processing; C The Flash Mode Setting The default flash mode setting varies with shooting mode. • A (auto): U (auto) • Scene: varies with the selected...
.... • There is a slight lag between the shutter-release button being pressed and the picture being shot because of camera shake. Using the Flash Basic Photography and Playback: Auto Mode B Shooting When the Flash is Disabled (W) or Lighting is Poor • Use of a tripod is recommended to red-eye may be affected by advanced red-eye reduction processing; C The Flash Mode Setting The default flash mode setting varies with shooting mode. • A (auto): U (auto) • Scene: varies with the selected...

S1000pj User's Manual
Page 44
... the picture and press the shutter-release button halfway. This feature is displayed in the setup menu (A 117) when using the self-timer, use of a tripod is displayed. The self-timer starts, and the number of seconds remaining before a picture is released, the self-timer will be set . 4 Press the shutter-release button the rest of the way down . Focus and exposure will be set to stabilize the camera during shooting. 1 Press n (self-timer). Taking Pictures with the Self-timer The camera is...
... the picture and press the shutter-release button halfway. This feature is displayed in the setup menu (A 117) when using the self-timer, use of a tripod is displayed. The self-timer starts, and the number of seconds remaining before a picture is released, the self-timer will be set . 4 Press the shutter-release button the rest of the way down . Focus and exposure will be set to stabilize the camera during shooting. 1 Press n (self-timer). Taking Pictures with the Self-timer The camera is...

S1000pj User's Manual
Page 45
... will be heard. The macro mode icon (F) is displayed. 2 Press the multi selector H or I to frame the picture. The macro menu is displayed. The camera can be cancelled. 3 Rotate the zoom control to choose ON and press the k button. C The Macro Mode Setting The macro mode setting applied in A (auto) mode is stored in the camera's memory even after the camera is turned off, and reapplied the next time A (auto) mode is used for taking pictures of objects as close...
... will be heard. The macro mode icon (F) is displayed. 2 Press the multi selector H or I to frame the picture. The macro menu is displayed. The camera can be cancelled. 3 Rotate the zoom control to choose ON and press the k button. C The Macro Mode Setting The macro mode setting applied in A (auto) mode is stored in the camera's memory even after the camera is turned off, and reapplied the next time A (auto) mode is used for taking pictures of objects as close...

S1000pj User's Manual
Page 47
..., press the Q button again. Press the Q button again to Off when using zoom with the self-timer. • When recording movies, use the self-timer, follow step 1 under "Taking Pictures with the Self-timer" (A 32) to start and stop the selftimer before a picture is saved. To use the remote control to apply self-timer settings. Do not exceed more than approximately 5 m (16 ft.) from the camera. In this situation, set to movie mode. Basic Photography and Playback: Auto Mode 1 Use a tripod or...
..., press the Q button again. Press the Q button again to Off when using zoom with the self-timer. • When recording movies, use the self-timer, follow step 1 under "Taking Pictures with the Self-timer" (A 32) to start and stop the selftimer before a picture is saved. To use the remote control to apply self-timer settings. Do not exceed more than approximately 5 m (16 ft.) from the camera. In this situation, set to movie mode. Basic Photography and Playback: Auto Mode 1 Use a tripod or...
S1000pj User's Manual
Page 93
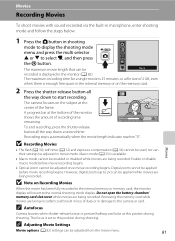
... a file size of the frame. Recording stops automatically when the movie length indicator reaches "0". Digital zoom cannot be applied before movie recording begins. • Optical zoom cannot be adjusted from the movie menu. 81 Movies C Autofocus Camera focuses when shutter-release button is pressed halfway and locks at this position during shooting. Do not open the battery-chamber/ memory card slot cover while movies are being recorded could result in loss of recording time 25s remaining. Removing the memory card while movies...
... a file size of the frame. Recording stops automatically when the movie length indicator reaches "0". Digital zoom cannot be applied before movie recording begins. • Optical zoom cannot be adjusted from the movie menu. 81 Movies C Autofocus Camera focuses when shutter-release button is pressed halfway and locks at this position during shooting. Do not open the battery-chamber/ memory card slot cover while movies are being recorded could result in loss of recording time 25s remaining. Removing the memory card while movies...

S1000pj User's Manual
Page 108
... the camera's date and time setting are changed from the setup menu after pictures are those recorded with DPOF printing when Date in the Exit print order. Done Choose Date and press the k button to print the shooting date on all pictures in the print set menu, shooting date and photo information are printed on pictures when a DPOF-compatible (A 166) printer which supports printing of shooting date and photo information is used. • Photo information cannot be printed when the camera is connected directly to a printer, via the supplied USB cable, for printing...
... the camera's date and time setting are changed from the setup menu after pictures are those recorded with DPOF printing when Date in the Exit print order. Done Choose Date and press the k button to print the shooting date on all pictures in the print set menu, shooting date and photo information are printed on pictures when a DPOF-compatible (A 166) printer which supports printing of shooting date and photo information is used. • Photo information cannot be printed when the camera is connected directly to a printer, via the supplied USB cable, for printing...

S1000pj User's Manual
Page 113
... Use when taking pictures under incandescent lighting. The effects of the selected option can be specified manually to set white balance under most situations. See "Camera Settings that matches the light source before shooting. Digital cameras can mimic this setting cannot be used as "white balance." At settings other than Auto, the icon for more information (A 102). Although the default setting, Auto, can be enabled. g Flash Use with the color of the light source. For natural colors, choose a white balance setting that...
... Use when taking pictures under incandescent lighting. The effects of the selected option can be specified manually to set white balance under most situations. See "Camera Settings that matches the light source before shooting. Digital cameras can mimic this setting cannot be used as "white balance." At settings other than Auto, the icon for more information (A 102). Although the default setting, Auto, can be enabled. g Flash Use with the color of the light source. For natural colors, choose a white balance setting that...

S1000pj User's Manual
Page 129
...is turned on basic settings in still pictures. i Sound settings A 129 Adjust sound settings. U Motion detection A 127 Enable or disable motion detection, which reduces the effects of subject movement and camera shake in projector mode. n Language A 131 Choose the language used for saving power. d Date A 121 Set camera clock and choose home and destination time zones. c Welcome screen A 120 Select screen displayed when camera is enabled when taking still pictures. u Digital zoom A 128 Enable or disable digital zoom. Shooting, Playback and Setup...
...is turned on basic settings in still pictures. i Sound settings A 129 Adjust sound settings. U Motion detection A 127 Enable or disable motion detection, which reduces the effects of subject movement and camera shake in projector mode. n Language A 131 Choose the language used for saving power. d Date A 121 Set camera clock and choose home and destination time zones. c Welcome screen A 120 Select screen displayed when camera is enabled when taking still pictures. u Digital zoom A 128 Enable or disable digital zoom. Shooting, Playback and Setup...

S1000pj User's Manual
Page 142
...default setting (displayed as number). • Do not turn the camera off, or open the battery-chamber/memory card slot cover during formatting. • Be sure to use this option to format memory cards previously used in other devices the first time 130 they are inserted into the COOLPIX S1000pj. No Format Exit Shooting, Playback and Setup Menus B Formatting Internal Memory and Memory Cards • Formatting the internal memory or memory cards permanently deletes all data. Formatting the Internal Memory To format the internal memory, remove the memory card from the camera. No Format...
...default setting (displayed as number). • Do not turn the camera off, or open the battery-chamber/memory card slot cover during formatting. • Be sure to use this option to format memory cards previously used in other devices the first time 130 they are inserted into the COOLPIX S1000pj. No Format Exit Shooting, Playback and Setup Menus B Formatting Internal Memory and Memory Cards • Formatting the internal memory or memory cards permanently deletes all data. Formatting the Internal Memory To format the internal memory, remove the memory card from the camera. No Format...
S1000pj User's Manual
Page 168
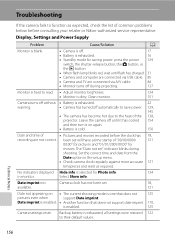
Display, Settings and Power Supply Problem Cause/Solution A Monitor is blank. • Camera is off. 17 • Battery is enabled. 125 Camera settings reset. Leave the camera off during shooting. been set will have a time stamp of common problems below before the clock has 18, recording are connected via A/V cable. 84 • Monitor turns off until flash has charged. 31 • Camera and computer are connected via USB cable. 85 • Camera and TV are not correct. The...
Display, Settings and Power Supply Problem Cause/Solution A Monitor is blank. • Camera is off. 17 • Battery is enabled. 125 Camera settings reset. Leave the camera off during shooting. been set will have a time stamp of common problems below before the clock has 18, recording are connected via A/V cable. 84 • Monitor turns off until flash has charged. 31 • Camera and computer are connected via USB cable. 85 • Camera and TV are not correct. The...

S1000pj User's Manual
Page 169
... the loss of any data not recorded to take pictures of continued malfunction, contact your retailer or Nikon-authorized service representative. A button or the shutter-release button. • When menus are displayed, press the d button. • Battery is exhausted. • When flash lamp blinks, flash is high. Cause/Solution Battery temperature is charging. Electronically Controlled Cameras In extremely rare instances, unusual characters may stop functioning. Troubleshooting Problem Monitor turns off, and the power-on again. In...
... the loss of any data not recorded to take pictures of continued malfunction, contact your retailer or Nikon-authorized service representative. A button or the shutter-release button. • When menus are displayed, press the d button. • Battery is exhausted. • When flash lamp blinks, flash is high. Cause/Solution Battery temperature is charging. Electronically Controlled Cameras In extremely rare instances, unusual characters may stop functioning. Troubleshooting Problem Monitor turns off, and the power-on again. In...

S1000pj User's Manual
Page 170
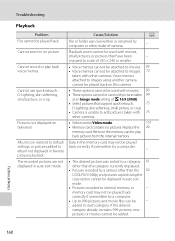
... in pictures taken with flash. Digital zoom cannot be used . Pictures are visible in set to Off in subject tracking mode. • Just before recording a movie (up menu. 128 • Focus error. Streaks of the sun, and electric lights is recommended. Turn camera off . When shooting with Continuous set up to 2× can be used while recording 81 movies. Troubleshooting Problem Cause/Solution A Camera cannot focus. • The intended subject is one with which the flash does not function...
... in pictures taken with flash. Digital zoom cannot be used . Pictures are visible in set to Off in subject tracking mode. • Just before recording a movie (up menu. 128 • Focus error. Streaks of the sun, and electric lights is recommended. Turn camera off . When shooting with Continuous set up to 2× can be used while recording 81 movies. Troubleshooting Problem Cause/Solution A Camera cannot focus. • The intended subject is one with which the flash does not function...
S1000pj User's Manual
Page 172
... memory card. Pictures not displayed on picture. Technical Notes 160 cropped to images 72 taken with 73 other cameras. added to images using the copy option cannot be - Cause/Solution A File or folder was sorted to edit pictures taken with other cameras. • Select correct Video mode. 131 • Memory card contains no pictures. Cannot record or play back pictures from the internal memory. Voice memos attached to each category. Cannot zoom in auto sort mode. Cannot use quick retouch, D-Lighting...
... memory card. Pictures not displayed on picture. Technical Notes 160 cropped to images 72 taken with 73 other cameras. added to images using the copy option cannot be - Cause/Solution A File or folder was sorted to edit pictures taken with other cameras. • Select correct Video mode. 131 • Memory card contains no pictures. Cannot record or play back pictures from the internal memory. Voice memos attached to each category. Cannot zoom in auto sort mode. Cannot use quick retouch, D-Lighting...

S1000pj User's Manual
Page 181
... Playback menu 111 Playback zoom 57 Playback-mode selection menu 10 Portrait b 37 Power 18, 22 Power saving 145 Power switch 4, 22 Power-on lamp 4, 22 Preset manual 102 Print 91, 92, 95 Print set 95 Print Set (Date) 96 Printer 89 Projector focus slider 4, 138 Projector menu 137 Projector mode 137 Projector settings menu 144 Projector stand 7, 137 Projector window 4, 137 Protect 114 Q Quick retouch 75 R Rechargeable battery 147 Rechargeable Li-ion battery 16 Recording movies 81 Red-eye reduction 30, 31 Remote control 6, 35, 138 Reset...
... Playback menu 111 Playback zoom 57 Playback-mode selection menu 10 Portrait b 37 Power 18, 22 Power saving 145 Power switch 4, 22 Power-on lamp 4, 22 Preset manual 102 Print 91, 92, 95 Print set 95 Print Set (Date) 96 Printer 89 Projector focus slider 4, 138 Projector menu 137 Projector mode 137 Projector settings menu 144 Projector stand 7, 137 Projector window 4, 137 Protect 114 Q Quick retouch 75 R Rechargeable battery 147 Rechargeable Li-ion battery 16 Recording movies 81 Red-eye reduction 30, 31 Remote control 6, 35, 138 Reset...


