L100 User's Manual
Page 4
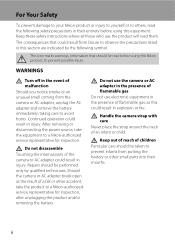
... adapter and remove the battery immediately, taking care to others, read them. For Your Safety To prevent damage to your Nikon product or injury to yourself or to avoid burns. Should the camera or AC adapter break open as this equipment. The consequences that should be taken to... a Nikon-authorized service representative for inspection, after unplugging the product and/or removing the battery. Keep these safety instructions where all...
... adapter and remove the battery immediately, taking care to others, read them. For Your Safety To prevent damage to your Nikon product or injury to yourself or to avoid burns. Should the camera or AC adapter break open as this equipment. The consequences that should be taken to... a Nikon-authorized service representative for inspection, after unplugging the product and/or removing the battery. Keep these safety instructions where all...

L100 User's Manual
Page 9
... Displays...13 About the Shutter-release Button...13 First Steps ...14 Inserting the Batteries ...14 Applicable Batteries ...14 Turning On and Off the Camera...14 Setting Display Language, Date and Time 16 Inserting Memory Cards ...18 Removing Memory Cards...19 G Basic Photography and Playback: Easy Auto... Mode 20 Step 1 Turn the Camera On and Select G (Easy Auto) Mode 20 Indicators Displayed in G (Easy auto) Mode 21 Step 2 Frame a Picture ...22 Using the Zoom......
... Displays...13 About the Shutter-release Button...13 First Steps ...14 Inserting the Batteries ...14 Applicable Batteries ...14 Turning On and Off the Camera...14 Setting Display Language, Date and Time 16 Inserting Memory Cards ...18 Removing Memory Cards...19 G Basic Photography and Playback: Easy Auto... Mode 20 Step 1 Turn the Camera On and Select G (Easy Auto) Mode 20 Indicators Displayed in G (Easy auto) Mode 21 Step 2 Frame a Picture ...22 Using the Zoom......

L100 User's Manual
Page 11
... Menu 77 Displaying the Shooting Menu...78 A Image Mode ...79 B White Balance...81 C Continuous ...83 F Color Options...84 Q Distortion Control...85 Camera Settings that Cannot Be Set at the Same Time 86 Playback Options: The Playback Menu 87 Displaying the Playback Menu...87 b Slide Show...89 c Delete... ...90 Basic Camera Setup: The Setup Menu 91 Displaying the Setup Menu...92 a Menus...94 c Welcome Screen...95 d Date...96 e Monitor Settings ...99 f Date ...
... Menu 77 Displaying the Shooting Menu...78 A Image Mode ...79 B White Balance...81 C Continuous ...83 F Color Options...84 Q Distortion Control...85 Camera Settings that Cannot Be Set at the Same Time 86 Playback Options: The Playback Menu 87 Displaying the Playback Menu...87 b Slide Show...89 c Delete... ...90 Basic Camera Setup: The Setup Menu 91 Displaying the Setup Menu...92 a Menus...94 c Welcome Screen...95 d Date...96 e Monitor Settings ...99 f Date ...

L100 User's Manual
Page 12
Table of Contents p Reset All ...109 s Battery Type ...111 d Protect ...111 f Rotate Image...112 h Copy ...113 r Firmware Version ...114 Technical Notes...115 Optional Accessories ...115 Approved Memory Cards ...115 Image File and Folder Names ...116 Caring for the Camera ...117 Cleaning ...118 Storage ...119 Error Messages...120 Troubleshooting...123 Specifications ...128 Supported Standards ...131 Index ...132 x
Table of Contents p Reset All ...109 s Battery Type ...111 d Protect ...111 f Rotate Image...112 h Copy ...113 r Firmware Version ...114 Technical Notes...115 Optional Accessories ...115 Approved Memory Cards ...115 Image File and Folder Names ...116 Caring for the Camera ...117 Cleaning ...118 Storage ...119 Error Messages...120 Troubleshooting...123 Specifications ...128 Supported Standards ...131 Index ...132 x
L100 User's Manual
Page 13
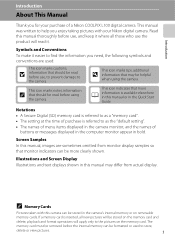
...taken with your purchase of purchase is available elsewhere in this manual or in this camera can be stored in bold. Introduction Introduction About This Manual Thank you for your Nikon digital camera. This icon marks notes, information C that should be stored on the memory card...the camera. Notations • A Secure Digital (SD) memory card is referred to help you enjoy taking pictures with this manual may be helpful when using the camera. This manual was written to as a "memory card". • The setting at the time of a Nikon COOLPIX L100 digital camera.
...taken with your purchase of purchase is available elsewhere in this manual or in this camera can be stored in bold. Introduction Introduction About This Manual Thank you for your Nikon digital camera. This icon marks notes, information C that should be stored on the memory card...the camera. Notations • A Secure Digital (SD) memory card is referred to help you enjoy taking pictures with this manual may be helpful when using the camera. This manual was written to as a "memory card". • The setting at the time of a Nikon COOLPIX L100 digital camera.

L100 User's Manual
Page 14
...-date with this Nikon digital camera are designed to the highest standards and include complex electronic circuitry. Additional information may be held liable for contact information: http://imaging.nikon.com/ Use Only Nikon Brand Electronic Accessories Nikon COOLPIX cameras are engineered and ...proven to the attention of this product may result from the Nikon representative in your area. Only Nikon brand electronic accessories (including AC...
...-date with this Nikon digital camera are designed to the highest standards and include complex electronic circuitry. Additional information may be held liable for contact information: http://imaging.nikon.com/ Use Only Nikon Brand Electronic Accessories Nikon COOLPIX cameras are engineered and ...proven to the attention of this product may result from the Nikon representative in your area. Only Nikon brand electronic accessories (including AC...

L100 User's Manual
Page 15
... prints, maps, drawings, movies and photographs is governed by national and international copyright laws. Unless the prior permission of the government was digitally copied or reproduced by means of a scanner, digital camera or other device may be punishable by law. • Items prohibited by a company. The copying or reproduction of such data is...
... prints, maps, drawings, movies and photographs is governed by national and international copyright laws. Unless the prior permission of the government was digitally copied or reproduced by means of a scanner, digital camera or other device may be punishable by law. • Items prohibited by a company. The copying or reproduction of such data is...

L100 User's Manual
Page 16
Parts of the Camera The Camera Body 1 2 34 5 67 8 Introduction 9 Zoom control 23 f : wide 23 1 g : tele 23 h : thumbnail playback 54 i : playback zoom 56 j : help 13 2 Shutter-release button 24 3 Self-timer lamp 33 AF-assist illuminator 25, 104 4 Power switch/Power-on lamp 20, 105 5 Built-in microphone 61 6 Eyelet for camera strap 7 7 Speaker 63 8 Built-in flash 6, 30 9 Lens 118, 128 4
Parts of the Camera The Camera Body 1 2 34 5 67 8 Introduction 9 Zoom control 23 f : wide 23 1 g : tele 23 h : thumbnail playback 54 i : playback zoom 56 j : help 13 2 Shutter-release button 24 3 Self-timer lamp 33 AF-assist illuminator 25, 104 4 Power switch/Power-on lamp 20, 105 5 Built-in microphone 61 6 Eyelet for camera strap 7 7 Speaker 63 8 Built-in flash 6, 30 9 Lens 118, 128 4

L100 User's Manual
Page 17
1 11 12 Parts of the Camera 2 3 4 56 7 Introduction 13 10 9 8 14 15 16 1 Monitor 8 2 Multi selector 11 3 A (shooting mode) button 10 4 Flash lamp 31 5 k (apply selection) button 11 6 c (playback) button 10, 26 7 Eyelet for camera strap 7 8 Battery-chamber/ memory card slot cover 14, 18 9 l (delete) button 26, 27, 63 10 d button 12, 62, 78, 87, 92 11 Pin cover 64, 66, 70 12 Cable connector 64, 66, 70 13 DC input connector (for AC adapter available separately from Nikon) .... 15, 115 14 Tripod socket 15 Battery-chamber 14 16 Memory card slot 18 5
1 11 12 Parts of the Camera 2 3 4 56 7 Introduction 13 10 9 8 14 15 16 1 Monitor 8 2 Multi selector 11 3 A (shooting mode) button 10 4 Flash lamp 31 5 k (apply selection) button 11 6 c (playback) button 10, 26 7 Eyelet for camera strap 7 8 Battery-chamber/ memory card slot cover 14, 18 9 l (delete) button 26, 27, 63 10 d button 12, 62, 78, 87, 92 11 Pin cover 64, 66, 70 12 Cable connector 64, 66, 70 13 DC input connector (for AC adapter available separately from Nikon) .... 15, 115 14 Tripod socket 15 Battery-chamber 14 16 Memory card slot 18 5

L100 User's Manual
Page 18
Lowering the Built-in Flash. • Push the built-in flash down gently. • When not using the flash, lower the built-in Flash. • See "Using the Flash" (A 30) for more information about flash settings. Introduction Parts of the Camera Raising and Lowering the Built-in Flash Raising the Built-in flash. 6
Lowering the Built-in Flash. • Push the built-in flash down gently. • When not using the flash, lower the built-in Flash. • See "Using the Flash" (A 30) for more information about flash settings. Introduction Parts of the Camera Raising and Lowering the Built-in Flash Raising the Built-in flash. 6

L100 User's Manual
Page 19
Parts of the Camera Introduction B Lens Cap • Remove the lens cap before you shoot a picture. • At times when you will not be shooting pictures such as when the power is off or while you are carrying the camera, attach the lens cap to the camera to the camera (at two places). Attaching the Camera Strap and Lens Cap Attach the lens cap to the camera strap, and then attach the strap to protect the lens. 7
Parts of the Camera Introduction B Lens Cap • Remove the lens cap before you shoot a picture. • At times when you will not be shooting pictures such as when the power is off or while you are carrying the camera, attach the lens cap to the camera to the camera (at two places). Attaching the Camera Strap and Lens Cap Attach the lens cap to the camera strap, and then attach the strap to protect the lens. 7
L100 User's Manual
Page 20
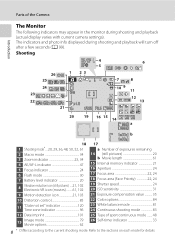
...31 21 Exposure compensation value 35 22 Color options 84 23 White balance mode 81 24 Continuous shooting mode 83 25 Type of the Camera Introduction The Monitor The following indicators may appear in the monitor during shooting and playback will turn off after a few seconds (A 99...). The indicators and photo info displayed during shooting and playback (actual display varies with current camera settings). Parts of sport continuous mode ....... 48 26 Self-timer indicator 33 8 * Differs according to the sections on each mode for details....
...31 21 Exposure compensation value 35 22 Color options 84 23 White balance mode 81 24 Continuous shooting mode 83 25 Type of the Camera Introduction The Monitor The following indicators may appear in the monitor during shooting and playback will turn off after a few seconds (A 99...). The indicators and photo info displayed during shooting and playback (actual display varies with current camera settings). Parts of sport continuous mode ....... 48 26 Self-timer indicator 33 8 * Differs according to the sections on each mode for details....

L100 User's Manual
Page 21
Parts of the Camera Introduction Playback 1 2 34 15/05/2009 12:00 13 9999.JPG 12 10 11 9 5 999 999 6 87 999 999 a 9999 9999 1m00s b 1m00s 1 Date of ...
Parts of the Camera Introduction Playback 1 2 34 15/05/2009 12:00 13 9999.JPG 12 10 11 9 5 999 999 6 87 999 999 a 9999 9999 1m00s b 1m00s 1 Date of ...

L100 User's Manual
Page 22
... the playback mode when c is pressed. • If the camera is displayed, you can return to turn the camera on in shooting mode to select the shooting mode. 1 G Easy auto mode (A 20) 1 Easy auto mode 2 b Scene (A 36)* 2 3 d Sport continuous (A 48), B High sensitivity 3 (A 50), a Smile (A ...
... the playback mode when c is pressed. • If the camera is displayed, you can return to turn the camera on in shooting mode to select the shooting mode. 1 G Easy auto mode (A 20) 1 Easy auto mode 2 b Scene (A 36)* 2 3 d Sport continuous (A 48), B High sensitivity 3 (A 50), a Smile (A ...
L100 User's Manual
Page 25
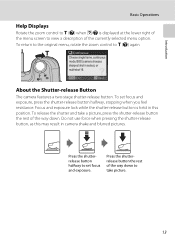
... shutterrelease button the rest of the currently selected menu option. Continuous Choose single frame, continuous mode, BSS (camera chooses sharpest shot in camera shake and blurred pictures. Exit Back About the Shutter-release Button The camera features a two-stage shutter-release button. To set focus and exposure. Focus and exposure lock while the...
... shutterrelease button the rest of the currently selected menu option. Continuous Choose single frame, continuous mode, BSS (camera chooses sharpest shot in camera shake and blurred pictures. Exit Back About the Shutter-release Button The camera features a two-stage shutter-release button. To set focus and exposure. Focus and exposure lock while the...

L100 User's Manual
Page 26
...the batteries correctly as shown at right. 3 1 2 First Steps 3 Close the battery-chamber/memory card slot cover. 1 2 Applicable Batteries This camera uses the following R6/AA-size batteries. • Four LR6/L40 alkaline batteries (batteries supplied) • Four FR6/L91 lithium batteries Rechargeable batteries cannot... be used. Turning On and Off the Camera After removing the lens cap, press the power switch to turn the camera off , hold the camera upside down c to turn the camera on lamp (green) will light for a moment, then the monitor...
...the batteries correctly as shown at right. 3 1 2 First Steps 3 Close the battery-chamber/memory card slot cover. 1 2 Applicable Batteries This camera uses the following R6/AA-size batteries. • Four LR6/L40 alkaline batteries (batteries supplied) • Four FR6/L91 lithium batteries Rechargeable batteries cannot... be used. Turning On and Off the Camera After removing the lens cap, press the power switch to turn the camera off , hold the camera upside down c to turn the camera on lamp (green) will light for a moment, then the monitor...

L100 User's Manual
Page 27
...battery-chamber/ memory card slot cover. While the monitor is pressed. After a further three minutes, the Auto off function will turn the camera off during standby mode, it will turn on again when the power switch or shutterrelease button is off automatically. Do not, under any other... old and new batteries or batteries of different makes or types. • Batteries with the following defects cannot be used , turn the camera on the manufacturer. Inserting the Batteries B Removing the Batteries Confirm the power-on lamp and the monitor are performed for the battery on ...
...battery-chamber/ memory card slot cover. While the monitor is pressed. After a further three minutes, the Auto off function will turn the camera off during standby mode, it will turn on again when the power switch or shutterrelease button is off automatically. Do not, under any other... old and new batteries or batteries of different makes or types. • Batteries with the following defects cannot be used , turn the camera on the manufacturer. Inserting the Batteries B Removing the Batteries Confirm the power-on lamp and the monitor are performed for the battery on ...

L100 User's Manual
Page 28
... selector to on. The power-on lamp (green) will light for the internal clock is displayed the first time the camera is selected, the date and time will turn on the camera. If No is turned on. 1 Press the power switch to select your home time zone (city name) (A 98) and press... choose the desired language and press k. For information on the top of the monitor. No Yes Cancel London Casablanca D Daylight Saving Time To use the camera in Step 4 to set . 4 Press J or K to turn on. When the daylight saving time setting is in effect, press H on the home time zone in...
... selector to on. The power-on lamp (green) will light for the internal clock is displayed the first time the camera is selected, the date and time will turn on the camera. If No is turned on. 1 Press the power switch to select your home time zone (city name) (A 98) and press... choose the desired language and press k. For information on the top of the monitor. No Yes Cancel London Casablanca D Daylight Saving Time To use the camera in Step 4 to set . 4 Press J or K to turn on. When the daylight saving time setting is in effect, press H on the home time zone in...

L100 User's Manual
Page 29
... Mode" (A 50), "Using the Smile Mode" (A 52), or "Recording Movies" (A 61) for shooting-mode selection menu. 8 When Easy auto mode is displayed, press k. • The camera enters the shooting mode and you can take pictures in Easy auto mode (A 20). See "Shooting in the Auto Mode" (A 29), "Using the Scene Mode...
... Mode" (A 50), "Using the Smile Mode" (A 52), or "Recording Movies" (A 61) for shooting-mode selection menu. 8 When Easy auto mode is displayed, press k. • The camera enters the shooting mode and you can take pictures in Easy auto mode (A 20). See "Shooting in the Auto Mode" (A 29), "Using the Scene Mode...

L100 User's Manual
Page 30
... the memory card. Make sure that the memory card is inserted in the camera, pictures are stored in the camera's internal memory (approximately 44 MB) or on removable Secure Digital (SD) memory cards (available separately) (A 115). If a memory card is correctly oriented. 18 Remove the memory card to store pictures in correctly until...
... the memory card. Make sure that the memory card is inserted in the camera, pictures are stored in the camera's internal memory (approximately 44 MB) or on removable Secure Digital (SD) memory cards (available separately) (A 115). If a memory card is correctly oriented. 18 Remove the memory card to store pictures in correctly until...


