
L100 User's Manual
Page 9
...Displays...13 About the Shutter-release Button...13 First Steps ...14 Inserting the Batteries ...14 Applicable Batteries ...14 Turning On and Off the Camera...14 Setting Display Language, Date and Time 16 Inserting Memory Cards ...18 Removing Memory Cards...19 G Basic Photography and Playback: Easy Auto... Mode 20 Step 1 Turn the Camera On and Select G (Easy Auto) Mode 20 Indicators Displayed in G (Easy auto) Mode 21 Step 2 Frame a Picture ...22 Using the Zoom...23 Step 3 Focus and Shoot ...24 Step 4 Viewing and Deleting...
...Displays...13 About the Shutter-release Button...13 First Steps ...14 Inserting the Batteries ...14 Applicable Batteries ...14 Turning On and Off the Camera...14 Setting Display Language, Date and Time 16 Inserting Memory Cards ...18 Removing Memory Cards...19 G Basic Photography and Playback: Easy Auto... Mode 20 Step 1 Turn the Camera On and Select G (Easy Auto) Mode 20 Indicators Displayed in G (Easy auto) Mode 21 Step 2 Frame a Picture ...22 Using the Zoom...23 Step 3 Focus and Shoot ...24 Step 4 Viewing and Deleting...
L100 User's Manual
Page 10
Table of Contents A Auto Mode...29 Shooting in the Auto Mode...29 Using the Flash...30 Setting the Flash Mode...30 Taking Pictures with the Self-timer 33 Macro Mode...34 Exposure Compensation ...35 C Shooting Suited for the Scene 36 Using the Scene Mode ...36 Setting... the Scene Mode...36 Features ...37 Taking Pictures for Food Mode...44 Taking Pictures for a Panorama ...46 d Shooting continuously at high speed (Sport Continuous 48 Shooting in the Sport Continuous Mode 48 Sport Continuous Menu...
Table of Contents A Auto Mode...29 Shooting in the Auto Mode...29 Using the Flash...30 Setting the Flash Mode...30 Taking Pictures with the Self-timer 33 Macro Mode...34 Exposure Compensation ...35 C Shooting Suited for the Scene 36 Using the Scene Mode ...36 Setting... the Scene Mode...36 Features ...37 Taking Pictures for Food Mode...44 Taking Pictures for a Panorama ...46 d Shooting continuously at high speed (Sport Continuous 48 Shooting in the Sport Continuous Mode 48 Sport Continuous Menu...

L100 User's Manual
Page 11
... and Printers 64 Connecting to a TV ...64 Connecting to a Computer...65 Before Connecting the Camera...65 Transferring Pictures from a Camera to a Computer 66 Connecting to a Printer...69 Connecting the Camera and Printer...70 Printing Pictures One at a Time ...71 Printing Multiple Pictures ...72 Creating a DPOF Print Order: Print Set 75 d Shooting, Playback and Setup Menus 77...
... and Printers 64 Connecting to a TV ...64 Connecting to a Computer...65 Before Connecting the Camera...65 Transferring Pictures from a Camera to a Computer 66 Connecting to a Printer...69 Connecting the Camera and Printer...70 Printing Pictures One at a Time ...71 Printing Multiple Pictures ...72 Creating a DPOF Print Order: Print Set 75 d Shooting, Playback and Setup Menus 77...
L100 User's Manual
Page 13
... and Screen Display Illustrations and text displays shown in this manual may be helpful when using the camera. The memory card must be removed before use, and keep it where all new pictures will be stored on the memory card and delete, playback and format operations will read before use, to prevent... card". • The setting at the time of purchase is referred to as the "default setting". • The names of menu items displayed in the camera monitor, and the names of a Nikon COOLPIX L100 digital camera.
... and Screen Display Illustrations and text displays shown in this manual may be helpful when using the camera. The memory card must be removed before use, and keep it where all new pictures will be stored on the memory card and delete, playback and format operations will read before use, to prevent... card". • The setting at the time of purchase is referred to as the "default setting". • The names of menu items displayed in the camera monitor, and the names of a Nikon COOLPIX L100 digital camera.

L100 User's Manual
Page 14
...nikon.com/ Use Only Nikon Brand Electronic Accessories Nikon COOLPIX cameras are designed to operate within the operational and safety requirements of this Nikon digital camera are engineered and proven to the highest standards and include complex electronic circuitry. For more information about Nikon brand accessories, contact a local authorized Nikon dealer. Only Nikon... the camera is accurate and complete, we would appreciate it were you to bring any errors or omissions to the attention of the Nikon representative in your area. Before Taking Important Pictures Before taking pictures on ...
...nikon.com/ Use Only Nikon Brand Electronic Accessories Nikon COOLPIX cameras are designed to operate within the operational and safety requirements of this Nikon digital camera are engineered and proven to the highest standards and include complex electronic circuitry. For more information about Nikon brand accessories, contact a local authorized Nikon dealer. Only Nikon... the camera is accurate and complete, we would appreciate it were you to bring any errors or omissions to the attention of the Nikon representative in your area. Before Taking Important Pictures Before taking pictures on ...

L100 User's Manual
Page 15
..., ID cards and tickets, such as passes and meal coupons. • Comply with images containing no private information (for example, pictures of empty sky). Deleted files can sometimes be recovered from being in possession of material that deleting images or formatting data storage devices... is prohibited. Be sure to also replace any pictures selected for the purpose of making illegal copies or to infringe copyright laws. Unless the prior permission of the government was digitally copied or reproduced by means of a scanner, digital camera or other device may be punishable by law. ...
..., ID cards and tickets, such as passes and meal coupons. • Comply with images containing no private information (for example, pictures of empty sky). Deleted files can sometimes be recovered from being in possession of material that deleting images or formatting data storage devices... is prohibited. Be sure to also replace any pictures selected for the purpose of making illegal copies or to infringe copyright laws. Unless the prior permission of the government was digitally copied or reproduced by means of a scanner, digital camera or other device may be punishable by law. ...

L100 User's Manual
Page 19
Attaching the Camera Strap and Lens Cap Attach the lens cap to the camera strap, and then attach the strap to protect the lens. 7 Parts of the Camera Introduction B Lens Cap • Remove the lens cap before you shoot a picture. • At times when you will not be shooting pictures such as when the power is off or while you are carrying the camera, attach the lens cap to the camera to the camera (at two places).
Attaching the Camera Strap and Lens Cap Attach the lens cap to the camera strap, and then attach the strap to protect the lens. 7 Parts of the Camera Introduction B Lens Cap • Remove the lens cap before you shoot a picture. • At times when you will not be shooting pictures such as when the power is off or while you are carrying the camera, attach the lens cap to the camera to the camera (at two places).
L100 User's Manual
Page 20
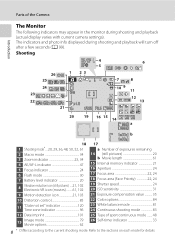
... Zoom indicator 23, 34 4 AE/AF-L indicator 47 5 Focus indicator 24 6 Flash mode 30 7 Battery level indicator 20 8 Vibration reduction icon (still pictures) ....21, 102 Electronic VR icon (movies) .........61, 102 9 Motion detection icon 21, 103 10 Distortion control 85 11 "Date not set" indicator 120...21 Exposure compensation value 35 22 Color options 84 23 White balance mode 81 24 Continuous shooting mode 83 25 Type of the Camera Introduction The Monitor The following indicators may appear in the monitor during shooting and playback will turn off after a few seconds (A...
... Zoom indicator 23, 34 4 AE/AF-L indicator 47 5 Focus indicator 24 6 Flash mode 30 7 Battery level indicator 20 8 Vibration reduction icon (still pictures) ....21, 102 Electronic VR icon (movies) .........61, 102 9 Motion detection icon 21, 103 10 Distortion control 85 11 "Date not set" indicator 120...21 Exposure compensation value 35 22 Color options 84 23 White balance mode 81 24 Continuous shooting mode 83 25 Type of the Camera Introduction The Monitor The following indicators may appear in the monitor during shooting and playback will turn off after a few seconds (A...

L100 User's Manual
Page 21
Parts of the Camera Introduction Playback 1 2 34 15/05/2009 12:00 13 9999.JPG 12 10 11 9 5 999 999 6 87 999 999 a 9999 9999 1m00s b 1m00s 1 Date of ... a Current frame number/ 6 total number of frames 26 b Movie length 63 7 Internal memory indicator 26 8 Movie playback indicator 63 9 Print-order icon 75 10 Small picture 60 11 D-Lighting icon 58 12 Protect icon 111 13 File number and type 116 * The displayed icons vary with the settings in shooting mode. 9
Parts of the Camera Introduction Playback 1 2 34 15/05/2009 12:00 13 9999.JPG 12 10 11 9 5 999 999 6 87 999 999 a 9999 9999 1m00s b 1m00s 1 Date of ... a Current frame number/ 6 total number of frames 26 b Movie length 63 7 Internal memory indicator 26 8 Movie playback indicator 63 9 Print-order icon 75 10 Small picture 60 11 D-Lighting icon 58 12 Protect icon 111 13 File number and type 116 * The displayed icons vary with the settings in shooting mode. 9
L100 User's Manual
Page 23
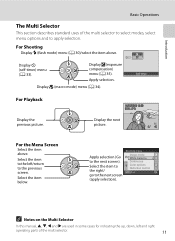
.../05/2009 15:30 0004.JPG Display the next picture. 44 For the Menu Screen Select the item above . Select the item to the left and right operating parts of the multi selector to select ...
.../05/2009 15:30 0004.JPG Display the next picture. 44 For the Menu Screen Select the item above . Select the item to the left and right operating parts of the multi selector to select ...
L100 User's Manual
Page 25
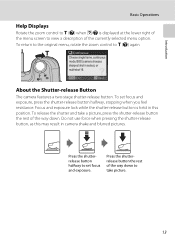
... held in this may result in series), or multi-shot 16. Continuous Choose single frame, continuous mode, BSS (camera chooses sharpest shot in camera shake and blurred pictures. To release the shutter and take picture. 13 Press the shutterrelease button halfway to set focus and exposure, press the shutter-release button halfway, stopping when... of the menu screen to view a description of the way down to g (j) again. To return to the original menu, rotate the zoom control to take a picture, press the shutter-release button the rest of the currently selected menu option.
... held in this may result in series), or multi-shot 16. Continuous Choose single frame, continuous mode, BSS (camera chooses sharpest shot in camera shake and blurred pictures. To release the shutter and take picture. 13 Press the shutterrelease button halfway to set focus and exposure, press the shutter-release button halfway, stopping when... of the menu screen to view a description of the way down to g (j) again. To return to the original menu, rotate the zoom control to take a picture, press the shutter-release button the rest of the currently selected menu option.

L100 User's Manual
Page 29
... Smile Mode" (A 52), or "Recording Movies" (A 61) for shooting-mode selection menu. 8 When Easy auto mode is displayed, press k. • The camera enters the shooting mode and you can take pictures in which the day, month and year are displayed and press k or K. • The settings are applied. 7 Make sure that the...
... Smile Mode" (A 52), or "Recording Movies" (A 61) for shooting-mode selection menu. 8 When Easy auto mode is displayed, press k. • The camera enters the shooting mode and you can take pictures in which the day, month and year are displayed and press k or K. • The settings are applied. 7 Make sure that the...

L100 User's Manual
Page 30
... card is correctly oriented. 18 Slide the memory card in the camera, pictures are off the camera before opening the battery-chamber/memory card slot cover, hold the camera upside down or backwards could damage the camera or the memory card. Make sure that the memory card is inserted... to the memory card can be played back, deleted or transferred. Be sure to store pictures in the camera's internal memory (approximately 44 MB) or on removable Secure Digital (SD) memory cards (available separately) (A 115). Before opening the battery-chamber/memory card slot cover. Remove the...
... card is correctly oriented. 18 Slide the memory card in the camera, pictures are off the camera before opening the battery-chamber/memory card slot cover, hold the camera upside down or backwards could damage the camera or the memory card. Make sure that the memory card is inserted... to the memory card can be played back, deleted or transferred. Be sure to store pictures in the camera's internal memory (approximately 44 MB) or on removable Secure Digital (SD) memory cards (available separately) (A 115). Before opening the battery-chamber/memory card slot cover. Remove the...

L100 User's Manual
Page 31
...SD memory cards are off. Write protect switch B Memory Cards • Use only Secure Digital memory cards. • Do not perform the following during formatting, while data is not formatted. Turn off the camera - Remove the card 2, being written to or deleted from the memory card, or ... press k. Failure to observe this precaution could result in the loss of any pictures you insert the memory cards used in damage to the camera or memory card: - The confirmation dialog will be formatted when this camera (A 106). Yes Use the multi selector to the "write" position. deletes...
...SD memory cards are off. Write protect switch B Memory Cards • Use only Secure Digital memory cards. • Do not perform the following during formatting, while data is not formatted. Turn off the camera - Remove the card 2, being written to or deleted from the memory card, or ... press k. Failure to observe this precaution could result in the loss of any pictures you insert the memory cards used in damage to the camera or memory card: - The confirmation dialog will be formatted when this camera (A 106). Yes Use the multi selector to the "write" position. deletes...

L100 User's Manual
Page 32
... and Playback: Easy Auto Mode Step 1 Turn the Camera On and Select G (Easy Auto) Mode In G (easy auto) mode, the camera automatically determines an appropriate shooting mode when you frame a picture, allowing you to easily take pictures. Easy auto mode 4 Check the battery level and ...number of pictures that suits the scene. 1 Remove the lens cap and press...
... and Playback: Easy Auto Mode Step 1 Turn the Camera On and Select G (Easy Auto) Mode In G (easy auto) mode, the camera automatically determines an appropriate shooting mode when you frame a picture, allowing you to easily take pictures. Easy auto mode 4 Check the battery level and ...number of pictures that suits the scene. 1 Remove the lens cap and press...

L100 User's Manual
Page 33
When memory card is inserted, C is not displayed and pictures will be recorded to indicate the shooting mode selected by the camera for the current subject and framing. The indicators and photo info displayed during shooting and playback will be recorded to raise the built-in... D Notes on the Flash When the built-in easy auto mode • When the camera is pointed at the top of camera shake. 108 Internal memory indicator Pictures will turn off and W appears at a person's face, the camera automatically recognizes the face and focuses on it. • The self-timer (A 33) ...
When memory card is inserted, C is not displayed and pictures will be recorded to indicate the shooting mode selected by the camera for the current subject and framing. The indicators and photo info displayed during shooting and playback will be recorded to raise the built-in... D Notes on the Flash When the built-in easy auto mode • When the camera is pointed at the top of camera shake. 108 Internal memory indicator Pictures will turn off and W appears at a person's face, the camera automatically recognizes the face and focuses on it. • The self-timer (A 33) ...

L100 User's Manual
Page 34
... center of the monitor. In this case, select another shooting mode. 22 • When digital zoom is U. Shooting mode icon • When the camera determines the scene mode, the shooting mode icon will change (A 28). • When the camera recognizes a human face (front view), that face will be in both hands, keeping your... will be framed in the focus area by a yellow double border. B Easy auto mode • The desired scene mode may not be recognized. Step 2 Frame a Picture 1 Ready the camera. Hold the camera steadily in the center of the focus area.
... center of the monitor. In this case, select another shooting mode. 22 • When digital zoom is U. Shooting mode icon • When the camera determines the scene mode, the shooting mode icon will change (A 28). • When the camera recognizes a human face (front view), that face will be in both hands, keeping your... will be framed in the focus area by a yellow double border. B Easy auto mode • The desired scene mode may not be recognized. Step 2 Frame a Picture 1 Ready the camera. Hold the camera steadily in the center of the focus area.
L100 User's Manual
Page 35
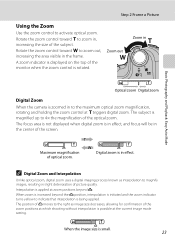
...size decreases, allowing for confirmation of optical zoom. Zoom out Zoom in Basic Photography and Playback: Easy Auto Mode Optical zoom Digital zoom Digital Zoom When the camera is rotated. Rotate the zoom control toward g to 4× the magnification of the screen. The subject is in effect,... the maximum optical zoom magnification, rotating and holding the zoom control at which shooting without interpolation is being applied. Step 2 Frame a Picture Using the Zoom Use the zoom control to zoom out, increasing the area visible in the frame. When zoom is increased beyond V. ...
...size decreases, allowing for confirmation of optical zoom. Zoom out Zoom in Basic Photography and Playback: Easy Auto Mode Optical zoom Digital zoom Digital Zoom When the camera is rotated. Rotate the zoom control toward g to 4× the magnification of the screen. The subject is in effect,... the maximum optical zoom magnification, rotating and holding the zoom control at which shooting without interpolation is being applied. Step 2 Frame a Picture Using the Zoom Use the zoom control to zoom out, increasing the area visible in the frame. When zoom is increased beyond V. ...

L100 User's Manual
Page 36
...focus indicator, blinks red. Change the composition and try again. 2 Press the shutter-release button the rest of the way down. • The picture will glow green. 1/125 F3.5 Focus indicator 1/125 F3.5 • The shutter speed and aperture are recognized: Basic Photography and Playback: Easy... Auto Mode 1/125 F3.5 Shutter Aperture Speed • When using the digital zoom, the camera focuses on the center of the frame, but the focus area is in focus, the focus indicator will be recorded to focus. Step...
...focus indicator, blinks red. Change the composition and try again. 2 Press the shutter-release button the rest of the way down. • The picture will glow green. 1/125 F3.5 Focus indicator 1/125 F3.5 • The shutter speed and aperture are recognized: Basic Photography and Playback: Easy... Auto Mode 1/125 F3.5 Shutter Aperture Speed • When using the digital zoom, the camera focuses on the center of the frame, but the focus area is in focus, the focus indicator will be recorded to focus. Step...

L100 User's Manual
Page 37
...8226; No contrast between the subject and surroundings (e.g. Basic Photography and Playback: Easy Auto Mode Step 3 Focus and Shoot B During Recording While pictures are being recorded, the number of exposures remaining display will be in focus despite the fact that is standing in front of a white wall,... all the way down. 25 Screen" (A 108) for more information. when the subject is the same distance from the camera (e.g. screen is displayed shortly after the picture is poorly lit, the AF-assist illuminator (A 104) may light by first focusing on an object that the focus area...
...8226; No contrast between the subject and surroundings (e.g. Basic Photography and Playback: Easy Auto Mode Step 3 Focus and Shoot B During Recording While pictures are being recorded, the number of exposures remaining display will be in focus despite the fact that is standing in front of a white wall,... all the way down. 25 Screen" (A 108) for more information. when the subject is the same distance from the camera (e.g. screen is displayed shortly after the picture is poorly lit, the AF-assist illuminator (A 104) may light by first focusing on an object that the focus area...


