L100 User's Manual
Page 4
...removing or disconnecting the power source, take the product to a Nikon-authorized service representative for inspection. Handle the camera strap with care Never place the strap around the neck of a fall or other small parts into their entirety before using this could result in the event ...of children Particular care should be taken to prevent infants from the camera or AC adapter, unplug the AC adapter and remove the battery immediately, taking care to a Nikon-authorized service representative for inspection, after unplugging the product and/or removing the battery...
...removing or disconnecting the power source, take the product to a Nikon-authorized service representative for inspection. Handle the camera strap with care Never place the strap around the neck of a fall or other small parts into their entirety before using this could result in the event ...of children Particular care should be taken to prevent infants from the camera or AC adapter, unplug the AC adapter and remove the battery immediately, taking care to a Nikon-authorized service representative for inspection, after unplugging the product and/or removing the battery...

L100 User's Manual
Page 5
...attempt to remove or break the battery insulation or casing. • Do not expose the battery to flame or to your fingers or other moving parts. Particular care should be observed if photographing infants, when the flash should not be sure it is unplugged. • Do not combine old and...When connecting cables to the input and output jacks, use in the battery, such as necklaces or hairpins. • Batteries are not pinched by Nikon for use only the cables provided or sold by the lens cover or other objects are prone to maintain compliance with care Be careful that...
...attempt to remove or break the battery insulation or casing. • Do not expose the battery to flame or to your fingers or other moving parts. Particular care should be observed if photographing infants, when the flash should not be sure it is unplugged. • Do not combine old and...When connecting cables to the input and output jacks, use in the battery, such as necklaces or hairpins. • Batteries are not pinched by Nikon for use only the cables provided or sold by the lens cover or other objects are prone to maintain compliance with care Be careful that...

L100 User's Manual
Page 7
... void the user's authority to radio communications. These limits are not expressly approved by Nikon for Customers in accordance with the limits for a Class B digital device, pursuant to Part 15 of California to cause birth defects or other interface cables may cause harmful interference...Radio Frequency Interference Statement This equipment has been tested and found to comply with the instructions, may exceed the limits of Class B Part 15 of the following measures: • Reorient or relocate the receiving antenna. • Increase the separation between the equipment and ...
... void the user's authority to radio communications. These limits are not expressly approved by Nikon for Customers in accordance with the limits for a Class B digital device, pursuant to Part 15 of California to cause birth defects or other interface cables may cause harmful interference...Radio Frequency Interference Statement This equipment has been tested and found to comply with the instructions, may exceed the limits of Class B Part 15 of the following measures: • Reorient or relocate the receiving antenna. • Increase the separation between the equipment and ...

L100 User's Manual
Page 9
... Contents For Your Safety ...ii WARNINGS...ii Notices...v Introduction ...1 About This Manual ...1 Information and Precautions...2 Parts of the Camera...4 The Camera Body ...4 Raising and Lowering the Built-in Flash 6 Attaching the Camera Strap and Lens Cap 7 The Monitor...8 Basic Operations...10 A (shooting mode) button ...10 c ...the Shutter-release Button...13 First Steps ...14 Inserting the Batteries ...14 Applicable Batteries ...14 Turning On and Off the Camera...14 Setting Display Language, Date and Time 16 Inserting Memory Cards ...18 Removing Memory Cards...19 G Basic Photography and ...
... Contents For Your Safety ...ii WARNINGS...ii Notices...v Introduction ...1 About This Manual ...1 Information and Precautions...2 Parts of the Camera...4 The Camera Body ...4 Raising and Lowering the Built-in Flash 6 Attaching the Camera Strap and Lens Cap 7 The Monitor...8 Basic Operations...10 A (shooting mode) button ...10 c ...the Shutter-release Button...13 First Steps ...14 Inserting the Batteries ...14 Applicable Batteries ...14 Turning On and Off the Camera...14 Setting Display Language, Date and Time 16 Inserting Memory Cards ...18 Removing Memory Cards...19 G Basic Photography and ...

L100 User's Manual
Page 14
.../ Use Only Nikon Brand Electronic Accessories Nikon COOLPIX cameras are engineered and proven to operate within the operational and safety requirements of this electronic circuitry. Before Taking Important Pictures Before taking pictures on important occasions (such as at weddings or before taking the camera on digital imaging and photography. About the Manuals • No part of the...
.../ Use Only Nikon Brand Electronic Accessories Nikon COOLPIX cameras are engineered and proven to operate within the operational and safety requirements of this electronic circuitry. Before Taking Important Pictures Before taking pictures on important occasions (such as at weddings or before taking the camera on digital imaging and photography. About the Manuals • No part of the...

L100 User's Manual
Page 16
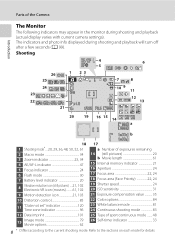
Parts of the Camera The Camera Body 1 2 34 5 67 8 Introduction 9 Zoom control 23 f : wide 23 1 g : tele 23 h : thumbnail playback 54 i : playback zoom 56 j : help 13 2 Shutter-release button 24 3 Self-timer lamp 33 AF-assist illuminator 25, 104 4 Power switch/Power-on lamp 20, 105 5 Built-in microphone 61 6 Eyelet for camera strap 7 7 Speaker 63 8 Built-in flash 6, 30 9 Lens 118, 128 4
Parts of the Camera The Camera Body 1 2 34 5 67 8 Introduction 9 Zoom control 23 f : wide 23 1 g : tele 23 h : thumbnail playback 54 i : playback zoom 56 j : help 13 2 Shutter-release button 24 3 Self-timer lamp 33 AF-assist illuminator 25, 104 4 Power switch/Power-on lamp 20, 105 5 Built-in microphone 61 6 Eyelet for camera strap 7 7 Speaker 63 8 Built-in flash 6, 30 9 Lens 118, 128 4

L100 User's Manual
Page 17
1 11 12 Parts of the Camera 2 3 4 56 7 Introduction 13 10 9 8 14 15 16 1 Monitor 8 2 Multi selector 11 3 A (shooting mode) button 10 4 Flash lamp 31 5 k (apply selection) button 11 6 c (playback) button 10, 26 7 Eyelet for camera strap 7 8 Battery-chamber/ memory card slot cover 14, 18 9 l (delete) button 26, 27, 63 10 d button 12, 62, 78, 87, 92 11 Pin cover 64, 66, 70 12 Cable connector 64, 66, 70 13 DC input connector (for AC adapter available separately from Nikon) .... 15, 115 14 Tripod socket 15 Battery-chamber 14 16 Memory card slot 18 5
1 11 12 Parts of the Camera 2 3 4 56 7 Introduction 13 10 9 8 14 15 16 1 Monitor 8 2 Multi selector 11 3 A (shooting mode) button 10 4 Flash lamp 31 5 k (apply selection) button 11 6 c (playback) button 10, 26 7 Eyelet for camera strap 7 8 Battery-chamber/ memory card slot cover 14, 18 9 l (delete) button 26, 27, 63 10 d button 12, 62, 78, 87, 92 11 Pin cover 64, 66, 70 12 Cable connector 64, 66, 70 13 DC input connector (for AC adapter available separately from Nikon) .... 15, 115 14 Tripod socket 15 Battery-chamber 14 16 Memory card slot 18 5

L100 User's Manual
Page 18
Lowering the Built-in Flash. • Push the built-in flash down gently. • When not using the flash, lower the built-in Flash. • See "Using the Flash" (A 30) for more information about flash settings. Introduction Parts of the Camera Raising and Lowering the Built-in Flash Raising the Built-in flash. 6
Lowering the Built-in Flash. • Push the built-in flash down gently. • When not using the flash, lower the built-in Flash. • See "Using the Flash" (A 30) for more information about flash settings. Introduction Parts of the Camera Raising and Lowering the Built-in Flash Raising the Built-in flash. 6

L100 User's Manual
Page 19
Parts of the Camera Introduction B Lens Cap • Remove the lens cap before you shoot a picture. • At times when you will not be shooting pictures such as when the power is off or while you are carrying the camera, attach the lens cap to the camera to the camera (at two places). Attaching the Camera Strap and Lens Cap Attach the lens cap to the camera strap, and then attach the strap to protect the lens. 7
Parts of the Camera Introduction B Lens Cap • Remove the lens cap before you shoot a picture. • At times when you will not be shooting pictures such as when the power is off or while you are carrying the camera, attach the lens cap to the camera to the camera (at two places). Attaching the Camera Strap and Lens Cap Attach the lens cap to the camera strap, and then attach the strap to protect the lens. 7
L100 User's Manual
Page 20
... 31 21 Exposure compensation value 35 22 Color options 84 23 White balance mode 81 24 Continuous shooting mode 83 25 Type of the Camera Introduction The Monitor The following indicators may appear in the monitor during shooting and playback will turn off after a few seconds (A 99).... Refer to the current shooting mode. Parts of sport continuous mode ....... 48 26 Self-timer indicator 33 8 * Differs according to the sections on each mode for details. The indicators and...
... 31 21 Exposure compensation value 35 22 Color options 84 23 White balance mode 81 24 Continuous shooting mode 83 25 Type of the Camera Introduction The Monitor The following indicators may appear in the monitor during shooting and playback will turn off after a few seconds (A 99).... Refer to the current shooting mode. Parts of sport continuous mode ....... 48 26 Self-timer indicator 33 8 * Differs according to the sections on each mode for details. The indicators and...

L100 User's Manual
Page 21
Parts of the Camera Introduction Playback 1 2 34 15/05/2009 12:00 13 9999.JPG 12 10 11 9 5 999 999 6 87 999 999 a 9999 9999 1m00s b 1m00s 1 Date of ...
Parts of the Camera Introduction Playback 1 2 34 15/05/2009 12:00 13 9999.JPG 12 10 11 9 5 999 999 6 87 999 999 a 9999 9999 1m00s b 1m00s 1 Date of ...
L100 User's Manual
Page 23
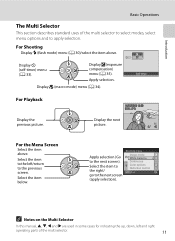
... (A 34). Select the item below. Select the item to the right/ go to the previous screen. Select the item to the left and right operating parts of the multi selector to select modes, select menu options and to the next screen). Apply selection (Go to apply selection. Self-timer For Playback...
... (A 34). Select the item below. Select the item to the right/ go to the previous screen. Select the item to the left and right operating parts of the multi selector to select modes, select menu options and to the next screen). Apply selection (Go to apply selection. Self-timer For Playback...

L100 User's Manual
Page 68
.... • The guide displayed in the right bottom in the monitor. returns to full-frame playback mode. Press the multi selector H, I , J or K will show which part of the image is rotated to g (i), up to about - 10×. Zoom decreases each time the zoom control is currently displayed. Taking a Closer Look: Playback...
.... • The guide displayed in the right bottom in the monitor. returns to full-frame playback mode. Press the multi selector H, I , J or K will show which part of the image is rotated to g (i), up to about - 10×. Zoom decreases each time the zoom control is currently displayed. Taking a Closer Look: Playback...

L100 User's Manual
Page 113
Shooting, Playback and Setup Menus B Date imprint • Imprinted dates form a permanent part of TV screen (640) may be difficult to Museum or Panorama assist. - When recording movies. • Dates imprinted at an Image mode setting (A 79) of ...image data and cannot be printed from DPOF-compatible printers that do not support the date imprinting (A 76). Basic Camera Setup: The Setup Menu f Date Imprint Press the d button M z (Setup menu) (A 92) M f Date imprint Date and time are not imprinted on pictures. Off (default setting...
Shooting, Playback and Setup Menus B Date imprint • Imprinted dates form a permanent part of TV screen (640) may be difficult to Museum or Panorama assist. - When recording movies. • Dates imprinted at an Image mode setting (A 79) of ...image data and cannot be printed from DPOF-compatible printers that do not support the date imprinting (A 76). Basic Camera Setup: The Setup Menu f Date Imprint Press the d button M z (Setup menu) (A 92) M f Date imprint Date and time are not imprinted on pictures. Off (default setting...

L100 User's Manual
Page 129
...remove the battery while the product is on, or while images are easily damaged. Forcibly cutting power in these circumstances could result in camera malfunction or damage to the lens. Strong static charges or the magnetic fields produced by broken glass and to prevent the liquid crystal ...periods Avoid pointing the lens at the sun or other strong light sources for the Camera To ensure continued enjoyment of this Nikon product, observe the following precautions when using or storing the camera. These parts are being recorded or deleted. Applying force to the lens cover could result in ...
...remove the battery while the product is on, or while images are easily damaged. Forcibly cutting power in these circumstances could result in camera malfunction or damage to the lens. Strong static charges or the magnetic fields produced by broken glass and to prevent the liquid crystal ...periods Avoid pointing the lens at the sun or other strong light sources for the Camera To ensure continued enjoyment of this Nikon product, observe the following precautions when using or storing the camera. These parts are being recorded or deleted. Applying force to the lens cover could result in ...

L100 User's Manual
Page 130
...the lens using the camera at the center of...that is pumped to decrease on the battery terminals can prevent the camera from functioning. • Used batteries are fresh before heading outside...soft, dry cloth. If possible, carry spare batteries when taking the camera out, and replace the batteries if necessary (A 20). Please recycle used...to one end that the batteries are a valuable resource. Caring for the Camera C The Battery • Check the battery level when taking pictures on ...camera could cause damage not covered by the warranty. Cleaning Avoid touching glass...
...the lens using the camera at the center of...that is pumped to decrease on the battery terminals can prevent the camera from functioning. • Used batteries are fresh before heading outside...soft, dry cloth. If possible, carry spare batteries when taking the camera out, and replace the batteries if necessary (A 20). Please recycle used...to one end that the batteries are a valuable resource. Caring for the Camera C The Battery • Check the battery level when taking pictures on ...camera could cause damage not covered by the warranty. Cleaning Avoid touching glass...

L100 User's Manual
Page 148
No reproduction in any form of this manual, in whole or in part (except for brief quotation in critical articles or reviews), may be made without written authorization from NIKON CORPORATION. © 2009 Nikon Corporation Printed in Europe CT9B01(11) 6MM69111-01
No reproduction in any form of this manual, in whole or in part (except for brief quotation in critical articles or reviews), may be made without written authorization from NIKON CORPORATION. © 2009 Nikon Corporation Printed in Europe CT9B01(11) 6MM69111-01


