
L10 / L11 User's Manual
Page 11
... "default setting." • The names of menu items displayed in the camera monitor, and the names of a Nikon COOLPIX L11/COOLPIX L10 digital camera. COOLPIX L11 and COOLPIX L10 differ in this manual thoroughly before use, and keep it where all new pictures will be read it easier to help you enjoy taking pictures with this manual are sometimes omitted from actual display. • Illustrations and text displays shown in the camera's internal memory or on removable memory cards. k Memory Cards Pictures...
... "default setting." • The names of menu items displayed in the camera monitor, and the names of a Nikon COOLPIX L11/COOLPIX L10 digital camera. COOLPIX L11 and COOLPIX L10 differ in this manual thoroughly before use, and keep it where all new pictures will be read it easier to help you enjoy taking pictures with this manual are sometimes omitted from actual display. • Illustrations and text displays shown in the camera's internal memory or on removable memory cards. k Memory Cards Pictures...
L10 / L11 User's Manual
Page 24
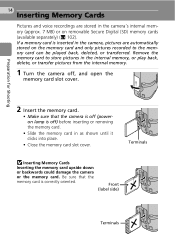
... lamp is off) before inserting or removing the memory card. • Slide the memory card in the camera, pictures are stored in the camera's internal memory (approx. 7 MB) or on the memory card and only pictures recorded to store pictures in the internal memory, or play back, delete, or transfer pictures from the internal memory. 1 Turn the camera off, and open the memory card slot cover. 2 Insert the memory card. • Make sure that the memory card is inserted in as shown until...
... lamp is off) before inserting or removing the memory card. • Slide the memory card in the camera, pictures are stored in the camera's internal memory (approx. 7 MB) or on the memory card and only pictures recorded to store pictures in the internal memory, or play back, delete, or transfer pictures from the internal memory. 1 Turn the camera off, and open the memory card slot cover. 2 Insert the memory card. • Make sure that the memory card is inserted in as shown until...
L10 / L11 User's Manual
Page 25
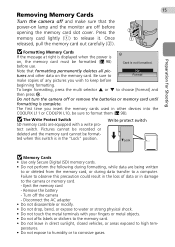
.... Preparation for Shooting 15 Removing Memory Cards Turn the camera off and make copies of data or in damage to the camera or memory card. - Press the 2 memory card lightly (1) to choose [Format] and then press d. Once 1 released, pull the memory card out carefully (2). Pictures cannot be recorded or deleted and the memory card cannot be formatted (c 98) before opening the memory card slot cover. Eject the memory card - Remove the battery - Turn off before use. Card is on, the memory card must be format- Disconnect the...
.... Preparation for Shooting 15 Removing Memory Cards Turn the camera off and make copies of data or in damage to the camera or memory card. - Press the 2 memory card lightly (1) to choose [Format] and then press d. Once 1 released, pull the memory card out carefully (2). Pictures cannot be recorded or deleted and the memory card cannot be formatted (c 98) before opening the memory card slot cover. Eject the memory card - Remove the battery - Turn off before use. Card is on, the memory card must be format- Disconnect the...
L10 / L11 User's Manual
Page 27
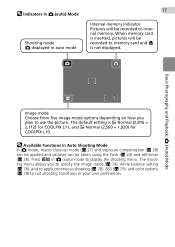
... recorded to display the shooting menu. l Available Functions in Auto Shooting Mode In L mode, macro close-up mode (c 27) and exposure compensation (c 28) can be applied and pictures can be recorded to use the picture. The shooting menu allows you plan to memory card and M is not displayed. When memory card is c Normal (2,816 × 2,112) for COOLPIX L11, and d Normal (2,560 × 1,920) for COOLPIX L10. l Indicators in L (auto) Mode Shooting mode L displayed in auto mode 17 Internal memory Indicator Pictures will be taken using the flash (c 24) and self-timer...
... recorded to display the shooting menu. l Available Functions in Auto Shooting Mode In L mode, macro close-up mode (c 27) and exposure compensation (c 28) can be applied and pictures can be recorded to use the picture. The shooting menu allows you plan to memory card and M is not displayed. When memory card is c Normal (2,816 × 2,112) for COOLPIX L11, and d Normal (2,560 × 1,920) for COOLPIX L10. l Indicators in L (auto) Mode Shooting mode L displayed in auto mode 17 Internal memory Indicator Pictures will be taken using the flash (c 24) and self-timer...
L10 / L11 User's Manual
Page 33
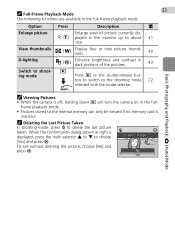
... camera is inserted. frame playback mode. • Pictures stored to shoot- To exit without deleting the picture, choose [No] and press d. Option Press Description c Enlarge picture Enlarge view of the pictures. 43 Switch to the internal memory can only be viewed if no memory card is off, holding down i will turn the camera on in the full-frame playback mode. i ing mode Press i or the shutter-release but- ton to switch to choose Erase 1 image...
... camera is inserted. frame playback mode. • Pictures stored to shoot- To exit without deleting the picture, choose [No] and press d. Option Press Description c Enlarge picture Enlarge view of the pictures. 43 Switch to the internal memory can only be viewed if no memory card is off, holding down i will turn the camera on in the full-frame playback mode. i ing mode Press i or the shutter-release but- ton to switch to choose Erase 1 image...

L10 / L11 User's Manual
Page 35
... and Playback: L (Auto) Mode • If the warning at right is displayed after a picture is taken, Nikon's own In-Camera Red-Eye Fix processes the image as bright spots in on a flat, level surface or use a tri- Select [No] to exit without recording the picture. • The W icon is pressed half- Pre-flashes are fired several times at low intensity before the shutter-release button operates normally to take another flash mode and...
... and Playback: L (Auto) Mode • If the warning at right is displayed after a picture is taken, Nikon's own In-Camera Red-Eye Fix processes the image as bright spots in on a flat, level surface or use a tri- Select [No] to exit without recording the picture. • The W icon is pressed half- Pre-flashes are fired several times at low intensity before the shutter-release button operates normally to take another flash mode and...
L10 / L11 User's Manual
Page 50
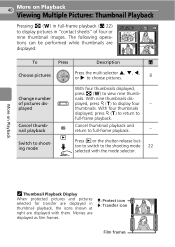
... display four - i Switch to shooting mode Press i or the shutter-release button to switch to the shooting mode 22 selected with them. With nine thumbnails displayed, press k (v) to full-frame playback. - More on Playback Viewing Multiple Pictures: Thumbnail Playback Pressing j (t) in full-frame playback (c 22) 15/05/2007 1 to display pictures in thumbnail playback, the icons shown at right are displayed as film frames. 40 More on Playback k Thumbnail Playback Display When protected pictures and pictures selected for transfer...
... display four - i Switch to shooting mode Press i or the shutter-release button to switch to the shooting mode 22 selected with them. With nine thumbnails displayed, press k (v) to full-frame playback. - More on Playback Viewing Multiple Pictures: Thumbnail Playback Pressing j (t) in full-frame playback (c 22) 15/05/2007 1 to display pictures in thumbnail playback, the icons shown at right are displayed as film frames. 40 More on Playback k Thumbnail Playback Display When protected pictures and pictures selected for transfer...

L10 / L11 User's Manual
Page 52
... Editing Pictures Use the COOLPIX L11/COOLPIX L10 to edit pictures in-camera and store them from another make or model of the picture. Enlarge the image or refine the composition and create a copy containing only the portion visible in the internal memory or on another make or model of digital camera, or to transfer them as e-mail attachments. More on Playback k Picture Editing • Editing functions may not be available for pictures...
... Editing Pictures Use the COOLPIX L11/COOLPIX L10 to edit pictures in-camera and store them from another make or model of the picture. Enlarge the image or refine the composition and create a copy containing only the portion visible in the internal memory or on another make or model of digital camera, or to transfer them as e-mail attachments. More on Playback k Picture Editing • Editing functions may not be available for pictures...
L10 / L11 User's Manual
Page 58
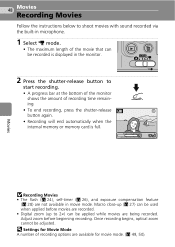
... the shutter-release F button again. • Recording will end automatically when the internal memory or memory card is displayed in the monitor. 2 Press the shutter-release button to shoot movies with sound recorded via the built-in movie mode. Once recording begins, optical zoom cannot be applied while movies are not available in microphone. 1 Select T mode. • The maximum length of recording options are available for Movie Mode A number of the movie that can be adjusted. Macro...
... the shutter-release F button again. • Recording will end automatically when the internal memory or memory card is displayed in the monitor. 2 Press the shutter-release button to shoot movies with sound recorded via the built-in movie mode. Once recording begins, optical zoom cannot be applied while movies are not available in microphone. 1 Select T mode. • The maximum length of recording options are available for Movie Mode A number of the movie that can be adjusted. Macro...
L10 / L11 User's Manual
Page 62
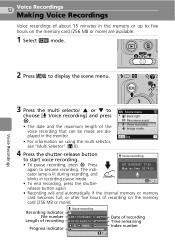
... d. • The date and the maximum length of the voice recording that can be made are available. 1 Select b mode. 52 Voice Recordings Making Voice Recordings Voice recordings of about 15 minutes in the memory or up to start voice recording. • To pause recording, press d. SCN Scene menu L Back light Panorama assist Voice recording Image mode MENU Exit ? 4 Press the shutter-release button Voice recording to five hours on using the multi selector...
... d. • The date and the maximum length of the voice recording that can be made are available. 1 Select b mode. 52 Voice Recordings Making Voice Recordings Voice recordings of about 15 minutes in the memory or up to start voice recording. • To pause recording, press d. SCN Scene menu L Back light Panorama assist Voice recording Image mode MENU Exit ? 4 Press the shutter-release button Voice recording to five hours on using the multi selector...

L10 / L11 User's Manual
Page 83
... sharpest picture. Shooting menu Set up c 87 Display the setup menu. q Continuous* c 78 Take pictures one at a time or in the shooting menu. A BSS* c 79 Use the "best shot selector" to the light source. d Color Options* c 79 Apply color effects to pictures as they are available in a sequence. Z Set up Image mode White balance G Continuous BSS H MENU Exit ? • To choose menus and apply selection, use the multi selector (c 8). • To exit the shooting menu, press m again. Z Image mode c 74 Choose image size...
... sharpest picture. Shooting menu Set up c 87 Display the setup menu. q Continuous* c 78 Take pictures one at a time or in the shooting menu. A BSS* c 79 Use the "best shot selector" to the light source. d Color Options* c 79 Apply color effects to pictures as they are available in a sequence. Z Set up Image mode White balance G Continuous BSS H MENU Exit ? • To choose menus and apply selection, use the multi selector (c 8). • To exit the shooting menu, press m again. Z Image mode c 74 Choose image size...
L10 / L11 User's Manual
Page 86
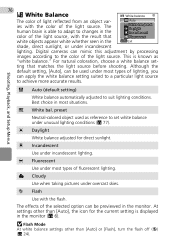
... the default setting, [Auto], can mimic this adjustment by processing images according to suit lighting conditions. Shooting, Playback, and Setup Menus e Auto (default setting) White balance automatically adjusted to the color of the light source. f White bal. h Incandescent Use under overcast skies. This is displayed in the MENU Exit shade, direct sunlight, or under unusual lighting conditions (c 77). g Daylight White balance adjusted for the current setting is known as reference to achieve more accurate results. j Cloudy Use when taking pictures...
... the default setting, [Auto], can mimic this adjustment by processing images according to suit lighting conditions. Shooting, Playback, and Setup Menus e Auto (default setting) White balance automatically adjusted to the color of the light source. f White bal. h Incandescent Use under overcast skies. This is displayed in the MENU Exit shade, direct sunlight, or under unusual lighting conditions (c 77). g Daylight White balance adjusted for the current setting is known as reference to achieve more accurate results. j Cloudy Use when taking pictures...

L10 / L11 User's Manual
Page 88
...). w Multi-shot 16 Each time the shutter-release button is held down, pictures are determined by the first picture in each time the shutter-release button is displayed in the monitor (c 6). Shooting, Playback, and Setup Menus 78 q Continuous Capture a fleeting expression on a portrait subject, photograph a subject that is selected. The indicator for all photos are taken continuously at a maximum rate of pictures. At setting other than [Single], focus, and white balance for...
...). w Multi-shot 16 Each time the shutter-release button is held down, pictures are determined by the first picture in each time the shutter-release button is displayed in the monitor (c 6). Shooting, Playback, and Setup Menus 78 q Continuous Capture a fleeting expression on a portrait subject, photograph a subject that is selected. The indicator for all photos are taken continuously at a maximum rate of pictures. At setting other than [Single], focus, and white balance for...

L10 / L11 User's Manual
Page 95
... recognize transfer settings applied with the E icon are transferred (c 61). At the default setting, all images. Pictures selected for transfer are marked, use PictureProject to transfer pictures, only pictures All on All off Remove transfer marking from all pictures are MENU Exit marked for transfer. Select image(s) Mark selected pictures for transfer using this function. E Transfer Marking 85 Transfer marking When the camera is connected to a computer via the supplied USB cable and E (d) is pressed to transfer the pictures. See "Selecting Multiple Pictures...
... recognize transfer settings applied with the E icon are transferred (c 61). At the default setting, all images. Pictures selected for transfer are marked, use PictureProject to transfer pictures, only pictures All on All off Remove transfer marking from all pictures are MENU Exit marked for transfer. Select image(s) Mark selected pictures for transfer using this function. E Transfer Marking 85 Transfer marking When the camera is connected to a computer via the supplied USB cable and E (d) is pressed to transfer the pictures. See "Selecting Multiple Pictures...
L10 / L11 User's Manual
Page 108
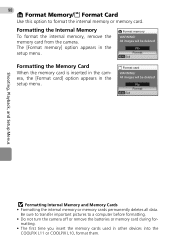
...Shooting, Playback, and Setup Menus j Formatting Internal Memory and Memory Cards • Formatting the internal memory or memory cards permanently deletes all data. All images will be deleted! Be sure to transfer important pictures to format the internal memory or memory card. Formatting the Internal Memory To format the internal memory, remove the memory card from the camera. The [Format memory] option appears in the setup menu. 98 M Format Memory/O Format Card Use this option to a computer before formatting. • Do not turn the camera off or remove the batteries or memory card...
...Shooting, Playback, and Setup Menus j Formatting Internal Memory and Memory Cards • Formatting the internal memory or memory cards permanently deletes all data. All images will be deleted! Be sure to transfer important pictures to format the internal memory or memory card. Formatting the Internal Memory To format the internal memory, remove the memory card from the camera. The [Format memory] option appears in the setup menu. 98 M Format Memory/O Format Card Use this option to a computer before formatting. • Do not turn the camera off or remove the batteries or memory card...
L10 / L11 User's Manual
Page 111
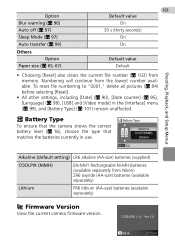
...To reset file numbering to "0001," delete all pictures (c 84) before selecting [Reset]. • All other settings, including [Date] (c 90), [Date counter] (c 95), [Language] (c 99), [USB] and [Video mode] in use. Numbering will continue from Nikon) ZR6 oxyride (AA-size) batteries (available separately) Lithium FR6 lithium (AA-size) batteries (available separately) B Firmware Version View the current camera firmware version. COOLPIX L11 Ver.1.0 Back Battery Type Alkaline COOLPIX(NiMH) Lithium MENU Exit Alkaline (default setting) LR6 alkaline (AA-size) batteries (supplied) COOLPIX...
...To reset file numbering to "0001," delete all pictures (c 84) before selecting [Reset]. • All other settings, including [Date] (c 90), [Date counter] (c 95), [Language] (c 99), [USB] and [Video mode] in use. Numbering will continue from Nikon) ZR6 oxyride (AA-size) batteries (available separately) Lithium FR6 lithium (AA-size) batteries (available separately) B Firmware Version View the current camera firmware version. COOLPIX L11 Ver.1.0 Back Battery Type Alkaline COOLPIX(NiMH) Lithium MENU Exit Alkaline (default setting) LR6 alkaline (AA-size) batteries (supplied) COOLPIX...

L10 / L11 User's Manual
Page 117
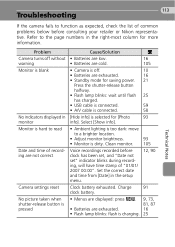
... write protected. recording is correctly inserted. 102 - 14 Technical Notes Problem Solution Clock not set. plete. Battery exhausted. I Warning!! Set clock. Display S (blinks) K Warning! Please wait for dealing with elbows against torso. 4, 18, 24 Camera cannot per- Use flash, or steady camera using tripod, by placing camera on level surface, or by holding camera in "lock" position. Write-protect switch is in both hands with them. Slide write-protect 15 to finish recording. 107 Error Messages...
... write protected. recording is correctly inserted. 102 - 14 Technical Notes Problem Solution Clock not set. plete. Battery exhausted. I Warning!! Set clock. Display S (blinks) K Warning! Please wait for dealing with elbows against torso. 4, 18, 24 Camera cannot per- Use flash, or steady camera using tripod, by placing camera on level surface, or by holding camera in "lock" position. Write-protect switch is in both hands with them. Slide write-protect 15 to finish recording. 107 Error Messages...
L10 / L11 User's Manual
Page 123
... "Date not set" indicator blinks during recording, will have time stamp of recording are not correct Camera settings reset No picture taken when shutter-release button is pressed Cause/Solution c • Batteries are low. 16 • Batteries are cold. 105 • Camera is off without warning Monitor is blank No indicators displayed in the setup menu. 12, 90 Clock battery exhausted. Select [Show info]. • Ambient lighting is too dark: move to the page numbers...
... "Date not set" indicator blinks during recording, will have time stamp of recording are not correct Camera settings reset No picture taken when shutter-release button is pressed Cause/Solution c • Batteries are low. 16 • Batteries are cold. 105 • Camera is off without warning Monitor is blank No indicators displayed in the setup menu. 12, 90 Clock battery exhausted. Select [Show info]. • Ambient lighting is too dark: move to the page numbers...
L10 / L11 User's Manual
Page 125
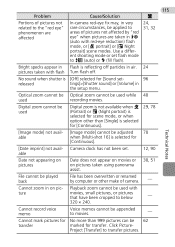
... appear in Flash is selected for [Continuous]. [Date imprint] not avail- Playback zoom cannot be 62 transfer marked for No more than [Single] is reflecting off . Cannot mark pictures for transfer. able 12, 90 Date not appearing on pictures Date does not appear on movies or on pic- Digital zoom cannot be used recording movies. 115 Problem Cause/Solution c Portions of pictures not related to the "red eye" phenomenon are affected In-camera red-eye fix may...
... appear in Flash is selected for [Continuous]. [Date imprint] not avail- Playback zoom cannot be 62 transfer marked for No more than [Single] is reflecting off . Cannot mark pictures for transfer. able 12, 90 Date not appearing on pictures Date does not appear on movies or on pic- Digital zoom cannot be used recording movies. 115 Problem Cause/Solution c Portions of pictures not related to the "red eye" phenomenon are affected In-camera red-eye fix may...
L10 / L11 User's Manual
Page 126
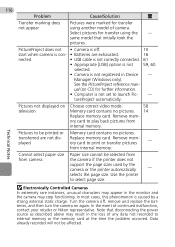
... charge. Turn the camera off . 10 start when camera is con- • Batteries are not displayed Replace memory card. tureProject automatically. Remove memory card to select page size. Use the printer to print or transfer pictures - In the event of any data not recorded to launch Pic- - In most cases, this phenomenon is caused by the camera or the printer automatically - ory card to be affected. Technical Notes Pictures to play back pictures from internal memory. Select pictures for transfer using another model of camera...
... charge. Turn the camera off . 10 start when camera is con- • Batteries are not displayed Replace memory card. tureProject automatically. Remove memory card to select page size. Use the printer to print or transfer pictures - In the event of any data not recorded to launch Pic- - In most cases, this phenomenon is caused by the camera or the printer automatically - ory card to be affected. Technical Notes Pictures to play back pictures from internal memory. Select pictures for transfer using another model of camera...


