
User Manual
Page 4
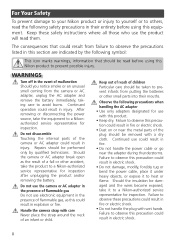
... following symbol: This icon marks warnings, information that should be taken to prevent infants from the camera or AC adapter, unplug the AC adapter and remove the battery immediately, taking care to observe the precautions listed in this precaution could result in electric shock. ... not use the camera or AC adapter in injury. ii Failure to a Nikon-authorized service representative for inspection after unplugging the product and/or removing the battery. For Your Safety To prevent damage to your Nikon product or injury to yourself or to a Nikon-authorized service representative ...
... following symbol: This icon marks warnings, information that should be taken to prevent infants from the camera or AC adapter, unplug the AC adapter and remove the battery immediately, taking care to observe the precautions listed in this precaution could result in electric shock. ... not use the camera or AC adapter in injury. ii Failure to a Nikon-authorized service representative for inspection after unplugging the product and/or removing the battery. For Your Safety To prevent damage to your Nikon product or injury to yourself or to a Nikon-authorized service representative ...

User Manual
Page 5
...water. • Replace the terminal cover when transporting the battery. Charge the battery either by inserting it in the camera and connecting the supplied AC adapter, or by Nikon for use in this device should not be sure to remove the battery when no charge remains. • Discontinue use only ...the cables provided or sold by inserting it in a MH-62 battery charger (available separately)....
...water. • Replace the terminal cover when transporting the battery. Charge the battery either by inserting it in the camera and connecting the supplied AC adapter, or by Nikon for use in this device should not be sure to remove the battery when no charge remains. • Discontinue use only ...the cables provided or sold by inserting it in a MH-62 battery charger (available separately)....

User Manual
Page 8
... Monitor 4 The MV-12 COOL-STATION 6 The EH-63 AC Adapter 6 First Steps 7 Inserting the Battery 7 Charging the Battery 8 Inserting Memory Cards 10 Turning the Camera On 12 Basic Setup 12 Basic Photography 14 Step 1-Select Mode 14 Step 2-Frame the Picture 15 Step 3-Focus and Shoot 16 Step 4-View the ... Other Scenes 28 Voice Recordings 33 Movies 36 Movie Mode 36 Recording Movies 38 Viewing Movies 40 More on Playback 41 Viewing Pictures on the Camera 41 Viewing Pictures on TV 45 Viewing Pictures on a Computer 46 Printing Pictures 50 vi
... Monitor 4 The MV-12 COOL-STATION 6 The EH-63 AC Adapter 6 First Steps 7 Inserting the Battery 7 Charging the Battery 8 Inserting Memory Cards 10 Turning the Camera On 12 Basic Setup 12 Basic Photography 14 Step 1-Select Mode 14 Step 2-Frame the Picture 15 Step 3-Focus and Shoot 16 Step 4-View the ... Other Scenes 28 Voice Recordings 33 Movies 36 Movie Mode 36 Recording Movies 38 Viewing Movies 40 More on Playback 41 Viewing Pictures on the Camera 41 Viewing Pictures on TV 45 Viewing Pictures on a Computer 46 Printing Pictures 50 vi

User Manual
Page 10
...) certified by Nikon could interfere with this Nikon digital camera are designed to operate within the operational and safety requirements of the camera or result in the batteries overheating, igniting, rupturing, or leaking. Attaching the Camera Strap Attach the camera strap as shown below. ቢ ባ Use Only Nikon Brand Electronic Accessories Nikon COOLPIX cameras are engineered and proven to...
...) certified by Nikon could interfere with this Nikon digital camera are designed to operate within the operational and safety requirements of the camera or result in the batteries overheating, igniting, rupturing, or leaking. Attaching the Camera Strap Attach the camera strap as shown below. ቢ ባ Use Only Nikon Brand Electronic Accessories Nikon COOLPIX cameras are engineered and proven to...

User Manual
Page 12
... settings are controlled by the camera. An additional voice recording mode is available for camera strap Lens ( 84, 95) Introduction Memory card slot/ Batterychamber cover ( 7, 10, 11) Sliding lens cover closed Sliding lens cover ( 12) Built-in flash ( 18) Memory card slot ( 10−11) Battery chamber ( 7) Battery latch ( 7) Movie ( 36) Choose from...
... settings are controlled by the camera. An additional voice recording mode is available for camera strap Lens ( 84, 95) Introduction Memory card slot/ Batterychamber cover ( 7, 10, 11) Sliding lens cover closed Sliding lens cover ( 12) Built-in flash ( 18) Memory card slot ( 10−11) Battery chamber ( 7) Battery latch ( 7) Movie ( 36) Choose from...

User Manual
Page 15
Introduction 1 Shooting mode 14, 22, 36 2 Exposure lock 32, 39, 62 3 Zoom indicator1 15 4 Focus indicator2 16 5 Battery level indicator3 14 6 Internal memory/memory card indicator 14, 16 7 Camera shake icon4 .......... 19, 28, 78 8 "Date not set" indicator5 13 9 Time zone indicator 74 10 Self-timer indicator 20 11 Date imprint/date counter...
Introduction 1 Shooting mode 14, 22, 36 2 Exposure lock 32, 39, 62 3 Zoom indicator1 15 4 Focus indicator2 16 5 Battery level indicator3 14 6 Internal memory/memory card indicator 14, 16 7 Camera shake icon4 .......... 19, 28, 78 8 "Date not set" indicator5 13 9 Time zone indicator 74 10 Self-timer indicator 20 11 Date imprint/date counter...

User Manual
Page 16
...the COOL-STATION as shown below , making sure that the connector is fully inserted in the supplied MV-12 COOL-STATION to: • Charge the camera battery ( 8) • View pictures on the COOL-STATION. Power lamp DC plug (connects to DC-IN connector) AC inlet AC plug Power cord (connects... to charge the battery or power the camera ( 8). Removing the Camera from the COOLSTATION Remove the camera as shown below and close the multi-connector cover. Cover fits here The EH-63 AC Adapter The...
...the COOL-STATION as shown below , making sure that the connector is fully inserted in the supplied MV-12 COOL-STATION to: • Charge the camera battery ( 8) • View pictures on the COOL-STATION. Power lamp DC plug (connects to DC-IN connector) AC inlet AC plug Power cord (connects... to charge the battery or power the camera ( 8). Removing the Camera from the COOLSTATION Remove the camera as shown below and close the multi-connector cover. Cover fits here The EH-63 AC Adapter The...

User Manual
Page 17
... in the direction shown until it latches (ᕢ). ᕡ ᕢ If the Camera Is Wet Dry the camera with a cloth to the battery chamber. First Steps Inserting the Battery The camera uses a rechargeable Nikon EN-EL8 lithium-ion battery (supplied). 1 Open the memory card slot/battery-chamber cover Slide the cover in the direction shown (ᕡ) until it...
... in the direction shown until it latches (ᕢ). ᕡ ᕢ If the Camera Is Wet Dry the camera with a cloth to the battery chamber. First Steps Inserting the Battery The camera uses a rechargeable Nikon EN-EL8 lithium-ion battery (supplied). 1 Open the memory card slot/battery-chamber cover Slide the cover in the direction shown (ᕡ) until it...

User Manual
Page 18
The power lamp on the AC adapter will not charge when the camera is on. 3 Place the camera in the COOL-STATION Open the multi connector cover and place the camera in the COOL-STATION with the monitor facing forwards and the connector fully inserted in the ... the power cord into a household AC power outlet (ᕣ). First Steps Charging the Battery Charge the battery before first use or when the battery is off. The battery will light (ᕤ). 4 1 3 2 2 Turn the camera off Charging the Battery Check that the camera power-on the COOL-STATION. Cover fits here 8
The power lamp on the AC adapter will not charge when the camera is on. 3 Place the camera in the COOL-STATION Open the multi connector cover and place the camera in the COOL-STATION with the monitor facing forwards and the connector fully inserted in the ... the power cord into a household AC power outlet (ᕣ). First Steps Charging the Battery Charge the battery before first use or when the battery is off. The battery will light (ᕤ). 4 1 3 2 2 Turn the camera off Charging the Battery Check that the camera power-on the COOL-STATION. Cover fits here 8

User Manual
Page 19
... direction shown. About two hours are required to the camera as follows: Indicator lamp Description Blinks Battery charging. Make sure that camera is tightly closed . 9 observe due caution when removing the battery. Whether connected directly to the camera or to the MV-12 COOL-STATION, the EH-... ii-iii and 85 of AC adapter. 4 Charge the battery The indicator lamp next to observe this manual. On Battery fully charged. The battery can then be connected directly to charge a fully depleted battery. 5 Remove the camera from the COOL-STATION When charging is shown as shown at...
... direction shown. About two hours are required to the camera as follows: Indicator lamp Description Blinks Battery charging. Make sure that camera is tightly closed . 9 observe due caution when removing the battery. Whether connected directly to the camera or to the MV-12 COOL-STATION, the EH-... ii-iii and 85 of AC adapter. 4 Charge the battery The indicator lamp next to observe this manual. On Battery fully charged. The battery can then be connected directly to charge a fully depleted battery. 5 Remove the camera from the COOL-STATION When charging is shown as shown at...

User Manual
Page 20
...card: 1 Confirm that the power-on lamp is used to record, delete, or view pictures. For information on removable Secure Digital (SD) memory cards. Formatting affects only the memory card, not internal memory. First Steps Inserting Memory Cards Pictures are recorded to, and ...played back and deleted from the camera before inserting or removing memory cards. 2 Open the memory card slot/battery-chamber cover Slide the cover in the camera's internal memory (approximately 12 MB) or on compatible memory cards, see "Technical Notes...
...card: 1 Confirm that the power-on lamp is used to record, delete, or view pictures. For information on removable Secure Digital (SD) memory cards. Formatting affects only the memory card, not internal memory. First Steps Inserting Memory Cards Pictures are recorded to, and ...played back and deleted from the camera before inserting or removing memory cards. 2 Open the memory card slot/battery-chamber cover Slide the cover in the camera's internal memory (approximately 12 MB) or on compatible memory cards, see "Technical Notes...

User Manual
Page 21
... edited and the card can then be formatted using the Format card option in the camera setup menu ( 79). Do not open the memory card slot/battery-chamber cover while the power-on lamp is in the COOLPIX S2, memory cards must be removed by hand. 11 Removing Memory Cards Memory cards can... that the power-on lamp is off . Lock switch 4 Close the memory card slot cover/battery-chamber cover Close the cover (ᕡ) and slide it clicks into place. Direction of data when the camera is lit. Open the memory card slot/batterychamber cover and press the card in the direction shown...
... edited and the card can then be formatted using the Format card option in the camera setup menu ( 79). Do not open the memory card slot/battery-chamber cover while the power-on lamp is in the COOLPIX S2, memory cards must be removed by hand. 11 Removing Memory Cards Memory cards can... that the power-on lamp is off . Lock switch 4 Close the memory card slot cover/battery-chamber cover Close the cover (ᕡ) and slide it clicks into place. Direction of data when the camera is lit. Open the memory card slot/batterychamber cover and press the card in the direction shown...
User Manual
Page 22
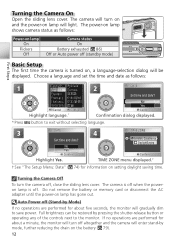
...lamp is turned on lamp has gone out. Auto Power off altogether and the camera will be restored by pressing the shutter-release button or operating any of the controls next to the monitor. Do not remove the battery or memory card or disconnect the AC adapter until the power-on , a ...the time and date as follows: Power-on lamp On Flickers Off Camera status On Battery exhausted ( 86) Off or Auto power off (standby mode) Basic Setup The first time the camera is off , close the sliding lens cover. The camera will turn off (Stand-by mode, further reducing the drain on ...
...lamp is turned on lamp has gone out. Auto Power off altogether and the camera will be restored by pressing the shutter-release button or operating any of the controls next to the monitor. Do not remove the battery or memory card or disconnect the AC adapter until the power-on , a ...the time and date as follows: Power-on lamp On Flickers Off Camera status On Battery exhausted ( 86) Off or Auto power off (standby mode) Basic Setup The first time the camera is off , close the sliding lens cover. The camera will turn off (Stand-by mode, further reducing the drain on ...
User Manual
Page 23
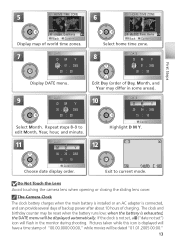
... provide several days of backup power after about 10 hours of Day, Month, and Year may be reset when the battery runs low; The Camera Clock The clock battery charges when the main battery is installed or an AC adapter is not set, a ("date not set") icon will flash in some areas... this icon is exhausted, the DATE menu will be displayed automatically. The clock and birthday counter may differ in the monitor during shooting. when the battery is displayed will have a time stamp of world time zones. 7 DATE DM Y 01 . 01 . 2005 00 : 00 Madrid, Paris, Berlin Back Confirm Select...
... provide several days of backup power after about 10 hours of Day, Month, and Year may be reset when the battery runs low; The Camera Clock The clock battery charges when the main battery is installed or an AC adapter is not set, a ("date not set") icon will flash in some areas... this icon is exhausted, the DATE menu will be displayed automatically. The clock and birthday counter may differ in the monitor during shooting. when the battery is displayed will have a time stamp of world time zones. 7 DATE DM Y 01 . 01 . 2005 00 : 00 Madrid, Paris, Berlin Back Confirm Select...

User Manual
Page 24
Press the mode button until battery has been re- The camera is ready to shoot when the view through the camera lens is displayed in (auto) mode, an automatic, "point-and-shoot" mode recommended for Image Mode ( 93). Internal memory/memory ... until the green (auto) mode indicator lights. Basic Photography This section describes how to take pictures in the monitor. The camera will turn off while flash recharges. Battery indicator: appears when battery is . Default is running low. Number of exposures remaining: depends on capacity of digital cameras.
Press the mode button until battery has been re- The camera is ready to shoot when the view through the camera lens is displayed in (auto) mode, an automatic, "point-and-shoot" mode recommended for Image Mode ( 93). Internal memory/memory ... until the green (auto) mode indicator lights. Basic Photography This section describes how to take pictures in the monitor. The camera will turn off while flash recharges. Battery indicator: appears when battery is . Default is running low. Number of exposures remaining: depends on capacity of digital cameras.

User Manual
Page 43
... sample and play or copy sound files created with other numbers are assigned in ascending order, to maximum of multi selector. Voice Recordings The COOLPIX S2 may be made. 3 VOICE RECORDING 1 Recording indicator 5 Date of recording ᕡ ᕢ 001 04.20.2005 15 : 46 ᕥ 2 File number 6 ....2005 15:41 Max rec time 00:27:14 Back Display shows length of recording time available or the battery is index number 01; Press again to resume recording. Camera can skip to any index during recording. other devices. 33 During recording, the monitor turns off. Voice Recordings...
... sample and play or copy sound files created with other numbers are assigned in ascending order, to maximum of multi selector. Voice Recordings The COOLPIX S2 may be made. 3 VOICE RECORDING 1 Recording indicator 5 Date of recording ᕡ ᕢ 001 04.20.2005 15 : 46 ᕥ 2 File number 6 ....2005 15:41 Max rec time 00:27:14 Back Display shows length of recording time available or the battery is index number 01; Press again to resume recording. Camera can skip to any index during recording. other devices. 33 During recording, the monitor turns off. Voice Recordings...

User Manual
Page 55
Viewing Pictures on TV To reduce the drain on the battery when viewing pictures for Video mode and the camera connected to turn on when the camera is selected for an extended period, use the supplied EH-63 AC adapter. Choosing a Video Mode The Interface > Video mode item in jack on the ... menu offers a choice of NTSC and PAL ( 80). Be sure that the mode selected matches the standard used to connect the camera to a television or videocassette recorder (VCR). The camera monitor will remain off and place it in movie mode. 45 More on Playback Viewing Pictures on TV The MV-12 COOL...
Viewing Pictures on TV To reduce the drain on the battery when viewing pictures for Video mode and the camera connected to turn on when the camera is selected for an extended period, use the supplied EH-63 AC adapter. Choosing a Video Mode The Interface > Video mode item in jack on the ... menu offers a choice of NTSC and PAL ( 80). Be sure that the mode selected matches the standard used to connect the camera to a television or videocassette recorder (VCR). The camera monitor will remain off and place it in movie mode. 45 More on Playback Viewing Pictures on TV The MV-12 COOL...

User Manual
Page 56
...of the multi selector ( / button) • Clicking the button in PictureProject Which method you will use depends on the battery when the camera is being updated. Operating system Windows XP Home Edition Windows XP Professional Windows 2000 Professional Windows Millennium Edition (Me) Windows 98... More on Playback Viewing Pictures on a Computer To reduce the drain on your computer, PictureProject must be installed. Before Connecting the Camera: Choosing a USB Option Pictures can be transferred (copied) to a computer running Windows 2000 or Windows 98SE, the Windows hardware ...
...of the multi selector ( / button) • Clicking the button in PictureProject Which method you will use depends on the battery when the camera is being updated. Operating system Windows XP Home Edition Windows XP Professional Windows 2000 Professional Windows Millennium Edition (Me) Windows 98... More on Playback Viewing Pictures on a Computer To reduce the drain on your computer, PictureProject must be installed. Before Connecting the Camera: Choosing a USB Option Pictures can be transferred (copied) to a computer running Windows 2000 or Windows 98SE, the Windows hardware ...

User Manual
Page 63
... pictures ( 55) • Current print order ( 57) Print picture ( 54). Choose page size ( 55). More on Playback Printing Pictures To reduce the drain on the battery when printing, use the supplied EH-63 AC adapter. PictBridge PictBridge is an industry standard for printing. 4 Print pictures Press the center of copies and...
... pictures ( 55) • Current print order ( 57) Print picture ( 54). Choose page size ( 55). More on Playback Printing Pictures To reduce the drain on the battery when printing, use the supplied EH-63 AC adapter. PictBridge PictBridge is an industry standard for printing. 4 Print pictures Press the center of copies and...

User Manual
Page 72
Camera will take pictures at values for first frame, Off to meter On new values for information on automatically immediately before recording is selected for ... to fix exposure and white balance for entire series Off at specified interval until shut- To ensure that the battery does not run flat before the camera takes the next shot. Interval Timer Photography To display the interval timer menu, highlight Intvl timer shooting in the CONTINUOUS menu and...
Camera will take pictures at values for first frame, Off to meter On new values for information on automatically immediately before recording is selected for ... to fix exposure and white balance for entire series Off at specified interval until shut- To ensure that the battery does not run flat before the camera takes the next shot. Interval Timer Photography To display the interval timer menu, highlight Intvl timer shooting in the CONTINUOUS menu and...


