L10 / L11 User's Manual
Page 67
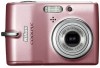
... browse, edit, and save those pictures. Use the supplied USB cable to connect the camera to a printer for printing pictures: • Insert a memory card into a DPOF-compatible printer's card slot • Take a memory card to a digital photo lab For printing using these methods, specify the pictures... prints each using your camera directly to a PictBridge-compatible printer. j Before Connecting the Camera Use fresh batteries or the AC Adapter EH-65A (available separately from Nikon) to a computer or print with the L11 or available separately for the L10. Connecting to Televisions, Computers...
... browse, edit, and save those pictures. Use the supplied USB cable to connect the camera to a printer for printing pictures: • Insert a memory card into a DPOF-compatible printer's card slot • Take a memory card to a digital photo lab For printing using these methods, specify the pictures... prints each using your camera directly to a PictBridge-compatible printer. j Before Connecting the Camera Use fresh batteries or the AC Adapter EH-65A (available separately from Nikon) to a computer or print with the L11 or available separately for the L10. Connecting to Televisions, Computers...
L10 / L11 User's Manual
Page 69
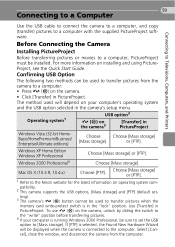
...; Press E (d) on the camera3 [Transfer] in the camera's setup menu. or [PTP]. Use [Transfer] in PictureProject. Select [Cancel], close the window, and disconnect the camera from the camera to the Nikon website for the latest information on installing and using PictureProject,... and Printers Use the USB cable to connect the camera to a computer, and copy (transfer) pictures to transfer pictures from the computer. Confirming USB Option The following two methods can be installed. Before Connecting the Camera Installing PictureProject Before transferring pictures...
...; Press E (d) on the camera3 [Transfer] in the camera's setup menu. or [PTP]. Use [Transfer] in PictureProject. Select [Cancel], close the window, and disconnect the camera from the camera to the Nikon website for the latest information on installing and using PictureProject,... and Printers Use the USB cable to connect the camera to a computer, and copy (transfer) pictures to transfer pictures from the computer. Confirming USB Option The following two methods can be installed. Before Connecting the Camera Installing PictureProject Before transferring pictures...

L10 / L11 User's Manual
Page 71
... E (d) on the camera to the computer. I I K Preparing to computer. y Transferring images to transfer. Connecting to Televisions, Computers, and Printers 3 Turn the camera on. • At... default PictureProject settings, PictureProject Transfer is launched immediately with recognition of camera connection. 4 Transfer pictures and movies. • Transfer using E (d) on a computer to the computer. y Transfer completed. Once transfer is complete, pictures are copied to which PictureProject has been installed. 2 Turn the camera off and connect the USB cable...
... E (d) on the camera to the computer. I I K Preparing to computer. y Transferring images to transfer. Connecting to Televisions, Computers, and Printers 3 Turn the camera on. • At... default PictureProject settings, PictureProject Transfer is launched immediately with recognition of camera connection. 4 Transfer pictures and movies. • Transfer using E (d) on a computer to the computer. y Transfer completed. Once transfer is complete, pictures are copied to which PictureProject has been installed. 2 Turn the camera off and connect the USB cable...
L10 / L11 User's Manual
Page 72
... icon displayed during playback. When disconnecting the USB cable, do not pull the connector at an angle. • Do not pinch the connector cover between the camera's USB connector and the USB cable connector when connecting the cable to the camera. • Connection may not be sure ... Connecting the USB Cable • When connecting the USB cable, be recognized when the camera is connected to a computer via a USB hub. 5 Disconnect the camera when transfer is complete. • If the USB option is set to [PTP] Turn the camera off and disconnect the USB cable. • If the USB option is ...
... icon displayed during playback. When disconnecting the USB cable, do not pull the connector at an angle. • Do not pinch the connector cover between the camera's USB connector and the USB cable connector when connecting the cable to the camera. • Connection may not be sure ... Connecting the USB Cable • When connecting the USB cable, be recognized when the camera is connected to a computer via a USB hub. 5 Disconnect the camera when transfer is complete. • If the USB option is set to [PTP] Turn the camera off and disconnect the USB cable. • If the USB option is ...

L10 / L11 User's Manual
Page 73
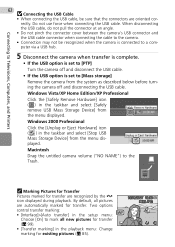
Connecting to Televisions, Computers, and Printers 63 Connecting to a Printer Users of PictBridge-compatible (c 120) printers can connect the camera directly to the printer and print pictures without using [Print set] option (c 69) Connecting the camera and printer (c 64) Print pictures one at a time (c 65) Print multiple pictures (c 66) Turn camera off and disconnect USB cable Take pictures Select pictures for printing using a computer.
Connecting to Televisions, Computers, and Printers 63 Connecting to a Printer Users of PictBridge-compatible (c 120) printers can connect the camera directly to the printer and print pictures without using [Print set] option (c 69) Connecting the camera and printer (c 64) Print pictures one at a time (c 65) Print multiple pictures (c 66) Turn camera off and disconnect USB cable Take pictures Select pictures for printing using a computer.

L10 / L11 User's Manual
Page 74
... the connectors are oriented correctly. Do not use force when connecting the USB cable. When disconnecting the USB cable, do not pull the connector at an angle. • Do not pinch the connector cover between the camera's USB connector and the USB cable connector when connecting the cable to [PTP]. Connecting to Televisions, Computers, and Printers 64 Connecting the...
... the connectors are oriented correctly. Do not use force when connecting the USB cable. When disconnecting the USB cable, do not pull the connector at an angle. • Do not pinch the connector cover between the camera's USB connector and the USB cable connector when connecting the cable to [PTP]. Connecting to Televisions, Computers, and Printers 64 Connecting the...

L10 / L11 User's Manual
Page 95
E Transfer Marking 85 Transfer marking When the camera is connected to a computer via the supplied USB cable and E (d) is pressed to transfer the pictures. Select image(s) Mark selected pictures for transfer are recognized by the E icon (c 7) in full-frame playback, and ... selected for transfer. If more than 999 pictures can be marked for transfer. All off Select image(s) marked with another make or model of digital camera. All on Mark all images for more than 999 pictures are marked, use PictureProject to transfer pictures, only pictures All on All off Remove transfer...
E Transfer Marking 85 Transfer marking When the camera is connected to a computer via the supplied USB cable and E (d) is pressed to transfer the pictures. Select image(s) Mark selected pictures for transfer are recognized by the E icon (c 7) in full-frame playback, and ... selected for transfer. If more than 999 pictures can be marked for transfer. All off Select image(s) marked with another make or model of digital camera. All on Mark all images for more than 999 pictures are marked, use PictureProject to transfer pictures, only pictures All on All off Remove transfer...
L10 / L11 User's Manual
Page 112
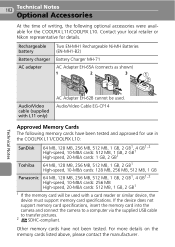
Contact your local retailer or Nikon representative for the COOLPIX L11/COOLPIX L10. Audio/Video Cable EG-CP14 Approved Memory Cards The following optional accessories were available for details. If the device does not support memory card specifications, insert the memory card into the camera and connect the camera to a computer via the supplied USB cable to transfer pictures. 2 SDHC...
Contact your local retailer or Nikon representative for the COOLPIX L11/COOLPIX L10. Audio/Video Cable EG-CP14 Approved Memory Cards The following optional accessories were available for details. If the device does not support memory card specifications, insert the memory card into the camera and connect the camera to a computer via the supplied USB cable to transfer pictures. 2 SDHC...

L10 / L11 User's Manual
Page 120
..., con- tact retailer or Nikon representa- If PictureProject dis- 61, 64 nected during trans- When the camera is connected. transfer in the fer or printing. circuitry. plays error in the play- Resume opera- K No pictures selected Select pictures for 85 No images are for transfer. Technical Notes I Communications error USB cable discon- tive. 110...
..., con- tact retailer or Nikon representa- If PictureProject dis- 61, 64 nected during trans- When the camera is connected. transfer in the fer or printing. circuitry. plays error in the play- Resume opera- K No pictures selected Select pictures for 85 No images are for transfer. Technical Notes I Communications error USB cable discon- tive. 110...

L10 / L11 User's Manual
Page 122
Technical Notes 112 Display I Interface error Problem The camera is connected to a computer or TV while attached to a TV, remove the camera from the dock insert and disconnect the USB cable. Solution • Disconnect the A/V cable or the USB cable to print pictures. • To connect to a computer, remove the camera from the dock insert and disconnect the A/V cable. • To connect to the dock insert. c 72 58 62
Technical Notes 112 Display I Interface error Problem The camera is connected to a computer or TV while attached to a TV, remove the camera from the dock insert and disconnect the USB cable. Solution • Disconnect the A/V cable or the USB cable to print pictures. • To connect to a computer, remove the camera from the dock insert and disconnect the A/V cable. • To connect to the dock insert. c 72 58 62
L10 / L11 User's Manual
Page 123
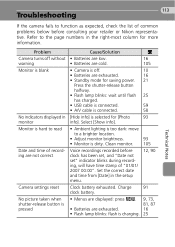
...the page numbers in the setup menu. 12, 90 Clock battery exhausted. 113 Troubleshooting If the camera fails to a brighter location. • Adjust monitor brightness. 93 • Monitor is dirty. Clean... monitor. 105 Voice recordings recorded before consulting your retailer or Nikon representative. Set the correct date and time from [Date] in the right-most column for [Photo 93... lamp blinks: wait until flash 25 has charged. • USB cable is connected. 59 • A/V cable is connected. 58 [Hide info] is selected for more information.
...the page numbers in the setup menu. 12, 90 Clock battery exhausted. 113 Troubleshooting If the camera fails to a brighter location. • Adjust monitor brightness. 93 • Monitor is dirty. Clean... monitor. 105 Voice recordings recorded before consulting your retailer or Nikon representative. Set the correct date and time from [Date] in the right-most column for [Photo 93... lamp blinks: wait until flash 25 has charged. • USB cable is connected. 59 • A/V cable is connected. 58 [Hide info] is selected for more information.
L10 / L11 User's Manual
Page 126
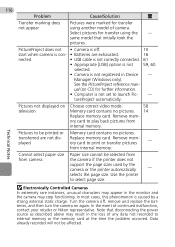
... pictures from internal memory. transferred are exhausted. 16 nected • USB cable is not correctly connected. 61 • Appropriate [USB] option is not 59, 60 selected. • Camera is caused by the camera or the printer automatically - Remove memory card to select page size... only). See the PictureProject reference manual (on CD) for transfer using another model of continued malfunction, contact your retailer or Nikon representative. Remove mem- 116 Problem Cause/Solution c Transfer marking does Pictures were marked for transfer not appear using the - ...
... pictures from internal memory. transferred are exhausted. 16 nected • USB cable is not correctly connected. 61 • Appropriate [USB] option is not 59, 60 selected. • Camera is caused by the camera or the printer automatically - Remove memory card to select page size... only). See the PictureProject reference manual (on CD) for transfer using another model of continued malfunction, contact your retailer or Nikon representative. Remove mem- 116 Problem Cause/Solution c Transfer marking does Pictures were marked for transfer not appear using the - ...
L10 / L11 User's Manual
Page 134
124 T Television 58 connecting to 58 Time zone 12, 90 time zone list 92 Transfer marking pictures for, 62 Transfer marking 85, 99 Transferring pictures 61 Tripod 5 U USB 60, 62, 64, 99 cable (UC-E6) 59, 61, 64 V Video mode 99 Voice memos 46 Voice recording 52 copying 56 playing 54 Volume 51 W WAV 103 Welcome screen 89 White balance 76 Z Zoom 18 digital 18, 19 optical 18 playback 41 Zoom buttons 5, 51 Technical Notes
124 T Television 58 connecting to 58 Time zone 12, 90 time zone list 92 Transfer marking pictures for, 62 Transfer marking 85, 99 Transferring pictures 61 Tripod 5 U USB 60, 62, 64, 99 cable (UC-E6) 59, 61, 64 V Video mode 99 Voice memos 46 Voice recording 52 copying 56 playing 54 Volume 51 W WAV 103 Welcome screen 89 White balance 76 Z Zoom 18 digital 18, 19 optical 18 playback 41 Zoom buttons 5, 51 Technical Notes


